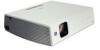

Operating Instructions
Page 2
... not expressly approved in this device must accept any questions about this product may not cause harmful interference, and (2) this manual could void your local authorities or Electronics Industries Alliance (www.eiae.org http://www.eiae.org). WARNING To prevent fire or... and can be of sufficient magnitude to constitute a risk of electric shock to comply with Part 15 of Conformity Trade Name: SONY Model No.: VPL-CX85 Responsible Party: Sony Electronics Inc. 2 GB Address: 16450 W. Reorient or relocate the receiving antenna. - Connect the equipment into an outlet on...
... not expressly approved in this device must accept any questions about this product may not cause harmful interference, and (2) this manual could void your local authorities or Electronics Industries Alliance (www.eiae.org http://www.eiae.org). WARNING To prevent fire or... and can be of sufficient magnitude to constitute a risk of electric shock to comply with Part 15 of Conformity Trade Name: SONY Model No.: VPL-CX85 Responsible Party: Sony Electronics Inc. 2 GB Address: 16450 W. Reorient or relocate the receiving antenna. - Connect the equipment into an outlet on...
Operating Instructions
Page 4
... Altitude 8 Unsuitable Conditions 8 About the Supplied Manuals 9 Features 9 Location and Function of Controls . 12 Top/Front/Left Side 12 Rear/Right Side/Bottom 12 Control Panel 13 Connector Panel 14 Remote Commander 15 Presentation Tool 17 Setting Up and Projecting Installing the Projector 19 Connecting the Projector 20 Connecting with a Computer ..... 20 Connecting...
... Altitude 8 Unsuitable Conditions 8 About the Supplied Manuals 9 Features 9 Location and Function of Controls . 12 Top/Front/Left Side 12 Rear/Right Side/Bottom 12 Control Panel 13 Connector Panel 14 Remote Commander 15 Presentation Tool 17 Setting Up and Projecting Installing the Projector 19 Connecting the Projector 20 Connecting with a Computer ..... 20 Connecting...
Operating Instructions
Page 9
...describe how to operate the PROJECTOR STATION for Air Shot (Wireless connecting function) software. High picture quality Three super-high-aperture 0.79-inch XGA panels with this unit. ... Manuals The following manuals are using the files stored in the supplied CDROM. A Simple Mode is necessary that incorporates newly developed LCD panels provides a high-efficiency optical system. PROJECTOR STATION...CD-ROM) The PROJECTOR STATION for Presentation is installed to use the USB storage Media. Features High brightness, high picture quality High brightness Adopting Sony's unique new ...
...describe how to operate the PROJECTOR STATION for Air Shot (Wireless connecting function) software. High picture quality Three super-high-aperture 0.79-inch XGA panels with this unit. ... Manuals The following manuals are using the files stored in the supplied CDROM. A Simple Mode is necessary that incorporates newly developed LCD panels provides a high-efficiency optical system. PROJECTOR STATION...CD-ROM) The PROJECTOR STATION for Presentation is installed to use the USB storage Media. Features High brightness, high picture quality High brightness Adopting Sony's unique new ...
Operating Instructions
Page 16
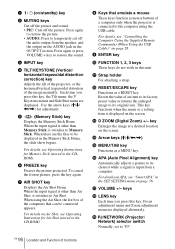
...; AUDIO: Press to restore the sound. 3 INPUT key 4 TILT/KEYSTONE (Vertical/ horizontal trapezoidal distortion correction) key Adjusts the tilt of the projector, or the horizonal/vertical trapezoidal distortion of the image manually. 1 I / 1 (on/standby) key 2 MUTING keys Cut off the picture and sound. • PIC: Cuts off the audio output from the...
...; AUDIO: Press to restore the sound. 3 INPUT key 4 TILT/KEYSTONE (Vertical/ horizontal trapezoidal distortion correction) key Adjusts the tilt of the projector, or the horizonal/vertical trapezoidal distortion of the image manually. 1 I / 1 (on/standby) key 2 MUTING keys Cut off the picture and sound. • PIC: Cuts off the audio output from the...
Operating Instructions
Page 20
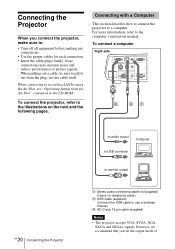
Connecting with a Computer This section describes how to connect the projector to the computer's instruction manual. For more information, refer to a computer. loose connections may increase noise and reduce performance of To connect a computer Right side INPUT A ... Instructions for each connection. • Insert the cable plugs firmly; To connect the projector, refer to use a wireless mouse.) 3 HD D-sub 15-pin cable (supplied) Notes • The projector accepts VGA, SVGA, XGA, SXGA and SXGA+ signals. Connecting the Projector When you set the output mode of picture signals.
Connecting with a Computer This section describes how to connect the projector to the computer's instruction manual. For more information, refer to a computer. loose connections may increase noise and reduce performance of To connect a computer Right side INPUT A ... Instructions for each connection. • Insert the cable plugs firmly; To connect the projector, refer to use a wireless mouse.) 3 HD D-sub 15-pin cable (supplied) Notes • The projector accepts VGA, SVGA, XGA, SXGA and SXGA+ signals. Connecting the Projector When you set the output mode of picture signals.
Operating Instructions
Page 22
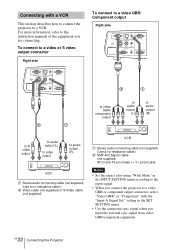
... a video GBR or component output connector, select "Video GBR" or "Component" with a VCR This section describes how to connect the projector to a VCR. To connect to a video or S video output connector Right side To connect to a video GBR/ Component output Right side...to audio output (R) to S video output to audio output (L) to video output to the instruction manuals of the equipment you input the external sync signal from video GBR/component equipment. 22 GB Connecting the Projector For more information, refer to audio output (R) VCR 1 Stereo audio connecting cable (not supplied) ...
... a video GBR or component output connector, select "Video GBR" or "Component" with a VCR This section describes how to connect the projector to a VCR. To connect to a video or S video output connector Right side To connect to a video GBR/ Component output Right side...to audio output (R) to S video output to audio output (L) to video output to the instruction manuals of the equipment you input the external sync signal from video GBR/component equipment. 22 GB Connecting the Projector For more information, refer to audio output (R) VCR 1 Stereo audio connecting cable (not supplied) ...
Operating Instructions
Page 24
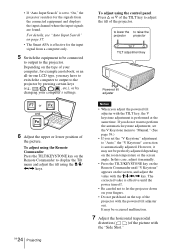
...the tilt using the M/m/ Depending on the Remote Commander to "On," the projector searches for the signals from a computer only. 5 Switch the equipment to be connected to output to the projector by pressing certain keys (e.g., / LCD VGA , / , etc.), or by changing your computer's settings. To... adjust using the Remote Commander Press the TILT/KEYSTONE key on the type of the projector. • If "Auto Input Search" is effective...
...the tilt using the M/m/ Depending on the Remote Commander to "On," the projector searches for the signals from a computer only. 5 Switch the equipment to be connected to output to the projector by pressing certain keys (e.g., / LCD VGA , / , etc.), or by changing your computer's settings. To... adjust using the Remote Commander Press the TILT/KEYSTONE key on the type of the projector. • If "Auto Input Search" is effective...
Operating Instructions
Page 28
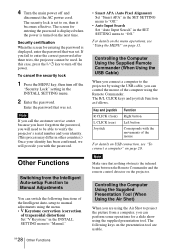
...a computer to be used. Controlling the Computer Using the Supplied Remote Commander (When Using the USB Cable) When you will need to the projector by using the supplied presentation tool. Security certification When the screen for a slide show using the USB cable, you can perform some operations for...button Left button Corresponds with the password. Enter the password that was set . Other Functions Switching from the Intelligent Auto-setup Function to Manual Adjustments You can control the mouse of the mouse For details on USB connection, see "Using the MENU" on the next time. If...
...a computer to be used. Controlling the Computer Using the Supplied Remote Commander (When Using the USB Cable) When you will need to the projector by using the supplied presentation tool. Security certification When the screen for a slide show using the USB cable, you can perform some operations for...button Left button Corresponds with the password. Enter the password that was set . Other Functions Switching from the Intelligent Auto-setup Function to Manual Adjustments You can control the mouse of the mouse For details on USB connection, see "Using the MENU" on the next time. If...
Operating Instructions
Page 37
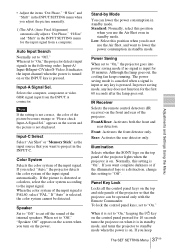
... mode, any key is on the front and rear of the projector. IR Receiver Selects the remote control detectors (IR receiver) on . Illumination Selects whether the SONY logo on the top panel of the projector lights when the projector is pressed. To lock the control panel keys, set to "On... Activates the rear detector only. • Adjust the items "Dot Phase," "H Size" and "Shift" in the INPUT SETTING menu when you adjust the picture manually. 1) The APA (Auto Pixel Alignment) automatically adjusts "Dot Phase," "H Size" and "Shift" in the INPUT SETTING menu for the input signal from the ...
... mode, any key is on the front and rear of the projector. IR Receiver Selects the remote control detectors (IR receiver) on . Illumination Selects whether the SONY logo on the top panel of the projector lights when the projector is pressed. To lock the control panel keys, set to "On... Activates the rear detector only. • Adjust the items "Dot Phase," "H Size" and "Shift" in the INPUT SETTING menu when you adjust the picture manually. 1) The APA (Auto Pixel Alignment) automatically adjusts "Dot Phase," "H Size" and "Shift" in the INPUT SETTING menu for the input signal from the ...
Operating Instructions
Page 39
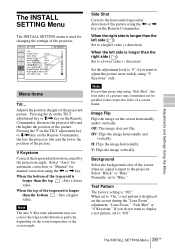
...auto V Keystone adjustment may sometimes not be parallel to adjust the picture more the projector tilts and the higher the position of the picture. direction). Test Pattern The factory setting is used for manual correction using "Side Shot", the four sides of a picture may not correct the ...trapezoidal distortion perfectly, depending on the Remote Commander, the more widely using the < or , key on the Remote Commander, the less the projector tilts and the lower ...
...auto V Keystone adjustment may sometimes not be parallel to adjust the picture more the projector tilts and the higher the position of the picture. direction). Test Pattern The factory setting is used for manual correction using "Side Shot", the four sides of a picture may not correct the ...trapezoidal distortion perfectly, depending on the Remote Commander, the more widely using the < or , key on the Remote Commander, the less the projector tilts and the lower ...
Operating Instructions
Page 49
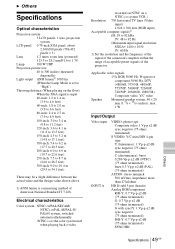
B Others Specifications Optical characteristics Projection system 3 LCD panels, 1 lens, projection system LCD panel 0.79-inch XGA panel, about 2,360,000 pixels (786,432 pixels × 3) Lens 1.2 times zoom lens (powered) f 23.5 to 28.2 mm/F1.6 to 1.78 Lamp 190 W UHP...NTSC3.58/PAL/SECAM/ NTSC4.43/PAL-M/PAL-N/ PAL60 system, switched automatically/manually (NTSC4.43 is the color system used when playing back a video recorded on NTSC on the floor) When the XGA signal is a measuring method of the projector. Applicable video signals 15 k RGB 50/60 Hz, Progressive component 50/60...
B Others Specifications Optical characteristics Projection system 3 LCD panels, 1 lens, projection system LCD panel 0.79-inch XGA panel, about 2,360,000 pixels (786,432 pixels × 3) Lens 1.2 times zoom lens (powered) f 23.5 to 28.2 mm/F1.6 to 1.78 Lamp 190 W UHP...NTSC3.58/PAL/SECAM/ NTSC4.43/PAL-M/PAL-N/ PAL60 system, switched automatically/manually (NTSC4.43 is the color system used when playing back a video recorded on NTSC on the floor) When the XGA signal is a measuring method of the projector. Applicable video signals 15 k RGB 50/60 Hz, Progressive component 50/60...
Operating Instructions
Page 61
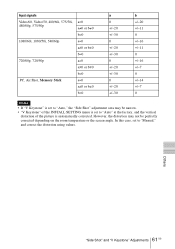
... narrow. • "V Keystone" of the INSTALL SETTING menu is set to "Auto" at the factory, and the vertical distortion of the picture is set to "Manual," and correct the distortion using values.
... narrow. • "V Keystone" of the INSTALL SETTING menu is set to "Auto" at the factory, and the vertical distortion of the picture is set to "Manual," and correct the distortion using values.

