Quick Start Guide
Page 2
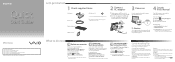
... adapter AA batteries (2) Power cord Insert the supplied AA alkaline battery before use. Printed manuals: Quick Start Guide (this document may appear different from Windows Update and VAIO Update for enhancing your computer. Click Start , All Programs, Windows Update or VAIO Update. On-screen manuals: 1 Click Start and Help and Support. 2 Click Use my VAIO. 3 Select your computer while it is required until the power indicator light turns on selected models only. For details, refer to access...
... adapter AA batteries (2) Power cord Insert the supplied AA alkaline battery before use. Printed manuals: Quick Start Guide (this document may appear different from Windows Update and VAIO Update for enhancing your computer. Click Start , All Programs, Windows Update or VAIO Update. On-screen manuals: 1 Click Start and Help and Support. 2 Click Use my VAIO. 3 Select your computer while it is required until the power indicator light turns on selected models only. For details, refer to access...
Safety Information
Page 2
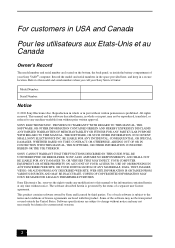
... THE FUNCTIONS DESCRIBED IN THIS GUIDE WILL BE UNINTERRUPTED OR ERROR-FREE. Use of your Sony Service Center. Refer to the model and serial numbers when you call your Sony VAIO® computer. BE LIABLE FOR ANY INCIDENTAL, CONSEQUENTIAL, OR SPECIAL DAMAGES, WHETHER BASED ON TORT, CONTRACT, OR OTHERWISE, ARISING OUT OF OR IN CONNECTION WITH THIS MANUAL, THE SOFTWARE, OR OTHER INFORMATION CONTAINED HEREIN...
... THE FUNCTIONS DESCRIBED IN THIS GUIDE WILL BE UNINTERRUPTED OR ERROR-FREE. Use of your Sony Service Center. Refer to the model and serial numbers when you call your Sony VAIO® computer. BE LIABLE FOR ANY INCIDENTAL, CONSEQUENTIAL, OR SPECIAL DAMAGES, WHETHER BASED ON TORT, CONTRACT, OR OTHERWISE, ARISING OUT OF OR IN CONNECTION WITH THIS MANUAL, THE SOFTWARE, OR OTHER INFORMATION CONTAINED HEREIN...
Safety Information
Page 4
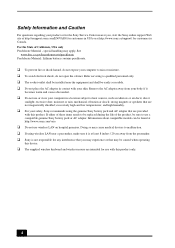
... For questions regarding your product or for the Sony Service Center nearest you may experience or that may be caused when operating this device. ❑ The supplied wireless keyboard and wireless mouse are intended for customers in Canada. For the State of the product, be easily accessible. ❑ Do not place the AC adapter in a location subject to rain or moisture. ❑ To...
... For questions regarding your product or for the Sony Service Center nearest you may experience or that may be caused when operating this device. ❑ The supplied wireless keyboard and wireless mouse are intended for customers in Canada. For the State of the product, be easily accessible. ❑ Do not place the AC adapter in a location subject to rain or moisture. ❑ To...
User Guide
Page 2
... Using the Mouse 34 Using the Touch Screen 39 Using the Built-in Camera 43 Using the Optical Disc Drive 44 Using "Memory Stick 51 Using Other Modules / Memory Cards 58 Using the Internet 62 Using the Network (LAN 63 Using the Wireless LAN 64 Using the Bluetooth Function 68 Using Peripheral Devices 73 Connecting External Speakers or Headphones ..........74 Connecting an External Microphone 75 Connecting a USB Device 76 Connecting an i.LINK Device 78 Customizing Your VAIO Computer 80 Setting the Password 81 Using Intel(R) VT 88 Using the VAIO Control Center 89 Upgrading...
... Using the Mouse 34 Using the Touch Screen 39 Using the Built-in Camera 43 Using the Optical Disc Drive 44 Using "Memory Stick 51 Using Other Modules / Memory Cards 58 Using the Internet 62 Using the Network (LAN 63 Using the Wireless LAN 64 Using the Bluetooth Function 68 Using Peripheral Devices 73 Connecting External Speakers or Headphones ..........74 Connecting an External Microphone 75 Connecting a USB Device 76 Connecting an i.LINK Device 78 Customizing Your VAIO Computer 80 Setting the Password 81 Using Intel(R) VT 88 Using the VAIO Control Center 89 Upgrading...
User Guide
Page 8
... Sony online support web site. The serial number is the last 7 digits of the number below the barcode. 3 The operating system on the computer. 2 Your computer's serial number You can find the nearest location. In Store Service & Support (available in USA only) Make an appointment with the setup of the problem 5. In order to find the contact numbers on the bottom, the back panel, or inside the battery...
... Sony online support web site. The serial number is the last 7 digits of the number below the barcode. 3 The operating system on the computer. 2 Your computer's serial number You can find the nearest location. In Store Service & Support (available in USA only) Make an appointment with the setup of the problem 5. In order to find the contact numbers on the bottom, the back panel, or inside the battery...
User Guide
Page 30
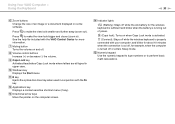
... upper case. H Volume control buttons Increase (+) or decrease (-) the volume. J Windows key Displays the Start menu. L Applications key Displays a context-sensitive shortcut menu (if any). Using Your VAIO Computer > Using the Keyboard n 30 N F Zoom buttons Change the size of power. (Caps lock): Turns on when Caps Lock mode is activated. (Connect): Stays off while the wireless keyboard is cut off, for more information. I Caps Lock key Activates/deactivates Caps Lock mode where letters are all typed...
... upper case. H Volume control buttons Increase (+) or decrease (-) the volume. J Windows key Displays the Start menu. L Applications key Displays a context-sensitive shortcut menu (if any). Using Your VAIO Computer > Using the Keyboard n 30 N F Zoom buttons Change the size of power. (Caps lock): Turns on when Caps Lock mode is activated. (Connect): Stays off while the wireless keyboard is cut off, for more information. I Caps Lock key Activates/deactivates Caps Lock mode where letters are all typed...
User Guide
Page 32
... enter the password once again. 5 Wait until the Windows starts, and then click Start and Computer. 6 Double-click Local Disk (C:), WConnectTool, and WConnect. Using Your VAIO Computer > Using the Keyboard n 32 N To connect the wireless keyboard When the supplied wireless keyboard does not seem to be working , do not need an optional USB keyboard. ! If the User Account Control window appears, click Yes. When the power-on password is set on the computer, however, the on-screen keyboard is set...
... enter the password once again. 5 Wait until the Windows starts, and then click Start and Computer. 6 Double-click Local Disk (C:), WConnectTool, and WConnect. Using Your VAIO Computer > Using the Keyboard n 32 N To connect the wireless keyboard When the supplied wireless keyboard does not seem to be working , do not need an optional USB keyboard. ! If the User Account Control window appears, click Yes. When the power-on password is set on the computer, however, the on-screen keyboard is set...
User Guide
Page 37
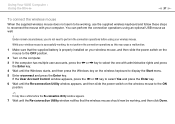
... the Enter key. 6 Wait until the Re-connection Utility window notifies that the wireless mouse should now be working , do not need to perform the connection operations before the Re-connection Utility window appears. 7 Wait until the Re-connection Utility window appears, and then slide the power switch on the wireless keyboard to the ON position. ✍ It may take a while before using an optional USB mouse as this may cause a malfunction. 1 Make sure that the supplied battery...
... the Enter key. 6 Wait until the Re-connection Utility window notifies that the wireless mouse should now be working , do not need to perform the connection operations before the Re-connection Utility window appears. 7 Wait until the Re-connection Utility window appears, and then slide the power switch on the wireless keyboard to the ON position. ✍ It may take a while before using an optional USB mouse as this may cause a malfunction. 1 Make sure that the supplied battery...
User Guide
Page 46
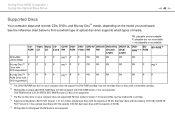
... > Using the Optical Disc Drive n 46 N Supported Discs Your computer plays and records CDs, DVDs, and Blu-ray Disc™ media, depending on your computer does not support the DVD-RAM cartridge. DVD- BD- See the reference chart below to find out which type of optical disc drive supports which types of 50 GB). *5 Writing data to Ultra Speed CD-RW discs is not supported. ROM CD CD Extra RW ROM Video RW RW (Double (Dual RAM*1 *2 ROM...
... > Using the Optical Disc Drive n 46 N Supported Discs Your computer plays and records CDs, DVDs, and Blu-ray Disc™ media, depending on your computer does not support the DVD-RAM cartridge. DVD- BD- See the reference chart below to find out which type of optical disc drive supports which types of 50 GB). *5 Writing data to Ultra Speed CD-RW discs is not supported. ROM CD CD Extra RW ROM Video RW RW (Double (Dual RAM*1 *2 ROM...
User Guide
Page 47
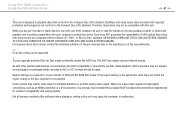
... not supported. ! To play copyright protected Blu-ray Disc media continually, update the AACS key. As with the official "CD," "DVD," or "Blu-ray Disc" standard. DualDiscs and some contents of DVD and BD-ROM Disc media. USING NON-COMPLIANT DISCS CAN CAUSE FATAL DAMAGE TO YOUR VAIO COMPUTER OR CREATE SOFTWARE CONFLICTS AND CAUSE SYSTEM HANGING. The AACS key update requires Internet access. If the region setting on the optical disc drive...
... not supported. ! To play copyright protected Blu-ray Disc media continually, update the AACS key. As with the official "CD," "DVD," or "Blu-ray Disc" standard. DualDiscs and some contents of DVD and BD-ROM Disc media. USING NON-COMPLIANT DISCS CAN CAUSE FATAL DAMAGE TO YOUR VAIO COMPUTER OR CREATE SOFTWARE CONFLICTS AND CAUSE SYSTEM HANGING. The AACS key update requires Internet access. If the region setting on the optical disc drive...
User Guide
Page 48
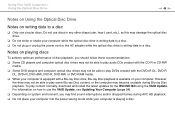
... power saving mode while your computer is available on system environment, you may not be able to play content normally, download and install the latest updates for the WinDVD BD using the VAIO Update. However, the drive may not be able to play audio CDs created with a Blu-ray Disc drive, Blu-ray Disc playback is playing a disc. For information on how to use the VAIO Update...
... power saving mode while your computer is available on system environment, you may not be able to play content normally, download and install the latest updates for the WinDVD BD using the VAIO Update. However, the drive may not be able to play audio CDs created with a Blu-ray Disc drive, Blu-ray Disc playback is playing a disc. For information on how to use the VAIO Update...
User Guide
Page 74
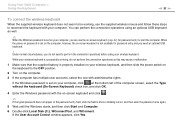
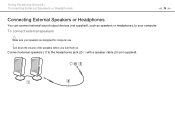
Connect external speakers (1) to your speakers are designed for computer use. ! Using Peripheral Devices > Connecting External Speakers or Headphones n 74 N Connecting External Speakers or Headphones You can connect external sound output devices (not supplied), such as speakers or headphones, to the headphones jack (2) i with a speaker cable (3) (not supplied). To connect external speakers ✍ Make sure your computer. Turn down the volume of the speakers before you turn them on.
Connect external speakers (1) to your speakers are designed for computer use. ! Using Peripheral Devices > Connecting External Speakers or Headphones n 74 N Connecting External Speakers or Headphones You can connect external sound output devices (not supplied), such as speakers or headphones, to the headphones jack (2) i with a speaker cable (3) (not supplied). To connect external speakers ✍ Make sure your computer. Turn down the volume of the speakers before you turn them on.
User Guide
Page 81
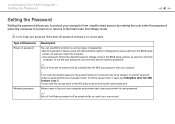
... returns to Normal mode from Sleep mode. ! To reset the password, contact an authorized Sony service/support center. You can use BIOS functions to set the machine password. ✍ Entry of passwords: - Write down the password and keep it in the BIOS setup screen, as well as to start the computer. - Type of Password Power-on password Windows password Description You can reset the user password at the BIOS setup screen by making the user enter the password when the computer is turned on password will be prompted...
... returns to Normal mode from Sleep mode. ! To reset the password, contact an authorized Sony service/support center. You can use BIOS functions to set the machine password. ✍ Entry of passwords: - Write down the password and keep it in the BIOS setup screen, as well as to start the computer. - Type of Password Power-on password Windows password Description You can reset the user password at the BIOS setup screen by making the user enter the password when the computer is turned on password will be prompted...
User Guide
Page 82
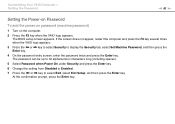
The BIOS setup screen appears. The password can be up to 32 alphanumeric characters long (including spaces). 5 Select Password when Power On under Security and press the Enter key. 6 Change the setting from Disabled to Enabled. 7 Press the < or , key to display the Security tab, select Set Machine Password, and then press the Enter key. 4 On the password entry screen, enter the password twice and press the Enter key. At the confirmation prompt, press the Enter key. If...
The BIOS setup screen appears. The password can be up to 32 alphanumeric characters long (including spaces). 5 Select Password when Power On under Security and press the Enter key. 6 Change the setting from Disabled to Enabled. 7 Press the < or , key to display the Security tab, select Set Machine Password, and then press the Enter key. 4 On the password entry screen, enter the password twice and press the Enter key. At the confirmation prompt, press the Enter key. If...
User Guide
Page 84
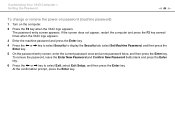
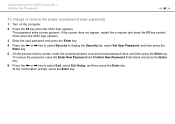
To remove the password, leave the Enter New Password and Confirm New Password fields blank and press the Enter key. 6 Press the < or , key to display the Security tab, select Set Machine Password, and then press the Enter key. 5 On the password entry screen, enter the current password once and a new password twice, and then press the Enter key. Customizing Your VAIO Computer > Setting the Password n 84 N To change or remove the power-on password (machine password) 1 Turn on the computer. 2 Press the F2 key when...
To remove the password, leave the Enter New Password and Confirm New Password fields blank and press the Enter key. 6 Press the < or , key to display the Security tab, select Set Machine Password, and then press the Enter key. 5 On the password entry screen, enter the current password once and a new password twice, and then press the Enter key. Customizing Your VAIO Computer > Setting the Password n 84 N To change or remove the power-on password (machine password) 1 Turn on the computer. 2 Press the F2 key when...
User Guide
Page 85
... Exit Setup, and then press the Enter key. To remove the password, leave the Enter New Password and Confirm New Password fields blank and press the Enter key. 6 Press the < or , key to display the Security tab, select Set User Password, and then press the Enter key. 5 On the password entry screen, enter the current password once and a new password twice, and then press the Enter key. Customizing Your VAIO Computer > Setting the Password n 85 N To change or remove the power-on password (user password) 1 Turn on...
... Exit Setup, and then press the Enter key. To remove the password, leave the Enter New Password and Confirm New Password fields blank and press the Enter key. 6 Press the < or , key to display the Security tab, select Set User Password, and then press the Enter key. 5 On the password entry screen, enter the current password once and a new password twice, and then press the Enter key. Customizing Your VAIO Computer > Setting the Password n 85 N To change or remove the power-on password (user password) 1 Turn on...
User Guide
Page 90
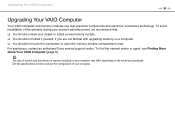
... yourself, if you purchased. To find out about Your VAIO Computer (page 5). See the specifications to install a new memory module. ❑ You should not touch the connectors or open the memory module compartment cover. For assistance, contact an authorized Sony service/support center. To avoid invalidation of your computer. Upgrading Your VAIO Computer > n 90 N Upgrading Your VAIO Computer Your VAIO computer and memory modules use high precision components and electronic...
... yourself, if you purchased. To find out about Your VAIO Computer (page 5). See the specifications to install a new memory module. ❑ You should not touch the connectors or open the memory module compartment cover. For assistance, contact an authorized Sony service/support center. To avoid invalidation of your computer. Upgrading Your VAIO Computer > n 90 N Upgrading Your VAIO Computer Your VAIO computer and memory modules use high precision components and electronic...
User Guide
Page 127
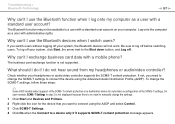
... headphones or audio/video controller supports the SCMS-T content protection. Why can 't I do not hear sound from my headphones or audio/video controller? Be sure to the Shut down button, and Log off before switching users. On such models, SCMS-T Settings in step 3 is not displayed because there is not supported. If you need to manually change the SCMS-T settings to connect the device using the A2DP and select Control. 3 Click SCMS-T Settings. 4 Click...
... headphones or audio/video controller supports the SCMS-T content protection. Why can 't I do not hear sound from my headphones or audio/video controller? Be sure to the Shut down button, and Log off before switching users. On such models, SCMS-T Settings in step 3 is not displayed because there is not supported. If you need to manually change the SCMS-T settings to connect the device using the A2DP and select Control. 3 Click SCMS-T Settings. 4 Click...

User Guide
Page 131
... while the disc is installed. If an "X" or an exclamation point appears on the listed device, you notice condensation on your desired drive. Troubleshooting > Optical Discs n 131 N ❑ Make sure the correct driver software is in the left pane. The Device Manager window appears with the optical disc drive. ❑ If you may be incompatible with the optical disc drive. Check the package to a disc. Follow these steps: 1 Click Start and Control Panel. 2 Click...
... while the disc is installed. If an "X" or an exclamation point appears on the listed device, you notice condensation on your desired drive. Troubleshooting > Optical Discs n 131 N ❑ Make sure the correct driver software is in the left pane. The Device Manager window appears with the optical disc drive. ❑ If you may be incompatible with the optical disc drive. Check the package to a disc. Follow these steps: 1 Click Start and Control Panel. 2 Click...
User Guide
Page 135
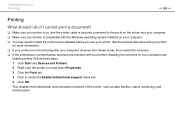
Follow these steps: 1 Click Start and Devices and Printers. 2 Right-click the printer icon and select Properties. 3 Click the Ports tab. 4 Click to install the printer driver software before you use your computer. ❑ You may enable printing. This disables the bidirectional communication functions of the printer, such as data transfer, status monitoring, and remote panel. See the manual that came with your printer...
Follow these steps: 1 Click Start and Devices and Printers. 2 Right-click the printer icon and select Properties. 3 Click the Ports tab. 4 Click to install the printer driver software before you use your computer. ❑ You may enable printing. This disables the bidirectional communication functions of the printer, such as data transfer, status monitoring, and remote panel. See the manual that came with your printer...


