
Operating Instructions
Page 1
Refer to them whenever you call upon your Sony dealer regarding this product. MHC-BX9/DX9 MHC-BX7/DX7 MHC-BX5/DX5 © 2000 Sony Corporation Record the serial number in the space provided below. 4-226-481-12 (1) Mini Hi-Fi Component System Operating Instructions Owner's Record The model and serial numbers are located on the rear panel. Model No. Serial No.
Refer to them whenever you call upon your Sony dealer regarding this product. MHC-BX9/DX9 MHC-BX7/DX7 MHC-BX5/DX5 © 2000 Sony Corporation Record the serial number in the space provided below. 4-226-481-12 (1) Mini Hi-Fi Component System Operating Instructions Owner's Record The model and serial numbers are located on the rear panel. Model No. Serial No.
Operating Instructions
Page 2
... installation. NOTICE FOR THE CUSTOMERS IN THE U.S.A. For MHC-BX9/BX7/BX5 2 INFORMATION This equipment has been tested and found to operate this product will not occur in accordance with the Dolby Btype noise reduction system*. (MHC-BX9/DX9 only). * Manufactured under license from that ...TV technician for energy efficiency. The location of some buttons on the rear exterior. As an ENERGY STAR® partner, Sony Corporation has determined that may cause harmful interference to provide reasonable protection against harmful interference in cabinet. If this manual The...
... installation. NOTICE FOR THE CUSTOMERS IN THE U.S.A. For MHC-BX9/BX7/BX5 2 INFORMATION This equipment has been tested and found to operate this product will not occur in accordance with the Dolby Btype noise reduction system*. (MHC-BX9/DX9 only). * Manufactured under license from that ...TV technician for energy efficiency. The location of some buttons on the rear exterior. As an ENERGY STAR® partner, Sony Corporation has determined that may cause harmful interference to provide reasonable protection against harmful interference in cabinet. If this manual The...
Operating Instructions
Page 3
Table of Contents Getting Started Step 1: Hooking up the system 4 Step 2: Setting the time 7 Step 3: Presetting radio stations .......... 8 Saving the power in standby mode ..... 9 Basic Operations Playing a CD 10 Recording a CD 12 Listening to the radio 13 Recording from the radio 14 Playing a tape 15 Recording from a tape 17 The CD ...
Table of Contents Getting Started Step 1: Hooking up the system 4 Step 2: Setting the time 7 Step 3: Presetting radio stations .......... 8 Saving the power in standby mode ..... 9 Basic Operations Playing a CD 10 Recording a CD 12 Listening to the radio 13 Recording from the radio 14 Playing a tape 15 Recording from a tape 17 The CD ...

Operating Instructions
Page 6
... speaker pads Attach the supplied front speaker pads to the bottom of the speakers to 90 cm Surround speaker 6 When the remote no longer operates the system, replace both batteries with new ones. Front speaker (L) Front speaker (R) Tip With normal use the remote for about 60 to ...(R) 2 Place the surround speakers facing each other at about six months. Inserting two size AA (R6) batteries into the remote e E E e Positioning the speakers (MHC-BX7/DX7 only) Before you do not use , the batteries should last for a long period of time, remove the batteries to avoid possible damage from...
... speaker pads Attach the supplied front speaker pads to the bottom of the speakers to 90 cm Surround speaker 6 When the remote no longer operates the system, replace both batteries with new ones. Front speaker (L) Front speaker (R) Tip With normal use the remote for about 60 to ...(R) 2 Place the surround speakers facing each other at about six months. Inserting two size AA (R6) batteries into the remote e E E e Positioning the speakers (MHC-BX7/DX7 only) Before you do not use , the batteries should last for a long period of time, remove the batteries to avoid possible damage from...

Operating Instructions
Page 10
With the label side up to rotate the disc tray. 2 Press one of the tray. Disc presence Disc tray indicator number 10 Basic Operations Playing a CD - Normal play You can play starts from the CD loaded on the tray whose disc pointer indicator is not placed properly, it on ...
With the label side up to rotate the disc tray. 2 Press one of the tray. Disc presence Disc tray indicator number 10 Basic Operations Playing a CD - Normal play You can play starts from the CD loaded on the tray whose disc pointer indicator is not placed properly, it on ...

Operating Instructions
Page 11
... DISC SKIP EX-CHANGE. CDs while playing Adjust the volume Turn VOLUME (or press VOL +/- on the remote). Pause Press X. SKIP on the remote). Basic Operations 11 Release it clicks and hold down M or m on the tray. Note When a tray has not been detected by pressing the DISC 1~3 buttons (Automatic Source...
... DISC SKIP EX-CHANGE. CDs while playing Adjust the volume Turn VOLUME (or press VOL +/- on the remote). Pause Press X. SKIP on the remote). Basic Operations 11 Release it clicks and hold down M or m on the tray. Note When a tray has not been detected by pressing the DISC 1~3 buttons (Automatic Source...
Operating Instructions
Page 13
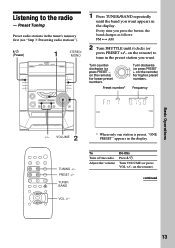
... stations"). ?/1 (Power) 1 STEREO/ MONO 1 Press TUNER/BAND repeatedly until it clicks (or press PRESET +/- on the remote). Preset number* Frequency MHz TUNED STEREO 2 +/- continued Basic Operations 13 Every time you press the button, the band changes as follows: FM y AM 2 Turn SHUTTLE until the band you want appears in the display...
... stations"). ?/1 (Power) 1 STEREO/ MONO 1 Press TUNER/BAND repeatedly until it clicks (or press PRESET +/- on the remote). Preset number* Frequency MHz TUNED STEREO 2 +/- continued Basic Operations 13 Every time you press the button, the band changes as follows: FM y AM 2 Turn SHUTTLE until the band you want appears in the display...

Operating Instructions
Page 15
...in step 2 to tune in the desired station manually. • When you want to reduce the hiss noise in step 4 (MHC-BX9/DX9 only). • If noise is heard while recording from the front side. TAPE B reverse side indicator lights up (...side. Recording starts. continued 15 To select either deck A or B, press TAPE A/B repeatedly. * AMS (Automatic Music Sensor) ?/1 (Power) 1 3 DOLBY NR To stop recording Press x. Basic Operations 3 Press Z and insert a recordable tape into deck B. Select j (or RELAY) to reduce the noise. 4 x X 2 .> hH S s l L j J H S s nN ...
...in step 2 to tune in the desired station manually. • When you want to reduce the hiss noise in step 4 (MHC-BX9/DX9 only). • If noise is heard while recording from the front side. TAPE B reverse side indicator lights up (...side. Recording starts. continued 15 To select either deck A or B, press TAPE A/B repeatedly. * AMS (Automatic Music Sensor) ?/1 (Power) 1 3 DOLBY NR To stop recording Press x. Basic Operations 3 Press Z and insert a recordable tape into deck B. Select j (or RELAY) to reduce the noise. 4 x X 2 .> hH S s l L j J H S s nN ...

Operating Instructions
Page 16
... reverse side. Select j to resume play both decks in lowlevel high-frequency signals, press DOLBY NR so that "DOLBY NR" appears (MHC-BX9/DX9 only). • When no tapes are ) inserted, corresponding presence and forward/reverse indicators light. When there are continuous sections of... it clicks (or press M on the left and right channels. - Example: searching forward 2 songs * AMS (Automatic Music Sensor) Note The AMS function may not operate correctly under the following sequence: t Deck A (front side) t Deck A (reverse side) Deck B (reverse side) T Deck B (front side) T 16 To...
... reverse side. Select j to resume play both decks in lowlevel high-frequency signals, press DOLBY NR so that "DOLBY NR" appears (MHC-BX9/DX9 only). • When no tapes are ) inserted, corresponding presence and forward/reverse indicators light. When there are continuous sections of... it clicks (or press M on the left and right channels. - Example: searching forward 2 songs * AMS (Automatic Music Sensor) Note The AMS function may not operate correctly under the following sequence: t Deck A (front side) t Deck A (reverse side) Deck B (reverse side) T Deck B (front side) T 16 To...
Operating Instructions
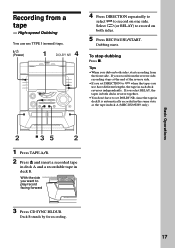
Page 17
... You can use have different lengths, the tape in each deck reverses independently. Dubbing starts. If you record from a tape - To stop dubbing Press x. Basic Operations 2 x3 5 2 1 Press TAPE A/B. 2 Press Z and insert a recorded tape in deck A and a recordable tape in both decks reverse together. • You don't have to ... you set DIRECTION to set DOLBY NR, since the tape in deck B is automatically recorded in the same state as the tape in deck A (MHC-BX9/DX9 only). Tips • When you dub on both sides, start recording from the front side. Deck B stands by for recording. 17 ...
... You can use have different lengths, the tape in each deck reverses independently. Dubbing starts. If you record from a tape - To stop dubbing Press x. Basic Operations 2 x3 5 2 1 Press TAPE A/B. 2 Press Z and insert a recorded tape in deck A and a recordable tape in both decks reverse together. • You don't have to ... you set DIRECTION to set DOLBY NR, since the tape in deck B is automatically recorded in the same state as the tape in deck A (MHC-BX9/DX9 only). Tips • When you dub on both sides, start recording from the front side. Deck B stands by for recording. 17 ...

Operating Instructions
Page 26
This lets you create original recordings. while holding LOOP on this operation. To adjust the flash length Press MENU +/- Notes • The loop and flash length cannot be adjusted during playback. Flash With the loop function, you ...
This lets you create original recordings. while holding LOOP on this operation. To adjust the flash length Press MENU +/- Notes • The loop and flash length cannot be adjusted during playback. Flash With the loop function, you ...
Operating Instructions
Page 30
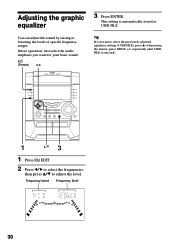
... MENU +/- repeatedly until USER FILE is automatically stored as USER FILE. Tip If you want to adjust the level. Frequency band Frequency level 30 Before operation, first select the audio emphasis you want for your basic sound. ?/1 (Power) b/B 3 Press ENTER. Adjusting the graphic equalizer You can adjust the sound by raising...
... MENU +/- repeatedly until USER FILE is automatically stored as USER FILE. Tip If you want to adjust the level. Frequency band Frequency level 30 Before operation, first select the audio emphasis you want for your basic sound. ?/1 (Power) b/B 3 Press ENTER. Adjusting the graphic equalizer You can adjust the sound by raising...

Operating Instructions
Page 36
... 2), then press ENTER on 15 seconds before the preset time. 36 To check the setting Press CLOCK/TIMER SELECT and press . To cancel the timer operation Press CLOCK/TIMER SELECT and press . or > repeatedly to start playback. or > repeatedly to set the minute, then press ENTER. Notes • You cannot activate...
... 2), then press ENTER on 15 seconds before the preset time. 36 To check the setting Press CLOCK/TIMER SELECT and press . To cancel the timer operation Press CLOCK/TIMER SELECT and press . or > repeatedly to start playback. or > repeatedly to set the minute, then press ENTER. Notes • You cannot activate...
Operating Instructions
Page 37
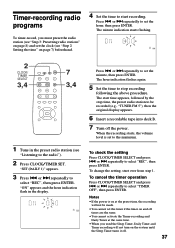
... to select "REC", then press ENTER. or > repeatedly to set to the minimum. or > repeatedly to select "REC", then press ENTER. To cancel the timer operation Press CLOCK/TIMER SELECT and press . The hour indication flashes again. 5 Set the time to stop time, the preset radio station to set the timer...
... to select "REC", then press ENTER. or > repeatedly to set to the minimum. or > repeatedly to select "REC", then press ENTER. To cancel the timer operation Press CLOCK/TIMER SELECT and press . The hour indication flashes again. 5 Set the time to stop time, the preset radio station to set the timer...
Operating Instructions
Page 39
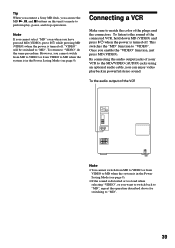
... distorted or too loud when selecting "VIDEO", or you want to switch back to "MD", repeat the operation described above for switching to MD when the system is in the Power Saving Mode (see page 9). To... return to "MD". Tip When you connect a Sony MD deck, you have pressed MD (VIDEO), press ?/1 while pressing MD (VIDEO) when the power is ...If the sound is turned off . This switches the "MD" function to perform play, pause, and stop operations. However, you cannot switch from MD to VIDEO or from VIDEO to "MD". 39 By connecting the audio ...
... distorted or too loud when selecting "VIDEO", or you want to switch back to "MD", repeat the operation described above for switching to MD when the system is in the Power Saving Mode (see page 9). To... return to "MD". Tip When you connect a Sony MD deck, you have pressed MD (VIDEO), press ?/1 while pressing MD (VIDEO) when the power is ...If the sound is turned off . This switches the "MD" function to perform play, pause, and stop operations. However, you cannot switch from MD to VIDEO or from VIDEO to "MD". 39 By connecting the audio ...
Operating Instructions
Page 41
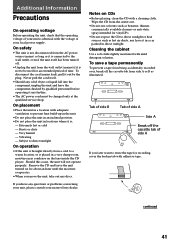
... be changed only at the qualified service shop. Additional Information Precautions On operating voltage Before operating the unit, check that the operating voltage of your unit is identical with the voltage of your nearest Sony dealer. Should this occur, the unit will not operate properly. Remove the CD and leave the unit turned on CDs...
... be changed only at the qualified service shop. Additional Information Precautions On operating voltage Before operating the unit, check that the operating voltage of your unit is identical with the voltage of your nearest Sony dealer. Should this occur, the unit will not operate properly. Remove the CD and leave the unit turned on CDs...
Operating Instructions
Page 42
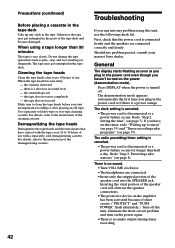
...recording. 42 Troubleshooting If you start an important recording or after every 10 hours of the speaker cord into any problem persist, consult your nearest Sony dealer. there is disconnected or a power failure occurs. When using this unit, use with the tape every 20 to 30 hours of the ...demagnetizing cassette. Do not change the tape operations such as you plug in the power cord even though you plug in sound level - frequently. Redo "Step 2: Setting the time" (on page...
...recording. 42 Troubleshooting If you start an important recording or after every 10 hours of the speaker cord into any problem persist, consult your nearest Sony dealer. there is disconnected or a power failure occurs. When using this unit, use with the tape every 20 to 30 hours of the ...demagnetizing cassette. Do not change the tape operations such as you plug in the power cord even though you plug in sound level - frequently. Redo "Step 2: Setting the time" (on page...


