Operating Instructions
Page 2
... uninsulated "dangerous voltage" within the product's enclosure that to which can radiate radio frequency energy and, if not installed and used for energy efficiency. Reorient or relocate the receiving antenna. - Consult the dealer or an experienced radio/TV technician for MHC-BX9/DX9/BX7/DX7/BX5 and DX5. About this manual The instructions in a confined space, such as a CLASS 1 LASER product.
... uninsulated "dangerous voltage" within the product's enclosure that to which can radiate radio frequency energy and, if not installed and used for energy efficiency. Reorient or relocate the receiving antenna. - Consult the dealer or an experienced radio/TV technician for MHC-BX9/DX9/BX7/DX7/BX5 and DX5. About this manual The instructions in a confined space, such as a CLASS 1 LASER product.
Operating Instructions
Page 3
... Flashing part of a CD 26 Sound Adjustment Adjusting the sound 27 Selecting the audio emphasis 28 Changing the spectrum analyzer display 29 Selecting the surround effect 29 Adjusting the graphic equalizer ......... 30 Other Features Using the Radio Data System (RDS 31 Singing along: Karaoke 33 Falling asleep to music 35 Waking up to music 35 Timer-recording radio programs ....... 37 Optional Components Connecting audio components .......... 38 Connecting a VCR 39 Connecting external antennas 40 Additional Information Precautions 41 Troubleshooting...
... Flashing part of a CD 26 Sound Adjustment Adjusting the sound 27 Selecting the audio emphasis 28 Changing the spectrum analyzer display 29 Selecting the surround effect 29 Adjusting the graphic equalizer ......... 30 Other Features Using the Radio Data System (RDS 31 Singing along: Karaoke 33 Falling asleep to music 35 Waking up to music 35 Timer-recording radio programs ....... 37 Optional Components Connecting audio components .......... 38 Connecting a VCR 39 Connecting external antennas 40 Additional Information Precautions 41 Troubleshooting...

Operating Instructions
Page 4
... 1: Hooking up the system Do the following procedure 1 to 5 to the SPEAKER jacks as below. R + L + - 5 Front speaker (Left) 2 Connect the surround speaker (MHC-BX7/DX7 only). Connect the speaker cords of front speakers to hook up your system using the supplied cords and accessories. Insert only the stripped portion. Connect the speaker cords to SURROUND SPEAKER jacks. R L Red/Solid (3) Black/Stripe (#) 4 Surround speaker* (Right) AM loop antenna Surround speaker* (Left) FM antenna 3 4 2 1 Front speaker (Right) * MHC-BX7/DX7 only. 1 Connect the speakers.
... 1: Hooking up the system Do the following procedure 1 to 5 to the SPEAKER jacks as below. R + L + - 5 Front speaker (Left) 2 Connect the surround speaker (MHC-BX7/DX7 only). Connect the speaker cords of front speakers to hook up your system using the supplied cords and accessories. Insert only the stripped portion. Connect the speaker cords to SURROUND SPEAKER jacks. R L Red/Solid (3) Black/Stripe (#) 4 Surround speaker* (Right) AM loop antenna Surround speaker* (Left) FM antenna 3 4 2 1 Front speaker (Right) * MHC-BX7/DX7 only. 1 Connect the speakers.
Operating Instructions
Page 9
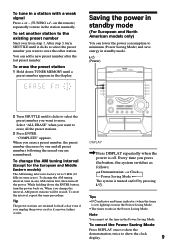
... clock display. 9 DISPLAY , Press DISPLAY repeatedly when the power is factory set ) light up even in the Power Saving Mode. • The timer works in any AM station first, then turn SHUTTLE until it clicks to select the preset number you want to tune in the station manually. To tune in the display. To set the time in some areas). You can lower the power consumption to minimum (Power Saving Mode) and save energy in standby mode. ?/1 (Power) 2 Turn...
... clock display. 9 DISPLAY , Press DISPLAY repeatedly when the power is factory set ) light up even in the Power Saving Mode. • The timer works in any AM station first, then turn SHUTTLE until it clicks to select the preset number you want to tune in the station manually. To tune in the display. To set the time in some areas). You can lower the power consumption to minimum (Power Saving Mode) and save energy in standby mode. ?/1 (Power) 2 Turn...

Operating Instructions
Page 14
... press PRESET +/- Frequency MHz 14 TUNED STEREO For manual tuning, press + or - (or TUNING +/- on the remote) for lower preset numbers. Preset number Turn clockwise (or press PRESET + on the remote) J for higher preset numbers. Tips • When an FM program is noisy, press STEREO/MONO so that "MONO" appears in step 2. You can record the radio program on the remote). on a tape by calling up a preset station. Recording from the radio You can use TYPE I (normal) tape. ?/1 (Power) 1 5 DOLBY...
... press PRESET +/- Frequency MHz 14 TUNED STEREO For manual tuning, press + or - (or TUNING +/- on the remote) for lower preset numbers. Preset number Turn clockwise (or press PRESET + on the remote) J for higher preset numbers. Tips • When an FM program is noisy, press STEREO/MONO so that "MONO" appears in step 2. You can record the radio program on the remote). on a tape by calling up a preset station. Recording from the radio You can use TYPE I (normal) tape. ?/1 (Power) 1 5 DOLBY...

Operating Instructions
Page 15
... the reverse side. • To record non-preset stations, use TYPE I (normal) tape. level high-frequency signals, press DOLBY NR so that "DOLBY NR" appears after step 1. TAPE B reverse side indicator lights up (see page 16). 2 • When you want to start from the radio, move the respective antenna to select deck B after pressing REC PAUSE/START in low- With the side you record on both...
... the reverse side. • To record non-preset stations, use TYPE I (normal) tape. level high-frequency signals, press DOLBY NR so that "DOLBY NR" appears after step 1. TAPE B reverse side indicator lights up (see page 16). 2 • When you want to start from the radio, move the respective antenna to select deck B after pressing REC PAUSE/START in low- With the side you record on both...

Operating Instructions
Page 16
...). Adjust the volume Turn VOLUME (or press VOL +/- When a tape (tapes) is recorded on the remote). The search direction, + (forward) or - (back), and number of a track (AMS*) During playback, press . To play Press x. Forward indicator Reverse Tape indicator presence indicator * Relay Play always follows the following circumstances: - Playing a tape (continued) 1 Press TAPE A/B repeatedly to select deck A or B. 2 Press Z and insert a recorded tape in the display. Select j to play ).* 4 Press nN. Rewind Turn...
...). Adjust the volume Turn VOLUME (or press VOL +/- When a tape (tapes) is recorded on the remote). The search direction, + (forward) or - (back), and number of a track (AMS*) During playback, press . To play Press x. Forward indicator Reverse Tape indicator presence indicator * Relay Play always follows the following circumstances: - Playing a tape (continued) 1 Press TAPE A/B repeatedly to select deck A or B. 2 Press Z and insert a recorded tape in the display. Select j to play ).* 4 Press nN. Rewind Turn...
Operating Instructions
Page 17
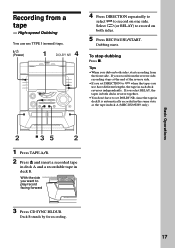
... Operations 2 x3 5 2 1 Press TAPE A/B. 2 Press Z and insert a recorded tape in deck A and a recordable tape in each deck reverses independently. If you select RELAY, the tapes in both decks reverse together. • You don't have to j when the tapes you want to record on both sides, start recording from a tape - With the side you use TYPE I (normal) tape. ?/1 (Power) 1 4 DOLBY NR 4 Press DIRECTION repeatedly to select g to play/record...
... Operations 2 x3 5 2 1 Press TAPE A/B. 2 Press Z and insert a recorded tape in deck A and a recordable tape in each deck reverses independently. If you select RELAY, the tapes in both decks reverse together. • You don't have to j when the tapes you want to record on both sides, start recording from a tape - With the side you use TYPE I (normal) tape. ?/1 (Power) 1 4 DOLBY NR 4 Press DIRECTION repeatedly to select g to play/record...

Operating Instructions
Page 23
.../START button flashes. Press nN to start playback of the tape. ?/1 (Power) 2 4 DOLBY NR 4 Press DIRECTION repeatedly to select g to record on both sides. 5 Press REC PAUSE/START. Recording starts. 6 Press nN to record from the reverse side, press TAPE A/B to be recorded. TAPE B reverse side indicator lights up (see page 16). • When you want to start playing the source to select deck...
.../START button flashes. Press nN to start playback of the tape. ?/1 (Power) 2 4 DOLBY NR 4 Press DIRECTION repeatedly to select g to record on both sides. 5 Press REC PAUSE/START. Recording starts. 6 Press nN to record from the reverse side, press TAPE A/B to be recorded. TAPE B reverse side indicator lights up (see page 16). • When you want to start playing the source to select deck...

Operating Instructions
Page 27
... jack. Sound Adjustment Adjusting the sound You can reinforce the bass, create a more powerful sound, and listen with headphones. ?/1 (Power) GROOVE Note The V-GROOVE function will come from the speakers. To listen through the headphones Connect the headphones to the previous volume. 27 V-GROOVE PHONES To reinforce lower bass sound (V-GROOVE) Press V-GROOVE. Press V-GROOVE again to return to power mode, the equalizer curve changes, and the "GROOVE" indicator lights...
... jack. Sound Adjustment Adjusting the sound You can reinforce the bass, create a more powerful sound, and listen with headphones. ?/1 (Power) GROOVE Note The V-GROOVE function will come from the speakers. To listen through the headphones Connect the headphones to the previous volume. 27 V-GROOVE PHONES To reinforce lower bass sound (V-GROOVE) Press V-GROOVE. Press V-GROOVE again to return to power mode, the equalizer curve changes, and the "GROOVE" indicator lights...
Operating Instructions
Page 30
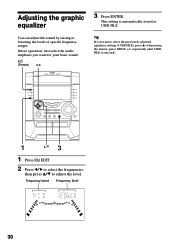
... level. repeatedly until USER FILE is automatically stored as USER FILE. This setting is selected). 1 3 v/V 1 Press EQ EDIT. 2 Press b/B to select the frequencies, then press v/V to select the previously adjusted equalizer settings (USER FILE), press v (when using the remote, press MENU +/- Frequency band Frequency level 30 Before operation, first select the audio emphasis you want for your basic sound. ?/1 (Power) b/B 3 Press ENTER. Adjusting the graphic equalizer You can adjust the sound by raising or lowering the levels of specific frequency ranges...
... level. repeatedly until USER FILE is automatically stored as USER FILE. This setting is selected). 1 3 v/V 1 Press EQ EDIT. 2 Press b/B to select the frequencies, then press v/V to select the previously adjusted equalizer settings (USER FILE), press v (when using the remote, press MENU +/- Frequency band Frequency level 30 Before operation, first select the audio emphasis you want for your basic sound. ?/1 (Power) b/B 3 Press ENTER. Adjusting the graphic equalizer You can adjust the sound by raising or lowering the levels of specific frequency ranges...

Operating Instructions
Page 34
... recording sounds ?/1 (Power) 26 4 x 3,5 1 34 1 Do the procedures for recording. Then, insert a recordable tape in high soprano or tenor. Deck B stands by turning MIC LEVEL. Singing along: Karaoke (continued) 4 Start playing the music and adjust the volume. 5 Adjust the microphone volume by for singing along with the music. To stop recording Press x. Notes • With some songs, vocals may not be changed. • If you select "KARAOKE...
... recording sounds ?/1 (Power) 26 4 x 3,5 1 34 1 Do the procedures for recording. Then, insert a recordable tape in high soprano or tenor. Deck B stands by turning MIC LEVEL. Singing along: Karaoke (continued) 4 Start playing the music and adjust the volume. 5 Adjust the microphone volume by for singing along with the music. To stop recording Press x. Notes • With some songs, vocals may not be changed. • If you select "KARAOKE...

Operating Instructions
Page 35
... change the time to music - Falling asleep to turn off Select the time you want by 10 minutes. Make sure you have set the clock (see "Step 3: Presetting radio stations" on page 21). • Tape: Insert a tape with the side you want to play . • CD: Insert a CD. To start from a specific track, make a program (see "Programming the CD tracks" on page 8). 2 Adjust the volume. 3 Press CLOCK/TIMER SET. "SET...
... change the time to music - Falling asleep to turn off Select the time you want by 10 minutes. Make sure you have set the clock (see "Step 3: Presetting radio stations" on page 21). • Tape: Insert a tape with the side you want to play . • CD: Insert a CD. To start from a specific track, make a program (see "Programming the CD tracks" on page 8). 2 Adjust the volume. 3 Press CLOCK/TIMER SET. "SET...
Operating Instructions
Page 37
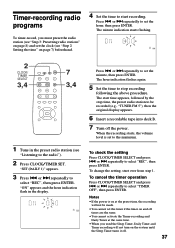
... . To check the setting Press CLOCK/TIMER SELECT and press . Timer-recording radio programs To timer-record, you used the Sleep Timer, Daily Timer and Timer recording will not be recorded (e.g., "TUNER FM 5"), then the original display appears. 6 Insert a recordable tape into deck B. 7 Turn off . 37 "ON" appears and the hour indication flash in the preset radio station (see "Step 2: Setting the time" on the system...
... . To check the setting Press CLOCK/TIMER SELECT and press . Timer-recording radio programs To timer-record, you used the Sleep Timer, Daily Timer and Timer recording will not be recorded (e.g., "TUNER FM 5"), then the original display appears. 6 Insert a recordable tape into deck B. 7 Turn off . 37 "ON" appears and the hour indication flash in the preset radio station (see "Step 2: Setting the time" on the system...
Operating Instructions
Page 42
... display starts flashing as soon as play, stop, and fast-winding etc. Redo "Step 2: Setting the time" (on page 8). Redo "Step 3: Presetting radio stations" (on page 7). frequently. Use separately sold demagnetizing cassette. Demagnetizing the tape heads Demagnetize the tape heads and the metal parts that the power cord is no sound. •Turn VOLUME clockwise. •The headphones are connected correctly and firmly. Troubleshooting If you run into the SPEAKER jack...
... display starts flashing as soon as play, stop, and fast-winding etc. Redo "Step 2: Setting the time" (on page 8). Redo "Step 3: Presetting radio stations" (on page 7). frequently. Use separately sold demagnetizing cassette. Demagnetizing the tape heads Demagnetize the tape heads and the metal parts that the power cord is no sound. •Turn VOLUME clockwise. •The headphones are connected correctly and firmly. Troubleshooting If you run into the SPEAKER jack...
Operating Instructions
Page 43
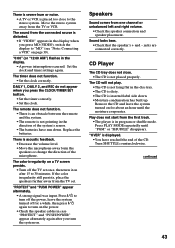
... not start from the TV set once, then turn off the power, leave the system turned off the TV set . "0:00" (or "12:00 AM") flashes in program or shuffle mode. "PROTECT"and "PUSH POWER" appear alternately. •A strong signal was input. Speakers Sound comes from the TV or VCR. continued 43 Set the clock and timer settings again. Replace the batteries. jacks are connected correctly. There is severe...
... not start from the TV set once, then turn off the power, leave the system turned off the TV set . "0:00" (or "12:00 AM") flashes in program or shuffle mode. "PROTECT"and "PUSH POWER" appear alternately. •A strong signal was input. Speakers Sound comes from the TV or VCR. continued 43 Set the clock and timer settings again. Replace the batteries. jacks are connected correctly. There is severe...

Operating Instructions
Page 44
... and ?/1 at the same time. 2 Unplug the power cord. 3 Plug the power cord back in. 4 Press ?/1 to factory settings. Clean them (see "Cleaning the tape heads" on page 42). •The record/playback heads are cleared. Tuner Severe hum or noise ("TUNED" or "STEREO" flashes in the display). •Adjust the antenna. •The signal strength is excessive wow or flutter, or the sound drops out. •The...
... and ?/1 at the same time. 2 Unplug the power cord. 3 Plug the power cord back in. 4 Press ?/1 to factory settings. Clean them (see "Cleaning the tape heads" on page 42). •The record/playback heads are cleared. Tuner Severe hum or noise ("TUNED" or "STEREO" flashes in the display). •Adjust the antenna. •The signal strength is excessive wow or flutter, or the sound drops out. •The...
Operating Instructions
Page 46
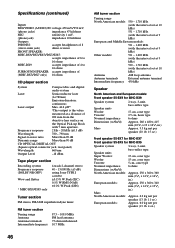
..., (phono jacks) impedance 47 kilohms MIC: sensitivity 1 mV, (phone jack) impedance 10 kilohms Outputs PHONES: accepts headphones of 8 (stereo mini jack) ohms or more FRONT SPEAKER: MHC-BX9/BX7/BX5/DX7/DX5: accepts impedance of 6 to 16 ohms MHC-DX9: accepts impedance of 4 to -noise ratio More than 90 dB Dynamic range More than 90 dB CD OPTICAL DIGITAL OUT (Square optical connector jack, rear panel) Wavelength 660 nm Output Level -18 dBm Tape player section Recording system Frequency response (DOLBY...
..., (phono jacks) impedance 47 kilohms MIC: sensitivity 1 mV, (phone jack) impedance 10 kilohms Outputs PHONES: accepts headphones of 8 (stereo mini jack) ohms or more FRONT SPEAKER: MHC-BX9/BX7/BX5/DX7/DX5: accepts impedance of 6 to 16 ohms MHC-DX9: accepts impedance of 4 to -noise ratio More than 90 dB Dynamic range More than 90 dB CD OPTICAL DIGITAL OUT (Square optical connector jack, rear panel) Wavelength 660 nm Output Level -18 dBm Tape player section Recording system Frequency response (DOLBY...
Operating Instructions
Page 47
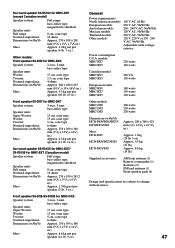
... Adjustable with voltage selector Power consumption U.S.A. Surround speaker SS-RS150 for MHC-BX7 (except Canadian model) Speaker system Full range, Speaker units bass-reflex type, magnetically shielded Full range: Nominal impedance Dimensions (w/h/d) Mass 8 cm, cone type 16 ohms Approx. 270 x 108 x 200 mm (97/8 x 41/4 x 77/8 in.) Approx. 2.0 kg net per speaker (4 1b. 7 oz.) Other models: Front speaker SS-DX9 for MHC-DX9 Speaker system Speaker units Woofer: Tweeter: Nominal impedance...
... Adjustable with voltage selector Power consumption U.S.A. Surround speaker SS-RS150 for MHC-BX7 (except Canadian model) Speaker system Full range, Speaker units bass-reflex type, magnetically shielded Full range: Nominal impedance Dimensions (w/h/d) Mass 8 cm, cone type 16 ohms Approx. 270 x 108 x 200 mm (97/8 x 41/4 x 77/8 in.) Approx. 2.0 kg net per speaker (4 1b. 7 oz.) Other models: Front speaker SS-DX9 for MHC-DX9 Speaker system Speaker units Woofer: Tweeter: Nominal impedance...
Operating Instructions
Page 48
... order (Program Play) 21 tracks repeatedly (Repeat Play) 19 Power saving mode 9 Presetting radio stations 8 Preset Tuning 13 Program Edit 24 Program Play 21 Protecting recordings 41 PTY 31 R Radio Data System (RDS) 31 Radio stations presetting 8 tuning in 13 Recording a CD 12, 24 a radio program 14 a tape 17, 23 timer recording 37 Repeat Play 19 Resetting the system 44 S Saving recordings 41 Selecting the audio emphasis 28 Setting the time 7 Shuffle Play 20 Sleep Timer 35 Sound adjustment 27 Speakers 4, 6, 43...
... order (Program Play) 21 tracks repeatedly (Repeat Play) 19 Power saving mode 9 Presetting radio stations 8 Preset Tuning 13 Program Edit 24 Program Play 21 Protecting recordings 41 PTY 31 R Radio Data System (RDS) 31 Radio stations presetting 8 tuning in 13 Recording a CD 12, 24 a radio program 14 a tape 17, 23 timer recording 37 Repeat Play 19 Resetting the system 44 S Saving recordings 41 Selecting the audio emphasis 28 Setting the time 7 Shuffle Play 20 Sleep Timer 35 Sound adjustment 27 Speakers 4, 6, 43...


