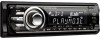
Operating Instructions
Page 2
...car's ignition has no guarantee that to the FRONT VIDEO OUT turns off , which the receiver is deactivated, but audio source can radiate radio frequency energy and, if not installed and used in this manual could void your safety, the monitor connected to which prevents battery drain. To cancel the ...2 while driving. To avoid electrical shock, do not expose the unit to radio communications. As the laser beam used in accordance with this CD/DVD player is harmful to eyes, do not set the Auto Off function, press and hold (OFF) until the display disappears each time you fail...
...car's ignition has no guarantee that to the FRONT VIDEO OUT turns off , which the receiver is deactivated, but audio source can radiate radio frequency energy and, if not installed and used in this manual could void your safety, the monitor connected to which prevents battery drain. To cancel the ...2 while driving. To avoid electrical shock, do not expose the unit to radio communications. As the laser beam used in accordance with this CD/DVD player is harmful to eyes, do not set the Auto Off function, press and hold (OFF) until the display disappears each time you fail...
Operating Instructions
Page 4
...CD 34 Selecting a playback layer 34 Selecting the sound quality 35 Advanced Operations - Playback control. . . . 22 Using play 31 Multi-channel output of 2-channel sources - BTM 36 Storing manually 36 Receiving...Storing and receiving stations 36 Storing automatically - Intelligent Time Alignment 37 Precisely calibrating the listening position - Intelligent Time Alignment Tune . . . . . 38 Customizing the equalizer curve - DVD level ...10 Main unit 10 Card remote commander RM-X169 12 Getting Started Installing the unit and an optional monitor 14 Resetting the unit 14 ...
...CD 34 Selecting a playback layer 34 Selecting the sound quality 35 Advanced Operations - Playback control. . . . 22 Using play 31 Multi-channel output of 2-channel sources - BTM 36 Storing manually 36 Receiving...Storing and receiving stations 36 Storing automatically - Intelligent Time Alignment 37 Precisely calibrating the listening position - Intelligent Time Alignment Tune . . . . . 38 Customizing the equalizer curve - DVD level ...10 Main unit 10 Card remote commander RM-X169 12 Getting Started Installing the unit and an optional monitor 14 Resetting the unit 14 ...

Operating Instructions
Page 5
... setup 44 Resetting all settings 45 System setup 45 Basic operation of system setup 45 Setting the clock 49 Using Optional Equipment Auxiliary equipment 49 CD changer 50 Rotary commander RM-X4S 51 Additional Information Precautions 52 Notes on discs 52 Playback order of MP3/WMA/JPEG files 53 About MP3... Maintenance 53 Removing the unit 54 Specifications 55 Troubleshooting 56 Error displays/Messages 57 Glossary 58 Language code/area code list 60 Index 61 For installation and connections, see the supplied installation/connections manual. 5
... setup 44 Resetting all settings 45 System setup 45 Basic operation of system setup 45 Setting the clock 49 Using Optional Equipment Auxiliary equipment 49 CD changer 50 Rotary commander RM-X4S 51 Additional Information Precautions 52 Notes on discs 52 Playback order of MP3/WMA/JPEG files 53 About MP3... Maintenance 53 Removing the unit 54 Specifications 55 Troubleshooting 56 Error displays/Messages 57 Glossary 58 Language code/area code list 60 Index 61 For installation and connections, see the supplied installation/connections manual. 5
Operating Instructions
Page 14
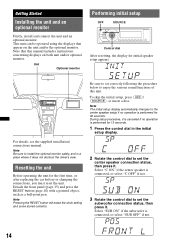
...the initial setup display. 2 Rotate the control dial to install the optional monitor safely, and in a place where it . For details, see the supplied installation/ connections manual. Getting Started Installing the unit and an optional monitor Firstly, install and connect the unit and an optional monitor. Note Be...operation is connected, or select "C OFF" if not. 3 Rotate the control dial to enjoy the various sound functions of this manual includes instructions concerning displays on the unit and/or the optional monitor. Note that appear on both unit and/or optional monitor. This...
...the initial setup display. 2 Rotate the control dial to install the optional monitor safely, and in a place where it . For details, see the supplied installation/ connections manual. Getting Started Installing the unit and an optional monitor Firstly, install and connect the unit and an optional monitor. Note Be...operation is connected, or select "C OFF" if not. 3 Rotate the control dial to enjoy the various sound functions of this manual includes instructions concerning displays on the unit and/or the optional monitor. Note that appear on both unit and/or optional monitor. This...
Operating Instructions
Page 57
... Resume playback or multi-disc resume playback (page 43) has taken effect. angles are not stored in the expansion format (DATA CD), or the UDF Bridge format (DATA DVD) (page 52). • The file extension is incorrect (page 53). • Files are not recorded on the disc, ... The broadcast signal is too weak. t Set "MONO OFF" (page 47). t See the supplied installation/connections manual to which data can be played. a disc recorded with this unit. Certain functions cannot be received. The sound is hampered by noises. • The connection is too weak. Automatic tuning is not ...
... Resume playback or multi-disc resume playback (page 43) has taken effect. angles are not stored in the expansion format (DATA CD), or the UDF Bridge format (DATA DVD) (page 52). • The file extension is incorrect (page 53). • Files are not recorded on the disc, ... The broadcast signal is too weak. t Set "MONO OFF" (page 47). t See the supplied installation/connections manual to which data can be played. a disc recorded with this unit. Certain functions cannot be received. The sound is hampered by noises. • The connection is too weak. Automatic tuning is not ...


