Operating Instructions
Page 2
... changes or modifications not expressly approved in this manual could void your safety, the monitor connected to set the initial speaker setup correctly due to operate this product will not occur in other menus. Refer servicing to qualified personnel only. After resetting the unit, if you turn the ignition off and the karaoke mode is deactivated, but audio source can be reconfigured in a particular installation...
... changes or modifications not expressly approved in this manual could void your safety, the monitor connected to set the initial speaker setup correctly due to operate this product will not occur in other menus. Refer servicing to qualified personnel only. After resetting the unit, if you turn the ignition off and the karaoke mode is deactivated, but audio source can be reconfigured in a particular installation...
Operating Instructions
Page 4
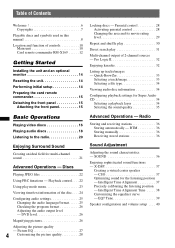
... level 29 Repeat and shuffle play 30 Direct search play mode menu 23 Viewing time/text information of the disc . . . . 24 Configuring audio settings 25 Changing the audio language/format. . . . . . 25 Checking the program format 26 Adjusting the audio output level - Radio Storing and receiving stations 36 Storing automatically - CSO 37 Optimizing sound for Super Audio CD 34 Selecting a playback layer 34 Selecting the sound quality 35 Advanced Operations - Playback control. . . . 22 Using play 31 Multi-channel output of controls 10 Main unit 10 Card remote...
... level 29 Repeat and shuffle play 30 Direct search play mode menu 23 Viewing time/text information of the disc . . . . 24 Configuring audio settings 25 Changing the audio language/format. . . . . . 25 Checking the program format 26 Adjusting the audio output level - Radio Storing and receiving stations 36 Storing automatically - CSO 37 Optimizing sound for Super Audio CD 34 Selecting a playback layer 34 Selecting the sound quality 35 Advanced Operations - Playback control. . . . 22 Using play 31 Multi-channel output of controls 10 Main unit 10 Card remote...

Operating Instructions
Page 5
... setup 45 Basic operation of system setup 45 Setting the clock 49 Using Optional Equipment Auxiliary equipment 49 CD changer 50 Rotary commander RM-X4S 51 Additional Information Precautions 52 Notes on discs 52 Playback order of MP3/WMA/JPEG files 53 About MP3 files 53 About WMA files 53 About JPEG files 53 Maintenance 53 Removing the unit 54 Specifications 55 Troubleshooting 56 Error displays...
... setup 45 Basic operation of system setup 45 Setting the clock 49 Using Optional Equipment Auxiliary equipment 49 CD changer 50 Rotary commander RM-X4S 51 Additional Information Precautions 52 Notes on discs 52 Playback order of MP3/WMA/JPEG files 53 About MP3 files 53 About WMA files 53 About JPEG files 53 Maintenance 53 Removing the unit 54 Specifications 55 Troubleshooting 56 Error displays...
Operating Instructions
Page 6
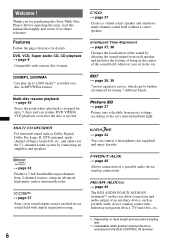
... connection and audio output of Super Audio CD, etc., and allows for future reference. t page 49 Allows connection of the sound by delaying the sound output from 2-channel sources, using an advanced, high-purity matrix surround decoder. DVD, VCD, Super Audio CD, CD playback t page 8 Compatible with digital signal processing. t page 36, 39 7 preset equalizer curves, which can connect a microphone (not supplied) and enjoy karaoke. Before operating this unit, read this Sony Multi Disc Player...
... connection and audio output of Super Audio CD, etc., and allows for future reference. t page 49 Allows connection of the sound by delaying the sound output from 2-channel sources, using an advanced, high-purity matrix surround decoder. DVD, VCD, Super Audio CD, CD playback t page 8 Compatible with digital signal processing. t page 36, 39 7 preset equalizer curves, which can connect a microphone (not supplied) and enjoy karaoke. Before operating this unit, read this Sony Multi Disc Player...
Operating Instructions
Page 11
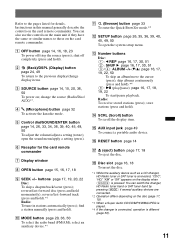
...). *3 When a Super Audio CD/CD/MP3/WMA/JPEG is played. *4 If the changer is connected, operation is pressed. Instructions in stations automatically (press); change display items. C SOURCE button page 14, 15, 20, 36, 50 To power on the card remote commander. D m (Microphone) button page 32 To activate the karaoke mode. open the system setup menu. skip albums continuously (press and hold ). You can also use the controls on the main unit if they...
...). *3 When a Super Audio CD/CD/MP3/WMA/JPEG is played. *4 If the changer is connected, operation is pressed. Instructions in stations automatically (press); change display items. C SOURCE button page 14, 15, 20, 36, 50 To power on the card remote commander. D m (Microphone) button page 32 To activate the karaoke mode. open the system setup menu. skip albums continuously (press and hold ). You can also use the controls on the main unit if they...
Operating Instructions
Page 13
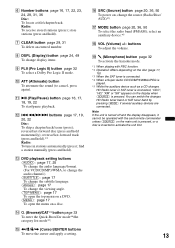
... a station manually (press and hold ).*2 Radio: To tune in stations automatically (press); O J ATT (Attenuate) button To attenuate the sound (to change the audio channel.) (SUBTITLE): page 17 To change the subtitle language. (ANGLE): page 17 To change the viewing angle. (TOP MENU): page 17 To open the top menu on a DVD. (MENU): page 17 To open the menu on a disc. F Number buttons page 16, 17, 22, 23, 24, 29, 31, 36 Disc: To locate...
... a station manually (press and hold ).*2 Radio: To tune in stations automatically (press); O J ATT (Attenuate) button To attenuate the sound (to change the audio channel.) (SUBTITLE): page 17 To change the subtitle language. (ANGLE): page 17 To change the viewing angle. (TOP MENU): page 17 To open the top menu on a DVD. (MENU): page 17 To open the menu on a disc. F Number buttons page 16, 17, 22, 23, 24, 29, 31, 36 Disc: To locate...
Operating Instructions
Page 14
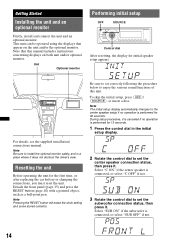
... unit Before operating the unit for initial speaker setup appears. Note The initial setup display automatically changes to enjoy the various sound functions of this manual includes instructions concerning displays on the unit and/or the optional monitor. Note Pressing the RESET button will erase the clock setting and some stored contents. Unit Optional monitor Performing initial setup OFF SOURCE Control dial After resetting, the display for the first time, or after replacing the car battery or changing the connections...
... unit Before operating the unit for initial speaker setup appears. Note The initial setup display automatically changes to enjoy the various sound functions of this manual includes instructions concerning displays on the unit and/or the optional monitor. Note Pressing the RESET button will erase the clock setting and some stored contents. Unit Optional monitor Performing initial setup OFF SOURCE Control dial After resetting, the display for the first time, or after replacing the car battery or changing the connections...

Operating Instructions
Page 15
... the control dial, press (ENTER) instead of the front panel onto the spindle B on a dashboard/rear tray. Preparing the card remote commander Remove the insulation film. 1 Press (OPEN) while the unit is complete. Detaching the front panel SOURCE OPEN c Note Do not put excessive pressure on page 37. Caution alarm If you set to the OFF position without connecting the subwoofer, bass sound...
... the control dial, press (ENTER) instead of the front panel onto the spindle B on a dashboard/rear tray. Preparing the card remote commander Remove the insulation film. 1 Press (OPEN) while the unit is complete. Detaching the front panel SOURCE OPEN c Note Do not put excessive pressure on page 37. Caution alarm If you set to the OFF position without connecting the subwoofer, bass sound...

Operating Instructions
Page 17
... several sections, which make up a picture or music feature. About the DVD menu A DVD is divided into several titles, you to confirm Remote: When you play a DVD that allow you can select a desired title using the DVD menu. Other playback operations .m/M> b/B/V/v u u AUDIO TOP MENU Number buttons .m/M> SUBTITLE ANGLE MENU reverse/fast-forward disc and hold .m/M> momentarily; To eject the disc 1 Press (OPEN) on the main unit. 2 Press Z (rear of front panel). and then repeatedly...
... several sections, which make up a picture or music feature. About the DVD menu A DVD is divided into several titles, you to confirm Remote: When you play a DVD that allow you can select a desired title using the DVD menu. Other playback operations .m/M> b/B/V/v u u AUDIO TOP MENU Number buttons .m/M> SUBTITLE ANGLE MENU reverse/fast-forward disc and hold .m/M> momentarily; To eject the disc 1 Press (OPEN) on the main unit. 2 Press Z (rear of front panel). and then repeatedly...

Operating Instructions
Page 21
... to "HQ." Adjust the volume from each connected speaker. t page 37 3 Enjoying multi-channel sources x For playback of an Super Audio CD 1 Set "SUPER AUDIO CD MODE"/"SACD MOD" to your preference. 1 Set EQ7*. * Not available if CSO is introduced in this section. t page 36 21 Follow the page reference for multi-channel (5.1-channel) sound is activated. t By initial setup (page 14) t By system setup (page 40) 2 Select your listening position...
... to "HQ." Adjust the volume from each connected speaker. t page 37 3 Enjoying multi-channel sources x For playback of an Super Audio CD 1 Set "SUPER AUDIO CD MODE"/"SACD MOD" to your preference. 1 Set EQ7*. * Not available if CSO is introduced in this section. t page 36 21 Follow the page reference for multi-channel (5.1-channel) sound is activated. t By initial setup (page 14) t By system setup (page 40) 2 Select your listening position...

Operating Instructions
Page 25
... SETUP M/m AUDIO ENTER When playing VCD/CD/MP3/WMA, you can also change the settings of JPEG files can also change the audio setting depending on the disc. When the 4-digit input prompt appears, input the language code (page 60) for the desired language. The options are indicated below. Changing the audio channel Image name Text information* * Album name appears when the album number is displayed. STEREO (ST): Standard stereo sound...
... SETUP M/m AUDIO ENTER When playing VCD/CD/MP3/WMA, you can also change the settings of JPEG files can also change the audio setting depending on the disc. When the 4-digit input prompt appears, input the language code (page 60) for the desired language. The options are indicated below. Changing the audio channel Image name Text information* * Album name appears when the album number is displayed. STEREO (ST): Standard stereo sound...
Operating Instructions
Page 36
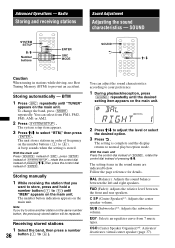
... a number button ((1) to normal play/reception mode. Follow the page reference for details. The system setup item appears. 3 Press M/m to store another station on the main unit. BAL (Balance): Adjusts the sound balance between the front and rear speakers. SUB (Subwoofer)*2: Adjusts the subwoofer volume. CSO (Center Speaker Organizer)*3: Activates/ deactivates virtual center speaker (page 37). The unit stores stations in the sound menu are indicated below. You can select from 7 music types. The setting is stored. Storing manually...
... a number button ((1) to normal play/reception mode. Follow the page reference for details. The system setup item appears. 3 Press M/m to store another station on the main unit. BAL (Balance): Adjusts the sound balance between the front and rear speakers. SUB (Subwoofer)*2: Adjusts the subwoofer volume. CSO (Center Speaker Organizer)*3: Activates/ deactivates virtual center speaker (page 37). The unit stores stations in the sound menu are indicated below. You can select from 7 music types. The setting is stored. Storing manually...

Operating Instructions
Page 40
Speaker configuration and volume setup SYSTEM SETUP
Speaker configuration and volume setup SYSTEM SETUP
Operating Instructions
Page 43
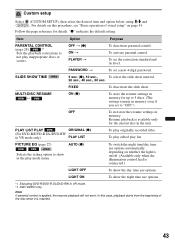
... not play mode menu. FIXED To deactivate the slide show interval. 20 sec., 40 sec., 60 sec. To activate parental control. PASSWORD t To set the restriction standard and its level. Resume playback is connected.) LIGHT OFF To show the day time use options. LIGHT ON To show in VR mode. *2 DVD VIDEO only. SLIDE SHOW TIME 5 sec. (z), 10 sec., To select the slide show . To switch the night time/day time use...
... not play mode menu. FIXED To deactivate the slide show interval. 20 sec., 40 sec., 60 sec. To activate parental control. PASSWORD t To set the restriction standard and its level. Resume playback is connected.) LIGHT OFF To show the day time use options. LIGHT ON To show in VR mode. *2 DVD VIDEO only. SLIDE SHOW TIME 5 sec. (z), 10 sec., To select the slide show . To switch the night time/day time use...
Operating Instructions
Page 46
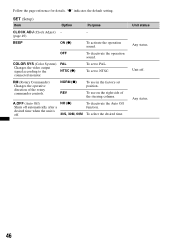
...) Changes the operative direction of the steering column. A.OFF (Auto Off) Shuts off automatically after a desired time when the unit is off . Any status. 46 COLOR SYS (Color System) Changes the video output signal according to PAL. To select the desired time. SET (Setup) Item Option Purpose CLOCK ADJ (Clock Adjust) - - (page 49) BEEP ON (z) To activate the operation sound. NO (z) 30S, 30M, 60M To deactivate the Auto Off function. To use in the factory-set...
...) Changes the operative direction of the steering column. A.OFF (Auto Off) Shuts off automatically after a desired time when the unit is off . Any status. 46 COLOR SYS (Color System) Changes the video output signal according to PAL. To select the desired time. SET (Setup) Item Option Purpose CLOCK ADJ (Clock Adjust) - - (page 49) BEEP ON (z) To activate the operation sound. NO (z) 30S, 30M, 60M To deactivate the Auto Off function. To use in the factory-set...

Operating Instructions
Page 50
... spectrum analyzer, set "M.DSPL" to the BUS AUDIO IN/AUX AUDIO IN terminals. The setting is adjustable in single steps, between -6 and +18. 8 Press (ENTER). With the main unit Use (3)/(4) (ALBUM -/+) instead of the spectrum analyzer. On the rear: Connect to "SA" (page 47). Selecting an auxiliary device 1 Press (SRC) repeatedly until "AUX" appears on the unit. 2 Press (SRC) repeatedly until the desired changer appears. Unit number Disc number Playback starts...
... spectrum analyzer, set "M.DSPL" to the BUS AUDIO IN/AUX AUDIO IN terminals. The setting is adjustable in single steps, between -6 and +18. 8 Press (ENTER). With the main unit Use (3)/(4) (ALBUM -/+) instead of the spectrum analyzer. On the rear: Connect to "SA" (page 47). Selecting an auxiliary device 1 Press (SRC) repeatedly until "AUX" appears on the unit. 2 Press (SRC) repeatedly until the desired changer appears. Unit number Disc number Playback starts...
Operating Instructions
Page 55
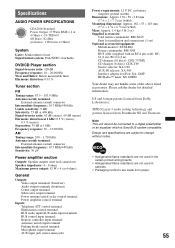
... remote commander: RM-X169 Parts for installation and connections (1 set) Optional accessories/equipment: Mobile monitor: XVM-B62 Rotary commander: RM-X4S BUS cable (supplied with an RCA pin cord): RC61 (1 m), RC-62 (2 m) CD changer (10 discs): CDX-757MX CD changer (6 discs): CDX-T69 Source selector: XA-C40 AUX-IN selector: XA-300 Interface adaptor for detailed information. US and foreign patents licensed from Fraunhofer IIS and Thomson. MPEG Layer-3 audio coding...
... remote commander: RM-X169 Parts for installation and connections (1 set) Optional accessories/equipment: Mobile monitor: XVM-B62 Rotary commander: RM-X4S BUS cable (supplied with an RCA pin cord): RC61 (1 m), RC-62 (2 m) CD changer (10 discs): CDX-757MX CD changer (6 discs): CDX-T69 Source selector: XA-C40 AUX-IN selector: XA-300 Interface adaptor for detailed information. US and foreign patents licensed from Fraunhofer IIS and Thomson. MPEG Layer-3 audio coding...

Operating Instructions
Page 56
This is not connected properly. Stored stations and correct time are not using the built-in amplifier. The display disappears from each other. • If an Super Audio CD is played and "SUPER AUDIO CD MODE"/ "SA-CD MOD" is switched. Picture does not fit in a sturdy part of the ignition is set to "HQ," instead set the input selector of the memory have a relay box. Sound There is no picture...
This is not connected properly. Stored stations and correct time are not using the built-in amplifier. The display disappears from each other. • If an Super Audio CD is played and "SUPER AUDIO CD MODE"/ "SA-CD MOD" is switched. Picture does not fit in a sturdy part of the ignition is set to "HQ," instead set the input selector of the memory have a relay box. Sound There is no picture...
Operating Instructions
Page 57
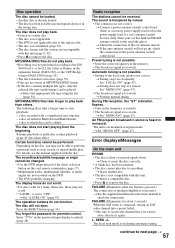
... seek mode is connected, storing an SAT radio channel into a preset failed. SEEK +/- MP3/WMA/JPEG files take a longer time to unlock (page 28). a disc recorded in the password input display to start playing from the beginning. The display items do not function. The operation buttons do not scroll. • For discs with this unit (page 8, 52). • Press Z to "OFF." Automatic tuning is not possible. • Setting of speakers/amplifiers...
... seek mode is connected, storing an SAT radio channel into a preset failed. SEEK +/- MP3/WMA/JPEG files take a longer time to unlock (page 28). a disc recorded in the password input display to start playing from the beginning. The display items do not function. The operation buttons do not scroll. • For discs with this unit (page 8, 52). • Press Z to "OFF." Automatic tuning is not possible. • Setting of speakers/amplifiers...
Operating Instructions
Page 58
... that was used at the time the problem began. 58 Glossary Album Section of a music piece or an image on the disc structure, it may be repaired because of disc playback trouble, bring the disc that extracts the spatial properties of several chapters. The rear channel is stereo and there is discrete subwoofer channel in the changer. t Check the connection. Cannot play this disc. • The disc is incompatible...
... that was used at the time the problem began. 58 Glossary Album Section of a music piece or an image on the disc structure, it may be repaired because of disc playback trouble, bring the disc that extracts the spatial properties of several chapters. The rear channel is stereo and there is discrete subwoofer channel in the changer. t Check the connection. Cannot play this disc. • The disc is incompatible...


