Operating Instructions
Page 7
...it at least 2.2 m (approx. 7 ft.) away from behind the screen. Carry the LCD Projection TV in the specified manner If you install the LCD projection TV. 7 If the lamp replacement indicator of persons, it . Ask a qualified service technician to so certify. This is securely ...When installing your LCD projection TV, and within 60° of the vertical viewing area, and 130° of the LCD Projection TV. Be sure to the operating instructions. Watch your LCD projection TV according to follow the instructions mentioned below. ❑ Carry the LCD Projection TV with a new one...
...it at least 2.2 m (approx. 7 ft.) away from behind the screen. Carry the LCD Projection TV in the specified manner If you install the LCD projection TV. 7 If the lamp replacement indicator of persons, it . Ask a qualified service technician to so certify. This is securely ...When installing your LCD projection TV, and within 60° of the vertical viewing area, and 130° of the LCD Projection TV. Be sure to the operating instructions. Watch your LCD projection TV according to follow the instructions mentioned below. ❑ Carry the LCD Projection TV with a new one...
Operating Instructions
Page 8
Contents Introducing the Sony LCD Projection TV Presenting the Sony LCD Projection TV 9 Using This Manual 10 Enjoying Your LCD Projection TV 11 Replacing the Lamp 13 Installing and Connecting the LCD Projection TV Contents 17 Inserting Batteries into the Remote Control ..........17 Carrying Your LCD Projection TV 18 To Prevent the LCD Projection TV from Falling Down 19 When Installing Your LCD Projection TV Against a Wall 19 Recommended...
Contents Introducing the Sony LCD Projection TV Presenting the Sony LCD Projection TV 9 Using This Manual 10 Enjoying Your LCD Projection TV 11 Replacing the Lamp 13 Installing and Connecting the LCD Projection TV Contents 17 Inserting Batteries into the Remote Control ..........17 Carrying Your LCD Projection TV 18 To Prevent the LCD Projection TV from Falling Down 19 When Installing Your LCD Projection TV Against a Wall 19 Recommended...
Operating Instructions
Page 11
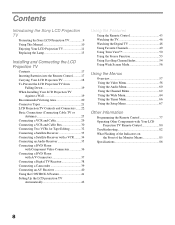
... your LCD projection TV. Replace the lamp with a new Sony XL-2000U replacement lamp (not supplied). ✍ Be sure to attach the lamp cover securely; For details on lamp replacement, see "What Flashing of the Indicators on the Front of your LCD projection TV, it may take a while before cleaning. Enjoying Your LCD Projection TV Introducing the Sony LCD Projection TV Introducing the Sony LCD Projection TV Indicators Projection lamp Screen Indicators...
... your LCD projection TV. Replace the lamp with a new Sony XL-2000U replacement lamp (not supplied). ✍ Be sure to attach the lamp cover securely; For details on lamp replacement, see "What Flashing of the Indicators on the Front of your LCD projection TV, it may take a while before cleaning. Enjoying Your LCD Projection TV Introducing the Sony LCD Projection TV Introducing the Sony LCD Projection TV Indicators Projection lamp Screen Indicators...
Operating Instructions
Page 13
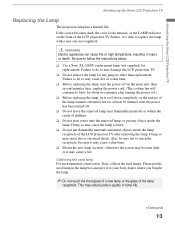
... extremely hot for any object inside the lamp receptacle of the lamp receptacle. Please put the used lamps. Be sure to do so may become dark, or it to burst. ❑ Do not put any purpose other than replacement. Introducing the Sony LCD Projection TV Introducing the Sony LCD Projection TV Replacing the Lamp The projection lamp has a limited life. Also, be sure not...
... extremely hot for any object inside the lamp receptacle of the lamp receptacle. Please put the used lamps. Be sure to do so may become dark, or it to burst. ❑ Do not put any purpose other than replacement. Introducing the Sony LCD Projection TV Introducing the Sony LCD Projection TV Replacing the Lamp The projection lamp has a limited life. Also, be sure not...
Operating Instructions
Page 14
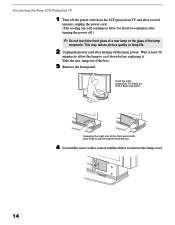
Introducing the Sony LCD Projection TV 1 Turn off the power switch on the LCD projection TV and after several minutes, unplug the power cord. (The cooling fan will continue to blow for about two minutes after turning off .) ✍ Do not touch the front glass of a new lamp or the glass of the box. 3 ...reduce picture quality or lamp life. 2 Unplug the power cord after turning the power off the main power. Grasping the right end of the front panel with your fingers, pull the panel towards you. 4 Loosen the screw with a coin or similar object to cool down before replacing it does not ...
Introducing the Sony LCD Projection TV 1 Turn off the power switch on the LCD projection TV and after several minutes, unplug the power cord. (The cooling fan will continue to blow for about two minutes after turning off .) ✍ Do not touch the front glass of a new lamp or the glass of the box. 3 ...reduce picture quality or lamp life. 2 Unplug the power cord after turning the power off the main power. Grasping the right end of the front panel with your fingers, pull the panel towards you. 4 Loosen the screw with a coin or similar object to cool down before replacing it does not ...
Operating Instructions
Page 15
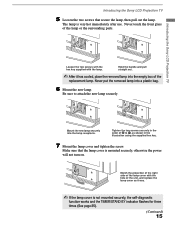
... 85). (Continued) 15 Never put the removed lamp into the lamp receptacle. Match the projection of the right side of the unit, and replace the lamp cover as shown in the order of 1 to attach the new lamp securely. Introducing the Sony LCD Projection TV Loosen the two screws with the hex key supplied... with the hole of the lamp cover with the lamp. Tighten the two screws securely in...
... 85). (Continued) 15 Never put the removed lamp into the lamp receptacle. Match the projection of the right side of the unit, and replace the lamp cover as shown in the order of 1 to attach the new lamp securely. Introducing the Sony LCD Projection TV Loosen the two screws with the hex key supplied... with the hole of the lamp cover with the lamp. Tighten the two screws securely in...
Operating Instructions
Page 16
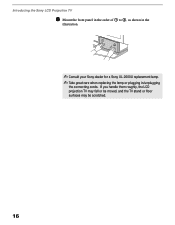
Introducing the Sony LCD Projection TV 8 Mount the front panel in the order of 1 to 2, as shown in the illustration. ✍ Consult your Sony dealer for a Sony XL-2000U replacement lamp. ✍ Take great care when replacing the lamp or plugging in/unplugging the connecting cords. If you handle them roughly, the LCD projection TV may fall or be moved, and the TV stand or floor surfaces may be scratched. 16
Introducing the Sony LCD Projection TV 8 Mount the front panel in the order of 1 to 2, as shown in the illustration. ✍ Consult your Sony dealer for a Sony XL-2000U replacement lamp. ✍ Take great care when replacing the lamp or plugging in/unplugging the connecting cords. If you handle them roughly, the LCD projection TV may fall or be moved, and the TV stand or floor surfaces may be scratched. 16
Operating Instructions
Page 85
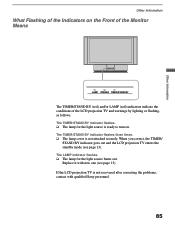
...problems, contact with new one (see page 13). If the LCD projection TV is ready to turn on the Front of the Monitor Means LAMP STEREO TIMER/STAND BY The TIMER/STAND BY (red) and/or LAMP (red) indicators indicate the conditions of the Indicators on . The TIMER...indicator flashes. ❑ The lamp for the light source burns out. The TIMER/STAND BY indicator flashes three times. ❑ The lamp cover is not attached securely. Replace it with qualified Sony personnel. 85 Other Information Other Information What Flashing of the LCD projection TV and warnings by lighting or ...
...problems, contact with new one (see page 13). If the LCD projection TV is ready to turn on the Front of the Monitor Means LAMP STEREO TIMER/STAND BY The TIMER/STAND BY (red) and/or LAMP (red) indicators indicate the conditions of the Indicators on . The TIMER...indicator flashes. ❑ The lamp for the light source burns out. The TIMER/STAND BY indicator flashes three times. ❑ The lamp cover is not attached securely. Replace it with qualified Sony personnel. 85 Other Information Other Information What Flashing of the LCD projection TV and warnings by lighting or ...
Operating Instructions
Page 89
... 58 I Image Revision 68 Inputs, labeling 68 Installation of the projection TV 25-41 J JUMP button 43 Jump, using 46 L Label channels 63 video inputs 68 Lamp, replacing 13-16 M MENU button 44 MENU button (inside panel) 45 Menus Audio 57, 60 Channel 57, 62 Setup 57, 67 Timer 57, 66 Video ... POWER button 45 POWER buttons (GREEN) 44 Presetting channels 42 Problems, troubleshooting 82-85 R Ratings setting 69-71 viewing blocked programs 71 Rear panel controls and connections 23, 24 Remote control buttons inside panel 45 Function of buttons 46 inserting batteries 17 programming 77-79 Remote control,...
... 58 I Image Revision 68 Inputs, labeling 68 Installation of the projection TV 25-41 J JUMP button 43 Jump, using 46 L Label channels 63 video inputs 68 Lamp, replacing 13-16 M MENU button 44 MENU button (inside panel) 45 Menus Audio 57, 60 Channel 57, 62 Setup 57, 67 Timer 57, 66 Video ... POWER button 45 POWER buttons (GREEN) 44 Presetting channels 42 Problems, troubleshooting 82-85 R Ratings setting 69-71 viewing blocked programs 71 Rear panel controls and connections 23, 24 Remote control buttons inside panel 45 Function of buttons 46 inserting batteries 17 programming 77-79 Remote control,...


