Operating Instructions (Large File - 14.9 MB)
Page 14
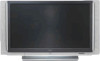
..., be sure to attach the lamp cover securely; Read the instructions "Cleaning the Screen Surface" on . 14 Introducing the Sony LCD Projection TV Enjoying Your LCD Projection TV Screen STD/DUO POWER/STANDBY LAMP TIMER POWER Projection lamp under the Control Panel Cover as its light source. Inappropriate cleaning methods could damage the screen's finish. For details...
..., be sure to attach the lamp cover securely; Read the instructions "Cleaning the Screen Surface" on . 14 Introducing the Sony LCD Projection TV Enjoying Your LCD Projection TV Screen STD/DUO POWER/STANDBY LAMP TIMER POWER Projection lamp under the Control Panel Cover as its light source. Inappropriate cleaning methods could damage the screen's finish. For details...
Operating Instructions (Large File - 14.9 MB)
Page 17
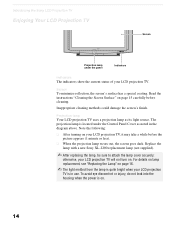
STD/DUO POWER/STANDBY LAMP TIMER POWER ✍ Hold beneath both sides of the cover, and pull forward to cool down before replacing it. Introducing the Sony LCD Projection TV Introducing the Sony LCD Projection TV 1 Turn off .) 2 Wait at least 30 minutes after unplugging the power cord to allow the lamp to release it , slide the knob...
STD/DUO POWER/STANDBY LAMP TIMER POWER ✍ Hold beneath both sides of the cover, and pull forward to cool down before replacing it. Introducing the Sony LCD Projection TV Introducing the Sony LCD Projection TV 1 Turn off .) 2 Wait at least 30 minutes after unplugging the power cord to allow the lamp to release it , slide the knob...
Operating Instructions (Large File - 14.9 MB)
Page 18
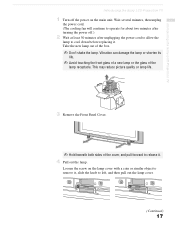
Place back the new lamp and tighten the screw. Introducing the Sony LCD Projection TV Loosen the screw that holds the lamp, then pull out the lamp. ✍ The lamp is hot. 5 Reattach the lamp. Replace the lamp cover, ...; After it correctly and then tighten the screw completely. ✍ If the lamp cover is inserted incorrectly, the lamp may be triggered and the POWER/STANDBY indicator flashes three times (see page 122). 18 Never touch the front glass of the replacement lamp. Never put the used lamp into a plastic bag...
Place back the new lamp and tighten the screw. Introducing the Sony LCD Projection TV Loosen the screw that holds the lamp, then pull out the lamp. ✍ The lamp is hot. 5 Reattach the lamp. Replace the lamp cover, ...; After it correctly and then tighten the screw completely. ✍ If the lamp cover is inserted incorrectly, the lamp may be triggered and the POWER/STANDBY indicator flashes three times (see page 122). 18 Never touch the front glass of the replacement lamp. Never put the used lamp into a plastic bag...
Operating Instructions (Large File - 14.9 MB)
Page 19
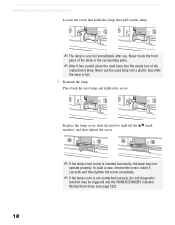
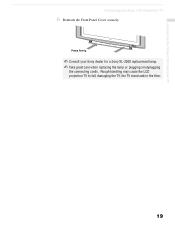
Press firmly. Rough handling may cause the LCD projection TV to fall, damaging the TV, the TV stand and/or the floor. 19 STD/DUO POWER/STANDBY LAMP TIMER POWER ✍ Consult your Sony dealer for a Sony XL-2200 replacement lamp. ✍ Take great care when replacing the lamp or plugging in/unplugging the connecting cords. Introducing the Sony LCD Projection TV Introducing the Sony LCD Projection TV 6 Reattach the Front Panel Cover securely.
Press firmly. Rough handling may cause the LCD projection TV to fall, damaging the TV, the TV stand and/or the floor. 19 STD/DUO POWER/STANDBY LAMP TIMER POWER ✍ Consult your Sony dealer for a Sony XL-2200 replacement lamp. ✍ Take great care when replacing the lamp or plugging in/unplugging the connecting cords. Introducing the Sony LCD Projection TV Introducing the Sony LCD Projection TV 6 Reattach the Front Panel Cover securely.
Operating Instructions (Large File - 14.9 MB)
Page 22
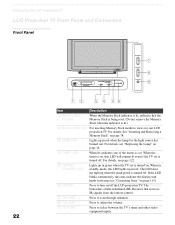
... a built-in red when the lamp for the light source has burned out. Setting Up the LCD Projection TV LCD Projection TV Front Panel and Connectors Front Panel 22 STD/DUO POWER/STANDBY LAMP TIMER POWER STD/DUO POWER/STANDBY LAMP TIMER POWER CHANNEL 3 VOLUME 3 # TV/VIDEO 7 8 9 12 3 4 56 Item Description ... . Press to adjust the volume. 9 TV/VIDEO Press to scan through channels. 8 VOLUME +/- For details, see "Contacting Sony" on page 115). 6 POWER Press to view on page 16. 4 TIMER LED When lit, indicates one of the timers is set is turned on /off the LCD projection TV.
... a built-in red when the lamp for the light source has burned out. Setting Up the LCD Projection TV LCD Projection TV Front Panel and Connectors Front Panel 22 STD/DUO POWER/STANDBY LAMP TIMER POWER STD/DUO POWER/STANDBY LAMP TIMER POWER CHANNEL 3 VOLUME 3 # TV/VIDEO 7 8 9 12 3 4 56 Item Description ... . Press to adjust the volume. 9 TV/VIDEO Press to scan through channels. 8 VOLUME +/- For details, see "Contacting Sony" on page 115). 6 POWER Press to view on page 16. 4 TIMER LED When lit, indicates one of the timers is set is turned on /off the LCD projection TV.
Operating Instructions (Large File - 14.9 MB)
Page 23
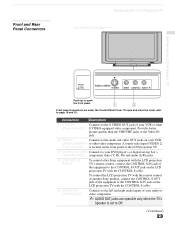
... other S VIDEO-equipped video component. To control the LCD projection TV with the remote control of another Sony product, connect the CONTROL S OUT jack of the equipment to the CONTROL S IN jack on the LCD projection TV with the LCD projection TV's remote control, connect the CONTROL S IN jack... to the S VIDEO OUT jack of your VCR or other Sony equipment with the CONTROL S cable. 5 AUDIO OUT (VAR/FIX) L/R Connects to the left and right audio inputs of LCD projection TV Setting Up the LCD Projection TV STD/DUO POWER/STANDBY LAMP TIMER POWER OPEN VIDEO 2 INPUT S VIDEO VIDEO L(MONO...
... other S VIDEO-equipped video component. To control the LCD projection TV with the remote control of another Sony product, connect the CONTROL S OUT jack of the equipment to the CONTROL S IN jack on the LCD projection TV with the LCD projection TV's remote control, connect the CONTROL S IN jack... to the S VIDEO OUT jack of your VCR or other Sony equipment with the CONTROL S cable. 5 AUDIO OUT (VAR/FIX) L/R Connects to the left and right audio inputs of LCD projection TV Setting Up the LCD Projection TV STD/DUO POWER/STANDBY LAMP TIMER POWER OPEN VIDEO 2 INPUT S VIDEO VIDEO L(MONO...
Operating Instructions (Large File - 14.9 MB)
Page 121
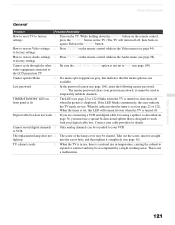
... restore Video settings ❏ Press RESET on the TV. (The TV will remain lit even when the TV is displayed. video equipment connected to the LCD projection TV Cannot operate Menu ❏ If a menu option appears in the Video menu (see page 16). it completely (see page 94). Contact your VCR. Take...record digital channels ❏ Only analog channels can be slanted. This is designed to work ❏ If you must use , there is not available. TIMER/STANDBY LED on front panel is lit ❏ The LED (see page 109). When the timer is set to Skip (see page 22 or 122) blinks...
... restore Video settings ❏ Press RESET on the TV. (The TV will remain lit even when the TV is displayed. video equipment connected to the LCD projection TV Cannot operate Menu ❏ If a menu option appears in the Video menu (see page 16). it completely (see page 94). Contact your VCR. Take...record digital channels ❏ Only analog channels can be slanted. This is designed to work ❏ If you must use , there is not available. TIMER/STANDBY LED on front panel is lit ❏ The LED (see page 109). When the timer is set to Skip (see page 22 or 122) blinks...
Operating Instructions (Large File - 14.9 MB)
Page 122
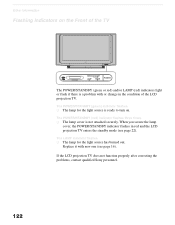
... (red) indicators light or flash if there is a problem with new one (see page 22). If the LCD projection TV does not function properly after correcting the problems, contact qualified Sony personnel. 122 The POWER/STANDBY (red) indicator flashes three times. ❑ The lamp cover is ready to turn on the Front of the...
... (red) indicators light or flash if there is a problem with new one (see page 22). If the LCD projection TV does not function properly after correcting the problems, contact qualified Sony personnel. 122 The POWER/STANDBY (red) indicator flashes three times. ❑ The lamp cover is ready to turn on the Front of the...
Operating Instructions (Large File - 14.9 MB)
Page 124
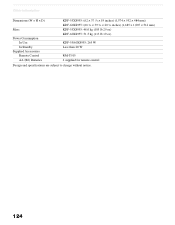
Other Information Dimensions (W × H × D) Mass Power Consumption In Use In Standby Supplied Accessories Remote Control AA (R6) Batteries KDF-55XS955: (62 × 37 1/2 × 19 inches) (1,574 × 952 × 484 mm) KDF-60XS955: (66 3/8 × 39 5/8 × 20 1/4 inches) (1,685 × 1,007 × 514 mm) KDF-55XS955: 48.0 kg (105 lb 29 oz) KDF-60XS955: 51.5 kg (113 lb 19 oz) KDF-55/60XS955: 265 W Less than 20 W RM-Y915 2 supplied for remote control Design and specifications are subject to change without notice. 124
Other Information Dimensions (W × H × D) Mass Power Consumption In Use In Standby Supplied Accessories Remote Control AA (R6) Batteries KDF-55XS955: (62 × 37 1/2 × 19 inches) (1,574 × 952 × 484 mm) KDF-60XS955: (66 3/8 × 39 5/8 × 20 1/4 inches) (1,685 × 1,007 × 514 mm) KDF-55XS955: 48.0 kg (105 lb 29 oz) KDF-60XS955: 51.5 kg (113 lb 19 oz) KDF-55/60XS955: 265 W Less than 20 W RM-Y915 2 supplied for remote control Design and specifications are subject to change without notice. 124
Operating Instructions (Large File - 14.9 MB)
Page 128
... Password, changing 105 PICTURE button 56 Picture contrast, adjusting 94 Picture size, adjusting in Twin View 70 128 Power Saving 95 POWER/STANDBY indicator 22, 122 problems, troubleshooting 115- 121 Program Guide 64 Program Options menu 65 progressive 114 R Ratings setting 106 viewing blocked ...programs 105 Rear panel controls and connections 23 Remote control inserting batteries 55 programming 58-59 Removing channels from the channel list 103 RESET button 56 Resetting Audio options 98 Video options 94 S Satellite receiver...
... Password, changing 105 PICTURE button 56 Picture contrast, adjusting 94 Picture size, adjusting in Twin View 70 128 Power Saving 95 POWER/STANDBY indicator 22, 122 problems, troubleshooting 115- 121 Program Guide 64 Program Options menu 65 progressive 114 R Ratings setting 106 viewing blocked ...programs 105 Rear panel controls and connections 23 Remote control inserting batteries 55 programming 58-59 Removing channels from the channel list 103 RESET button 56 Resetting Audio options 98 Video options 94 S Satellite receiver...


