
Operating Instructions
Page 1
Record the serial number in the space provided below. Serial No. DCR-IP5/IP7BT ©2001 Sony Corporation Owner's Record The model and serial numbers are located on the bottom. Model No. Model No. 3-069-933-12 (1) Digital Video Camera Recorder Operating Instructions Before operating the unit, please read this product. AC- Refer to these numbers whenever you call upon your Sony dealer regarding this manual thoroughly, and retain it for future reference. Serial No.
Record the serial number in the space provided below. Serial No. DCR-IP5/IP7BT ©2001 Sony Corporation Owner's Record The model and serial numbers are located on the bottom. Model No. Model No. 3-069-933-12 (1) Digital Video Camera Recorder Operating Instructions Before operating the unit, please read this product. AC- Refer to these numbers whenever you call upon your Sony dealer regarding this manual thoroughly, and retain it for future reference. Serial No.
Operating Instructions
Page 2
.... Note: In some areas the disposal of lithium ion batteries in the U.S.A. For the Sony Factory Service Center nearest you call 416-499-SONY (Canada only). DCR-IP7BT only Countries and areas where you can return your Handycam, you can capture life's precious moments... damaged or leaking lithium ion battery. Congratulations on your nearest Sony Service Center or Factory Service Center. "Memory Stick" (DCR-IP7BT only) This device complies with superior picture and sound quality. This Class B digital apparatus complies with advanced features, but at the same time...
.... Note: In some areas the disposal of lithium ion batteries in the U.S.A. For the Sony Factory Service Center nearest you call 416-499-SONY (Canada only). DCR-IP7BT only Countries and areas where you can return your Handycam, you can capture life's precious moments... damaged or leaking lithium ion battery. Congratulations on your nearest Sony Service Center or Factory Service Center. "Memory Stick" (DCR-IP7BT only) This device complies with superior picture and sound quality. This Class B digital apparatus complies with advanced features, but at the same time...

Operating Instructions
Page 3
Telephone No.: 201-930-6972 This device complies with the limits for a Class B digital device, pursuant to comply with Part 15 of the FCC Rules. Note: This equipment has been tested and found to Part 15 of the FCC ... the equipment into an outlet on , the user is subject to correct the interference by one or more of Conformity Trade Name: SONY Model No.: DCR-IP5, DCR-IP7 Responsible Party:Sony Electronics Inc. For the Customers in accordance with the instructions, may cause undesired operation. If you have any interference received, including interference...
Telephone No.: 201-930-6972 This device complies with the limits for a Class B digital device, pursuant to comply with Part 15 of the FCC Rules. Note: This equipment has been tested and found to Part 15 of the FCC ... the equipment into an outlet on , the user is subject to correct the interference by one or more of Conformity Trade Name: SONY Model No.: DCR-IP5, DCR-IP7 Responsible Party:Sony Electronics Inc. For the Customers in accordance with the instructions, may cause undesired operation. If you have any interference received, including interference...
Operating Instructions
Page 4
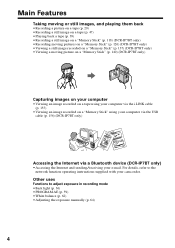
... (p. 155) •Viewing an image recorded on a "Memory Stick" using your computer via the USB cable (p. 156) (DCR-IP7BT only) Accessing the Internet via a Bluetooth device (DCR-IP7BT only) •Accessing the Internet and sending/receiving your camcorder. For details, refer to adjust exposure in recording mode •Back light (p. 36) •PROGRAM AE (p. 59...
... (p. 155) •Viewing an image recorded on a "Memory Stick" using your computer via the USB cable (p. 156) (DCR-IP7BT only) Accessing the Internet via a Bluetooth device (DCR-IP7BT only) •Accessing the Internet and sending/receiving your camcorder. For details, refer to adjust exposure in recording mode •Back light (p. 36) •PROGRAM AE (p. 59...

Operating Instructions
Page 5
... than 10×, set up the D ZOOM item in the menu settings.) •Fader (p. 51) •Picture effect (p. 54) •Digital effect (p. 56) •Title (p. 89, 95) •MEMORY MIX (p. 132) (DCR-IP7BT only) Functions to give a natural appearance to your recordings •Manual focus (p. 65) •Landscape mode (p. 59) Functions used after...
... than 10×, set up the D ZOOM item in the menu settings.) •Fader (p. 51) •Picture effect (p. 54) •Digital effect (p. 56) •Title (p. 89, 95) •MEMORY MIX (p. 132) (DCR-IP7BT only) Functions to give a natural appearance to your recordings •Manual focus (p. 65) •Landscape mode (p. 59) Functions used after...
Operating Instructions
Page 6
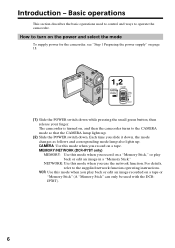
... follows and corresponding mode lamp also lights up . (2) Slide the POWER switch down while pressing the small green button, then release your finger. MEMORY/NETWORK (DCR-IP7BT only) MEMORY: Use this mode when you record on a "Memory Stick," or play back or edit an image recorded on a tape or "Memory Stick" ...(A "Memory Stick" can only be used to control and ways to turn on the power and select the mode To supply power for the camcorder, see "Step 1 Preparing the power supply" on page 18. 1,2 CAMERA MEMORY/ NETWORK VCR POWER (CHG) OFF ON MODE (1) Slide the POWER switch down ....
... follows and corresponding mode lamp also lights up . (2) Slide the POWER switch down while pressing the small green button, then release your finger. MEMORY/NETWORK (DCR-IP7BT only) MEMORY: Use this mode when you record on a "Memory Stick," or play back or edit an image recorded on a tape or "Memory Stick" ...(A "Memory Stick" can only be used to control and ways to turn on the power and select the mode To supply power for the camcorder, see "Step 1 Preparing the power supply" on page 18. 1,2 CAMERA MEMORY/ NETWORK VCR POWER (CHG) OFF ON MODE (1) Slide the POWER switch down ....

Operating Instructions
Page 9
... PAGE2 PAGE3 MENU, VOL, TITLE, MULTI SRCH, x/ PB*, m , BX *, M * LCD BRT, DIG EFFT, END SCH, x/ PB*, m *, BX *, M * DATA CODE, COUNT RESET, qREC CTRL, x/ PB*, m *, BX *, M * * (DCR-IP7BT only) See page 112 for the MEMORY/NETWORK mode...
... PAGE2 PAGE3 MENU, VOL, TITLE, MULTI SRCH, x/ PB*, m , BX *, M * LCD BRT, DIG EFFT, END SCH, x/ PB*, m *, BX *, M * DATA CODE, COUNT RESET, qREC CTRL, x/ PB*, m *, BX *, M * * (DCR-IP7BT only) See page 112 for the MEMORY/NETWORK mode...
Operating Instructions
Page 10
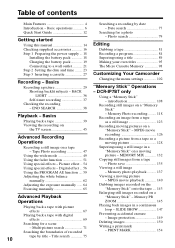
...the tape .... 143 Enlarging still images recorded on a "Memory Stick" - PRINT MARK 154 DCR-IP7BT only Using a "Memory Stick" - Table of recorded tape by date - END SEARCH 38 ...84 Superimposing a title 89 Making your own titles 95 The Micro Cassette Memory 98 Customizing Your Camcorder Changing the menu settings 102 "Memory Stick" Operations - MEMORY MIX 132 Copying still images ...23 Step 3 Inserting a cassette 27 Recording - Picture effect .. 54 Using special effects - Digital effect ... 56 Using the PROGRAM AE function .... 59 Adjusting the white balance manually 62 ...
...the tape .... 143 Enlarging still images recorded on a "Memory Stick" - PRINT MARK 154 DCR-IP7BT only Using a "Memory Stick" - Table of recorded tape by date - END SEARCH 38 ...84 Superimposing a title 89 Making your own titles 95 The Micro Cassette Memory 98 Customizing Your Camcorder Changing the menu settings 102 "Memory Stick" Operations - MEMORY MIX 132 Copying still images ...23 Step 3 Inserting a cassette 27 Recording - Picture effect .. 54 Using special effects - Digital effect ... 56 Using the PROGRAM AE function .... 59 Adjusting the white balance manually 62 ...
Operating Instructions
Page 11
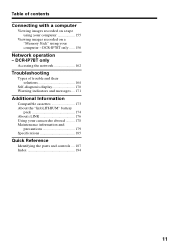
....... 171 Additional Information Compatible cassettes 173 About the "InfoLITHIUM" battery pack 174 About i.LINK 176 Using your computer - DCR-IP7BT only Accessing the network 162 Troubleshooting Types of contents Connecting with a computer Viewing images recorded on a tape using your ...computer 155 Viewing images recorded on a "Memory Stick" using your camcorder abroad .......... 178 Maintenance information and precautions 179 Specifications 185 Quick Reference Identifying the parts and controls .... 187 Index 194 11 DCR-IP7BT only ...... 156 Network operation -
....... 171 Additional Information Compatible cassettes 173 About the "InfoLITHIUM" battery pack 174 About i.LINK 176 Using your computer - DCR-IP7BT only Accessing the network 162 Troubleshooting Types of contents Connecting with a computer Viewing images recorded on a tape using your ...computer 155 Viewing images recorded on a "Memory Stick" using your camcorder abroad .......... 178 Maintenance information and precautions 179 Specifications 185 Quick Reference Identifying the parts and controls .... 187 Index 194 11 DCR-IP7BT only ...... 156 Network operation -
Operating Instructions
Page 14
... the POWER switch is the model used for details. Note on your camcorder. •Records and plays back for DVD (digital video disc). - As you can only use MICROMV cassettes with your camcorder are clearly indicated in the table below. To view your camcorder (The DCR-IP7BT is the same as a data compression method. Getting started - The...
... the POWER switch is the model used for details. Note on your camcorder. •Records and plays back for DVD (digital video disc). - As you can only use MICROMV cassettes with your camcorder are clearly indicated in the table below. To view your camcorder (The DCR-IP7BT is the same as a data compression method. Getting started - The...
Operating Instructions
Page 17
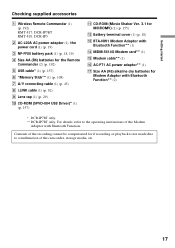
...of the Modem Adaptor with Bluetooth Function** (2) * DCR-IP7BT only. ** DCR-IP7BT only. Getting started Checking supplied accessories 1 Wireless Remote Commander (1) (p. 192) RMT-817: DCR-IP7BT RMT-818: DCR-IP5 2 AC-L20A AC power adaptor (1), the ...cap (1) (p. 29) 0 CD-ROM (SPVD-004 USB Driver)* (1) (p. 157) qa CD-ROM (Movie Shaker Ver. 3.1 for MICROMV) (1) (p. 155) qs Battery terminal cover (1) (p. 18) qd BTA-NW1 Modem Adaptor with Bluetooth Function** (1) qf MDM-5614G Modem...of the camcorder, storage media, etc. 17 Contents of the recording cannot be compensated for...
...of the Modem Adaptor with Bluetooth Function** (2) * DCR-IP7BT only. ** DCR-IP7BT only. Getting started Checking supplied accessories 1 Wireless Remote Commander (1) (p. 192) RMT-817: DCR-IP7BT RMT-818: DCR-IP5 2 AC-L20A AC power adaptor (1), the ...cap (1) (p. 29) 0 CD-ROM (SPVD-004 USB Driver)* (1) (p. 157) qa CD-ROM (Movie Shaker Ver. 3.1 for MICROMV) (1) (p. 155) qs Battery terminal cover (1) (p. 18) qd BTA-NW1 Modem Adaptor with Bluetooth Function** (1) qf MDM-5614G Modem...of the camcorder, storage media, etc. 17 Contents of the recording cannot be compensated for...
Operating Instructions
Page 23
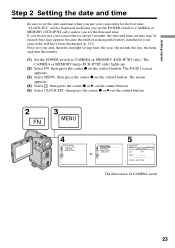
The CAMERA or MEMORY lamp (DCR-IP7BT only) lights up. (2) Select FN, then press the center z on the control button. 2 FN 3 MENU 4 SETUP MENU CLOCK SET LTR SIZE DEMO MODE SETUP MENU CLOCK SET --:--:-- First, set the date and time. If you use your camcorder for the first time. The menu appears. (4) Select ... illustration: In CAMERA mode 23 "CLOCK SET" will be erased (bars may be displayed each time you set the POWER switch to CAMERA or MEMORY (DCR-IP7BT only) unless you set your area, then the daylight saving time, the year, the month, the day, the hour and then the minute. (1)...
The CAMERA or MEMORY lamp (DCR-IP7BT only) lights up. (2) Select FN, then press the center z on the control button. 2 FN 3 MENU 4 SETUP MENU CLOCK SET LTR SIZE DEMO MODE SETUP MENU CLOCK SET --:--:-- First, set the date and time. If you use your camcorder for the first time. The menu appears. (4) Select ... illustration: In CAMERA mode 23 "CLOCK SET" will be erased (bars may be displayed each time you set the POWER switch to CAMERA or MEMORY (DCR-IP7BT only) unless you set your area, then the daylight saving time, the year, the month, the day, the hour and then the minute. (1)...
Operating Instructions
Page 25
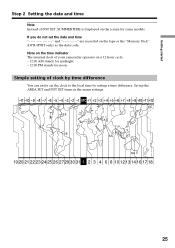
... to the local time by time difference You can easily set the date and time and are recorded on the tape or the "Memory Stick" (DCR-IP7BT only) as the data code. Note on the time indicator The internal clock of DST SET, SUMMERTIME is displayed on the screen for noon. Getting... started Step 2 Setting the date and time Note Instead of your camcorder operates on a 12-hour cycle. - 12:00 AM stands for midnight. - 12:00 PM stands for some models.
... to the local time by time difference You can easily set the date and time and are recorded on the tape or the "Memory Stick" (DCR-IP7BT only) as the data code. Note on the time indicator The internal clock of DST SET, SUMMERTIME is displayed on the screen for noon. Getting... started Step 2 Setting the date and time Note Instead of your camcorder operates on a 12-hour cycle. - 12:00 AM stands for midnight. - 12:00 PM stands for some models.

Operating Instructions
Page 27
... lid until it . To prevent accidental erasure Slide the write-protect tab on the cassette to disconnect the A/V connecting cable, i.LINK cable, and USB cable (DCR-IP7BT only). Getting started Step 3 Inserting a cassette (1) Install the battery pack, or connect the AC power adaptor for the power supply (p. 18 to 22). (2) Slide OPEN...
... lid until it . To prevent accidental erasure Slide the write-protect tab on the cassette to disconnect the A/V connecting cable, i.LINK cable, and USB cable (DCR-IP7BT only). Getting started Step 3 Inserting a cassette (1) Install the battery pack, or connect the AC power adaptor for the power supply (p. 18 to 22). (2) Slide OPEN...

Operating Instructions
Page 31
... the control button when FN is displayed on the LCD screen while you use the LCD screen (except in the viewfinder. In CAMERA or MEMORY (DCR-IP7BT only) mode. However, the picture will be normal when recorded. The subject uses this feature to view himself-or herself on the LCD screen. The...
... the control button when FN is displayed on the LCD screen while you use the LCD screen (except in the viewfinder. In CAMERA or MEMORY (DCR-IP7BT only) mode. However, the picture will be normal when recorded. The subject uses this feature to view himself-or herself on the LCD screen. The...

Operating Instructions
Page 32
... screen used for adjusting the brightness of the LCD screen When recording in bright conditions, set the LCD BACKLIGHT switch to OFF. (1) In CAMERA, MEMORY (DCR-IP7BT only), playback, or playback pause mode, select FN, then press the center z on the screen Press DISPLAY or z so that FN is not displayed on...
... screen used for adjusting the brightness of the LCD screen When recording in bright conditions, set the LCD BACKLIGHT switch to OFF. (1) In CAMERA, MEMORY (DCR-IP7BT only), playback, or playback pause mode, select FN, then press the center z on the screen Press DISPLAY or z so that FN is not displayed on...

Operating Instructions
Page 35
JUL 4 2002 12 : 05 : 56 PM FN FN button Select this button to MEMORY (DCR-IP7BT only) You cannot use the digital zoom. Time indicator The time is displayed about 5 seconds after the power is displayed about 5 seconds after you are not recorded on the ...battery time indicator The remaining battery time indicator roughly indicates the recording time. Remaining tape indicator The indicator may not be correct, depending on digital zoom •Digital zoom allows you to set to display the operation buttons on the tape. When you push ZOOM down toward the "T" side. Basics ...
JUL 4 2002 12 : 05 : 56 PM FN FN button Select this button to MEMORY (DCR-IP7BT only) You cannot use the digital zoom. Time indicator The time is displayed about 5 seconds after the power is displayed about 5 seconds after you are not recorded on the ...battery time indicator The remaining battery time indicator roughly indicates the recording time. Remaining tape indicator The indicator may not be correct, depending on digital zoom •Digital zoom allows you to set to display the operation buttons on the tape. When you push ZOOM down toward the "T" side. Basics ...

Operating Instructions
Page 36
Shooting backlit subjects - Press BACK LIGHT in CAMERA or MEMORY (DCR-IP7BT only) mode. To cancel, press BACK LIGHT again. You can also use the backlight function. However, they are not displayed during playback. The . indicator appears ...
Shooting backlit subjects - Press BACK LIGHT in CAMERA or MEMORY (DCR-IP7BT only) mode. To cancel, press BACK LIGHT again. You can also use the backlight function. However, they are not displayed during playback. The . indicator appears ...

Operating Instructions
Page 37
... EXPO- Note The self-timer recording mode is finished. - The self-timer recording is automatically canceled when: - When the POWER switch is set to MEMORY (DCR-IP7BT only) You can also use the Remote Commander for this operation. (1) In standby mode, select FN, then press the center z on a tape using the self...
... EXPO- Note The self-timer recording mode is finished. - The self-timer recording is automatically canceled when: - When the POWER switch is set to MEMORY (DCR-IP7BT only) You can also use the Remote Commander for this operation. (1) In standby mode, select FN, then press the center z on a tape using the self...
Operating Instructions
Page 47
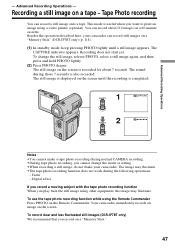
... You can record about 7 seconds. Besides the operation described here, your camcorder. To change the mode or setting. •When recording a still image, do not shake your camcorder can record still images on a "Memory Stick" (DCR-IP7BT only) (p. 118). (1) In standby mode, keep pressing PHOTO lightly until...image on the screen. You can record a still image onto a tape. Recording does not start yet. This mode is also recorded. Digital effect If you record a moving subject with the tape photo recording function When you want to print an image using other equipment, the...
... You can record about 7 seconds. Besides the operation described here, your camcorder. To change the mode or setting. •When recording a still image, do not shake your camcorder can record still images on a "Memory Stick" (DCR-IP7BT only) (p. 118). (1) In standby mode, keep pressing PHOTO lightly until...image on the screen. You can record a still image onto a tape. Recording does not start yet. This mode is also recorded. Digital effect If you record a moving subject with the tape photo recording function When you want to print an image using other equipment, the...

