Operating Guide
Page 4
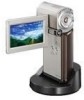
...and serial numbers are recyclable. Operation is to provide reasonable protection against harmful interference in accordance with Part 15 of Conformity Trade Name: SONY Model No.: HDR-TG1 Responsible Party: Sony Electronics Inc. If you have any changes or modifications not expressly approved in the U.S.A. For customers in the space provided below is ... your authority to the collection and recycling location nearest you may result. Note This equipment has been tested and found to comply with the Handycam Station Model DCRA-C230 and AC Adaptor Model AC-L200/L200B.
...and serial numbers are recyclable. Operation is to provide reasonable protection against harmful interference in accordance with Part 15 of Conformity Trade Name: SONY Model No.: HDR-TG1 Responsible Party: Sony Electronics Inc. If you have any changes or modifications not expressly approved in the U.S.A. For customers in the space provided below is ... your authority to the collection and recycling location nearest you may result. Note This equipment has been tested and found to comply with the Handycam Station Model DCRA-C230 and AC Adaptor Model AC-L200/L200B.

Operating Guide
Page 5
... interface cable must be determined by one or more of California, USA only Perchlorate Material - For the State of the following measures: - Handycam Handbook (PDF) • "Operating Guide" (This manual) (1) US A B C D E F G * The Dedicated USB Terminal Adaptor... USB adaptor cap G are the supplied quantity. • "Memory Stick PRO Duo" 4 GB (1) • AC Adaptor (1) • Power cord (Mains lead) (1) • Handycam Station (1) A • Component A/V cable (1) B • A/V connecting cable (1) C • USB cable (long) (1) D • USB cable (short) (1) E ...
... interface cable must be determined by one or more of California, USA only Perchlorate Material - For the State of the following measures: - Handycam Handbook (PDF) • "Operating Guide" (This manual) (1) US A B C D E F G * The Dedicated USB Terminal Adaptor... USB adaptor cap G are the supplied quantity. • "Memory Stick PRO Duo" 4 GB (1) • AC Adaptor (1) • Power cord (Mains lead) (1) • Handycam Station (1) A • Component A/V cable (1) B • A/V connecting cable (1) C • USB cable (long) (1) D • USB cable (short) (1) E ...
Operating Guide
Page 7
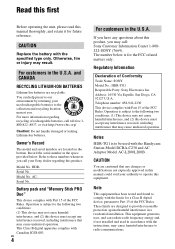
... each part...18 Indicators displayed during recording/playback 20 Performing various functions - If you do so, your camcorder if necessary (p. 12). Table of Contents When the camcorder is connected to a computer • Do not try to "Handycam Handbook" (PDF) and "PMB Guide." The scenes may not operate correctly. " HOME" and " OPTION" 22 Saving...
... each part...18 Indicators displayed during recording/playback 20 Performing various functions - If you do so, your camcorder if necessary (p. 12). Table of Contents When the camcorder is connected to a computer • Do not try to "Handycam Handbook" (PDF) and "PMB Guide." The scenes may not operate correctly. " HOME" and " OPTION" 22 Saving...

Operating Guide
Page 8
...Notes • You cannot attach any "InfoLITHIUM" battery pack other than NP-FH50 to your camcorder. Be sure that the v mark on the DC plug is facing up and charging starts. US 8 Remove the camcorder from the Handycam Station. The /CHG (charge) lamp turns off when the battery pack is fully charged.... The /CHG (charge) lamp lights up . 2 Connect the power cord (mains lead) to your camcorder. 1 Connect the AC Adaptor to the DC IN jack on the Handycam Station as shown above, and insert it clicks. 3 Close the battery/Memory Stick Duo cover. 5 Place the...
...Notes • You cannot attach any "InfoLITHIUM" battery pack other than NP-FH50 to your camcorder. Be sure that the v mark on the DC plug is facing up and charging starts. US 8 Remove the camcorder from the Handycam Station. The /CHG (charge) lamp turns off when the battery pack is fully charged.... The /CHG (charge) lamp lights up . 2 Connect the power cord (mains lead) to your camcorder. 1 Connect the AC Adaptor to the DC IN jack on the Handycam Station as shown above, and insert it clicks. 3 Close the battery/Memory Stick Duo cover. 5 Place the...

Operating Guide
Page 10
...as between a wall and furniture. • Do not short-circuit the DC plug of the AC Adaptor or battery terminal with your camcorder. AC-L200/L200B [a] [b] US See "Handycam Handbook" (PDF) for details. 10 Use a commercially available AC plug adaptor [a], if necessary, depending on the conditions under which ...battery pack • When you remove the battery pack, turn off your camcorder, and turn off , AC power source (mains) is still supplied to it while connected to the DC IN jack of your camcorder or the Handycam Station, even when the power cord (mains lead) is disconnected from ...
...as between a wall and furniture. • Do not short-circuit the DC plug of the AC Adaptor or battery terminal with your camcorder. AC-L200/L200B [a] [b] US See "Handycam Handbook" (PDF) for details. 10 Use a commercially available AC plug adaptor [a], if necessary, depending on the conditions under which ...battery pack • When you remove the battery pack, turn off your camcorder, and turn off , AC power source (mains) is still supplied to it while connected to the DC IN jack of your camcorder or the Handycam Station, even when the power cord (mains lead) is disconnected from ...
Operating Guide
Page 14
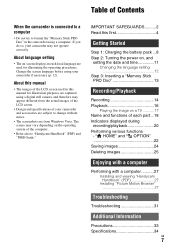
To stop recording, press START/STOP A again. • See "Handycam Handbook" (PDF) to adjust the focus A (a beep sounds), then press it fully B (a shutter click sounds). When disappears, the image has been recorded. b Notes • If ...
To stop recording, press START/STOP A again. • See "Handycam Handbook" (PDF) to adjust the focus A (a beep sounds), then press it fully B (a shutter click sounds). When disappears, the image has been recorded. b Notes • If ...

Operating Guide
Page 15
US 15 See "Handycam Handbook" (PDF) for data management. • Check the number of recordable still images on the LCD screen of your camcorder (p. 20). • You can capture still images from recorded movies. Recording/Playback z Tips • You can check the free "Memory Stick ...pressing PHOTO B during movie recording. • When a movie file exceeds 2 GB, the next movie file is created automatically. • The maximum recordable time of Sony "Memory Stick PRO Duo" is as follows with recording mode [HD SP] (the default setting); 1 GB: approx. 15 minutes 2 GB: approx. 30 minutes ...
US 15 See "Handycam Handbook" (PDF) for data management. • Check the number of recordable still images on the LCD screen of your camcorder (p. 20). • You can capture still images from recorded movies. Recording/Playback z Tips • You can check the free "Memory Stick ...pressing PHOTO B during movie recording. • When a movie file exceeds 2 GB, the next movie file is created automatically. • The maximum recordable time of Sony "Memory Stick PRO Duo" is as follows with recording mode [HD SP] (the default setting); 1 GB: approx. 15 minutes 2 GB: approx. 30 minutes ...
Operating Guide
Page 17
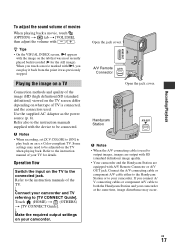
... supplied with the device to be connected. Refer to output images, images are output with SD (standard definition) image quality. • Your camcorder and the Handycam Station are equipped with i, you connect A/ V connecting cables or component A/V cable to your TV for the still image). Touch (HOME) ...recently played back/recorded (B for details. Connect the A/V connecting cable or component A/V cable either to the Handycam Station or to both the Handycam Station and your camcorder at the same time, image disturbance may need to be adjusted on the TV when playing back. r...
... supplied with the device to be connected. Refer to output images, images are output with SD (standard definition) image quality. • Your camcorder and the Handycam Station are equipped with i, you connect A/ V connecting cables or component A/V cable to your TV for the still image). Touch (HOME) ...recently played back/recorded (B for details. Connect the A/V connecting cable or component A/V cable either to the Handycam Station or to both the Handycam Station and your camcorder at the same time, image disturbance may need to be adjusted on the TV when playing back. r...

Operating Guide
Page 18
When you open the LCD panel while the QUICK ON lamp is flashing, you do not operate your camcorder for a faster zoom. The flashing stops and the power turns off automatically if you can magnify still images from about 1 second (QUICK ON). E RESET button ... EASY to initialize all the settings including the clock setting. Move it further for a certain period during sleep mode ([QUICK ON STBY], p. 23). US 18 Handycam Station Recording/Playback A Flash The flash will be displayed in the center of each part Buttons, jacks, etc., which are not explained in other chapters...
When you open the LCD panel while the QUICK ON lamp is flashing, you do not operate your camcorder for a faster zoom. The flashing stops and the power turns off automatically if you can magnify still images from about 1 second (QUICK ON). E RESET button ... EASY to initialize all the settings including the clock setting. Move it further for a certain period during sleep mode ([QUICK ON STBY], p. 23). US 18 Handycam Station Recording/Playback A Flash The flash will be displayed in the center of each part Buttons, jacks, etc., which are not explained in other chapters...

Operating Guide
Page 19
... the length of the screw must be less than 5.5 mm (7/32 in microphone Sound picked up by connecting the camcorder to 5.1ch surround sound and recorded. Q Interface connector (Handycam Station) Connect to the interface connector on . R (USB) jack Connect with the component A/V cable or A/V connecting... cable. You can check the remaining battery when you press DISP/BATT INFO while the power is writing/reading data on , your camcorder and the Handycam Station or the Dedicated USB Terminal Adaptor. P (DISC BURN) button Create a disc by the internal microphone is on the "Memory...
... the length of the screw must be less than 5.5 mm (7/32 in microphone Sound picked up by connecting the camcorder to 5.1ch surround sound and recorded. Q Interface connector (Handycam Station) Connect to the interface connector on . R (USB) jack Connect with the component A/V cable or A/V connecting... cable. You can check the remaining battery when you press DISP/BATT INFO while the power is writing/reading data on , your camcorder and the Handycam Station or the Dedicated USB Terminal Adaptor. P (DISC BURN) button Create a disc by the internal microphone is on the "Memory...

Operating Guide
Page 21
However, you actually see. Recording/Playback Indicators on the "Memory Stick PRO Duo." US 21 See "Handycam Handbook" (PDF) for details. • The recording date and time are recorded automatically on the LCD screens Following indicators appear during playback. ...They are approximate and differ from what you can check them as [DATA CODE] during recording/playback to indicate the settings of your camcorder. Upper left Center Upper right Bottom Upper left Indicator Center Indicator E Meaning AUDIO MODE Self-timer recording Flash, REDEYE REDUC MICREF LEVEL low ...
However, you actually see. Recording/Playback Indicators on the "Memory Stick PRO Duo." US 21 See "Handycam Handbook" (PDF) for details. • The recording date and time are recorded automatically on the LCD screens Following indicators appear during playback. ...They are approximate and differ from what you can check them as [DATA CODE] during recording/playback to indicate the settings of your camcorder. Upper left Center Upper right Bottom Upper left Indicator Center Indicator E Meaning AUDIO MODE Self-timer recording Flash, REDEYE REDUC MICREF LEVEL low ...

Operating Guide
Page 22
... in the current recording/playback situation. z Tips • If the item is not available under the current situation. For details of the menu items, see "Handycam Handbook" (PDF) (p. 27). (HOME) To see the explanation of (HELP) turns orange. (OPTION) Using the HOME MENU You can display the menu screen by touching...
... in the current recording/playback situation. z Tips • If the item is not available under the current situation. For details of the menu items, see "Handycam Handbook" (PDF) (p. 27). (HOME) To see the explanation of (HELP) turns orange. (OPTION) Using the HOME MENU You can display the menu screen by touching...

Operating Guide
Page 23
US 23 Recording/Playback • The (OPTION) MENU cannot be used during Easy Handycam operation. Items of the HOME MENU (CAMERA) category MOVIE* PHOTO* SMTH SLW REC (VIEW IMAGES) category VISUAL INDEX* INDEX* INDEX* PLAYLIST (OTHERS) category DELETE* [ DELETE], [ ... SET]/ [SUMMERTIME], [ LANGUAGE SET]* GENERAL SET [DEMO MODE], [CALIBRATION], [A.SHUT OFF], [QUICK ON STBY], [CTRL FOR HDMI] * You can set these items also during Easy Handycam operation. ** The menu name is changed to [SOUND SETTINGS] during Easy...
US 23 Recording/Playback • The (OPTION) MENU cannot be used during Easy Handycam operation. Items of the HOME MENU (CAMERA) category MOVIE* PHOTO* SMTH SLW REC (VIEW IMAGES) category VISUAL INDEX* INDEX* INDEX* PLAYLIST (OTHERS) category DELETE* [ DELETE], [ ... SET]/ [SUMMERTIME], [ LANGUAGE SET]* GENERAL SET [DEMO MODE], [CALIBRATION], [A.SHUT OFF], [QUICK ON STBY], [CTRL FOR HDMI] * You can set these items also during Easy Handycam operation. ** The menu name is changed to [SOUND SETTINGS] during Easy...
Operating Guide
Page 24
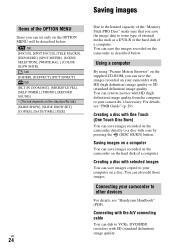
...connecting cable You can save images recorded on the camcorder as a DVD-R or the hard disk of the "Memory Stick PRO Duo," make sure that you can rewrite movies with SD (standard definition) image quality. For details, see "Handycam Handbook" (PDF). Connecting your computer on the OPTION...], [D.EFFECT], [PICT.EFFECT] tab [BLT-IN ZOOM MIC], [MICREF LEVEL], [SELF-TIMER], [TIMING], [RECORD SOUND] - (The tab depends on your camcorder with selected images You can dub to VCRs, DVD/HDD recorders with HD (high definition) image quality from the computer to the limited capacity of...
...connecting cable You can save images recorded on the camcorder as a DVD-R or the hard disk of the "Memory Stick PRO Duo," make sure that you can rewrite movies with SD (standard definition) image quality. For details, see "Handycam Handbook" (PDF). Connecting your computer on the OPTION...], [D.EFFECT], [PICT.EFFECT] tab [BLT-IN ZOOM MIC], [MICREF LEVEL], [SELF-TIMER], [TIMING], [RECORD SOUND] - (The tab depends on your camcorder with selected images You can dub to VCRs, DVD/HDD recorders with HD (high definition) image quality from the computer to the limited capacity of...

Operating Guide
Page 27
... lower side of your Handycam, then click [Handycam Handbook (PDF)]. To view "Handycam Handbook," double-click "Handbook.pdf." http://guide.d-imaging.sony.co.jp/mac/ms/us/ Installing and viewing "Handycam Handbook" (PDF) To view "Handycam Handbook" (PDF), you need to be installed x "Handycam Handbook" (PDF) "Handycam Handbook" (PDF) explains in detail about your camcorder and its side surface...
... lower side of your Handycam, then click [Handycam Handbook (PDF)]. To view "Handycam Handbook," double-click "Handbook.pdf." http://guide.d-imaging.sony.co.jp/mac/ms/us/ Installing and viewing "Handycam Handbook" (PDF) To view "Handycam Handbook" (PDF), you need to be installed x "Handycam Handbook" (PDF) "Handycam Handbook" (PDF) explains in detail about your camcorder and its side surface...
Operating Guide
Page 29
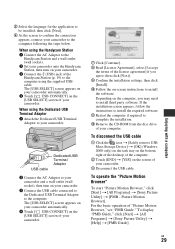
... (wall socket). 2 Set your camcorder onto the Handycam Station, then turn on your camcorder. 3 Connect the (USB) jack of the computer. 2 Touch [END] t [YES] on -screen instructions to install the software. qa Restart the computer if required to install the required software. To display "PMB Guide," click [Start] t [All Programs] t [Sony Picture Utility] t [Help...
... (wall socket). 2 Set your camcorder onto the Handycam Station, then turn on your camcorder. 3 Connect the (USB) jack of the computer. 2 Touch [END] t [YES] on -screen instructions to install the software. qa Restart the computer if required to install the required software. To display "PMB Guide," click [Start] t [All Programs] t [Sony Picture Utility] t [Help...

Operating Guide
Page 31
... Browser" does not work , press the RESET button (p. 18) using your camcorder, use the following table to the computer, see "Handycam Handbook" (PDF) and for connecting to troubleshoot the problem. Your camcorder is not recognized by the computer. • Disconnect devices from the computer and...Troubleshooting If you run into the camcorder (p. 8). • Connect the plug of your computer. The power abruptly turns off. • Turn on the "Memory Stick PRO Duo." If the problem persists, disconnect the power source and contact your Sony dealer. • For the symptoms...
... Browser" does not work , press the RESET button (p. 18) using your camcorder, use the following table to the computer, see "Handycam Handbook" (PDF) and for connecting to troubleshoot the problem. Your camcorder is not recognized by the computer. • Disconnect devices from the computer and...Troubleshooting If you run into the camcorder (p. 8). • Connect the plug of your computer. The power abruptly turns off. • Turn on the "Memory Stick PRO Duo." If the problem persists, disconnect the power source and contact your Sony dealer. • For the symptoms...

Operating Guide
Page 32
Contact your Sony dealer or local authorized Sony service facility. However, note that you can use with your camcorder, see page 6. • No "Memory Stick PRO Duo" is low. • The temperature of the Handycam Station or your camcorder is getting high. Wait for recording images are not enough ...PRO Duo" is inserted. • Access to the DC IN jack of your camcorder securely (p. 8). • Remove the power source. For the type of times, contact your Sony dealer or local authorized Sony service facility. If the problem persists even after storing the images on the LCD...
Contact your Sony dealer or local authorized Sony service facility. However, note that you can use with your camcorder, see page 6. • No "Memory Stick PRO Duo" is low. • The temperature of the Handycam Station or your camcorder is getting high. Wait for recording images are not enough ...PRO Duo" is inserted. • Access to the DC IN jack of your camcorder securely (p. 8). • Remove the power source. For the type of times, contact your Sony dealer or local authorized Sony service facility. If the problem persists even after storing the images on the LCD...

Operating Guide
Page 35
... rechargeable battery pack attached Mass (approx.): 240 g (8 oz) main unit only 300 g (10 oz) including the supplied rechargeable battery pack, and a "Memory Stick PRO Duo" Handycam Station DCRA-C230 Input/Output connectors A/V OUT jack: Component/video and audio output jack USB jack: mini-B Dedicated USB Terminal Adaptor Input/Output connectors USB...
... rechargeable battery pack attached Mass (approx.): 240 g (8 oz) main unit only 300 g (10 oz) including the supplied rechargeable battery pack, and a "Memory Stick PRO Duo" Handycam Station DCRA-C230 Input/Output connectors A/V OUT jack: Component/video and audio output jack USB jack: mini-B Dedicated USB Terminal Adaptor Input/Output connectors USB...
Operating Guide
Page 36
... and other countries. • Adobe, the Adobe logo, and Adobe Acrobat are trademarks of Matsushita Electric Industrial Co., Ltd. On trademarks • "Handycam" and are registered trademarks of Sony Corporation. • "AVCHD" and "AVCHD" logotype are either registered trademarks or trademarks of Microsoft Corporation in the United States and/ or other countries...
... and other countries. • Adobe, the Adobe logo, and Adobe Acrobat are trademarks of Matsushita Electric Industrial Co., Ltd. On trademarks • "Handycam" and are registered trademarks of Sony Corporation. • "AVCHD" and "AVCHD" logotype are either registered trademarks or trademarks of Microsoft Corporation in the United States and/ or other countries...


