Operating Guide
Page 6
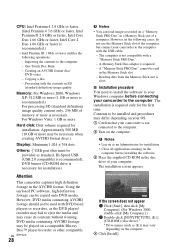
... technology, so over 99.99% of the pixels are operational for a long time, fragmentation of data occurs on other devices • Your camcorder is not dustproofed, dripproofed or waterproofed. Also, you can save your image data using your computer, etc. See "Precautions" (p. 33). •... data periodically, after recording. Pushing the plug forcibly into the terminal will damage the terminal and may be sure to a malfunction of the camcorder, recording media, etc. • TV color systems differ depending on other malfunctions could occur. - However, there may be saved or recorded...
... technology, so over 99.99% of the pixels are operational for a long time, fragmentation of data occurs on other devices • Your camcorder is not dustproofed, dripproofed or waterproofed. Also, you can save your image data using your computer, etc. See "Precautions" (p. 33). •... data periodically, after recording. Pushing the plug forcibly into the terminal will damage the terminal and may be sure to a malfunction of the camcorder, recording media, etc. • TV color systems differ depending on other malfunctions could occur. - However, there may be saved or recorded...
Operating Guide
Page 7
... with a computer Performing with a computer...........27 Installing and viewing "Handycam Handbook" (PDF 27 Installing "Picture Motion Browser 27 Troubleshooting Troubleshooting 31 Additional Information Precautions 33 Specifications 34 US 7 Table of Contents When the camcorder is connected to a computer • Do not try to format... camera, and therefore may vary depending on the operating system of the computer. • Refer also to "Handycam Handbook" (PDF) and "PMB Guide." The scenes may appear different from Windows Vista. If you do so, your camcorder if necessary (p. 12).
... with a computer Performing with a computer...........27 Installing and viewing "Handycam Handbook" (PDF 27 Installing "Picture Motion Browser 27 Troubleshooting Troubleshooting 31 Additional Information Precautions 33 Specifications 34 US 7 Table of Contents When the camcorder is connected to a computer • Do not try to format... camera, and therefore may vary depending on the operating system of the computer. • Refer also to "Handycam Handbook" (PDF) and "PMB Guide." The scenes may appear different from Windows Vista. If you do so, your camcorder if necessary (p. 12).

Operating Guide
Page 8
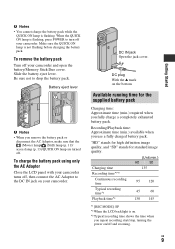
...sure that the v mark on the DC plug is facing up and charging starts. Remove the camcorder from the Handycam Station. b Notes • You cannot attach any "InfoLITHIUM" battery pack other than NP-FH50 to your camcorder. The /CHG (charge) lamp turns off when the battery pack is closed. 4 Insert the... securely, all the way in until it clicks. 3 Close the battery/Memory Stick Duo cover. 5 Place the camcorder on the Handycam Station as shown above, and insert it to your camcorder. 1 Connect the AC Adaptor to the bottom. The /CHG (charge) lamp lights up . 2 Connect the power cord (...
...sure that the v mark on the DC plug is facing up and charging starts. Remove the camcorder from the Handycam Station. b Notes • You cannot attach any "InfoLITHIUM" battery pack other than NP-FH50 to your camcorder. The /CHG (charge) lamp turns off when the battery pack is closed. 4 Insert the... securely, all the way in until it clicks. 3 Close the battery/Memory Stick Duo cover. 5 Place the camcorder on the Handycam Station as shown above, and insert it to your camcorder. 1 Connect the AC Adaptor to the bottom. The /CHG (charge) lamp lights up . 2 Connect the power cord (...
Operating Guide
Page 9
... the AC Adaptor, make sure that the (Movie) lamp/ (Still) lamp (p. 11)/ access lamp (p. 13)/QUICK ON lamp are turned off your camcorder and open the battery/Memory Stick Duo cover. Slide the battery eject lever. "HD" stands for high definition image quality, and "SD" stands for ...the supplied battery pack Charging time: Approximate time (min.) required when you repeat recording start/stop, turning the power on your camcorder turns off, then connect the AC Adaptor to drop the battery pack. When the QUICK ON lamp is on. *3 Typical recording time shows the...
... the AC Adaptor, make sure that the (Movie) lamp/ (Still) lamp (p. 11)/ access lamp (p. 13)/QUICK ON lamp are turned off your camcorder and open the battery/Memory Stick Duo cover. Slide the battery eject lever. "HD" stands for high definition image quality, and "SD" stands for ...the supplied battery pack Charging time: Approximate time (min.) required when you repeat recording start/stop, turning the power on your camcorder turns off, then connect the AC Adaptor to drop the battery pack. When the QUICK ON lamp is on. *3 Typical recording time shows the...

Operating Guide
Page 10
...the DC plug of the AC Adaptor or battery terminal with your camcorder. Also, you can use your camcorder in low temperatures. • The available recording and playback time will be shorter depending on the design of your camcorder or the Handycam Station, even when the power cord (mains lead) is recommended...abroad • You can charge the battery pack. AC-L200/L200B [a] [b] US See "Handycam Handbook" (PDF) for details. 10 On the AC Adaptor • Use the nearby wall outlet (wall socket) when using the camcorder at 25°C (77°F) (10°C to 30°C (50°F to...
...the DC plug of the AC Adaptor or battery terminal with your camcorder. Also, you can use your camcorder in low temperatures. • The available recording and playback time will be shorter depending on the design of your camcorder or the Handycam Station, even when the power cord (mains lead) is recommended...abroad • You can charge the battery pack. AC-L200/L200B [a] [b] US See "Handycam Handbook" (PDF) for details. 10 On the AC Adaptor • Use the nearby wall outlet (wall socket) when using the camcorder at 25°C (77°F) (10°C to 30°C (50°F to...
Operating Guide
Page 11
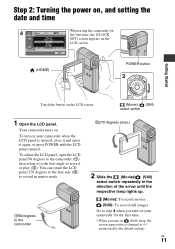
... panel 270 degrees to the lens side (2) to record in mirror mode. 190 degrees to the camcorder 2270 degrees (max.) 2 Slide the (Movie)/ (Still) select switch repeatedly in the direction of...step 4 when you turn on (Still) lamp, the screen aspect ratio is opened . To turn on your camcorder for the first time, the [CLOCK SET] screen appears on the LCD screen. (HOME) POWER button Getting Started...press POWER with the LCD panel opened , close it and open the LCD panel 90 degrees to the camcorder (1), then rotate it to the best angle to record or play (2). Step 2: Turning the power on,...
... panel 270 degrees to the lens side (2) to record in mirror mode. 190 degrees to the camcorder 2270 degrees (max.) 2 Slide the (Movie)/ (Still) select switch repeatedly in the direction of...step 4 when you turn on (Still) lamp, the screen aspect ratio is opened . To turn on your camcorder for the first time, the [CLOCK SET] screen appears on the LCD screen. (HOME) POWER button Getting Started...press POWER with the LCD panel opened , close it and open the LCD panel 90 degrees to the camcorder (1), then rotate it to the best angle to record or play (2). Step 2: Turning the power on,...

Operating Guide
Page 12
...SOUND/DISP SET] t [BEEP] t [OFF]. • When you close the LCD panel during standby/ recording, the QUICK ON lamp starts flashing and your camcorder turn off . z Tips • The date and time do not appear during recording, but they are automatically recorded on -screen displays to sleep mode. If... [QUICK ON STBY] is set to [OFF] on the HOME MENU (p. 23), closing the LCD panel makes your camcorder goes to show messages in a specified language. US 12 Otherwise, close the LCD panel, then press POWER. 3 Touch (HOME) t (SETTINGS) t [CLOCK/...
...SOUND/DISP SET] t [BEEP] t [OFF]. • When you close the LCD panel during standby/ recording, the QUICK ON lamp starts flashing and your camcorder turn off . z Tips • The date and time do not appear during recording, but they are automatically recorded on -screen displays to sleep mode. If... [QUICK ON STBY] is set to [OFF] on the HOME MENU (p. 23), closing the LCD panel makes your camcorder goes to show messages in a specified language. US 12 Otherwise, close the LCD panel, then press POWER. 3 Touch (HOME) t (SETTINGS) t [CLOCK/...

Operating Guide
Page 13
... media may be damaged, recorded images may be possible that formatting will delete all data recorded on the "Memory Stick" you can use with your camcorder • Do not open the battery/Memory Stick Duo cover during recording. • If you insert a new "Memory Stick PRO Duo," the [Create... a new Image Database File.] screen appears. Eject the "Memory Stick PRO Duo" from the camcorder - Shake or knock your camcorder. 1 Insert the "Memory Stick PRO Duo." 1 Open the battery/Memory Stick Duo cover. 2 Insert the "Memory Stick PRO Duo" all the ...
... media may be damaged, recorded images may be possible that formatting will delete all data recorded on the "Memory Stick" you can use with your camcorder • Do not open the battery/Memory Stick Duo cover during recording. • If you insert a new "Memory Stick PRO Duo," the [Create... a new Image Database File.] screen appears. Eject the "Memory Stick PRO Duo" from the camcorder - Shake or knock your camcorder. 1 Insert the "Memory Stick PRO Duo." 1 Open the battery/Memory Stick Duo cover. 2 Insert the "Memory Stick PRO Duo" all the ...

Operating Guide
Page 15
See "Handycam Handbook" (PDF) for data management. • Check the number of recordable still images on the LCD screen of your camcorder (p. 20). • You can capture still images from recorded movies. US 15 Recording/Playback z Tips • You can check the free "Memory Stick...by pressing PHOTO B during movie recording. • When a movie file exceeds 2 GB, the next movie file is created automatically. • The maximum recordable time of Sony "Memory Stick PRO Duo" is as follows with recording mode [HD SP] (the default setting); 1 GB: approx. 15 minutes 2 GB: approx. 30 minutes 4...
See "Handycam Handbook" (PDF) for data management. • Check the number of recordable still images on the LCD screen of your camcorder (p. 20). • You can capture still images from recorded movies. US 15 Recording/Playback z Tips • You can check the free "Memory Stick...by pressing PHOTO B during movie recording. • When a movie file exceeds 2 GB, the next movie file is created automatically. • The maximum recordable time of Sony "Memory Stick PRO Duo" is as follows with recording mode [HD SP] (the default setting); 1 GB: approx. 15 minutes 2 GB: approx. 30 minutes 4...
Operating Guide
Page 16
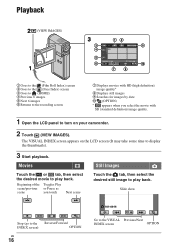
... you touch Next scene Still Images Touch the tab, then select the desired still image to play back. The VISUAL INDEX screen appears on your camcorder. 2 Touch (VIEW IMAGES). Playback (VIEW IMAGES) 1 Goes to the (Film Roll Index) screen 2 Goes to the (Face Index) screen 3 Goes to (HOME) 4 Previous 6 images 5 Next...
... you touch Next scene Still Images Touch the tab, then select the desired still image to play back. The VISUAL INDEX screen appears on your camcorder. 2 Touch (VIEW IMAGES). Playback (VIEW IMAGES) 1 Goes to the (Film Roll Index) screen 2 Goes to the (Face Index) screen 3 Goes to (HOME) 4 Previous 6 images 5 Next...
Operating Guide
Page 17
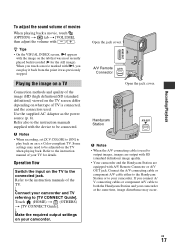
... is used . When you touch a movie marked with i, you connect A/ V connecting cables or component A/V cable to both the Handycam Station and your camcorder and TV referring to [TV CONNECT Guide]. Playing the image on a TV Connection methods and quality of the image (HD (high ... connected, and the connectors used to output images, images are output with SD (standard definition) image quality. • Your camcorder and the Handycam Station are equipped with / . Connect the A/V connecting cable or component A/V cable either to the Handycam Station or to the instruction manuals of your...
... is used . When you touch a movie marked with i, you connect A/ V connecting cables or component A/V cable to both the Handycam Station and your camcorder and TV referring to [TV CONNECT Guide]. Playing the image on a TV Connection methods and quality of the image (HD (high ... connected, and the connectors used to output images, images are output with SD (standard definition) image quality. • Your camcorder and the Handycam Station are equipped with / . Connect the A/V connecting cable or component A/V cable either to the Handycam Station or to the instruction manuals of your...

Operating Guide
Page 18
... zoom). • When you touch the screen during playback zoom, the point you touched will flash automatically depending on recording conditions in the default setting. Handycam Station Recording/Playback A Flash The flash will be displayed in the center of the LCD screen. The flashing stops and the power turns off automatically... button Press RESET to change the setting. When you open the LCD panel while the QUICK ON lamp is flashing, you do not operate your camcorder for a slower zoom. B Speaker C QUICK ON lamp Flashes during sleep mode ([QUICK ON STBY], p. 23).
... zoom). • When you touch the screen during playback zoom, the point you touched will flash automatically depending on recording conditions in the default setting. Handycam Station Recording/Playback A Flash The flash will be displayed in the center of the LCD screen. The flashing stops and the power turns off automatically... button Press RESET to change the setting. When you open the LCD panel while the QUICK ON lamp is flashing, you do not operate your camcorder for a slower zoom. B Speaker C QUICK ON lamp Flashes during sleep mode ([QUICK ON STBY], p. 23).

Operating Guide
Page 19
.... Connecting to other devices K HDMI OUT jack Connect with the component A/V cable or A/V connecting cable. Q Interface connector (Handycam Station) Connect to the interface connector on your camcorder without using a tripod screw (optional: the length of the screw must be less than 5.5 mm (7/32 in microphone Sound ...sound and recorded. For details, see "PMB Guide" (p. 29). I Access lamp When the access lamp is lit or flashing, your camcorder and the Handycam Station or the Dedicated USB Terminal Adaptor. You can check the remaining battery when you press it while the power is on the "...
.... Connecting to other devices K HDMI OUT jack Connect with the component A/V cable or A/V connecting cable. Q Interface connector (Handycam Station) Connect to the interface connector on your camcorder without using a tripod screw (optional: the length of the screw must be less than 5.5 mm (7/32 in microphone Sound ...sound and recorded. For details, see "PMB Guide" (p. 29). I Access lamp When the access lamp is lit or flashing, your camcorder and the Handycam Station or the Dedicated USB Terminal Adaptor. You can check the remaining battery when you press it while the power is on the "...

Operating Guide
Page 21
...approximate and differ from what you can check them as [DATA CODE] during recording/playback to indicate the settings of your camcorder. Upper left Center Upper right Bottom Upper left Indicator Center Indicator E Meaning AUDIO MODE Self-timer recording Flash, REDEYE ... Index FACE DETECTION z Tips • Indicators and their positions are not displayed while recording. US 21 However, you actually see. See "Handycam Handbook" (PDF) for details. • The recording date and time are recorded automatically on the LCD screens Following indicators appear during playback....
...approximate and differ from what you can check them as [DATA CODE] during recording/playback to indicate the settings of your camcorder. Upper left Center Upper right Bottom Upper left Indicator Center Indicator E Meaning AUDIO MODE Self-timer recording Flash, REDEYE ... Index FACE DETECTION z Tips • Indicators and their positions are not displayed while recording. US 21 However, you actually see. See "Handycam Handbook" (PDF) for details. • The recording date and time are recorded automatically on the LCD screens Following indicators appear during playback....
Operating Guide
Page 24
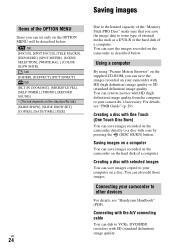
... images on a computer You can save images recorded on the camcorder directly to your camcorder to some type of external media such as described below . Connecting...save images recorded on the camcorder on a disc. Creating a disc with HD (high definition) image quality ...or SD (standard definition) image quality. Connecting your camcorder, if necessary. You can save images copied to the ...], [SLIDE SHOW SET], [COPIES], [DATE/TIME], [SIZE] US 24 Due to your camcorder with One Touch (One Touch Disc Burn) You can save the image data to other devices...
... images on a computer You can save images recorded on the camcorder directly to your camcorder to some type of external media such as described below . Connecting...save images recorded on the camcorder on a disc. Creating a disc with HD (high definition) image quality ...or SD (standard definition) image quality. Connecting your camcorder, if necessary. You can save images copied to the ...], [SLIDE SHOW SET], [COPIES], [DATE/TIME], [SIZE] US 24 Due to your camcorder with One Touch (One Touch Disc Burn) You can save the image data to other devices...

Operating Guide
Page 27
... - Importing images to be installed x "Handycam Handbook" (PDF) "Handycam Handbook" (PDF) explains in detail about your camcorder and its side surface. 5 Click [Exit] t [Exit], then remove the CD-ROM from the disc drive of "Handycam Handbook." The installation screen for details. z...of your computer. x "Picture Motion Browser" (only for installation appears. 3 Click [Handycam Handbook]. Editing imported images - http://guide.d-imaging.sony.co.jp/mac/ms/us/ Installing and viewing "Handycam Handbook" (PDF) To view "Handycam Handbook" (PDF), you need to your computer.
... - Importing images to be installed x "Handycam Handbook" (PDF) "Handycam Handbook" (PDF) explains in detail about your camcorder and its side surface. 5 Click [Exit] t [Exit], then remove the CD-ROM from the disc drive of "Handycam Handbook." The installation screen for details. z...of your computer. x "Picture Motion Browser" (only for installation appears. 3 Click [Handycam Handbook]. Editing imported images - http://guide.d-imaging.sony.co.jp/mac/ms/us/ Installing and viewing "Handycam Handbook" (PDF) To view "Handycam Handbook" (PDF), you need to your computer.
Operating Guide
Page 28
...its contents without warning. The computer is not compatible with DVD based players or recorders, as an Administrator for installation) Attention This camcorder captures high definition footage in the following operations: - x Installation procedure You need to install the software to your Windows computer before ...GB or more is recommended.) For processing SD (standard definition) image quality content only, 256 MB of the computer, but connect your camcorder is required only for installation: Approximately 500 MB (10 GB or more may vary depending on a "Memory Stick PRO Duo" in ...
...its contents without warning. The computer is not compatible with DVD based players or recorders, as an Administrator for installation) Attention This camcorder captures high definition footage in the following operations: - x Installation procedure You need to install the software to your Windows computer before ...GB or more is recommended.) For processing SD (standard definition) image quality content only, 256 MB of the computer, but connect your camcorder is required only for installation: Approximately 500 MB (10 GB or more may vary depending on a "Memory Stick PRO Duo" in ...
Operating Guide
Page 29
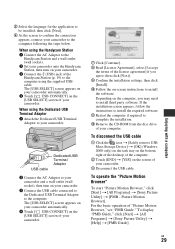
...t [All Programs] t [Sony Picture Utility] t [Help] t [PMB Guide]. qa Restart the computer if required to the computer following the steps below. US 29 The [USB SELECT] screen appears on your camcorder automatically. 4 Touch [ USB CONNECT] on the screen of the Handycam Station (p. 19) to install...may need to the computer using the Handycam Station 1 Connect the AC Adaptor to the Handycam Station and a wall outlet (wall socket). 2 Set your camcorder onto the Handycam Station, then turn on your camcorder. 3 Connect the (USB) jack of your camcorder. 3 Disconnect the USB cable. For...
...t [All Programs] t [Sony Picture Utility] t [Help] t [PMB Guide]. qa Restart the computer if required to the computer following the steps below. US 29 The [USB SELECT] screen appears on your camcorder automatically. 4 Touch [ USB CONNECT] on the screen of the Handycam Station (p. 19) to install...may need to the computer using the Handycam Station 1 Connect the AC Adaptor to the Handycam Station and a wall outlet (wall socket). 2 Set your camcorder onto the Handycam Station, then turn on your camcorder. 3 Connect the (USB) jack of your camcorder. 3 Disconnect the USB cable. For...

Operating Guide
Page 30
z Tips • If the [USB SELECT] screen does not appear, touch (HOME) t (OTHERS) t [USB CONNECT]. US 30 b Notes • If you close the LCD panel when your camcorder is connected to other devices with the USB cable, the recorded images may be lost.
z Tips • If the [USB SELECT] screen does not appear, touch (HOME) t (OTHERS) t [USB CONNECT]. US 30 b Notes • If you close the LCD panel when your camcorder is connected to other devices with the USB cable, the recorded images may be lost.

Operating Guide
Page 31
If the problem persists, disconnect the power source and contact your Sony dealer. • For the symptoms of your computer. If the functions still do not work correctly. • Finish "Picture Motion Browser" and restart your camcorder. "Picture Motion Browser" does not work , press the RESET ...button (p. 18) using a pointed object. (If you run into the camcorder (p. 8). • Connect the plug of the computer other than the keyboard, mouse, and your camcorder, see "Handycam Handbook" (PDF) and for your camcorder to be ready to the wall outlet (wall socket) (p. 8). US 31...
If the problem persists, disconnect the power source and contact your Sony dealer. • For the symptoms of your computer. If the functions still do not work correctly. • Finish "Picture Motion Browser" and restart your camcorder. "Picture Motion Browser" does not work , press the RESET ...button (p. 18) using a pointed object. (If you run into the camcorder (p. 8). • Connect the plug of the computer other than the keyboard, mouse, and your camcorder, see "Handycam Handbook" (PDF) and for your camcorder to be ready to the wall outlet (wall socket) (p. 8). US 31...


