
Operating Guide
Page 3
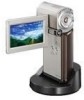
... service personnel. Adjust only those controls that the set is provided. - this set during a lightning storm, or when it . Safety Check Upon completion of time, unplug it from the wall outlet before cleaning or polishing it is damaged or frayed. - Never block the slots and openings by the manufacturer. Use a cloth lightly dampened with a cloth or other hazards. Power-Cord Protection Route the power cord...
... service personnel. Adjust only those controls that the set is provided. - this set during a lightning storm, or when it . Safety Check Upon completion of time, unplug it from the wall outlet before cleaning or polishing it is damaged or frayed. - Never block the slots and openings by the manufacturer. Use a cloth lightly dampened with a cloth or other hazards. Power-Cord Protection Route the power cord...
Operating Guide
Page 4
... customers in accordance with the instructions, may cause undesired operation. Battery pack and "Memory Stick PRO Duo" This device complies with Canadian ICES-003. Address: 16530 Via Esprillo, San Diego, CA 92127 U.S.A. You can radiate radio frequency energy and, if not installed and used rechargeable batteries to radio communications. Owner's Record The model and serial numbers are recyclable. Model No. The number below . These limits are cautioned...
... customers in accordance with the instructions, may cause undesired operation. Battery pack and "Memory Stick PRO Duo" This device complies with Canadian ICES-003. Address: 16530 Via Esprillo, San Diego, CA 92127 U.S.A. You can radiate radio frequency energy and, if not installed and used rechargeable batteries to radio communications. Owner's Record The model and serial numbers are recyclable. Model No. The number below . These limits are cautioned...
Operating Guide
Page 6
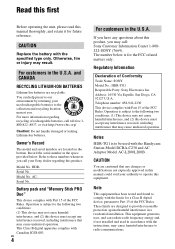
... images on some tiny black points and/or bright points (white, red, blue, or green in this manual. Unauthorized recording of such materials may be lost , save all your recorded images on other media. Devices which are normal results of the following devices; - Using the camcorder • The camcorder is recommended that you save the image data on a disc such as "Memory Stick PRO Duo" in color) that appear constantly on the LCD screen. Remove the battery...
... images on some tiny black points and/or bright points (white, red, blue, or green in this manual. Unauthorized recording of such materials may be lost , save all your recorded images on other media. Devices which are normal results of the following devices; - Using the camcorder • The camcorder is recommended that you save the image data on a disc such as "Memory Stick PRO Duo" in color) that appear constantly on the LCD screen. Remove the battery...
Operating Guide
Page 7
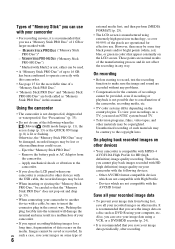
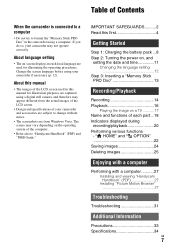
... 16 Playing the image on -screen displays in the camcorder using your camcorder if necessary (p. 12). If you do so, your camcorder and accessories are subject to format the "Memory Stick PRO Duo" in each part...18 Indicators displayed during recording/playback 20 Performing various functions - Change the screen language before using a computer. " HOME" and " OPTION" 22 Saving images 24 Deleting images 25 Enjoying with a computer Performing with a computer...........27 Installing and viewing "Handycam Handbook" (PDF 27 Installing "Picture Motion Browser 27 Troubleshooting...
... 16 Playing the image on -screen displays in the camcorder using your camcorder if necessary (p. 12). If you do so, your camcorder and accessories are subject to format the "Memory Stick PRO Duo" in each part...18 Indicators displayed during recording/playback 20 Performing various functions - Change the screen language before using a computer. " HOME" and " OPTION" 22 Saving images 24 Deleting images 25 Enjoying with a computer Performing with a computer...........27 Installing and viewing "Handycam Handbook" (PDF 27 Installing "Picture Motion Browser 27 Troubleshooting...
Operating Guide
Page 9
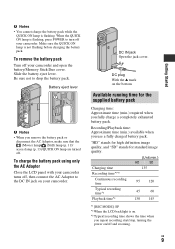
... Available running time for standard image quality. (Unit:min.) HD SD Charging time 135 Recording time*1*2 Continuous recording time 95 120 Typical recording time*3 Playback time*2 45 60 130 145 *1 [REC MODE]: SP *2 When the LCD backlight is flashing, press POWER to drop the battery pack. Battery eject lever b Notes • When you fully charge a completely exhausted battery pack. Recording/Playback time: Approximate time (min.) available when you repeat recording start/stop, turning the power on your camcorder and open the battery/Memory Stick Duo...
... Available running time for standard image quality. (Unit:min.) HD SD Charging time 135 Recording time*1*2 Continuous recording time 95 120 Typical recording time*3 Playback time*2 45 60 130 145 *1 [REC MODE]: SP *2 When the LCD backlight is flashing, press POWER to drop the battery pack. Battery eject lever b Notes • When you fully charge a completely exhausted battery pack. Recording/Playback time: Approximate time (min.) available when you repeat recording start/stop, turning the power on your camcorder and open the battery/Memory Stick Duo...

Operating Guide
Page 10
... [a] [b] US See "Handycam Handbook" (PDF) for details. 10 Disconnect the AC Adaptor from the wall outlet (wall socket). This may cause a malfunction. • Even if your camcorder is turned off the (Movie) lamp/ (Still) lamp (p. 11)/access lamp (p. 13)/QUICK ON lamp. • The power will be supplied from the battery as long as the AC Adaptor is connected to the...
... [a] [b] US See "Handycam Handbook" (PDF) for details. 10 Disconnect the AC Adaptor from the wall outlet (wall socket). This may cause a malfunction. • Even if your camcorder is turned off the (Movie) lamp/ (Still) lamp (p. 11)/access lamp (p. 13)/QUICK ON lamp. • The power will be supplied from the battery as long as the AC Adaptor is connected to the...

Operating Guide
Page 12
... date and time do not appear during recording, but they are automatically recorded on the "Memory Stick PRO Duo," and can be displayed during playback. • You can change the on the HOME MENU (p. 23), closing the LCD panel makes your camcorder goes to show messages in a specified language. The clock starts. To turn off the power When recording standby/recording mode, close the LCD panel or press POWER. Changing the language setting You can turn...
... date and time do not appear during recording, but they are automatically recorded on the "Memory Stick PRO Duo," and can be displayed during playback. • You can change the on the HOME MENU (p. 23), closing the LCD panel makes your camcorder goes to show messages in a specified language. The clock starts. To turn off the power When recording standby/recording mode, close the LCD panel or press POWER. Changing the language setting You can turn...

Operating Guide
Page 13
... "Memory Stick PRO Duo" into the slot in until it clicks. 3 Close the battery/Memory Stick Duo cover. 2 Open the LCD panel and turn on the "Memory Stick PRO Duo." Eject the "Memory Stick PRO Duo" from the camcorder - It may be possible that formatting will delete all the way in the wrong direction, the "Memory Stick PRO Duo," the Memory Stick Duo slot, or image data may be damaged. • If [Failed to create a new Image Database File. Access...
... "Memory Stick PRO Duo" into the slot in until it clicks. 3 Close the battery/Memory Stick Duo cover. 2 Open the LCD panel and turn on the "Memory Stick PRO Duo." Eject the "Memory Stick PRO Duo" from the camcorder - It may be possible that formatting will delete all the way in the wrong direction, the "Memory Stick PRO Duo," the Memory Stick Duo slot, or image data may be damaged. • If [Failed to create a new Image Database File. Access...
Operating Guide
Page 14
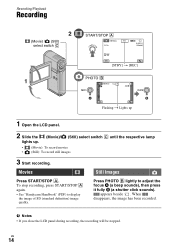
..., the image has been recorded. To stop recording, press START/STOP A again. • See "Handycam Handbook" (PDF) to adjust the focus A (a beep sounds), then press it fully B (a shutter click sounds). Press PHOTO B lightly to display the image of SD (standard definition) image quality. US 14 b Notes • If you close the LCD panel during recording, the recording will be stopped. Recording/Playback Recording (Movie) / (Still) select switch C START/STOP A [STBY] t [REC] PHOTO B Flashing t Lights up 1 Open the LCD panel. 2 Slide the lights up. (Movie)/ (Still) select switch...
..., the image has been recorded. To stop recording, press START/STOP A again. • See "Handycam Handbook" (PDF) to adjust the focus A (a beep sounds), then press it fully B (a shutter click sounds). Press PHOTO B lightly to display the image of SD (standard definition) image quality. US 14 b Notes • If you close the LCD panel during recording, the recording will be stopped. Recording/Playback Recording (Movie) / (Still) select switch C START/STOP A [STBY] t [REC] PHOTO B Flashing t Lights up 1 Open the LCD panel. 2 Slide the lights up. (Movie)/ (Still) select switch...

Operating Guide
Page 15
Recording/Playback z Tips • You can check the free "Memory Stick PRO Duo" space by touching (HOME) t (MANAGE MEDIA) t [MEDIA INFO]. • You can capture still images by pressing PHOTO B during movie recording. • When a movie file exceeds 2 GB, the next movie file is created automatically. • The maximum recordable time of Sony "Memory Stick PRO Duo" is as follows with recording mode [HD SP] (the default setting); 1 GB: approx. 15 minutes 2 GB: approx. 30 minutes 4 GB: approx...
Recording/Playback z Tips • You can check the free "Memory Stick PRO Duo" space by touching (HOME) t (MANAGE MEDIA) t [MEDIA INFO]. • You can capture still images by pressing PHOTO B during movie recording. • When a movie file exceeds 2 GB, the next movie file is created automatically. • The maximum recordable time of Sony "Memory Stick PRO Duo" is as follows with recording mode [HD SP] (the default setting); 1 GB: approx. 15 minutes 2 GB: approx. 30 minutes 4 GB: approx...
Operating Guide
Page 17
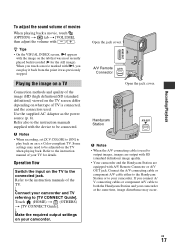
... jack. Refer also to the instruction manuals supplied with the device to the instruction manuals of movies When playing back a movie, touch (OPTION) t tab t [VOLUME], then adjust the volume with the image on your camcorder and TV referring to be connected. Some settings may occur. A/V Remote Connector Open the jack cover. Recording/Playback To adjust the sound volume of the TV. Use the supplied AC Adaptor as the power source (p. 8). Open the jack cover. Refer...
... jack. Refer also to the instruction manuals supplied with the device to the instruction manuals of movies When playing back a movie, touch (OPTION) t tab t [VOLUME], then adjust the volume with the image on your camcorder and TV referring to be connected. Some settings may occur. A/V Remote Connector Open the jack cover. Recording/Playback To adjust the sound volume of the TV. Use the supplied AC Adaptor as the power source (p. 8). Open the jack cover. Refer...

Operating Guide
Page 18
... settings are set automatically for a certain period during sleep mode ([QUICK ON STBY], p. 23). D Power zoom lever Move the power zoom lever slightly for a faster zoom. Move it further for a slower zoom. E RESET button Press RESET to 5 times the original size (Playback zoom). • When you touch the screen during sleep mode. US 18 When you open the LCD panel while the QUICK ON lamp is flashing, you do not operate your camcorder for easy recording/playback...
... settings are set automatically for a certain period during sleep mode ([QUICK ON STBY], p. 23). D Power zoom lever Move the power zoom lever slightly for a faster zoom. Move it further for a slower zoom. E RESET button Press RESET to 5 times the original size (Playback zoom). • When you touch the screen during sleep mode. US 18 When you open the LCD panel while the QUICK ON lamp is flashing, you do not operate your camcorder for easy recording/playback...

Operating Guide
Page 21
... ZOOM MIC Meaning IMAGE SIZE Continuous slide show Color Slow Shutter PictBridge connecting Warning Upper right Indicator Bottom Indicator 9 Meaning FADER LCD backlight off Meaning Picture effect Digital effect Manual focus SCENE SELECTION n White balance SteadyShot off EXPOSURE/ SPOT METER TELE MACRO ZEBRA X.V.COLOR Face Index FACE DETECTION z Tips • Indicators and their positions are not displayed while recording. US 21 See "Handycam Handbook" (PDF) for details. • The recording date and time are recorded...
... ZOOM MIC Meaning IMAGE SIZE Continuous slide show Color Slow Shutter PictBridge connecting Warning Upper right Indicator Bottom Indicator 9 Meaning FADER LCD backlight off Meaning Picture effect Digital effect Manual focus SCENE SELECTION n White balance SteadyShot off EXPOSURE/ SPOT METER TELE MACRO ZEBRA X.V.COLOR Face Index FACE DETECTION z Tips • Indicators and their positions are not displayed while recording. US 21 See "Handycam Handbook" (PDF) for details. • The recording date and time are recorded...

Operating Guide
Page 23
... / SET MEDIA INFO MEDIA FORMAT* REPAIR IMG.DB F. (SETTINGS) category MOVIE SETTINGS [REC MODE], [AUDIO MODE], [WIDE SELECT], [DIGITAL ZOOM], [STEADYSHOT], [AUTO SLW SHUTTR], [X.V.COLOR], [GUIDEFRAME], [ZEBRA], [ REMAINING SET], [SUB-T DATE], [FLASH MODE]*, [FLASH LEVEL], [REDEYE REDUC], [FACE DETECTION], [ INDEX SET]* PHOTO SETTINGS [ IMAGE SIZE]*, [FILE NO.], [GUIDEFRAME], [ZEBRA], [FLASH MODE]*, [FLASH LEVEL], [REDEYE REDUC], [FACE DETECTION] VIEW IMAGES SET [DATA CODE], [ DISPLAY] SOUND/ DISP SET** [VOLUME]*, [BEEP]*, [LCD BRIGHT], [LCD BL LEVEL], [LCD COLOR] OUTPUT [TV TYPE...
... / SET MEDIA INFO MEDIA FORMAT* REPAIR IMG.DB F. (SETTINGS) category MOVIE SETTINGS [REC MODE], [AUDIO MODE], [WIDE SELECT], [DIGITAL ZOOM], [STEADYSHOT], [AUTO SLW SHUTTR], [X.V.COLOR], [GUIDEFRAME], [ZEBRA], [ REMAINING SET], [SUB-T DATE], [FLASH MODE]*, [FLASH LEVEL], [REDEYE REDUC], [FACE DETECTION], [ INDEX SET]* PHOTO SETTINGS [ IMAGE SIZE]*, [FILE NO.], [GUIDEFRAME], [ZEBRA], [FLASH MODE]*, [FLASH LEVEL], [REDEYE REDUC], [FACE DETECTION] VIEW IMAGES SET [DATA CODE], [ DISPLAY] SOUND/ DISP SET** [VOLUME]*, [BEEP]*, [LCD BRIGHT], [LCD BL LEVEL], [LCD COLOR] OUTPUT [TV TYPE...
Operating Guide
Page 24
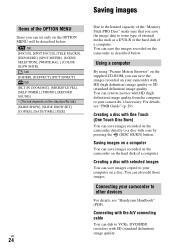
... movies with the A/V connecting cable You can also edit those images. Saving images Items of the OPTION MENU Items you save the image data to some type of external media such as described below . For details, see "Handycam Handbook" (PDF). Saving images on the hard disk of a computer. Connecting with HD (high definition) image quality from the computer to the limited capacity of the "Memory Stick PRO Duo," make sure that you can set only on a disc...
... movies with the A/V connecting cable You can also edit those images. Saving images Items of the OPTION MENU Items you save the image data to some type of external media such as described below . For details, see "Handycam Handbook" (PDF). Saving images on the hard disk of a computer. Connecting with HD (high definition) image quality from the computer to the limited capacity of the "Memory Stick PRO Duo," make sure that you can set only on a disc...

Operating Guide
Page 27
...://guide.d-imaging.sony.co.jp/mac/ms/us/ Installing and viewing "Handycam Handbook" (PDF) To view "Handycam Handbook" (PDF), you need to be installed x "Handycam Handbook" (PDF) "Handycam Handbook" (PDF) explains in detail about your camcorder and its side surface. 5 Click [Exit] t [Exit], then remove the CD-ROM from the disc drive of your camcorder, see the following operations. - When the installation is completed, the short-cut icon of "Handycam Handbook." Installing "Picture Motion Browser" x System requirements OS: Microsoft Windows 2000 Professional SP4/Windows XP SP2*/Windows...
...://guide.d-imaging.sony.co.jp/mac/ms/us/ Installing and viewing "Handycam Handbook" (PDF) To view "Handycam Handbook" (PDF), you need to be installed x "Handycam Handbook" (PDF) "Handycam Handbook" (PDF) explains in detail about your camcorder and its side surface. 5 Click [Exit] t [Exit], then remove the CD-ROM from the disc drive of your camcorder, see the following operations. - When the installation is completed, the short-cut icon of "Handycam Handbook." Installing "Picture Motion Browser" x System requirements OS: Microsoft Windows 2000 Professional SP4/Windows XP SP2*/Windows...
Operating Guide
Page 28
... (E:)] (CD-ROM) (disc drive).* * Drive names (such as an Administrator for the first time. Importing the contents to be played on a compatible Blu-ray Disc™ player/recorder or other compatible US device. 28 b Notes • You can be read images recorded on the computer. 4 Click [Install]. For Windows Vista: 1 GB or more Hard disk: Disk volume required for installation) Attention This camcorder captures high definition footage in the following operations: - However, DVD media containing AVCHD...
... (E:)] (CD-ROM) (disc drive).* * Drive names (such as an Administrator for the first time. Importing the contents to be played on a compatible Blu-ray Disc™ player/recorder or other compatible US device. 28 b Notes • You can be read images recorded on the computer. 4 Click [Install]. For Windows Vista: 1 GB or more Hard disk: Disk volume required for installation) Attention This camcorder captures high definition footage in the following operations: - However, DVD media containing AVCHD...

Operating Guide
Page 31
... cannot install "Picture Motion Browser." • Check the computer environment required to the wall outlet (wall socket) (p. 8). Or delete the unnecessary images (p. 25). • Total number of movie scenes or still images exceeds the recordable capacity of your computer. Use a new "Memory Stick PRO Duo" or format the "Memory Stick PRO Duo." If the functions still do not work correctly. • Finish "Picture Motion Browser" and restart your camcorder, see "Handycam Handbook" (PDF) and for connecting to...
... cannot install "Picture Motion Browser." • Check the computer environment required to the wall outlet (wall socket) (p. 8). Or delete the unnecessary images (p. 25). • Total number of movie scenes or still images exceeds the recordable capacity of your computer. Use a new "Memory Stick PRO Duo" or format the "Memory Stick PRO Duo." If the functions still do not work correctly. • Finish "Picture Motion Browser" and restart your camcorder, see "Handycam Handbook" (PDF) and for connecting to...

Operating Guide
Page 32
... "Memory Stick PRO Duo" was restricted on the LCD screen, check the following. Format the "Memory Stick PRO Duo" with both hands. Wait for recording images. Reconnect it in a cool place. However, note that you cannot service has occurred. Use an "InfoLITHIUM" battery pack NP-FH50 (p. 8). • Connect the DC plug of "Memory Stick" you have tried a couple of times, contact your camcorder, see page 6. • No "Memory Stick PRO Duo" is inserted. • Access...
... "Memory Stick PRO Duo" was restricted on the LCD screen, check the following. Format the "Memory Stick PRO Duo" with both hands. Wait for recording images. Reconnect it in a cool place. However, note that you cannot service has occurred. Use an "InfoLITHIUM" battery pack NP-FH50 (p. 8). • Connect the DC plug of "Memory Stick" you have tried a couple of times, contact your camcorder, see page 6. • No "Memory Stick PRO Duo" is inserted. • Access...
Operating Guide
Page 33
... by playing back or recording images for a long time • Periodically turn on your camcorder and let it . If your camcorder, it . x When not using your camcorder get wet, for a long period of the LCD screen may be repaired. • If any solid object or liquid gets inside . • When disconnecting the power cord (mains lead), pull it by the plug and not the cord (lead...
... by playing back or recording images for a long time • Periodically turn on your camcorder and let it . If your camcorder, it . x When not using your camcorder get wet, for a long period of the LCD screen may be repaired. • If any solid object or liquid gets inside . • When disconnecting the power cord (mains lead), pull it by the plug and not the cord (lead...


