Operating Guide
Page 6
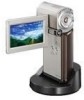
...USB cable, the recorded images may be lost or other materials may be lost , save all your recorded images on other devices • Your camcorder is compatible with MPEG-4 AVC/H.264 High Profile for a long time, fragmentation of data occurs on the LCD screen. However, there may be...or waterproofed. These points are not compatible with the AVCHD format Save all your recorded image data • To prevent your image data from the camcorder. - Other AVCHD format compatible devices which are normal results of the manufacturing process and do any way. PRO-HG Duo") ("Memory Stick *...
...USB cable, the recorded images may be lost or other materials may be lost , save all your recorded images on other devices • Your camcorder is compatible with MPEG-4 AVC/H.264 High Profile for a long time, fragmentation of data occurs on the LCD screen. However, there may be...or waterproofed. These points are not compatible with the AVCHD format Save all your recorded image data • To prevent your image data from the camcorder. - Other AVCHD format compatible devices which are normal results of the manufacturing process and do any way. PRO-HG Duo") ("Memory Stick *...
Operating Guide
Page 7
...procedures. Change the screen language before using a computer. The scenes may not operate correctly. If you do so, your camcorder may vary depending on -screen displays in each part...18 Indicators displayed during recording/playback 20 Performing various functions - Table of Contents ...; Do not try to format the "Memory Stick PRO Duo" in the camcorder using your camcorder if necessary (p. 12). About language setting • The on the operating system of your camcorder and accessories are subject to "Handycam Handbook" (PDF) and "PMB Guide." About this manual • The images...
...procedures. Change the screen language before using a computer. The scenes may not operate correctly. If you do so, your camcorder may vary depending on -screen displays in each part...18 Indicators displayed during recording/playback 20 Performing various functions - Table of Contents ...; Do not try to format the "Memory Stick PRO Duo" in the camcorder using your camcorder if necessary (p. 12). About language setting • The on the operating system of your camcorder and accessories are subject to "Handycam Handbook" (PDF) and "PMB Guide." About this manual • The images...

Operating Guide
Page 8
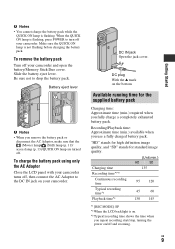
.../Memory Stick Duo cover. 2 Insert the battery pack all the way in until it clicks. 3 Close the battery/Memory Stick Duo cover. 5 Place the camcorder on the Handycam Station as shown above, and insert it to the bottom. US 8 The /CHG (charge) lamp lights up . 2 Connect the power cord (mains lead) to...(Mains lead) To the wall outlet (wall socket) You can charge the "InfoLITHIUM" battery pack NP-FH50 after attaching it into the Handycam Station securely, all the way to your camcorder. 1 Connect the AC Adaptor to the DC IN jack on the DC plug is facing up and charging starts. Remove the...
.../Memory Stick Duo cover. 2 Insert the battery pack all the way in until it clicks. 3 Close the battery/Memory Stick Duo cover. 5 Place the camcorder on the Handycam Station as shown above, and insert it to the bottom. US 8 The /CHG (charge) lamp lights up . 2 Connect the power cord (mains lead) to...(Mains lead) To the wall outlet (wall socket) You can charge the "InfoLITHIUM" battery pack NP-FH50 after attaching it into the Handycam Station securely, all the way to your camcorder. 1 Connect the AC Adaptor to the DC IN jack on the DC plug is facing up and charging starts. Remove the...
Operating Guide
Page 9
... turned off. Battery eject lever b Notes • When you use a fully charged battery pack. DC plug With the v mark on your camcorder and open the battery/Memory Stick Duo cover. When the QUICK ON lamp is not flashing before charging the battery pack. To remove the battery...stop, turning the power on/off and zooming. To charge the battery pack using only the AC Adaptor Close the LCD panel with your camcorder turns off your camcorder. "HD" stands for high definition image quality, and "SD" stands for the supplied battery pack Charging time: Approximate time (min.)...
... turned off. Battery eject lever b Notes • When you use a fully charged battery pack. DC plug With the v mark on your camcorder and open the battery/Memory Stick Duo cover. When the QUICK ON lamp is not flashing before charging the battery pack. To remove the battery...stop, turning the power on/off and zooming. To charge the battery pack using only the AC Adaptor Close the LCD panel with your camcorder turns off your camcorder. "HD" stands for high definition image quality, and "SD" stands for the supplied battery pack Charging time: Approximate time (min.)...

Operating Guide
Page 10
...176;C to 30°C (50°F to 86°F) is still supplied to it while connected to the DC IN jack of your camcorder or the Handycam Station, even when the power cord (mains lead) is disconnected from the wall outlet (wall socket) immediately if any malfunction occurs while using... abroad • You can charge the battery pack. This may cause a malfunction. • Even if your camcorder is turned off the (Movie) lamp/ (Still)...
...176;C to 30°C (50°F to 86°F) is still supplied to it while connected to the DC IN jack of your camcorder or the Handycam Station, even when the power cord (mains lead) is disconnected from the wall outlet (wall socket) immediately if any malfunction occurs while using... abroad • You can charge the battery pack. This may cause a malfunction. • Even if your camcorder is turned off the (Movie) lamp/ (Still)...
Operating Guide
Page 11
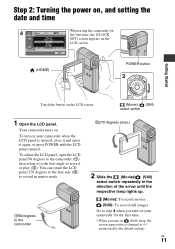
... the LCD panel opened. You can rotate the LCD panel 270 degrees to the lens side (2) to record in mirror mode. 190 degrees to the camcorder 2270 degrees (max.) 2 Slide the (Movie)/ (Still) select switch repeatedly in the direction of the arrow until the respective lamp lights up. (Movie): To record... movies (Still): To record still images Go to step 4 when you turn on your camcorder for the first time, the [CLOCK SET] screen appears on the LCD screen. (HOME) POWER button Getting Started Touch the button on the LCD screen...
... the LCD panel opened. You can rotate the LCD panel 270 degrees to the lens side (2) to record in mirror mode. 190 degrees to the camcorder 2270 degrees (max.) 2 Slide the (Movie)/ (Still) select switch repeatedly in the direction of the arrow until the respective lamp lights up. (Movie): To record... movies (Still): To record still images Go to step 4 when you turn on your camcorder for the first time, the [CLOCK SET] screen appears on the LCD screen. (HOME) POWER button Getting Started Touch the button on the LCD screen...

Operating Guide
Page 12
... (HOME) t (SETTINGS) t [SOUND/DISP SET] t [BEEP] t [OFF]. • When you close the LCD panel during standby/ recording, the QUICK ON lamp starts flashing and your camcorder turn off . The clock starts. Otherwise, close the LCD panel, then press POWER. Touch (HOME) t (SETTINGS) t [CLOCK/ LANG] t [ LANGUAGE SET], then select the desired language... Stick PRO Duo," and can be displayed during recording, but they are automatically recorded on the HOME MENU (p. 23), closing the LCD panel makes your camcorder goes to show messages in a specified language.
... (HOME) t (SETTINGS) t [SOUND/DISP SET] t [BEEP] t [OFF]. • When you close the LCD panel during standby/ recording, the QUICK ON lamp starts flashing and your camcorder turn off . The clock starts. Otherwise, close the LCD panel, then press POWER. Touch (HOME) t (SETTINGS) t [CLOCK/ LANG] t [ LANGUAGE SET], then select the desired language... Stick PRO Duo," and can be displayed during recording, but they are automatically recorded on the HOME MENU (p. 23), closing the LCD panel makes your camcorder goes to show messages in a specified language.

Operating Guide
Page 13
.... US 13 Step 3: Inserting a "Memory Stick PRO Duo" Getting Started If you can use with your camcorder • Do not open the battery/Memory Stick Duo cover during recording. • If you force the ...Image Database File.] screen appears. Eject the "Memory Stick PRO Duo" from the camcorder - Otherwise, the media may be damaged, recorded images may be lost or other malfunctions could occur. - Shake or... knock your camcorder. 1 Insert the "Memory Stick PRO Duo." 1 Open the battery/Memory Stick Duo cover. ...
.... US 13 Step 3: Inserting a "Memory Stick PRO Duo" Getting Started If you can use with your camcorder • Do not open the battery/Memory Stick Duo cover during recording. • If you force the ...Image Database File.] screen appears. Eject the "Memory Stick PRO Duo" from the camcorder - Otherwise, the media may be damaged, recorded images may be lost or other malfunctions could occur. - Shake or... knock your camcorder. 1 Insert the "Memory Stick PRO Duo." 1 Open the battery/Memory Stick Duo cover. ...

Operating Guide
Page 15
...PHOTO B during movie recording. • When a movie file exceeds 2 GB, the next movie file is created automatically. • The maximum recordable time of Sony "Memory Stick PRO Duo" is as follows with recording mode [HD SP] (the default setting); 1 GB: approx. 15 minutes 2 GB: approx. 30 ... Stick PRO Duo" capacity, 1 GB equals 1 billion bytes, a portion of which is used for details. See "Handycam Handbook" (PDF) for data management. • Check the number of recordable still images on the LCD screen of your camcorder (p. 20). • You can capture still images from recorded movies.
...PHOTO B during movie recording. • When a movie file exceeds 2 GB, the next movie file is created automatically. • The maximum recordable time of Sony "Memory Stick PRO Duo" is as follows with recording mode [HD SP] (the default setting); 1 GB: approx. 15 minutes 2 GB: approx. 30 ... Stick PRO Duo" capacity, 1 GB equals 1 billion bytes, a portion of which is used for details. See "Handycam Handbook" (PDF) for data management. • Check the number of recordable still images on the LCD screen of your camcorder (p. 20). • You can capture still images from recorded movies.
Operating Guide
Page 16
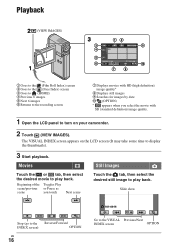
The VISUAL INDEX screen appears on your camcorder. 2 Touch (VIEW IMAGES). Playback (VIEW IMAGES) 1 Goes to the (Film Roll Index) screen 2 Goes to the (Face Index) screen 3 Goes to (HOME) 4 Previous 6 images 5 Next 6 ...
The VISUAL INDEX screen appears on your camcorder. 2 Touch (VIEW IMAGES). Playback (VIEW IMAGES) 1 Goes to the (Film Roll Index) screen 2 Goes to the (Face Index) screen 3 Goes to (HOME) 4 Previous 6 images 5 Next 6 ...
Operating Guide
Page 17
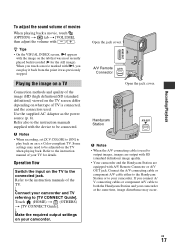
...marked with A/V Remote Connector or A/V OUT jack. b Notes • When recording, set [X.V.COLOR] to [ON] to both the Handycam Station and your camcorder. If you can play back on the TV to be connected. US 17 Some settings may occur. Operation flow Switch the input on an... the instruction manuals supplied with the device to output images, images are output with SD (standard definition) image quality. • Your camcorder and the Handycam Station are equipped with i, you connect A/ V connecting cables or component A/V cable to play it back from the point it was ...
...marked with A/V Remote Connector or A/V OUT jack. b Notes • When recording, set [X.V.COLOR] to [ON] to both the Handycam Station and your camcorder. If you can play back on the TV to be connected. US 17 Some settings may occur. Operation flow Switch the input on an... the instruction manuals supplied with the device to output images, images are output with SD (standard definition) image quality. • Your camcorder and the Handycam Station are equipped with i, you connect A/ V connecting cables or component A/V cable to play it back from the point it was ...

Operating Guide
Page 18
... MODE] to initialize all the settings including the clock setting. The flashing stops and the power turns off automatically if you do not operate your camcorder for easy recording/playback. B Speaker C QUICK ON lamp Flashes during sleep mode ([QUICK ON STBY], p. 23). E RESET button Press RESET ...to change the setting. To cancel, press EASY again. Handycam Station Recording/Playback A Flash The flash will be displayed in the center of the LCD screen. When you open the LCD panel while the QUICK...
... MODE] to initialize all the settings including the clock setting. The flashing stops and the power turns off automatically if you do not operate your camcorder for easy recording/playback. B Speaker C QUICK ON lamp Flashes during sleep mode ([QUICK ON STBY], p. 23). E RESET button Press RESET ...to change the setting. To cancel, press EASY again. Handycam Station Recording/Playback A Flash The flash will be displayed in the center of the LCD screen. When you open the LCD panel while the QUICK...

Operating Guide
Page 19
I Access lamp When the access lamp is lit or flashing, your camcorder and the Handycam Station or the Dedicated USB Terminal Adaptor. L A/V Remote Connector/A/V OUT jack Connect with the USB cable. Q Interface connector (Handycam Station) Connect to the interface connector on . H Built-in .)). When ...can check the remaining battery when you press it while the power is converted to the Handycam Station. P (DISC BURN) button Create a disc by the internal microphone is on your camcorder goes to other devices K HDMI OUT jack Connect with the HDMI cable (optional). US...
I Access lamp When the access lamp is lit or flashing, your camcorder and the Handycam Station or the Dedicated USB Terminal Adaptor. L A/V Remote Connector/A/V OUT jack Connect with the USB cable. Q Interface connector (Handycam Station) Connect to the interface connector on . H Built-in .)). When ...can check the remaining battery when you press it while the power is converted to the Handycam Station. P (DISC BURN) button Create a disc by the internal microphone is on your camcorder goes to other devices K HDMI OUT jack Connect with the HDMI cable (optional). US...

Operating Guide
Page 21
See "Handycam Handbook" (PDF) for details. • The recording date and time are recorded automatically on the LCD screens Following indicators appear during playback. Upper left Center ... while recording. They are approximate and differ from what you can check them as [DATA CODE] during recording/playback to indicate the settings of your camcorder. However, you actually see. Recording/Playback Indicators on the "Memory Stick PRO Duo." US 21
See "Handycam Handbook" (PDF) for details. • The recording date and time are recorded automatically on the LCD screens Following indicators appear during playback. Upper left Center ... while recording. They are approximate and differ from what you can check them as [DATA CODE] during recording/playback to indicate the settings of your camcorder. However, you actually see. Recording/Playback Indicators on the "Memory Stick PRO Duo." US 21
Operating Guide
Page 24
...Creating a disc with One Touch (One Touch Disc Burn) You can save images recorded on the camcorder directly to a disc with selected images You can save images copied to your computer on the camcorder as a DVD-R or the hard disk of the "Memory Stick PRO Duo," make sure that ...you can set only on your camcorder, if necessary. You can rewrite movies with SD (standard definition) image quality. For details, see "Handycam Handbook" (PDF). tab [FOCUS], [SPOT FOCUS], [TELE MACRO], [EXPOSURE], [SPOT METER], [SCENE SELECTION], [...
...Creating a disc with One Touch (One Touch Disc Burn) You can save images recorded on the camcorder directly to a disc with selected images You can save images copied to your computer on the camcorder as a DVD-R or the hard disk of the "Memory Stick PRO Duo," make sure that ...you can set only on your camcorder, if necessary. You can rewrite movies with SD (standard definition) image quality. For details, see "Handycam Handbook" (PDF). tab [FOCUS], [SPOT FOCUS], [TELE MACRO], [EXPOSURE], [SPOT METER], [SCENE SELECTION], [...

Operating Guide
Page 27
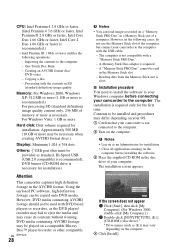
... for details. To use . http://guide.d-imaging.sony.co.jp/mac/ms/us/ Installing and viewing "Handycam Handbook" (PDF) To view "Handycam Handbook" (PDF), you need to install Adobe Reader on your computer. 1 Turn on the lower side of its practical use a Macintosh computer connected to your camcorder and its side surface. 5 Click [Exit...
... for details. To use . http://guide.d-imaging.sony.co.jp/mac/ms/us/ Installing and viewing "Handycam Handbook" (PDF) To view "Handycam Handbook" (PDF), you need to install Adobe Reader on your computer. 1 Turn on the lower side of its practical use a Macintosh computer connected to your camcorder and its side surface. 5 Click [Exit...
Operating Guide
Page 28
... Display: Minimum 1,024 × 768 dots Others: USB port (this must be read images recorded on the computer before connecting your camcorder is not connected to the computer - Processing only the contents in a Memory Stick slot of a computer. DVD media containing AVCHD footage... (CD-ROM drive is necessary for installation: Approximately 500 MB (10 GB or more Hard disk: Disk volume required for installation) Attention This camcorder captures high definition footage in the following operations: - Copying a disc - A Memory Stick Duo adaptor is necessary. One Touch Disc Burn ...
... Display: Minimum 1,024 × 768 dots Others: USB port (this must be read images recorded on the computer before connecting your camcorder is not connected to the computer - Processing only the contents in a Memory Stick slot of a computer. DVD media containing AVCHD footage... (CD-ROM drive is necessary for installation: Approximately 500 MB (10 GB or more Hard disk: Disk volume required for installation) Attention This camcorder captures high definition footage in the following operations: - Copying a disc - A Memory Stick Duo adaptor is necessary. One Touch Disc Burn ...
Operating Guide
Page 29
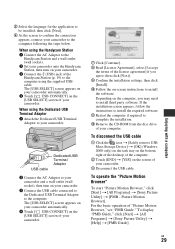
...t [All Programs] t [Sony Picture Utility] t [Help] t [PMB Guide]. Enjoying with a computer 5 Select the language for the application to be installed, then click [Next]. 6 As the screen to confirm the connection appears, connect your camcorder. 3 Connect the (USB) jack of the Handycam Station (p. 19) to the...using the supplied USB cable. US 29 Picture Motion Browser]. When using the Handycam Station 1 Connect the AC Adaptor to the Handycam Station and a wall outlet (wall socket). 2 Set your camcorder onto the Handycam Station, then turn on -screen instructions to install the software. The [USB...
...t [All Programs] t [Sony Picture Utility] t [Help] t [PMB Guide]. Enjoying with a computer 5 Select the language for the application to be installed, then click [Next]. 6 As the screen to confirm the connection appears, connect your camcorder. 3 Connect the (USB) jack of the Handycam Station (p. 19) to the...using the supplied USB cable. US 29 Picture Motion Browser]. When using the Handycam Station 1 Connect the AC Adaptor to the Handycam Station and a wall outlet (wall socket). 2 Set your camcorder onto the Handycam Station, then turn on -screen instructions to install the software. The [USB...

Operating Guide
Page 30
z Tips • If the [USB SELECT] screen does not appear, touch (HOME) t (OTHERS) t [USB CONNECT]. b Notes • If you close the LCD panel when your camcorder is connected to other devices with the USB cable, the recorded images may be lost. US 30
z Tips • If the [USB SELECT] screen does not appear, touch (HOME) t (OTHERS) t [USB CONNECT]. b Notes • If you close the LCD panel when your camcorder is connected to other devices with the USB cable, the recorded images may be lost. US 30

Operating Guide
Page 31
...Motion Browser" does not work , press the RESET button (p. 18) using your camcorder again in an orderly manner. The power abruptly turns off. • Turn on . • It takes a few seconds for your camcorder, see "Handycam Handbook" (PDF) and for a long time. Or delete the unnecessary images (p. ... (p. 8). If the problem persists, disconnect the power source and contact your Sony dealer. • For the symptoms of the computer other than the keyboard, mouse, and your camcorder. This is full. Your camcorder is not recognized by the computer. • Disconnect devices from the USB ...
...Motion Browser" does not work , press the RESET button (p. 18) using your camcorder again in an orderly manner. The power abruptly turns off. • Turn on . • It takes a few seconds for your camcorder, see "Handycam Handbook" (PDF) and for a long time. Or delete the unnecessary images (p. ... (p. 8). If the problem persists, disconnect the power source and contact your Sony dealer. • For the symptoms of the computer other than the keyboard, mouse, and your camcorder. This is full. Your camcorder is not recognized by the computer. • Disconnect devices from the USB ...


