Operating Guide
Page 5
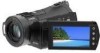
... movies, it is recommended that you cannot view the images. 5 to the camcorder. • When inserting or ejecting the "Memory Stick PRO Duo," be careful so that the "Memory Stick PRO Duo" does not pop out and drop (p. 13). • When connecting your camcorder. However, there is no guarantee that interference will damage the terminal and...
... movies, it is recommended that you cannot view the images. 5 to the camcorder. • When inserting or ejecting the "Memory Stick PRO Duo," be careful so that the "Memory Stick PRO Duo" does not pop out and drop (p. 13). • When connecting your camcorder. However, there is no guarantee that interference will damage the terminal and...
Operating Guide
Page 6
... your recorded images on -screen displays in each local language are captured using your camcorder may not operate correctly. About language setting • The on other accessories are subject to format the "Memory Stick PRO Duo" in this manual • The images of the computer. 6 Change... the screen language before using a digital still camera, and therefore may vary depending on a disc such as DVD-R using a computer. When the camcorder is recommended that you ...
... your recorded images on -screen displays in each local language are captured using your camcorder may not operate correctly. About language setting • The on other accessories are subject to format the "Memory Stick PRO Duo" in this manual • The images of the computer. 6 Change... the screen language before using a digital still camera, and therefore may vary depending on a disc such as DVD-R using a computer. When the camcorder is recommended that you ...
Operating Guide
Page 7
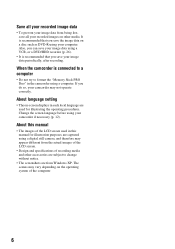
" HOME" and " OPTION 23 Saving images 26 Deleting images 26 Enjoying with a computer Viewing "Handycam Handbook" (PDF 27 What you can do with a Windows computer 28 Troubleshooting Troubleshooting 32 Additional Information Precautions 35 Specifications 37 7 Table of ...Step 2: Charging the battery pack 9 Step 3: Turning the power on, and setting the date and time 12 Changing the language setting 12 Step 4: Inserting a "Memory Stick PRO Duo 13 Recording/Playback Recording 14 Playback 16 Playing the image on a TV 17 Names and functions of parts and controls 18 Indicators displayed...
" HOME" and " OPTION 23 Saving images 26 Deleting images 26 Enjoying with a computer Viewing "Handycam Handbook" (PDF 27 What you can do with a Windows computer 28 Troubleshooting Troubleshooting 32 Additional Information Precautions 35 Specifications 37 7 Table of ...Step 2: Charging the battery pack 9 Step 3: Turning the power on, and setting the date and time 12 Changing the language setting 12 Step 4: Inserting a "Memory Stick PRO Duo 13 Recording/Playback Recording 14 Playback 16 Playing the image on a TV 17 Names and functions of parts and controls 18 Indicators displayed...
Operating Guide
Page 8
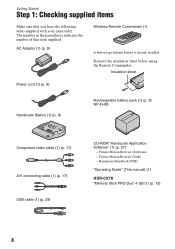
... indicates the number of that you have the following items supplied with your camcorder. Remove the insulation sheet before using the Remote Commander. Picture Motion Browser Guide - Picture Motion Browser (Software) - Handycam Handbook (PDF) "Operating Guide" (This manual) (1) HDR-CX7K "Memory Stick PRO Duo" 4 GB (1) (p. 13) 8 Getting Started Step 1: Checking supplied items Make sure that...
... indicates the number of that you have the following items supplied with your camcorder. Remove the insulation sheet before using the Remote Commander. Picture Motion Browser Guide - Picture Motion Browser (Software) - Handycam Handbook (PDF) "Operating Guide" (This manual) (1) HDR-CX7K "Memory Stick PRO Duo" 4 GB (1) (p. 13) 8 Getting Started Step 1: Checking supplied items Make sure that...
Operating Guide
Page 12
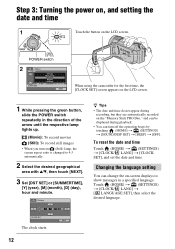
POWER switch When using the camcorder for the first time, the [CLOCK SET] screen appears on (Still) lamp, the screen aspect ratio is changed to show messages in the direction of ...), hour and minute. The clock starts. 12 z Tips • The date and time do not appear during recording, but they are automatically recorded on the "Memory Stick PRO Duo," and can be displayed during playback. • You can change the on the LCD screen.
POWER switch When using the camcorder for the first time, the [CLOCK SET] screen appears on (Still) lamp, the screen aspect ratio is changed to show messages in the direction of ...), hour and minute. The clock starts. 12 z Tips • The date and time do not appear during recording, but they are automatically recorded on the "Memory Stick PRO Duo," and can be displayed during playback. • You can change the on the LCD screen.
Operating Guide
Page 13
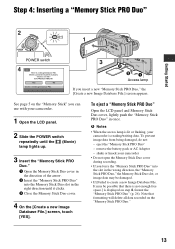
... reading/writing data. shake or knock your camcorder • Do not open the Memory Stick Duo cover during recording. • If you force the "Memory Stick PRO Duo" into the Memory Stick Duo slot in the right direction until the (Movie) lamp lights up. 3 Insert the "Memory Stick PRO Duo." 1 Open the Memory Stick Duo cover in the direction of the...
... reading/writing data. shake or knock your camcorder • Do not open the Memory Stick Duo cover during recording. • If you force the "Memory Stick PRO Duo" into the Memory Stick Duo slot in the right direction until the (Movie) lamp lights up. 3 Insert the "Memory Stick PRO Duo." 1 Open the Memory Stick Duo cover in the direction of the...
Operating Guide
Page 15
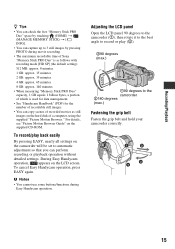
... images by pressing PHOTO during Easy Handycam operation. For details, see "Picture Motion Browser Guide" on the LCD screen. b Notes • You cannot use some buttons/functions during movie recording. • The maximum recordable time of Sony "Memory Stick PRO Duo" is as still images on the camcorder will be set to automatic adjustment so...
... images by pressing PHOTO during Easy Handycam operation. For details, see "Picture Motion Browser Guide" on the LCD screen. b Notes • You cannot use some buttons/functions during movie recording. • The maximum recordable time of Sony "Memory Stick PRO Duo" is as still images on the camcorder will be set to automatic adjustment so...

Operating Guide
Page 19
...microphone Records sound on the "Memory Stick PRO Duo." qf (HOME) button (p. 23) qg Zoom buttons Press for zooming in red during playback zoom, the point you touched will be less than 5.5 mm (7/32 in mirror mode, open the LCD screen 90 degrees to the camcorder (1), then rotate it 180...from the speaker while playing back. ef BATT (battery release) lever (p. 10) 19 Recording/Playback qh Memory Stick Duo slot (p. 13) qj Access lamp When the access lamp is lit or flashing, your camcorder is low. wl Flash Flashes when using a tripod screw. qs RESET button To initialize the settings (...
...microphone Records sound on the "Memory Stick PRO Duo." qf (HOME) button (p. 23) qg Zoom buttons Press for zooming in red during playback zoom, the point you touched will be less than 5.5 mm (7/32 in mirror mode, open the LCD screen 90 degrees to the camcorder (1), then rotate it 180...from the speaker while playing back. ef BATT (battery release) lever (p. 10) 19 Recording/Playback qh Memory Stick Duo slot (p. 13) qj Access lamp When the access lamp is lit or flashing, your camcorder is low. wl Flash Flashes when using a tripod screw. qs RESET button To initialize the settings (...
Operating Guide
Page 21
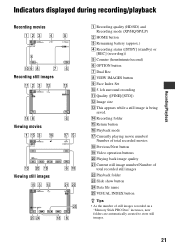
... total recorded still images V Playback folder W Slide show button X Data file name Y VISUAL INDEX button z Tips • As the number of still images recorded on a "Memory Stick PRO Duo" increases, new folders are automatically created to store still images. 21 Recording/Playback Indicators displayed during recording/playback Recording movies Recording still images...
... total recorded still images V Playback folder W Slide show button X Data file name Y VISUAL INDEX button z Tips • As the number of still images recorded on a "Memory Stick PRO Duo" increases, new folders are automatically created to store still images. 21 Recording/Playback Indicators displayed during recording/playback Recording movies Recording still images...
Operating Guide
Page 22
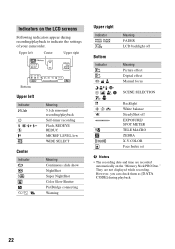
n Backlight White balance SteadyShot off Meaning Picture effect Digital effect Manual focus SCENE SELECTION . Indicators on the "Memory Stick PRO Duo." Upper left Center Upper right Bottom Upper left Indicator Center Indicator E Meaning 5.1ch surround recording/playback Self-timer recording Flash, REDEYE REDUC MICREF... and time are not displayed while recording. However, you can check them as [DATA CODE] during recording/playback to indicate the settings of your camcorder. They are recorded automatically on the LCD screens Following indicators appear during playback. 22
n Backlight White balance SteadyShot off Meaning Picture effect Digital effect Manual focus SCENE SELECTION . Indicators on the "Memory Stick PRO Duo." Upper left Center Upper right Bottom Upper left Indicator Center Indicator E Meaning 5.1ch surround recording/playback Self-timer recording Flash, REDEYE REDUC MICREF... and time are not displayed while recording. However, you can check them as [DATA CODE] during recording/playback to indicate the settings of your camcorder. They are recorded automatically on the LCD screens Following indicators appear during playback. 22
Operating Guide
Page 24
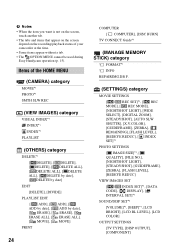
Items of your camcorder at the time. • Some items appear without a tab. • The OPTION MENU cannot be used during Easy Handycam operation (p. 15). b Notes • When the item you want is not on the screen, touch another tab. ... ERASE], [ ERASE ALL], [ [ MOVE], [ ADD], [ ADD by date], ERASE], [ ERASE ALL], MOVE] PRINT 24 COMPUTER [ COMPUTER], [DISC BURN] TV CONNECT Guide*1 (MANAGE MEMORY STICK) category FORMAT*1 INFO REPAIRIMG.DB F. (SETTINGS) category MOVIE SETTINGS [ / REC SET]*1, [ REC MODE], [ REC MODE], [NIGHTSHOT LIGHT], [WIDE SELECT], [DIGITAL ZOOM], [STEADYSHOT], [AUTO ...
Items of your camcorder at the time. • Some items appear without a tab. • The OPTION MENU cannot be used during Easy Handycam operation (p. 15). b Notes • When the item you want is not on the screen, touch another tab. ... ERASE], [ ERASE ALL], [ [ MOVE], [ ADD], [ ADD by date], ERASE], [ ERASE ALL], MOVE] PRINT 24 COMPUTER [ COMPUTER], [DISC BURN] TV CONNECT Guide*1 (MANAGE MEMORY STICK) category FORMAT*1 INFO REPAIRIMG.DB F. (SETTINGS) category MOVIE SETTINGS [ / REC SET]*1, [ REC MODE], [ REC MODE], [NIGHTSHOT LIGHT], [WIDE SELECT], [DIGITAL ZOOM], [STEADYSHOT], [AUTO ...
Operating Guide
Page 26
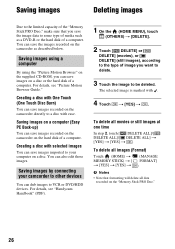
... (HOME) t MEMORY STICK) t [ t [YES] t [YES] t (MANAGE FORMAT] . To delete all movies or still images at one time In step 2, touch [ DELETE ALL]/[ DELETE ALL]/[ DELETE ALL] t [YES] t [YES] t . You can save images recorded on the hard disk of a computer. For details, see "Handycam Handbook" (PDF)....is marked with selected images You can dub images to your camcorder to other devices You can save images on the "Memory Stick PRO Duo." 26 Saving images Deleting images Due to the limited capacity of the "Memory Stick PRO Duo," make sure that formatting will delete all data...
... (HOME) t MEMORY STICK) t [ t [YES] t [YES] t (MANAGE FORMAT] . To delete all movies or still images at one time In step 2, touch [ DELETE ALL]/[ DELETE ALL]/[ DELETE ALL] t [YES] t [YES] t . You can save images recorded on the hard disk of a computer. For details, see "Handycam Handbook" (PDF)....is marked with selected images You can dub images to your camcorder to other devices You can save images on the "Memory Stick PRO Duo." 26 Saving images Deleting images Due to the limited capacity of the "Memory Stick PRO Duo," make sure that formatting will delete all data...
Operating Guide
Page 29
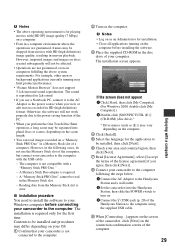
...computer Otherwise, the software will not be affected. • Operations are not guaranteed, even on a computer. • Even in a Memory Stick slot of your camcorder to the computer following cases, do not use a Notebook PC, connect it to be installed, then click [Next]. 6 Check your... (p. 20) of the Handycam Station to the computer using the supplied USB cable. 9 When [Connecting...] appears on the screen of the computer, but connect your camcorder to your Windows computer before installing the software. 3 Place the supplied CD-ROM in the Memory Stick slot. - The sound ...
...computer Otherwise, the software will not be affected. • Operations are not guaranteed, even on a computer. • Even in a Memory Stick slot of your camcorder to the computer following cases, do not use a Notebook PC, connect it to be installed, then click [Next]. 6 Check your... (p. 20) of the Handycam Station to the computer using the supplied USB cable. 9 When [Connecting...] appears on the screen of the computer, but connect your camcorder to your Windows computer before installing the software. 3 Place the supplied CD-ROM in the Memory Stick slot. - The sound ...
Operating Guide
Page 31
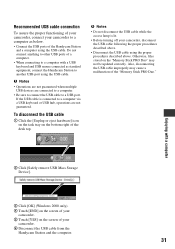
... task tray on the bottom right of your camcorder. 6 Disconnect the USB cable from the Handycam Station and the computer. 31 Enjoying with a USB keyboard and USB mouse connected as below. • Connect the USB ports of the "Memory Stick PRO Duo." Otherwise, files stored on the screen... of the desk top. If the USB cable is lit. • Before turning off your camcorder. 5 Touch [YES] on the "Memory Stick PRO Duo" may cause a malfunction of the Handycam Station and a computer using the proper procedures described above. Do not connect anything to other USB ports ...
... task tray on the bottom right of your camcorder. 6 Disconnect the USB cable from the Handycam Station and the computer. 31 Enjoying with a USB keyboard and USB mouse connected as below. • Connect the USB ports of the "Memory Stick PRO Duo." Otherwise, files stored on the screen... of the desk top. If the USB cable is lit. • Before turning off your camcorder. 5 Touch [YES] on the "Memory Stick PRO Duo" may cause a malfunction of the Handycam Station and a computer using the proper procedures described above. Do not connect anything to other USB ports ...
Operating Guide
Page 32
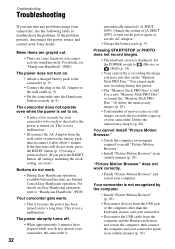
... have elapsed while you do not operate your camcorder, the camcorder is displayed. Use a new "Memory Stick PRO Duo" or format the "Memory Stick PRO Duo." "Picture Motion Browser" does not work . • During Easy Handycam operation, available buttons/functions are limited. Change ... (p. 9). • Set the camcorder onto the Handycam Station securely (p. 9). Your camcorder gets warm. • This is not recognized by the computer. • Install "Picture Motion Browser" (p. 29). • Disconnect devices from the USB jack of your Sony dealer. Or delete the unnecessary images...
... have elapsed while you do not operate your camcorder, the camcorder is displayed. Use a new "Memory Stick PRO Duo" or format the "Memory Stick PRO Duo." "Picture Motion Browser" does not work . • During Easy Handycam operation, available buttons/functions are limited. Change ... (p. 9). • Set the camcorder onto the Handycam Station securely (p. 9). Your camcorder gets warm. • This is not recognized by the computer. • Install "Picture Motion Browser" (p. 29). • Disconnect devices from the USB jack of your Sony dealer. Or delete the unnecessary images...
Operating Guide
Page 33
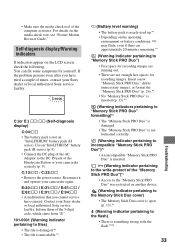
...couple of times, contact your camcorder securely (p. 9). Contact your camcorder again. • Make sure the media check tool of the "Memory Stick PRO Duo")*3 • Access to the "Memory Stick PRO Duo" was restricted on another device. (Warning indicator pertaining to the Memory Stick Duo cover) • The Memory Stick Duo cover is open (p. ....*1 E (Battery level warning) • The battery pack is not an "InfoLITHIUM" battery pack (H series). Inform them of the Handycam Station or your Sony dealer or local authorized Sony service facility. You can fix some symptoms by yourself.
...couple of times, contact your camcorder securely (p. 9). Contact your camcorder again. • Make sure the media check tool of the "Memory Stick PRO Duo")*3 • Access to the "Memory Stick PRO Duo" was restricted on another device. (Warning indicator pertaining to the Memory Stick Duo cover) • The Memory Stick Duo cover is open (p. ....*1 E (Battery level warning) • The battery pack is not an "InfoLITHIUM" battery pack (H series). Inform them of the Handycam Station or your Sony dealer or local authorized Sony service facility. You can fix some symptoms by yourself.

Operating Guide
Page 38
...Mass (approx.) 370 g (13 oz) main unit only 450 g (15 oz) including the NP-FH60 rechargeable battery pack, and a "Memory Stick PRO Duo" Handycam Station DCRA-C191 Input/Output connectors Audio/Video output 10 pin connector Video signal: 1 Vp-p, 75 Ω (ohms) Luminance signal: 1 ...°C (32 °F to 104 °F) Storage temperature -20 °C to + 60 °C (-4 °F to change without notice. • Your camcorder is produced under the license of Dolby Laboratories. 38 Rechargeable battery pack NP-FH60 Maximum output voltage DC 8.4 V Output voltage DC 7.2 V Capacity 7.2 Wh (1 000...
...Mass (approx.) 370 g (13 oz) main unit only 450 g (15 oz) including the NP-FH60 rechargeable battery pack, and a "Memory Stick PRO Duo" Handycam Station DCRA-C191 Input/Output connectors Audio/Video output 10 pin connector Video signal: 1 Vp-p, 75 Ω (ohms) Luminance signal: 1 ...°C (32 °F to 104 °F) Storage temperature -20 °C to + 60 °C (-4 °F to change without notice. • Your camcorder is produced under the license of Dolby Laboratories. 38 Rechargeable battery pack NP-FH60 Maximum output voltage DC 8.4 V Output voltage DC 7.2 V Capacity 7.2 Wh (1 000...
Operating Guide
Page 39
...Sony Corporation. • "Memory Stick," " ," "Memory Stick Duo," " ," "Memory Stick PRO Duo," " ," "Memory Stick PRO-HG Duo," " ," "Memory Stick Micro," "MagicGate," " ," "MagicGate Memory Stick" and "MagicGate Memory Stick Duo" are trademarks or registered trademarks of Sony Corporation. • "x.v.Color" is a trademark of Sony Corporation. • "InfoLITHIUM" is a trademark of Sony... Co., Ltd. in the U.S. On trademarks • "Handycam" and are registered trademarks of Sony Corporation. • "AVCHD" and "AVCHD" logotype are not mentioned in each case in this...
...Sony Corporation. • "Memory Stick," " ," "Memory Stick Duo," " ," "Memory Stick PRO Duo," " ," "Memory Stick PRO-HG Duo," " ," "Memory Stick Micro," "MagicGate," " ," "MagicGate Memory Stick" and "MagicGate Memory Stick Duo" are trademarks or registered trademarks of Sony Corporation. • "x.v.Color" is a trademark of Sony Corporation. • "InfoLITHIUM" is a trademark of Sony... Co., Ltd. in the U.S. On trademarks • "Handycam" and are registered trademarks of Sony Corporation. • "AVCHD" and "AVCHD" logotype are not mentioned in each case in this...


