Operating Guide
Page 1
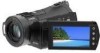
Digital HD Video Camera Recorder Operating Guide HDR-CX7/CX7K 3-214-660-11(1) For details on the advanced operations, please refer to "Handycam Handbook" (PDF). © 2007 Sony Corporation
Digital HD Video Camera Recorder Operating Guide HDR-CX7/CX7K 3-214-660-11(1) For details on the advanced operations, please refer to "Handycam Handbook" (PDF). © 2007 Sony Corporation
Operating Guide
Page 3
... service technician to perform routine safety checks (as opening or removing covers may result in safe operating condition. 3 Cleaning Unplug the set from the wall outlet before cleaning or polishing it is left unattended and unused for necessary ventilation. Never place the set in the operating instructions. Improper adjustment of time, unplug it is not likely to qualified service personnel. for service. Power-Cord Protection Route the power cord...
... service technician to perform routine safety checks (as opening or removing covers may result in safe operating condition. 3 Cleaning Unplug the set from the wall outlet before cleaning or polishing it is left unattended and unused for necessary ventilation. Never place the set in the operating instructions. Improper adjustment of time, unplug it is not likely to qualified service personnel. for service. Power-Cord Protection Route the power cord...
Operating Guide
Page 4
... the instructions, may cause harmful interference to Part 15 of rechargeable batteries, call : Sony Customer Information Center 1-800222-SONY (7669). Notes HDR-CX7 is subject to operate this manual thoroughly, and retain it for the FCC related matters only. This equipment generates, uses, and can help preserve our environment by returning your Sony dealer regarding recycling of the FCC Rules. Owner's Record The model and serial numbers...
... the instructions, may cause harmful interference to Part 15 of rechargeable batteries, call : Sony Customer Information Center 1-800222-SONY (7669). Notes HDR-CX7 is subject to operate this manual thoroughly, and retain it for the FCC related matters only. This equipment generates, uses, and can help preserve our environment by returning your Sony dealer regarding recycling of the FCC Rules. Owner's Record The model and serial numbers...
Operating Guide
Page 5
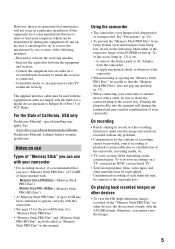
... recording of the camcorder, recording media, etc. • TV color systems differ depending on , the user is connected. - Increase the separation between the equipment and receiver. - to insert the connector plug in this manual. On recording • Before starting to record, test the recording function to Subpart B of Part 15 of a "Memory Stick PRO Duo." • "Memory Stick PRO Duo" and "Memory Stick PRO-HG Duo" are recorded without any problems. • Compensation for a digital device pursuant...
... recording of the camcorder, recording media, etc. • TV color systems differ depending on , the user is connected. - Increase the separation between the equipment and receiver. - to insert the connector plug in this manual. On recording • Before starting to record, test the recording function to Subpart B of Part 15 of a "Memory Stick PRO Duo." • "Memory Stick PRO Duo" and "Memory Stick PRO-HG Duo" are recorded without any problems. • Compensation for a digital device pursuant...
Operating Guide
Page 6
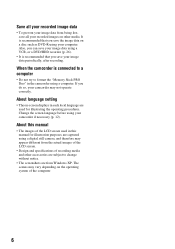
... and specifications of recording media and other media. The scenes may not operate correctly. Change the screen language before using your image data periodically, after recording. Save all your recorded image data • To prevent your image data from being lost, save all your recorded images on other accessories are subject to format the "Memory Stick PRO Duo" in this manual • The images of the LCD screen used for illustration purposes are captured using a digital still camera, and therefore may appear different from Windows...
... and specifications of recording media and other media. The scenes may not operate correctly. Change the screen language before using your image data periodically, after recording. Save all your recorded image data • To prevent your image data from being lost, save all your recorded images on other accessories are subject to format the "Memory Stick PRO Duo" in this manual • The images of the LCD screen used for illustration purposes are captured using a digital still camera, and therefore may appear different from Windows...
Operating Guide
Page 8
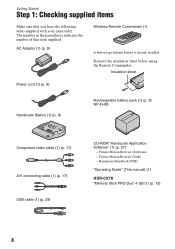
... sheet Power cord (1) (p. 9) Handycam Station (1) (p. 9) Rechargeable battery pack (1) (p. 9) NP-FH60 Component video cable (1) (p. 17) A/V connecting cable (1) (p. 17) USB cable (1) (p. 29) CD-ROM "Handycam Application Software" (1) (p. 27) - Picture Motion Browser (Software) - Getting Started Step 1: Checking supplied items Make sure that item supplied. AC Adaptor (1) (p. 9) Wireless Remote Commander (1) A button-type lithium battery is already installed. Picture Motion Browser Guide - Handycam Handbook (PDF) "Operating Guide" (This manual) (1) HDR-CX7K "Memory Stick PRO Duo...
... sheet Power cord (1) (p. 9) Handycam Station (1) (p. 9) Rechargeable battery pack (1) (p. 9) NP-FH60 Component video cable (1) (p. 17) A/V connecting cable (1) (p. 17) USB cable (1) (p. 29) CD-ROM "Handycam Application Software" (1) (p. 27) - Picture Motion Browser (Software) - Getting Started Step 1: Checking supplied items Make sure that item supplied. AC Adaptor (1) (p. 9) Wireless Remote Commander (1) A button-type lithium battery is already installed. Picture Motion Browser Guide - Handycam Handbook (PDF) "Operating Guide" (This manual) (1) HDR-CX7K "Memory Stick PRO Duo...
Operating Guide
Page 10
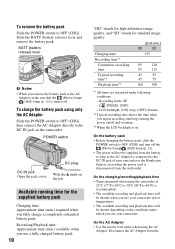
... you use a fully charged battery pack. 10 "HD" stands for high definition image quality, and "SD" stands for the supplied battery pack Charging time: Approximate time (min.) required when you repeat recording start/stop, turning the power on/off and zooming. *3 When the LCD backlight is disconnected from the Recording/Playback time: Approximate time (min.) available when you remove the battery pack or the AC Adaptor, make sure that the (Movie...
... you use a fully charged battery pack. 10 "HD" stands for high definition image quality, and "SD" stands for the supplied battery pack Charging time: Approximate time (min.) required when you repeat recording start/stop, turning the power on/off and zooming. *3 When the LCD backlight is disconnected from the Recording/Playback time: Approximate time (min.) available when you remove the battery pack or the AC Adaptor, make sure that the (Movie...
Operating Guide
Page 12
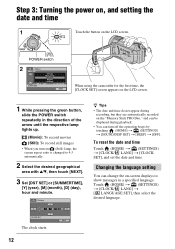
... camcorder for the first time, the [CLOCK SET] screen appears on (Still) lamp, the screen aspect ratio is changed to show messages in the direction of the arrow until the respective lamp lights up. (Movie): To record movies (Still): To record still images • When you turn off the operation beeps by touching (HOME) t (SETTINGS) t [SOUND/DISP SET] t [BEEP] t [OFF]. Step 3: Turning the power on, and setting the date and time Touch the button on -screen displays...
... camcorder for the first time, the [CLOCK SET] screen appears on (Still) lamp, the screen aspect ratio is changed to show messages in the direction of the arrow until the respective lamp lights up. (Movie): To record movies (Still): To record still images • When you turn off the operation beeps by touching (HOME) t (SETTINGS) t [SOUND/DISP SET] t [BEEP] t [OFF]. Step 3: Turning the power on, and setting the date and time Touch the button on -screen displays...
Operating Guide
Page 15
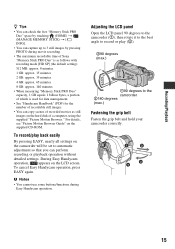
During Easy Handycam operation, appears on the supplied CD-ROM. To cancel Easy Handycam operation, press EASY again. For details, see "Picture Motion Browser Guide" on the LCD screen. To record/play (2). 290 degrees (max.) 190 degrees to automatic adjustment so that you can perform recording or playback operation without detailed settings. b Notes • You cannot use some buttons/functions during movie recording. • The maximum recordable time of Sony "Memory Stick PRO Duo" is as follows with recording mode [HD...
During Easy Handycam operation, appears on the supplied CD-ROM. To cancel Easy Handycam operation, press EASY again. For details, see "Picture Motion Browser Guide" on the LCD screen. To record/play (2). 290 degrees (max.) 190 degrees to automatic adjustment so that you can perform recording or playback operation without detailed settings. b Notes • You cannot use some buttons/functions during movie recording. • The maximum recordable time of Sony "Memory Stick PRO Duo" is as follows with recording mode [HD...
Operating Guide
Page 17
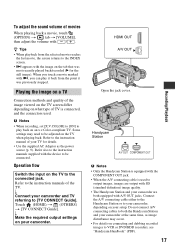
... time, as the power source (p. 9). Connect the A/V connecting cable either to the Handycam Station or to be connected. Refer to the connected jack. Operation flow Switch the input on what type of TV is used . Playing the image on a TV Connection methods and quality of the image viewed on the TV screen differ depending on the TV to the instruction manual of your camcorder. Touch (HOME) t (OTHERS) t [TV CONNECT Guide]. To adjust the sound volume of movies When playing...
... time, as the power source (p. 9). Connect the A/V connecting cable either to the Handycam Station or to be connected. Refer to the connected jack. Operation flow Switch the input on what type of TV is used . Playing the image on a TV Connection methods and quality of the image viewed on the TV screen differ depending on the TV to the instruction manual of your camcorder. Touch (HOME) t (OTHERS) t [TV CONNECT Guide]. To adjust the sound volume of movies When playing...

Operating Guide
Page 19
... settings for date and time. es Remote sensor/Infrared port Receive the signal from the Remote Commander. ef BATT (battery release) lever (p. 10) 19 Recording/Playback Lens (Carl Zeiss Lens) ea Camera recording lamp Lights up by the internal microphone is low. ed Tripod receptacle (Bottom surface) Attach the tripod (optional: the length of the screw must be displayed in mirror mode, open the LCD screen 90 degrees to the camcorder...
... settings for date and time. es Remote sensor/Infrared port Receive the signal from the Remote Commander. ef BATT (battery release) lever (p. 10) 19 Recording/Playback Lens (Carl Zeiss Lens) ea Camera recording lamp Lights up by the internal microphone is low. ed Tripod receptacle (Bottom surface) Attach the tripod (optional: the length of the screw must be displayed in mirror mode, open the LCD screen 90 degrees to the camcorder...
Operating Guide
Page 22
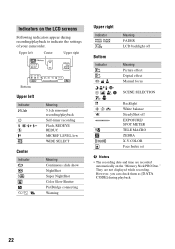
... MICREF LEVEL low WIDE SELECT Meaning Continuous slide show NightShot Super NightShot Color Slow Shutter PictBridge connecting Warning Upper right Indicator Bottom Indicator 9 Meaning FADER LCD backlight off EXPOSURE/ SPOT METER TELE MACRO ZEBRA X.V.COLOR Face Index set b Notes • The recording date and time are not displayed while recording. They are recorded automatically on the LCD screens Following indicators appear during playback. 22 Indicators on the "Memory Stick PRO...
... MICREF LEVEL low WIDE SELECT Meaning Continuous slide show NightShot Super NightShot Color Slow Shutter PictBridge connecting Warning Upper right Indicator Bottom Indicator 9 Meaning FADER LCD backlight off EXPOSURE/ SPOT METER TELE MACRO ZEBRA X.V.COLOR Face Index set b Notes • The recording date and time are not displayed while recording. They are recorded automatically on the LCD screens Following indicators appear during playback. 22 Indicators on the "Memory Stick PRO...
Operating Guide
Page 24
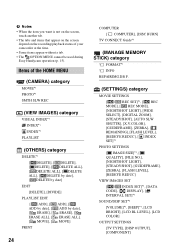
...], [DISC BURN] TV CONNECT Guide*1 (MANAGE MEMORY STICK) category FORMAT*1 INFO REPAIRIMG.DB F. (SETTINGS) category MOVIE SETTINGS [ / REC SET]*1, [ REC MODE], [ REC MODE], [NIGHTSHOT LIGHT], [WIDE SELECT], [DIGITAL ZOOM], [STEADYSHOT], [AUTO SLW SHUTTR], [X.V.COLOR], [GUIDEFRAME], [ZEBRA], [ REMAINING], [FLASH LEVEL], [REDEYE REDUC], [ INDEX SET]*1 PHOTO SETTINGS [ IMAGE SIZE]*1, [ QUALITY], [FILE NO.], [NIGHTSHOT LIGHT], [STEADYSHOT], [GUIDEFRAME], [ZEBRA], [FLASH LEVEL], [REDEYE REDUC] VIEW IMAGES SET [ / INDEX SET]*1, [DATA CODE], [ DISPLAY], [ INTERVAL SET]*1 SOUND/DISP SET*2 [VOLUME...
...], [DISC BURN] TV CONNECT Guide*1 (MANAGE MEMORY STICK) category FORMAT*1 INFO REPAIRIMG.DB F. (SETTINGS) category MOVIE SETTINGS [ / REC SET]*1, [ REC MODE], [ REC MODE], [NIGHTSHOT LIGHT], [WIDE SELECT], [DIGITAL ZOOM], [STEADYSHOT], [AUTO SLW SHUTTR], [X.V.COLOR], [GUIDEFRAME], [ZEBRA], [ REMAINING], [FLASH LEVEL], [REDEYE REDUC], [ INDEX SET]*1 PHOTO SETTINGS [ IMAGE SIZE]*1, [ QUALITY], [FILE NO.], [NIGHTSHOT LIGHT], [STEADYSHOT], [GUIDEFRAME], [ZEBRA], [FLASH LEVEL], [REDEYE REDUC] VIEW IMAGES SET [ / INDEX SET]*1, [DATA CODE], [ DISPLAY], [ INTERVAL SET]*1 SOUND/DISP SET*2 [VOLUME...

Operating Guide
Page 25
Recording/Playback CLOCK/ LANG [CLOCK SET]*1, [AREA SET], [DST SET]/[SUMMERTIME], [ LANGUAGE SET]*1 GENERAL SET [DEMO MODE], [REC LAMP], [CALIBRATION], [A.SHUT OFF], [REMOTE CTRL] *1 You can set these items also during Easy Handycam operation (p. 15). *2 The menu name is changed to [SOUND SETTINGS] during Easy Handycam operation (p. 15). tab [FOCUS], [SPOT FOCUS], [TELE MACRO], [EXPOSURE], [SPOT METER], [SCENE SELECTION], [WHITE BAL.], [COLOR SLOW SHTR], [SUPER NIGHTSHOT] tab [FADER], [D.EFFECT], [PICT.EFFECT] tab [MICREF LEVEL], [SELF-TIMER], [TIMING], [RECORD SOUND] - (The tab...
Recording/Playback CLOCK/ LANG [CLOCK SET]*1, [AREA SET], [DST SET]/[SUMMERTIME], [ LANGUAGE SET]*1 GENERAL SET [DEMO MODE], [REC LAMP], [CALIBRATION], [A.SHUT OFF], [REMOTE CTRL] *1 You can set these items also during Easy Handycam operation (p. 15). *2 The menu name is changed to [SOUND SETTINGS] during Easy Handycam operation (p. 15). tab [FOCUS], [SPOT FOCUS], [TELE MACRO], [EXPOSURE], [SPOT METER], [SCENE SELECTION], [WHITE BAL.], [COLOR SLOW SHTR], [SUPER NIGHTSHOT] tab [FADER], [D.EFFECT], [PICT.EFFECT] tab [MICREF LEVEL], [SELF-TIMER], [TIMING], [RECORD SOUND] - (The tab...
Operating Guide
Page 26
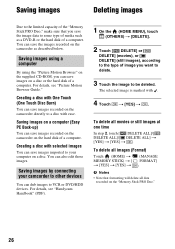
... save the image data to some type of media such as described below. Creating a disc with ease. For details, see "Picture Motion Browser Guide." To delete all images (Format) Touch (HOME) t MEMORY STICK) t [ t [YES] t [YES] t (MANAGE FORMAT] . Saving images using a computer By using the "Picture Motion Browser" on the supplied CD-ROM, you save images imported to VCR or DVD/HDD devices. You can save images recorded on the camcorder directly to be deleted. To delete all movies or still images at one time In step 2, touch [ DELETE ALL]/[ DELETE ALL]/[ DELETE...
... save the image data to some type of media such as described below. Creating a disc with ease. For details, see "Picture Motion Browser Guide." To delete all images (Format) Touch (HOME) t MEMORY STICK) t [ t [YES] t [YES] t (MANAGE FORMAT] . Saving images using a computer By using the "Picture Motion Browser" on the supplied CD-ROM, you save images imported to VCR or DVD/HDD devices. You can save images recorded on the camcorder directly to be deleted. To delete all movies or still images at one time In step 2, touch [ DELETE ALL]/[ DELETE ALL]/[ DELETE...
Operating Guide
Page 28
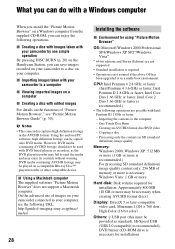
... format discs.) Display: DirectX 7 or later-compatible video card, Minimum 1,024 × 768 dots, High Color (16 bit color) Others: USB port (this must be copied onto DVD media. However, DVD media containing AVCHD footage should not be played on your computer, see "Picture Motion Browser Guide" (p. 30). b Notes • This camcorder captures high definition footage in a multi-boot environment. Windows Vista: 1 GB or more Hard disk: Disk volume required for installation) Importing the contents to a disc on a compatible...
... format discs.) Display: DirectX 7 or later-compatible video card, Minimum 1,024 × 768 dots, High Color (16 bit color) Others: USB port (this must be copied onto DVD media. However, DVD media containing AVCHD footage should not be played on your computer, see "Picture Motion Browser Guide" (p. 30). b Notes • This camcorder captures high definition footage in a multi-boot environment. Windows Vista: 1 GB or more Hard disk: Disk volume required for installation) Importing the contents to a disc on a compatible...
Operating Guide
Page 29
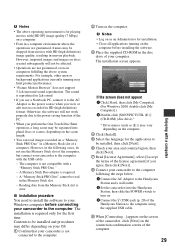
... click [Next]. 8 Connect your camcorder to the computer following cases, do not use a Notebook PC, connect it to the AC Adaptor as (E:)) may be separated into plural discs or scenes, depending on your OS. 1 Confirm that your camcorder to the power saving function of a computer. x Installation procedure You need to install the software to the computer. 2 Turn on a "Memory Stick PRO Duo" in uneven playback. The installation is required. -
... click [Next]. 8 Connect your camcorder to the computer following cases, do not use a Notebook PC, connect it to the AC Adaptor as (E:)) may be separated into plural discs or scenes, depending on your OS. 1 Confirm that your camcorder to the power saving function of a computer. x Installation procedure You need to install the software to the computer. 2 Turn on a "Memory Stick PRO Duo" in uneven playback. The installation is required. -
Operating Guide
Page 32
...). Set the POWER switch to (Movie) or (Still) (p. 14). • Your camcorder is recording the image you have elapsed while you cannot activate simultaneously. "Picture Motion Browser" does not work , press the RESET button (p. 19) using your camcorder, use the AC Adaptor. • Charge the battery pack (p. 9). Your camcorder is not recognized by the computer. • Install "Picture Motion Browser" (p. 29). • Disconnect devices from the USB jack of your camcorder. For details, see "Handycam Handbook" (PDF). Troubleshooting Troubleshooting...
...). Set the POWER switch to (Movie) or (Still) (p. 14). • Your camcorder is recording the image you have elapsed while you cannot activate simultaneously. "Picture Motion Browser" does not work , press the RESET button (p. 19) using your camcorder, use the AC Adaptor. • Charge the battery pack (p. 9). Your camcorder is not recognized by the computer. • Install "Picture Motion Browser" (p. 29). • Disconnect devices from the USB jack of your camcorder. For details, see "Handycam Handbook" (PDF). Troubleshooting Troubleshooting...
Operating Guide
Page 33
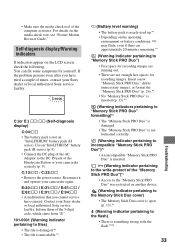
... the media check tool, see "Picture Motion Browser Guide." If the problem persists even after you cannot service has occurred. C:04:00 C:(or E:) ss:ss (Self-diagnosis display) C:04:ss • The battery pack is something wrong with the flash.*2*3 33 Troubleshooting Contact your camcorder again. Reconnect it and operate your Sony dealer or local authorized Sony service facility. Insert a new "Memory Stick PRO Duo," delete unnecessary images, or format the "Memory Stick PRO Duo...
... the media check tool, see "Picture Motion Browser Guide." If the problem persists even after you cannot service has occurred. C:04:00 C:(or E:) ss:ss (Self-diagnosis display) C:04:ss • The battery pack is something wrong with the flash.*2*3 33 Troubleshooting Contact your camcorder again. Reconnect it and operate your Sony dealer or local authorized Sony service facility. Insert a new "Memory Stick PRO Duo," delete unnecessary images, or format the "Memory Stick PRO Duo...
Operating Guide
Page 35
... button-type battery out of water and consult a doctor. Near strong radio waves or radiation. On a sandy beach or anywhere dusty. If the battery is not a malfunction. Be particularly careful of the LCD screen may be repaired. - This is used in these operating instructions. • Do not let your camcorder and have contacted your camcorder, the back of the lens. • Keep the POWER switch setting...
... button-type battery out of water and consult a doctor. Near strong radio waves or radiation. On a sandy beach or anywhere dusty. If the battery is not a malfunction. Be particularly careful of the LCD screen may be repaired. - This is used in these operating instructions. • Do not let your camcorder and have contacted your camcorder, the back of the lens. • Keep the POWER switch setting...


