
Operating Instructions
Page 1
4-147-229-13(1) The software of this system may be updated in Malaysia BD/DVD Home Theatre System Operating Instructions BDV-T10 / T11 / E300 © 2009 Sony Corporation To find out details on any available updates, please visit: http://esupport.sony.com (1) Sony Corporation Printed in the future.
4-147-229-13(1) The software of this system may be updated in Malaysia BD/DVD Home Theatre System Operating Instructions BDV-T10 / T11 / E300 © 2009 Sony Corporation To find out details on any available updates, please visit: http://esupport.sony.com (1) Sony Corporation Printed in the future.
Operating Instructions
Page 2
...classified as a CLASS 1 LASER product. BDV-T10/BDV-T11/BDV-E300 Serial No The following measures: - If this apparatus to persons....Sony dealer regarding this product will not occur in a residential installation. However, there is no guarantee that may be securely attached to comply with the installation instructions...Reorient or relocate the receiving antenna (aerial). To reduce the risk of important operating and maintenance (servicing) instructions in the unit,...as long as a bookcase or built-in this BD/ DVD Home Theatre System is encouraged to try to correct the...
...classified as a CLASS 1 LASER product. BDV-T10/BDV-T11/BDV-E300 Serial No The following measures: - If this apparatus to persons....Sony dealer regarding this product will not occur in a residential installation. However, there is no guarantee that may be securely attached to comply with the installation instructions...Reorient or relocate the receiving antenna (aerial). To reduce the risk of important operating and maintenance (servicing) instructions in the unit,...as long as a bookcase or built-in this BD/ DVD Home Theatre System is encouraged to try to correct the...
Operating Instructions
Page 3
...Sony Corporation. 3US When a cart is required when the apparatus has been damaged in any heat sources such as power-supply cord or plug is damaged, liquid has been spilled or objects have fallen into your authority to which the receiver is a trademark. • "Blu-ray Disc," "DVD+RW," "DVD-RW," "DVD+R," "DVD-R," "DVD...at plugs, convenience receptacles, and the point where they exit from Dolby Laboratories. Important Safety Instructions 1) Read these instructions. 2) Keep these instructions. 3) Heed all warnings. 4) Follow all Java-based trademarks and logos are trademarks or ...
...Sony Corporation. 3US When a cart is required when the apparatus has been damaged in any heat sources such as power-supply cord or plug is damaged, liquid has been spilled or objects have fallen into your authority to which the receiver is a trademark. • "Blu-ray Disc," "DVD+RW," "DVD-RW," "DVD+R," "DVD-R," "DVD...at plugs, convenience receptacles, and the point where they exit from Dolby Laboratories. Important Safety Instructions 1) Read these instructions. 2) Keep these instructions. 3) Heed all warnings. 4) Follow all Java-based trademarks and logos are trademarks or ...
Operating Instructions
Page 4
... of Sony Corporation and Sony Computer Entertainment Inc. • "PLAYSTATION" is a trademark of Sony Computer Entertainment Inc. • "x.v.Color" and "x.v.Color" logo are trademarks of Sony Corporation. • "PhotoTV HD" and the "PhotoTV HD" logo are trademarks of Sony Corporation....DVDs, or CDs unless otherwise specified by the text or illustrations. • The instructions in this document. T10, BDV-T11, and BDV-E300. BDV-T10 is underlined. 4US For details, see "Playable Discs" (page 96). • In this manual, "disc" is clearly indicated in these Operating Instructions...
... of Sony Corporation and Sony Computer Entertainment Inc. • "PLAYSTATION" is a trademark of Sony Computer Entertainment Inc. • "x.v.Color" and "x.v.Color" logo are trademarks of Sony Corporation. • "PhotoTV HD" and the "PhotoTV HD" logo are trademarks of Sony Corporation....DVDs, or CDs unless otherwise specified by the text or illustrations. • The instructions in this document. T10, BDV-T11, and BDV-E300. BDV-T10 is underlined. 4US For details, see "Playable Discs" (page 96). • In this manual, "disc" is clearly indicated in these Operating Instructions...

Operating Instructions
Page 5
... Product" (page 56). 5US The following S-AIR products can be used . Notes or instructions for the surround amplifier, surround back amplifier, or S-AIR receiver in these Operating Instructions refer only to when the surround amplifier, surround back amplifier, or S-AIR receiver is compatible with the system: • Surround amplifier: You can enjoy surround speaker...
... Product" (page 56). 5US The following S-AIR products can be used . Notes or instructions for the surround amplifier, surround back amplifier, or S-AIR receiver in these Operating Instructions refer only to when the surround amplifier, surround back amplifier, or S-AIR receiver is compatible with the system: • Surround amplifier: You can enjoy surround speaker...
Operating Instructions
Page 6
...Instructions ....... 4 About the S-AIR function 5 Unpacking 7 Index to Parts and Control 11 Getting Started Step 1: Installing the System .......16 Step 2: Connecting the System ...20 Step 3: Performing the Easy Setup 29 Step 4: Selecting the Source .......32 Step 5: Enjoying Surround Sound 33 Playback Playing a BD/DVD...Settings 84 [Easy Setup 85 [Resetting 86 Additional Information Precautions 87 Notes about the Discs 88 Troubleshooting 89 Self-diagnosis Function 95 Playable Discs 96 Supported Audio Formats 98 Video Output Resolution 99 Specifications 100 Language Code List 102...
...Instructions ....... 4 About the S-AIR function 5 Unpacking 7 Index to Parts and Control 11 Getting Started Step 1: Installing the System .......16 Step 2: Connecting the System ...20 Step 3: Performing the Easy Setup 29 Step 4: Selecting the Source .......32 Step 5: Enjoying Surround Sound 33 Playback Playing a BD/DVD...Settings 84 [Easy Setup 85 [Resetting 86 Additional Information Precautions 87 Notes about the Discs 88 Troubleshooting 89 Self-diagnosis Function 95 Playable Discs 96 Supported Audio Formats 98 Video Output Resolution 99 Specifications 100 Language Code List 102...
Operating Instructions
Page 7
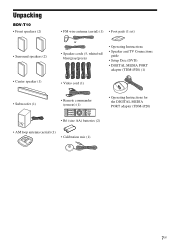
... speakers (2) • Center speaker (1) • FM wire antenna (aerial) (1) • Foot pads (1 set) or • Speaker cords (5, white/red/ blue/gray/green) • Operating Instructions • Speaker and TV Connections guide • Setup Disc (DVD) • DIGITAL MEDIA PORT adapter (TDM-iP20) (1) • Video cord (1) • Subwoofer (1) • Remote commander (remote) (1) • Operating...
... speakers (2) • Center speaker (1) • FM wire antenna (aerial) (1) • Foot pads (1 set) or • Speaker cords (5, white/red/ blue/gray/green) • Operating Instructions • Speaker and TV Connections guide • Setup Disc (DVD) • DIGITAL MEDIA PORT adapter (TDM-iP20) (1) • Video cord (1) • Subwoofer (1) • Remote commander (remote) (1) • Operating...
Operating Instructions
Page 8
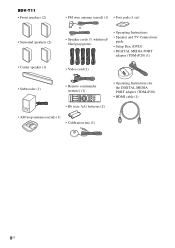
... speaker (1) • FM wire antenna (aerial) (1) • Foot pads (1 set) or • Speaker cords (5, white/red/ blue/gray/green) • Operating Instructions • Speaker and TV Connections guide • Setup Disc (DVD) • DIGITAL MEDIA PORT adapter (TDM-iP20) (1) • Video cord (1) • Subwoofer (1) • Remote commander (remote) (1) • R6 (size AA) batteries...
... speaker (1) • FM wire antenna (aerial) (1) • Foot pads (1 set) or • Speaker cords (5, white/red/ blue/gray/green) • Operating Instructions • Speaker and TV Connections guide • Setup Disc (DVD) • DIGITAL MEDIA PORT adapter (TDM-iP20) (1) • Video cord (1) • Subwoofer (1) • Remote commander (remote) (1) • R6 (size AA) batteries...
Operating Instructions
Page 9
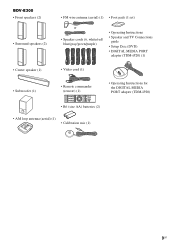
BDV-E300 • Front speakers (2) • Surround speakers (2) • Center speaker (1) • Subwoofer (1) • FM wire antenna (aerial) (1) • Foot pads (1 set) or • Speaker cords (6, white/red/ blue/gray/green/purple) • Operating Instructions • Speaker and TV Connections guide • Setup Disc (DVD) • DIGITAL MEDIA PORT adapter (TDM-iP20) (1) • Video cord...
BDV-E300 • Front speakers (2) • Surround speakers (2) • Center speaker (1) • Subwoofer (1) • FM wire antenna (aerial) (1) • Foot pads (1 set) or • Speaker cords (6, white/red/ blue/gray/green/purple) • Operating Instructions • Speaker and TV Connections guide • Setup Disc (DVD) • DIGITAL MEDIA PORT adapter (TDM-iP20) (1) • Video cord...
Operating Instructions
Page 23
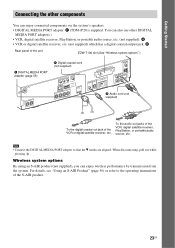
Getting Started Connecting the other components You can also use other DIGITAL MEDIA PORT adapters.) • VCR, digital satellite receiver, PlayStation, or portable audio source, etc. (not supplied): G • VCR or digital satellite receiver, etc. (not supplied) which has a digital coaxial output jack: H Rear panel...the S-AIR product. 23US For details, see "Using an S-AIR Product" (page 56) or refer to the operating instructions of the VCR, digital satellite receiver, PlayStation, or portable audio source, etc. Note • Connect the DIGITAL MEDIA PORT adapter so that the V marks ...
Getting Started Connecting the other components You can also use other DIGITAL MEDIA PORT adapters.) • VCR, digital satellite receiver, PlayStation, or portable audio source, etc. (not supplied): G • VCR or digital satellite receiver, etc. (not supplied) which has a digital coaxial output jack: H Rear panel...the S-AIR product. 23US For details, see "Using an S-AIR Product" (page 56) or refer to the operating instructions of the VCR, digital satellite receiver, PlayStation, or portable audio source, etc. Note • Connect the DIGITAL MEDIA PORT adapter so that the V marks ...
Operating Instructions
Page 24
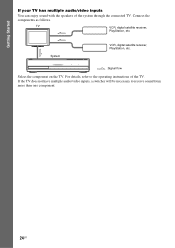
System VCR, digital satellite receiver, PlayStation, etc. :Signal flow Select the component on the TV. TV VCR, digital satellite receiver, PlayStation, etc. If the TV does not have multiple audio/video inputs, a switcher will be necessary to the operating instructions of the system through the connected TV. Connect the components as follows. For details, refer to receive sound from more than one component. 24US Getting Started If your TV has multiple audio/video inputs You can enjoy sound with the speakers of the TV.
System VCR, digital satellite receiver, PlayStation, etc. :Signal flow Select the component on the TV. TV VCR, digital satellite receiver, PlayStation, etc. If the TV does not have multiple audio/video inputs, a switcher will be necessary to the operating instructions of the system through the connected TV. Connect the components as follows. For details, refer to receive sound from more than one component. 24US Getting Started If your TV has multiple audio/video inputs You can enjoy sound with the speakers of the TV.
Operating Instructions
Page 27
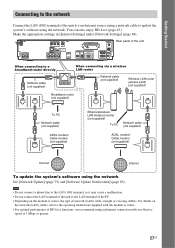
... R AUDIO IN Rear panel of the unit to your Internet source using a network cable to update the system's software using the network. SPEAKER CENTER SUBWOOFER COMPONENT VIDEO OUT VIDEO OUT Y PB / CB PR / CR LAN(100) SPEAKER HDMI OUT DMPORT DC5V 700mA MAX FRONT R FRONT L SUR R SUR L EZW... to the LAN (100) terminal, as it may cause a malfunction. • Do not connect the LAN terminal of the unit to the operating instructions supplied with the modem or router. • For optimal performance of BD-Live functions, we recommend using an Internet connection with an effective speed of...
... R AUDIO IN Rear panel of the unit to your Internet source using a network cable to update the system's software using the network. SPEAKER CENTER SUBWOOFER COMPONENT VIDEO OUT VIDEO OUT Y PB / CB PR / CR LAN(100) SPEAKER HDMI OUT DMPORT DC5V 700mA MAX FRONT R FRONT L SUR R SUR L EZW... to the LAN (100) terminal, as it may cause a malfunction. • Do not connect the LAN terminal of the unit to the operating instructions supplied with the modem or router. • For optimal performance of BD-Live functions, we recommend using an Internet connection with an effective speed of...
Operating Instructions
Page 30
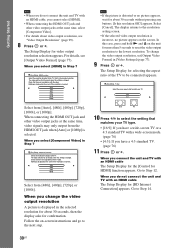
...picture appears on the unit for confirmation. The Setup Display for about video output resolution, see [Output Video Format] (page 77). When you select [Component Video] in Step 7 Easy Setup - The video switches for [BD Internet Connection] appears. Go to the TV. When you select [HDMI] in...Video Output Resolution" (page 99). 8 Press or c. "Auto" is incorrect. Check that there are no problems with the video. Nothing is displayed on -screen instructions and go to the next step. 10 Press X/x to match your TV type. • [16:9]: If you have a wide-screen TV or a 4:3 ...
...picture appears on the unit for confirmation. The Setup Display for about video output resolution, see [Output Video Format] (page 77). When you select [Component Video] in Step 7 Easy Setup - The video switches for [BD Internet Connection] appears. Go to the TV. When you select [HDMI] in...Video Output Resolution" (page 99). 8 Press or c. "Auto" is incorrect. Check that there are no problems with the video. Nothing is displayed on -screen instructions and go to the next step. 10 Press X/x to match your TV type. • [16:9]: If you have a wide-screen TV or a 4:3 ...

Operating Instructions
Page 36
... X/x to this case, go to adjust the volume. FUNCTION "/1 Nx Z FUNCTION VOLUME Disc tray VOLUME +/- When you play an 8 cm disc, place it on . 4 Press FUNCTION repeatedly until "BD/ DVD" appears in the front panel display. 36US Press X/x to the operating instructions supplied with your TV. 2 Switch the input selector on the TV screen...
... X/x to this case, go to adjust the volume. FUNCTION "/1 Nx Z FUNCTION VOLUME Disc tray VOLUME +/- When you play an 8 cm disc, place it on . 4 Press FUNCTION repeatedly until "BD/ DVD" appears in the front panel display. 36US Press X/x to the operating instructions supplied with your TV. 2 Switch the input selector on the TV screen...

Operating Instructions
Page 39
...on the system. - The contents of the menu vary depending on the disc. 2 Press C/X/x/c or the number buttons to select the item you want using the Top Menu. 1 Press TOP MENU. Note • Depending on -screen instructions. 39US Playback starts from exactly the same point. • The point where...power cord (mains lead). - To play another title. - Using the BD's or DVD's menu To display the Top Menu A BD/DVD is set to standby mode by pressing "/1. 1 While playing a disc, press x to stop the disc, the system remembers the point where you pressed x. You can select the title you ...
...on the system. - The contents of the menu vary depending on the disc. 2 Press C/X/x/c or the number buttons to select the item you want using the Top Menu. 1 Press TOP MENU. Note • Depending on -screen instructions. 39US Playback starts from exactly the same point. • The point where...power cord (mains lead). - To play another title. - Using the BD's or DVD's menu To display the Top Menu A BD/DVD is set to standby mode by pressing "/1. 1 While playing a disc, press x to stop the disc, the system remembers the point where you pressed x. You can select the title you ...
Operating Instructions
Page 43
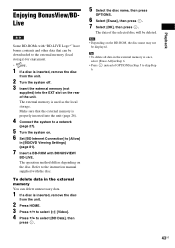
... To delete all data in the external memory at once, select [Erase All] in Step 6. • Press instead of OPTIONS in [BD/DVD Viewing Settings] (page 81). 7 Insert a BD-ROM with BONUSVIEW/ BD-LIVE. The operation method differs depending on the rear of the selected.... 6 Set [BD Internet Connection] to [Allow] in Step 5 to the instruction manual supplied with the disc. The external memory is properly inserted into the EXT slot on the disc. Make sure that can delete unnecessary data. 1 If a disc is inserted, remove the disc from the unit. 2 Press HOME. 3 Press C/c to select [Video]. 4...
... To delete all data in the external memory at once, select [Erase All] in Step 6. • Press instead of OPTIONS in [BD/DVD Viewing Settings] (page 81). 7 Insert a BD-ROM with BONUSVIEW/ BD-LIVE. The operation method differs depending on the rear of the selected.... 6 Set [BD Internet Connection] to [Allow] in Step 5 to the instruction manual supplied with the disc. The external memory is properly inserted into the EXT slot on the disc. Make sure that can delete unnecessary data. 1 If a disc is inserted, remove the disc from the unit. 2 Press HOME. 3 Press C/c to select [Video]. 4...
Operating Instructions
Page 46
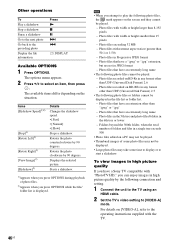
...high picture quality If you have an extension other than 50:1 or 1:50) - To view images in JPEG format - Photo files that have a Sony TV compatible with extreme aspect ratios (greater than ".jpeg" or ".jpg" - Photo files recorded on BD-Rs in high picture quality by the ...be played. • Thumbnail images of photo files. 2)Appears when you press OPTIONS during playback of some time to display or to the operating instructions supplied with the TV. 46US Photo files that have an extremely long name - Photo files with "PhotoTV HD," you attempt to [VIDEO-A] mode....
...high picture quality If you have an extension other than 50:1 or 1:50) - To view images in JPEG format - Photo files that have a Sony TV compatible with extreme aspect ratios (greater than ".jpeg" or ".jpg" - Photo files recorded on BD-Rs in high picture quality by the ...be played. • Thumbnail images of photo files. 2)Appears when you press OPTIONS during playback of some time to display or to the operating instructions supplied with the TV. 46US Photo files that have an extremely long name - Photo files with "PhotoTV HD," you attempt to [VIDEO-A] mode....
Operating Instructions
Page 55
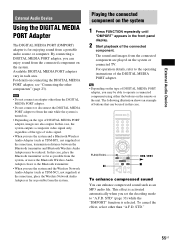
... Device Using the DIGITAL MEDIA PORT Adapter The DIGITAL MEDIA PORT (DMPORT) adapter is selected. The sound and images from the connected component are also output. The following illustration shows an example of video signal. • When you use the system and a Bluetooth Wireless...adapter. • Do not connect or disconnect the DIGITAL MEDIA PORT adapter to the operating instructions of DIGITAL MEDIA PORT adapter, images are played on connecting the DIGITAL MEDIA PORT adapter, see "Connecting the other components" (page 23). In this case. 123 456 789 0 FUNCTION X ./> N x ...
... Device Using the DIGITAL MEDIA PORT Adapter The DIGITAL MEDIA PORT (DMPORT) adapter is selected. The sound and images from the connected component are also output. The following illustration shows an example of video signal. • When you use the system and a Bluetooth Wireless...adapter. • Do not connect or disconnect the DIGITAL MEDIA PORT adapter to the operating instructions of DIGITAL MEDIA PORT adapter, images are played on connecting the DIGITAL MEDIA PORT adapter, see "Connecting the other components" (page 23). In this case. 123 456 789 0 FUNCTION X ./> N x ...

Operating Instructions
Page 57
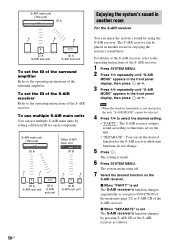
...L R AUDIO IN AUDIO AM L A. Tip • When you change the S-AIR configuration, Sony recommends that the V marks are aligned. • Do not insert anything other screws to secure the...7 Press SYSTEM MENU. External Audio Device 2 Insert the wireless transmitter. For details, see the operating instructions of the unit and the S-AIR sub unit, you perform [Auto Calibration]. To insert the wireless ... For the surround amplifier For the S-AIR receiver Simply by matching the ID of the S-AIR sub unit. Rear of the unit SPEAKER CENTER SUBWOOFER COMPONENT VIDEO OUT VIDEO OUT Y PB / CB ...
...L R AUDIO IN AUDIO AM L A. Tip • When you change the S-AIR configuration, Sony recommends that the V marks are aligned. • Do not insert anything other screws to secure the...7 Press SYSTEM MENU. External Audio Device 2 Insert the wireless transmitter. For details, see the operating instructions of the unit and the S-AIR sub unit, you perform [Auto Calibration]. To insert the wireless ... For the surround amplifier For the S-AIR receiver Simply by matching the ID of the S-AIR sub unit. Rear of the unit SPEAKER CENTER SUBWOOFER COMPONENT VIDEO OUT VIDEO OUT Y PB / CB ...
Operating Instructions
Page 58
...S-AIR sub unit S-AIR sub unit ID B S-AIR sub unit Enjoying the system's sound in another room for each component. The setting is set The S-AIR receiver's function changes sequentially as follows. 58US The system menu turns off. 7 Select the desired function on the unit. ...To set the ID of the S-AIR receiver Refer to the operating instructions of the S-AIR receiver. The S-AIR receiver can be selected. 4 Press X/x to select the desired setting. • "PARTY": The S-AIR receiver outputs sound according to the operating instructions of the S-AIR receiver. 1 Press SYSTEM MENU. 2 Press ...
...S-AIR sub unit S-AIR sub unit ID B S-AIR sub unit Enjoying the system's sound in another room for each component. The setting is set The S-AIR receiver's function changes sequentially as follows. 58US The system menu turns off. 7 Select the desired function on the unit. ...To set the ID of the S-AIR receiver Refer to the operating instructions of the S-AIR receiver. The S-AIR receiver can be selected. 4 Press X/x to select the desired setting. • "PARTY": The S-AIR receiver outputs sound according to the operating instructions of the S-AIR receiver. 1 Press SYSTEM MENU. 2 Press ...


