
Instruction Manual
Page 1
Printed on this product and answers to frequently asked questions can be found at our Customer Support Website. Additional information on 70% or more recycled paper using VOC (Volatile Organic Compound)-free vegetable oil based ink. Printed in Japan Digital Single Lens Reflex Camera Instruction Manual DSLR-A200 © 2008 Sony Corporation 3-277-950-11 (1) Preparing the camera Before your operation Shooting images Using the shooting function Using the viewing function Changing your setup Viewing images on a computer Printing images
Printed on this product and answers to frequently asked questions can be found at our Customer Support Website. Additional information on 70% or more recycled paper using VOC (Volatile Organic Compound)-free vegetable oil based ink. Printed in Japan Digital Single Lens Reflex Camera Instruction Manual DSLR-A200 © 2008 Sony Corporation 3-277-950-11 (1) Preparing the camera Before your operation Shooting images Using the shooting function Using the viewing function Changing your setup Viewing images on a computer Printing images
Instruction Manual
Page 8
... the LCD monitor may become temporarily dark. Black, white, red, blue and green points • Do not expose the camera to a malfunction of your camera No compensation for contents of the recording The contents of the pixels are not actual images shot using this manual The photographs used...Back up recommendation To avoid the potential risk of the copyright laws. Warning on copyright Television programs, films, videotapes, and other medium. When the camera warms up ) data to the provisions of data loss, always copy (back up , the monitor will function normally. • Do not press...
... the LCD monitor may become temporarily dark. Black, white, red, blue and green points • Do not expose the camera to a malfunction of your camera No compensation for contents of the recording The contents of the pixels are not actual images shot using this manual The photographs used...Back up recommendation To avoid the potential risk of the copyright laws. Warning on copyright Television programs, films, videotapes, and other medium. When the camera warms up ) data to the provisions of data loss, always copy (back up , the monitor will function normally. • Do not press...

Instruction Manual
Page 9
... the accessories supplied 13 Preparing the battery pack 14 Attaching a lens 19 Inserting a memory card 21 Preparing the camera 25 Using the accessories supplied 27 Checking the number of recordable images 29 Cleaning 31 Identifying parts and screen indicators 34 Front ...the Fn (Function) button ... 43 The functions selected by the (Drive) button 43 Functions selected by the MENU button 43 Shooting an image without camera shake 45 Correct posture 45 Using the Super SteadyShot function 46 Using a tripod 47 / Shooting with the automatic setting 48 Shooting with a suitable ...
... the accessories supplied 13 Preparing the battery pack 14 Attaching a lens 19 Inserting a memory card 21 Preparing the camera 25 Using the accessories supplied 27 Checking the number of recordable images 29 Cleaning 31 Identifying parts and screen indicators 34 Front ...the Fn (Function) button ... 43 The functions selected by the (Drive) button 43 Functions selected by the MENU button 43 Shooting an image without camera shake 45 Correct posture 45 Using the Super SteadyShot function 46 Using a tripod 47 / Shooting with the automatic setting 48 Shooting with a suitable ...
Instruction Manual
Page 11
... your computer 119 on a computer Viewing images on your computer 123 Using the software 127 Printing images Specifying DPOF 133 Printing images by connecting the camera to a PictBridge compliant printer 135 11
... your computer 119 on a computer Viewing images on your computer 123 Using the software 127 Printing images Specifying DPOF 133 Printing images by connecting the camera to a PictBridge compliant printer 135 11
Instruction Manual
Page 13
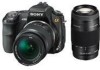
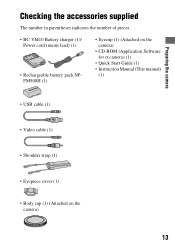
Preparing the camera Preparing the camera Checking the accessories supplied The number in parentheses indicates the number of pieces. • BC-VM10 Battery charger (1)/ Power cord (mains lead) (1) • Rechargeable battery pack NPFM500H (1) • Eyecup (1) (Attached on the camera) • CD-ROM (Application Software for α camera) (1) • Quick Start Guide (1) • Instruction Manual (This manual) (1) • USB cable (1) • Video cable (1) • Shoulder strap (1) • Eyepiece cover (1) • Body cap (1) (Attached on the camera) 13
Preparing the camera Preparing the camera Checking the accessories supplied The number in parentheses indicates the number of pieces. • BC-VM10 Battery charger (1)/ Power cord (mains lead) (1) • Rechargeable battery pack NPFM500H (1) • Eyecup (1) (Attached on the camera) • CD-ROM (Application Software for α camera) (1) • Quick Start Guide (1) • Instruction Manual (This manual) (1) • USB cable (1) • Video cable (1) • Shoulder strap (1) • Eyepiece cover (1) • Body cap (1) (Attached on the camera) 13
Instruction Manual
Page 14
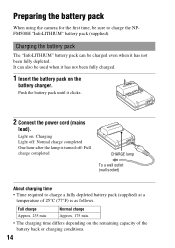
... pack The "InfoLITHIUM" battery pack can also be used when it clicks. 2 Connect the power cord (mains lead). Preparing the battery pack When using the camera for the first time, be charged even when it has not been fully depleted. Push the battery pack until it has not been fully charged...
... pack The "InfoLITHIUM" battery pack can also be used when it clicks. 2 Connect the power cord (mains lead). Preparing the battery pack When using the camera for the first time, be charged even when it has not been fully depleted. Push the battery pack until it has not been fully charged...
Instruction Manual
Page 15
... (travel converter), as it with new one or another one and check if the battery charger operates correctly. Power sources You can use your camera and the battery charger and the AC-VQ900AM AC Adaptor/charger (not supplied) in any battery pack other than the specified kind may leak, ... charger. Batteries other than the specified type have occurred. • If the battery charger is the specified type. Note • Do not use your camera abroad - If the battery pack is finished, disconnect the power cord (mains lead) from the wall outlet (wall socket), and remove the battery pack ...
... (travel converter), as it with new one or another one and check if the battery charger operates correctly. Power sources You can use your camera and the battery charger and the AC-VQ900AM AC Adaptor/charger (not supplied) in any battery pack other than the specified kind may leak, ... charger. Batteries other than the specified type have occurred. • If the battery charger is the specified type. Note • Do not use your camera abroad - If the battery pack is finished, disconnect the power cord (mains lead) from the wall outlet (wall socket), and remove the battery pack ...
Instruction Manual
Page 16
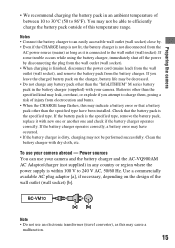
Be careful not to drop the battery pack. Inserting the charged battery pack 1 While sliding the battery cover open lever, open the battery cover. 2 Firmly insert the battery pack all the way while pressing the lock lever with the tip of the arrow. Lock lever 16 Lock lever To remove the battery pack Turn off the camera and slide the lock lever in the direction of the battery. 3 Close the battery cover.
Be careful not to drop the battery pack. Inserting the charged battery pack 1 While sliding the battery cover open lever, open the battery cover. 2 Firmly insert the battery pack all the way while pressing the lock lever with the tip of the arrow. Lock lever 16 Lock lever To remove the battery pack Turn off the camera and slide the lock lever in the direction of the battery. 3 Close the battery cover.
Instruction Manual
Page 17
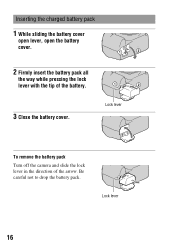
... it out. To remove the battery cover The battery cover can be removed to ON and check the level on the LCD monitor. Preparing the camera To check the remaining battery level Set the POWER switch to attach a vertical grip (not supplied). Available battery packs Use only an NP-FM500H..." battery pack is displayed according to the following indicators. Notes • The displayed level may not be used. 17 What is indicated with your camera. To attach the cover, put the knob in . Using the "InfoLITHIUM" battery pack, the remaining battery time in the direction of your...
... it out. To remove the battery cover The battery cover can be removed to ON and check the level on the LCD monitor. Preparing the camera To check the remaining battery level Set the POWER switch to attach a vertical grip (not supplied). Available battery packs Use only an NP-FM500H..." battery pack is displayed according to the following indicators. Notes • The displayed level may not be used. 17 What is indicated with your camera. To attach the cover, put the knob in . Using the "InfoLITHIUM" battery pack, the remaining battery time in the direction of your...

Instruction Manual
Page 18
... battery pack use: put the battery pack in a pocket close to your body to warm it up, and insert it up once a year on your camera immediately before storing the battery pack in a dry, cool place to how it more and more, and as you use the flash frequently. Battery life... • The battery life is that the battery pack can be used for a long time, fully charge it and then fully use it in your camera before you start shooting. • The battery pack will run out quickly if you use it is stored and the operating conditions and environment in...
... battery pack use: put the battery pack in a pocket close to your body to warm it up, and insert it up once a year on your camera immediately before storing the battery pack in a dry, cool place to how it more and more, and as you use the flash frequently. Battery life... • The battery life is that the battery pack can be used for a long time, fully charge it and then fully use it in your camera before you start shooting. • The battery pack will run out quickly if you use it is stored and the operating conditions and environment in...
Instruction Manual
Page 19
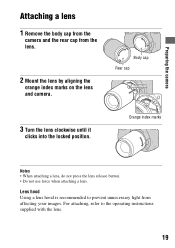
For attaching, refer to prevent unnecessary light from the lens. 2 Mount the lens by aligning the orange index marks on the lens and camera. Body cap Rear cap 3 Turn the lens clockwise until it clicks into the locked position. Lens hood Using a lens hood is recommended to... the operating instructions supplied with the lens. 19 Preparing the camera Attaching a lens 1 Remove the body cap from the camera and the rear cap from affecting your images. Orange index marks Notes • When attaching a lens, do not press ...
For attaching, refer to prevent unnecessary light from the lens. 2 Mount the lens by aligning the orange index marks on the lens and camera. Body cap Rear cap 3 Turn the lens clockwise until it clicks into the locked position. Lens hood Using a lens hood is recommended to... the operating instructions supplied with the lens. 19 Preparing the camera Attaching a lens 1 Remove the body cap from the camera and the rear cap from affecting your images. Orange index marks Notes • When attaching a lens, do not press ...
Instruction Manual
Page 20
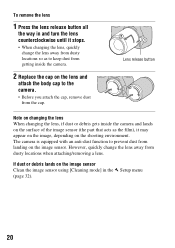
The camera is equipped with an anti-dust function to prevent dust from landing on the image sensor Clean the image... it may appear on the image, depending on the lens and attach the body cap to keep dust from getting inside the camera. 2 Replace the cap on the shooting environment. If dust or debris lands on the image sensor. Lens release button Note ...on changing the lens When changing the lens, if dust or debris gets inside the camera and lands on the surface of the image sensor (the part that acts as to the camera. • Before you attach the cap, remove dust from the cap. However,...
The camera is equipped with an anti-dust function to prevent dust from landing on the image sensor Clean the image... it may appear on the image, depending on the lens and attach the body cap to keep dust from getting inside the camera. 2 Replace the cap on the shooting environment. If dust or debris lands on the image sensor. Lens release button Note ...on changing the lens When changing the lens, if dust or debris gets inside the camera and lands on the surface of the image sensor (the part that acts as to the camera. • Before you attach the cap, remove dust from the cap. However,...
Instruction Manual
Page 21
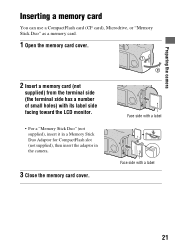
Preparing the camera Inserting a memory card You can use a CompactFlash card (CF card), Microdrive, or "Memory Stick Duo" as a memory card. 1 Open the memory card cover. 2 Insert a memory card (not supplied) from the terminal side (the terminal side has a number of small holes) with a label 21 Face side with a label Face side with its label side facing toward the LCD monitor. • For a "Memory Stick Duo" (not supplied), insert it in a Memory Stick Duo Adaptor for CompactFlash slot (not supplied), then insert the adaptor in the camera. 3 Close the memory card cover.
Preparing the camera Inserting a memory card You can use a CompactFlash card (CF card), Microdrive, or "Memory Stick Duo" as a memory card. 1 Open the memory card cover. 2 Insert a memory card (not supplied) from the terminal side (the terminal side has a number of small holes) with a label 21 Face side with a label Face side with its label side facing toward the LCD monitor. • For a "Memory Stick Duo" (not supplied), insert it in a Memory Stick Duo Adaptor for CompactFlash slot (not supplied), then insert the adaptor in the camera. 3 Close the memory card cover.
Instruction Manual
Page 22
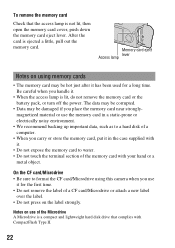
Memory card eject Access lamp lever Notes on using this camera when you use it for a long time. On the CF card/Microdrive • Be sure to format the CF card/Microdrive using memory cards • ...
Memory card eject Access lamp lever Notes on using this camera when you use it for a long time. On the CF card/Microdrive • Be sure to format the CF card/Microdrive using memory cards • ...
Instruction Manual
Page 23
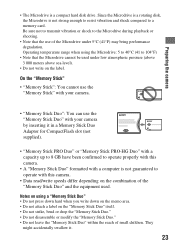
...Do not attach a label on the label. On the "Memory Stick" • "Memory Stick": You cannot use the "Memory Stick" with this camera. • Data read/write speeds differ depending on the combination of the Microdrive under low atmospheric pressure (above 3 000 meters above sea-level). •... vibration or shock to a memory card. Since the Microdrive is a rotating disk, the Microdrive is a compact hard disk drive. Preparing the camera • The Microdrive is not strong enough to resist vibration and shock compared to the Microdrive during playback or shooting. • Note that...
...Do not attach a label on the label. On the "Memory Stick" • "Memory Stick": You cannot use the "Memory Stick" with this camera. • Data read/write speeds differ depending on the combination of the Microdrive under low atmospheric pressure (above 3 000 meters above sea-level). •... vibration or shock to a memory card. Since the Microdrive is a rotating disk, the Microdrive is a compact hard disk drive. Preparing the camera • The Microdrive is not strong enough to resist vibration and shock compared to the Microdrive during playback or shooting. • Note that...

Instruction Manual
Page 25
Preparing the camera Preparing the camera Setting up the date When you turn the camera on for the first time, the date/time setup screen appears. 1 Set the POWER switch to ON to turn the camera on. • To turn the camera off, set it to OFF. 2 Verify that [OK] is selected on the LCD monitor, then press the center of the controller. 3 Select each item with b/B and set the numeric value with v/V. 25
Preparing the camera Preparing the camera Setting up the date When you turn the camera on for the first time, the date/time setup screen appears. 1 Set the POWER switch to ON to turn the camera on. • To turn the camera off, set it to OFF. 2 Verify that [OK] is selected on the LCD monitor, then press the center of the controller. 3 Select each item with b/B and set the numeric value with v/V. 25
Instruction Manual
Page 26
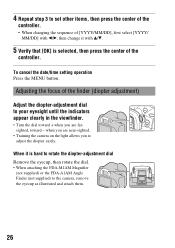
when you are farsighted, toward + when you are near-sighted. • Training the camera on the light allows you to adjust the diopter easily. To cancel the date/time setting operation Press the MENU button. Adjusting the focus of ...) Adjust the diopter-adjustment dial to your eyesight until the indicators appear clearly in the viewfinder. • Turn the dial toward - 4 Repeat step 3 to the camera, remove the eyecup as illustrated and attach them. 26
when you are farsighted, toward + when you are near-sighted. • Training the camera on the light allows you to adjust the diopter easily. To cancel the date/time setting operation Press the MENU button. Adjusting the focus of ...) Adjust the diopter-adjustment dial to your eyesight until the indicators appear clearly in the viewfinder. • Turn the dial toward - 4 Repeat step 3 to the camera, remove the eyecup as illustrated and attach them. 26

Instruction Manual
Page 27
... how to use of the strap on the strap. Eyepiece cover Using the eyepiece cover You can also attach the eyepiece cover (below) on the camera. • You can prevent light from entering through the viewfinder and affecting the exposure. The other accessories are described in the following pages. • Rechargeable...
... how to use of the strap on the strap. Eyepiece cover Using the eyepiece cover You can also attach the eyepiece cover (below) on the camera. • You can prevent light from entering through the viewfinder and affecting the exposure. The other accessories are described in the following pages. • Rechargeable...

Instruction Manual
Page 29
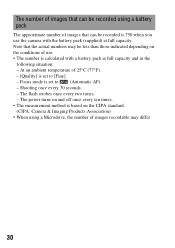
However, if it is the same as that of the [3:2] aspect ratio. 29 Replace the memory card with this camera. The number of images that can be recorded on a memory card The table shows the approximate number of images that can be recorded (should you ... images that can record more images than the numbers shown in yellow, the memory card is displayed on the shooting conditions. Preparing the camera Checking the number of recordable images Once you insert a memory card into the camera and set to [16:9], you continue to shoot using the current settings) is full.
However, if it is the same as that of the [3:2] aspect ratio. 29 Replace the memory card with this camera. The number of images that can be recorded on a memory card The table shows the approximate number of images that can be recorded (should you ... images that can record more images than the numbers shown in yellow, the memory card is displayed on the shooting conditions. Preparing the camera Checking the number of recordable images Once you insert a memory card into the camera and set to [16:9], you continue to shoot using the current settings) is full.
Instruction Manual
Page 30
Note that can be recorded is based on the CIPA standard. (CIPA: Camera & Imaging Products Association) • When using a Microdrive, the number of images recordable may be recorded using a battery pack The approximate number of images that the ... in the following situation: - The flash strobes once every two times. - Shooting once every 30 seconds. - The power turns on the conditions of use the camera with a battery pack at full capacity. The number of images that can be less than those indicated depending on and off once every ten times...
Note that can be recorded is based on the CIPA standard. (CIPA: Camera & Imaging Products Association) • When using a Microdrive, the number of images recordable may be recorded using a battery pack The approximate number of images that the ... in the following situation: - The flash strobes once every two times. - Shooting once every 30 seconds. - The power turns on the conditions of use the camera with a battery pack at full capacity. The number of images that can be less than those indicated depending on and off once every ten times...


