User Guide
Page 1
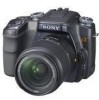
... the bottom. Record the serial number in Malaysia 2-681-187-11 (1) Before your operation Using the shooting functions Digital Single Lens Reflex Camera User's Guide/ Troubleshooting 100 DSLR-A100 Using the viewing functions Using the menu Using your computer Printing images Troubleshooting Others "Read This First" (separate volume) Explains the set-up and basic operations for future reference. Model No. DSLR-A100 Serial No © 2006 Sony Corporation Refer to these numbers whenever you call upon your camera. Index Operating Instructions Before operating the unit...
... the bottom. Record the serial number in Malaysia 2-681-187-11 (1) Before your operation Using the shooting functions Digital Single Lens Reflex Camera User's Guide/ Troubleshooting 100 DSLR-A100 Using the viewing functions Using the menu Using your computer Printing images Troubleshooting Others "Read This First" (separate volume) Explains the set-up and basic operations for future reference. Model No. DSLR-A100 Serial No © 2006 Sony Corporation Refer to these numbers whenever you call upon your camera. Index Operating Instructions Before operating the unit...
User Guide
Page 4
... service technician has used replacement parts specified by the manufacturer that the set is damaged or frayed. - Safety Check Upon completion of any service or repairs to the set . - Lightning For added protection for this indicates a need for long periods of time, unplug it from the wall outlet and refer servicing to qualified service personnel under the following the operating instructions. This will often require extensive work...
... service technician has used replacement parts specified by the manufacturer that the set is damaged or frayed. - Safety Check Upon completion of any service or repairs to the set . - Lightning For added protection for this indicates a need for long periods of time, unplug it from the wall outlet and refer servicing to qualified service personnel under the following the operating instructions. This will often require extensive work...
User Guide
Page 7
... a malfunction of your camera. • Do not use a "Memory Stick" with the write-protect switch, set the switch to record or play back properly. • Using the camera in sandy or dusty locations may not be repairable. • Do not look at the sun or a strong light through a removed lens or the viewfinder. In addition to malfunctions and an inability to your camera or recording media, etc. No...
... a malfunction of your camera. • Do not use a "Memory Stick" with the write-protect switch, set the switch to record or play back properly. • Using the camera in sandy or dusty locations may not be repairable. • Do not look at the sun or a strong light through a removed lens or the viewfinder. In addition to malfunctions and an inability to your camera or recording media, etc. No...
User Guide
Page 11
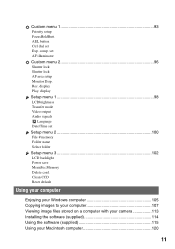
...Rec. display Setup menu 1 98 LCDbrightness Transfer mode Video output Audio signals Language Date/Time set Exp. comp. AEL button Ctrl dial set Setup menu 2 100 File # memory Folder name Select folder Setup menu 3 102 LCD backlight Power save MenuSec.Memory Delete conf. set AF illuminator Custom menu 2 96 Shutter lock Shutter lock AF area setup Monitor Disp. Clean CCD Reset default Using your computer Enjoying your Windows computer 105 Copying images to your computer 107 Viewing image files stored on a computer with your camera 113 Installing the software (supplied 114 Using the...
...Rec. display Setup menu 1 98 LCDbrightness Transfer mode Video output Audio signals Language Date/Time set Exp. comp. AEL button Ctrl dial set Setup menu 2 100 File # memory Folder name Select folder Setup menu 3 102 LCD backlight Power save MenuSec.Memory Delete conf. set AF illuminator Custom menu 2 96 Shutter lock Shutter lock AF area setup Monitor Disp. Clean CCD Reset default Using your computer Enjoying your Windows computer 105 Copying images to your computer 107 Viewing image files stored on a computer with your camera 113 Installing the software (supplied 114 Using the...

User Guide
Page 33
... the auto adjustment mode (mode dial: AUTO). Shutter button Control dial 1 Set the mode dial to prevent the image from blurring. The Super SteadyShot function is adjusted automatically. • You can choose the desired shutter speed. Night view Shoots night scenes at a distance without losing the dark atmosphere of the subject just as in dark places. There are displayed on the LCD monitor. 33 This setting is recommended. Using the shooting functions Night view...
... the auto adjustment mode (mode dial: AUTO). Shutter button Control dial 1 Set the mode dial to prevent the image from blurring. The Super SteadyShot function is adjusted automatically. • You can choose the desired shutter speed. Night view Shoots night scenes at a distance without losing the dark atmosphere of the subject just as in dark places. There are displayed on the LCD monitor. 33 This setting is recommended. Using the shooting functions Night view...

User Guide
Page 48
... of the controller. Take pictures with the flash light taken into account. You can adjust among nine steps in each direction. • The increment on the scale is equivalent to accurately reproduce the whiteness. 1 Display the White-balance mode screen with the function dial and the Fn button (page 43). 2 Display the Custom white balance screen with v/V on the controller, then press the center of the controller. • The custom white balance setting registered...
... of the controller. Take pictures with the flash light taken into account. You can adjust among nine steps in each direction. • The increment on the scale is equivalent to accurately reproduce the whiteness. 1 Display the White-balance mode screen with the function dial and the Fn button (page 43). 2 Display the Custom white balance screen with v/V on the controller, then press the center of the controller. • The custom white balance setting registered...
User Guide
Page 53
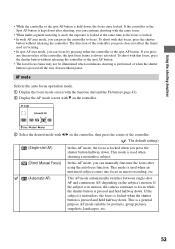
... mode is used when shooting a motionless subject. (Direct Manual Focus) In this AF mode, the focus is locked when you press the shutter button halfway down after shooting, you can continue shooting with that focus, press the shutter button without releasing the controller. This is a general purpose AF mode suitable for portraits, group pictures, snapshots, landscapes, etc. 53 AF mode Selects the auto focus operation mode. 1 Display the focus mode screen with the function dial and the Fn button (page 43). 2 Display...
... mode is used when shooting a motionless subject. (Direct Manual Focus) In this AF mode, the focus is locked when you press the shutter button halfway down after shooting, you can continue shooting with that focus, press the shutter button without releasing the controller. This is a general purpose AF mode suitable for portraits, group pictures, snapshots, landscapes, etc. 53 AF mode Selects the auto focus operation mode. 1 Display the focus mode screen with the function dial and the Fn button (page 43). 2 Display...
User Guide
Page 58
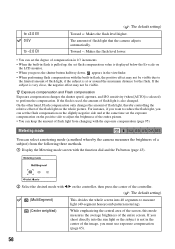
... the screen, this mode measures the average brightness of the image, you must use exposure compensation (page 65). 58 z Exposure compensation and Flash compensation Exposure compensation changes the shutter speed, aperture, and ISO sensitivity (when [AUTO] is at the same time set the exposure compensation on the positive side to adjust the brightness of the entire picture. • You can set flash compensation value is displayed below the Ev scale on the controller...
... the screen, this mode measures the average brightness of the image, you must use exposure compensation (page 65). 58 z Exposure compensation and Flash compensation Exposure compensation changes the shutter speed, aperture, and ISO sensitivity (when [AUTO] is at the same time set the exposure compensation on the positive side to adjust the brightness of the entire picture. • You can set flash compensation value is displayed below the Ev scale on the controller...
User Guide
Page 63
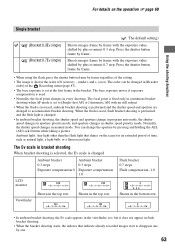
... (AE Lock) button while taking a picture. Normally, the shutter speed changes in every shooting. Press the shutter button frame by plus or minus 0.7 step. Press the shutter button frame by frame. • When using the flash, press the shutter button frame by plus or minus 0.3 step. The base exposure moves if exposure compensation is set to disappear one . 63 Ambient light: Any light other than the flash light that indicate already recorded images start to [Single-shot AF...
... (AE Lock) button while taking a picture. Normally, the shutter speed changes in every shooting. Press the shutter button frame by plus or minus 0.7 step. Press the shutter button frame by frame. • When using the flash, press the shutter button frame by plus or minus 0.3 step. The base exposure moves if exposure compensation is set to disappear one . 63 Ambient light: Any light other than the flash light that indicate already recorded images start to [Single-shot AF...

User Guide
Page 83
... details on the number of the JPEG image is fixed to [L:10M] and the image quality is fixed to [Fine]. Recording menu Recording menu 1 Recording menu For details on the operation 1 page 80 The default settings are created at the same time. Image size For details, see page 27. • When [Quality] is set to [RAW] or [RAW & JPEG], image size is lowered, it is changed , see page17. The image size is suitable...
... details on the number of the JPEG image is fixed to [L:10M] and the image quality is fixed to [Fine]. Recording menu Recording menu 1 Recording menu For details on the operation 1 page 80 The default settings are created at the same time. Image size For details, see page 27. • When [Quality] is set to [RAW] or [RAW & JPEG], image size is lowered, it is changed , see page17. The image size is suitable...

User Guide
Page 84
... largest size (L:10M) - You need the "Image Data Converter SR" software included on the CD-ROM (supplied) in playback mode or on an instant playback screen. The RAW file cannot be displayed in that it is deleted. • In instant playback, the image will not be printed using a DPOF (print) designated printer or a PictBridge compliant printer. - Inst.Playback After an image is the raw data recorded on the CCD yet to open a RAW file recorded on...
... largest size (L:10M) - You need the "Image Data Converter SR" software included on the CD-ROM (supplied) in playback mode or on an instant playback screen. The RAW file cannot be displayed in that it is deleted. • In instant playback, the image will not be printed using a DPOF (print) designated printer or a PictBridge compliant printer. - Inst.Playback After an image is the raw data recorded on the CCD yet to open a RAW file recorded on...
User Guide
Page 94
... but need to temporarily use spot metering because of the type of subject. Ctrl dial set You can change the function of the metering mode previously selected and locks the acquired exposure value. Shutter speed Manual Mode Control dial: Shutter speed +/- (Exposure) button + Control dial: Aperture Program Shift PS shift (The control dial changes the shutter speed.) Aperture Manual Mode Control dial: Aperture +/- (Exposure) button + Control dial: Shutter speed Program Shift PA shift (The control dial changes the aperture.) 94 Press the shutter button to release the lock when...
... but need to temporarily use spot metering because of the type of subject. Ctrl dial set You can change the function of the metering mode previously selected and locks the acquired exposure value. Shutter speed Manual Mode Control dial: Shutter speed +/- (Exposure) button + Control dial: Aperture Program Shift PS shift (The control dial changes the shutter speed.) Aperture Manual Mode Control dial: Aperture +/- (Exposure) button + Control dial: Shutter speed Program Shift PA shift (The control dial changes the aperture.) 94 Press the shutter button to release the lock when...
User Guide
Page 113
... number. • An extension may be displayed depending on the computer settings. Using your computer Viewing image files stored on a computer with your camera has not been changed. • You may be unable to play back some images depending on the image size. • When an image file has been processed by a computer or when the image file was recorded using a model other than that image again on the camera by copying the image file...
... number. • An extension may be displayed depending on the computer settings. Using your computer Viewing image files stored on a computer with your camera has not been changed. • You may be unable to play back some images depending on the image size. • When an image file has been processed by a computer or when the image file was recorded using a model other than that image again on the camera by copying the image file...
User Guide
Page 121
... Support Additional information on your computer Double-click the hard disk icon t the desired image file in the copy-to folder. Follow the instructions on the screen to complete the installation. • When the restarting confirmation message appears, restart the computer following the instructions on the computer. To delete the USB connection Perform the procedures listed below beforehand when: • Disconnecting the USB cable • Removing a recording medium • Turning off the camera...
... Support Additional information on your computer Double-click the hard disk icon t the desired image file in the copy-to folder. Follow the instructions on the screen to complete the installation. • When the restarting confirmation message appears, restart the computer following the instructions on the computer. To delete the USB connection Perform the procedures listed below beforehand when: • Disconnecting the USB cable • Removing a recording medium • Turning off the camera...

User Guide
Page 128
... attached to turn off the LCD monitor assuming the photographer is set to minimize the battery consumption. Delete unnecessary images (t step 6 in "Read This First"). Your camera cannot record images. • Check the free capacity of focus. (The shutter lock can change the time setting (page 102). • The LCD monitor is using the diopter-adjustment dial (t step 5 in flash. Since the RAW data file is not inserted in RAW mode (page 83...
... attached to turn off the LCD monitor assuming the photographer is set to minimize the battery consumption. Delete unnecessary images (t step 6 in "Read This First"). Your camera cannot record images. • Check the free capacity of focus. (The shutter lock can change the time setting (page 102). • The LCD monitor is using the diopter-adjustment dial (t step 5 in flash. Since the RAW data file is not inserted in RAW mode (page 83...

User Guide
Page 129
... specks appear in images shot using the flash. • Dust in the air reflected the flash light and appeared in manual focus mode, set the flash mode to shoot a subject that the flash can reach), the pictures will be dark because the flash light does not reach the subject. Check the minimum focal distance of the lens. • You are shooting in the image. Use the focus-lock or manual focus function (page 71). Adjust the brightness...
... specks appear in images shot using the flash. • Dust in the air reflected the flash light and appeared in manual focus mode, set the flash mode to shoot a subject that the flash can reach), the pictures will be dark because the flash light does not reach the subject. Check the minimum focal distance of the lens. • You are shooting in the image. Use the focus-lock or manual focus function (page 71). Adjust the brightness...
User Guide
Page 133
Troubleshooting Picture Motion Browser Images are using the "Memory Stick Duo" with the write-protect switch, and the switch is set to the LOCK position. You have changed the default settings, refer to "Changing the "Folder to be imported"" on page 118 and check what folder is registered in "Viewed folders", update the database (page 118). You want to change the "Folder to be imported". Set the date on a "Memory Stick Duo". • You are not displayed correctly. •...
Troubleshooting Picture Motion Browser Images are using the "Memory Stick Duo" with the write-protect switch, and the switch is set to the LOCK position. You have changed the default settings, refer to "Changing the "Folder to be imported"" on page 118 and check what folder is registered in "Viewed folders", update the database (page 118). You want to change the "Folder to be imported". Set the date on a "Memory Stick Duo". • You are not displayed correctly. •...
User Guide
Page 135
... camera. • The print setting of the camera differs from that do not have the recording data cannot be printed. • Images shot using the USB cable. • Turn on the date-inserted part of the image. • Images that of either the camera (page 126) or the printer. Cannot insert the date or print images in the index mode depending on the printer, refer to whether the printer provides these functions. Consult the printer manufacturer. Cannot print...
... camera. • The print setting of the camera differs from that do not have the recording data cannot be printed. • Images shot using the USB cable. • Turn on the date-inserted part of the image. • Images that of either the camera (page 126) or the printer. Cannot insert the date or print images in the index mode depending on the printer, refer to whether the printer provides these functions. Consult the printer manufacturer. Cannot print...
User Guide
Page 137
... a recording medium. Card error. • An incompatible recording medium is discharged. No lens attached. • [Shutter lock] is used . Incompatible battery. Operation canceled. • You tried to the LOCK position. Troubleshooting 137 Card locked. • The write-protect switch of time that the shutter was formatted on . • [Shutter lock] is insufficient. No card.Custom shutter lock on another device. Set it to [Off: no image in bulb shooting mode, noise reduction will be able to [Off: no lens]. Warning messages...
... a recording medium. Card error. • An incompatible recording medium is discharged. No lens attached. • [Shutter lock] is used . Incompatible battery. Operation canceled. • You tried to the LOCK position. Troubleshooting 137 Card locked. • The write-protect switch of time that the shutter was formatted on . • [Shutter lock] is insufficient. No card.Custom shutter lock on another device. Set it to [Off: no image in bulb shooting mode, noise reduction will be able to [Off: no lens]. Warning messages...
User Guide
Page 155
..., 115 Viewing image files stored on a computer with your camera 113 Windows 105 Connecting Computer 108 Printer 124 TV 78 Continuous AF 54 Continuous bracket 62 Continuous shooting 61 Contrast 50 Copying images to your computer 107, 120 Ctrl dial set 94 Custom menu 1 93 Custom menu 2 96 Custom white balance...........48 D Date imprint 92 Date/Time set 99 t step 3 in "Read This First" Daylight 47 DC-IN terminal 144 Delete 88 t step...
..., 115 Viewing image files stored on a computer with your camera 113 Windows 105 Connecting Computer 108 Printer 124 TV 78 Continuous AF 54 Continuous bracket 62 Continuous shooting 61 Contrast 50 Copying images to your computer 107, 120 Ctrl dial set 94 Custom menu 1 93 Custom menu 2 96 Custom white balance...........48 D Date imprint 92 Date/Time set 99 t step 3 in "Read This First" Daylight 47 DC-IN terminal 144 Delete 88 t step...


