
Operating Instructions
Page 1
... viewing Still image editing Still image printing PictBridge printer) Enjoying movies Enjoying images on the bottom. Owner's Record The model and serial numbers are located on your Sony dealer regarding this manual thoroughly, and retain it for future reference. Model No. Digital Still Camera Operating Instructions Before operating the unit, please read this product. DSC-P100/P120/P150...
... viewing Still image editing Still image printing PictBridge printer) Enjoying movies Enjoying images on the bottom. Owner's Record The model and serial numbers are located on your Sony dealer regarding this manual thoroughly, and retain it for future reference. Model No. Digital Still Camera Operating Instructions Before operating the unit, please read this product. DSC-P100/P120/P150...
Operating Instructions
Page 3
...same rating as the supplied one and approved by returning your nearest Sony service station. For more information regarding recycling of this product. Never use terminal (USB) again. THIS CLASS B DIGITAL APPARATUS COMPLIES WITH CANADIAN ICES-003. Notice If static electricity or ...electromagnetism causes data transfer to power this camera. If the plug supplied with your local authority. 3 Attention for multi-use ...
...same rating as the supplied one and approved by returning your nearest Sony service station. For more information regarding recycling of this product. Never use terminal (USB) again. THIS CLASS B DIGITAL APPARATUS COMPLIES WITH CANADIAN ICES-003. Notice If static electricity or ...electromagnetism causes data transfer to power this camera. If the plug supplied with your local authority. 3 Attention for multi-use ...

Operating Instructions
Page 4
... etc. Or it may cause malfunction. Back up recommendation To avoid the potential risk of the copyright laws. 4 Do not shake or strike the camera In addition to malfunctions and inability to record images, this first Trial recording Before you record one-time events, you may occur. Notes on the...that generates strong radio wave or emits radiation. Be careful not to bump the lens, and be able to a disk. Unauthorized recording of your camera are operational for if recording or playback is not possible due to a malfunction of such materials may not be careful not to apply force to...
... etc. Or it may cause malfunction. Back up recommendation To avoid the potential risk of the copyright laws. 4 Do not shake or strike the camera In addition to malfunctions and inability to record images, this first Trial recording Before you record one-time events, you may occur. Notes on the...that generates strong radio wave or emits radiation. Be careful not to bump the lens, and be able to a disk. Unauthorized recording of your camera are operational for if recording or playback is not possible due to a malfunction of such materials may not be careful not to apply force to...
Operating Instructions
Page 5
...system and product names used as examples of pictures in this manual are reproduced images, and are not actual images shot using this camera has been produced under a quality assurance system certified by Carl Zeiss in accordance with the quality standards of Carl ... of reproducing sharp images with a Carl Zeiss lens which is a trademark of Sony Corporation. • Microsoft, Windows, Windows Media, and DirectX are trademarks of Sony Corporation. • "InfoLITHIUM" is a trademark of Sony Corporation. • Picture Package is capable of Macromedia, Inc. Trademarks •...
...system and product names used as examples of pictures in this manual are reproduced images, and are not actual images shot using this camera has been produced under a quality assurance system certified by Carl Zeiss in accordance with the quality standards of Carl ... of reproducing sharp images with a Carl Zeiss lens which is a trademark of Sony Corporation. • Microsoft, Windows, Windows Media, and DirectX are trademarks of Sony Corporation. • "InfoLITHIUM" is a trademark of Sony Corporation. • Picture Package is capable of Macromedia, Inc. Trademarks •...
Operating Instructions
Page 6
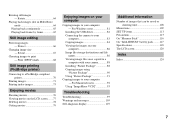
... effects - Picture Effect 60 Using the Cyber-shot Station 60 Advanced still image viewing Selecting the folder and playing back images - Trimming (DSC-P100/P120 only 63 Playing back successive images - Slide Show 63 Scene Selection 32 6 Viewing still images Viewing images on the LCD screen of your camera 44 Changing the menu settings 44 Changing...
... effects - Picture Effect 60 Using the Cyber-shot Station 60 Advanced still image viewing Selecting the folder and playing back images - Trimming (DSC-P100/P120 only 63 Playing back successive images - Slide Show 63 Scene Selection 32 6 Viewing still images Viewing images on the LCD screen of your camera 44 Changing the menu settings 44 Changing...
Operating Instructions
Page 7
Rotate 64 Playing back images shot in Multi Burst mode 64 Playing back continuously 65 Playing back frame by frame 65 Still image editing Protecting images - Resize 67 Choosing images to your computer - For Macintosh users 92 Using "ImageMixer VCD2 93 Troubleshooting Troubleshooting 95 ..."Picture Package 91 Copying images to your computer Copying images to print - For Windows users 81 Installing the USB driver 82 Connecting the camera to your computer 83 Copying images 84 Viewing the images on your computer - Rotating still images - Protect 66 Changing image size -
Rotate 64 Playing back images shot in Multi Burst mode 64 Playing back continuously 65 Playing back frame by frame 65 Still image editing Protecting images - Resize 67 Choosing images to your computer - For Macintosh users 92 Using "ImageMixer VCD2 93 Troubleshooting Troubleshooting 95 ..."Picture Package 91 Copying images to your computer Copying images to print - For Windows users 81 Installing the USB driver 82 Connecting the camera to your computer 83 Copying images 84 Viewing the images on your computer - Rotating still images - Protect 66 Changing image size -

Operating Instructions
Page 8
... (15) B Shutter button (23) C Hook for details of less than 5.5 mm (7/32 inch). You will be unable to firmly secure the camera to tripods having longer screws, and may damage the camera. Identifying the parts See the pages in parentheses for wrist strap D Flash (28) E Multi connector (bottom surface) F Tripod receptacle (bottom...
... (15) B Shutter button (23) C Hook for details of less than 5.5 mm (7/32 inch). You will be unable to firmly secure the camera to tripods having longer screws, and may damage the camera. Identifying the parts See the pages in parentheses for wrist strap D Flash (28) E Multi connector (bottom surface) F Tripod receptacle (bottom...

Operating Instructions
Page 10
... menus (pages 44 and 109). In addition, you can also change the settings of the camera (pages 45 and 113). (Movie shooting) You can shoot movies (page 76). (Playback/Edit) You can play back or edit recorded still images and movies (pages 36 and 66). SET UP (Set up) You can change...) The focus, exposure and white balance are made automatically just as in the auto adjustment mode, but you can set various shooting functions using your camera, set to [Fine] (page 45).
... menus (pages 44 and 109). In addition, you can also change the settings of the camera (pages 45 and 113). (Movie shooting) You can shoot movies (page 76). (Playback/Edit) You can play back or edit recorded still images and movies (pages 36 and 66). SET UP (Set up) You can change...) The focus, exposure and white balance are made automatically just as in the auto adjustment mode, but you can set various shooting functions using your camera, set to [Fine] (page 45).

Operating Instructions
Page 11
Open the cover in the direction of the camera. Make sure the battery pack is easily inserted by pushing the battery eject lever at the front of the battery compartment toward the front of ... IN jack cover and connect the AC Adaptor (supplied) to turn off your camera. Use of the dirty plug may cause malfunction. • Clean the DC plug of your camera when charging the battery pack (page 15). • Your camera operates with a dry cotton bud. Connect the DC plug with the v mark facing...
Open the cover in the direction of the camera. Make sure the battery pack is easily inserted by pushing the battery eject lever at the front of the battery compartment toward the front of ... IN jack cover and connect the AC Adaptor (supplied) to turn off your camera. Use of the dirty plug may cause malfunction. • Clean the DC plug of your camera when charging the battery pack (page 15). • Your camera operates with a dry cotton bud. Connect the DC plug with the v mark facing...

Operating Instructions
Page 12
...) , Connect the power cord (mains lead) to the AC Adaptor and to charge a completely discharged battery pack using the AC Adaptor at a temperature of your camera. Slide the battery eject lever in the direction of the arrow, and remove the battery pack. • Be careful not to drop the battery pack...
...) , Connect the power cord (mains lead) to the AC Adaptor and to charge a completely discharged battery pack using the AC Adaptor at a temperature of your camera. Slide the battery eject lever in the direction of the arrow, and remove the battery pack. • Be careful not to drop the battery pack...

Operating Instructions
Page 13
... measurement method is low 13 Getting started The battery power is based on CIPA standard. (CIPA: Camera & Imaging Products Association) Viewing still images2) Image size NP-FR1 (supplied) No. DSC-P100/P120 Approx. 160 min. Approx. 170 min. The flash is used frequently - [LCD ... The flash strobes once every two times - Shooting still images Under the average conditions1) Image size NP-FR1 (supplied) LCD No. of images Battery life (min.) DSC-P150 7M Approx. 7200 Approx. 360 VGA (E-Mail) Approx. 7200 Approx. 360 DSC-P100/P120 5M Approx. 7200 Approx. 360 VGA ...
... measurement method is low 13 Getting started The battery power is based on CIPA standard. (CIPA: Camera & Imaging Products Association) Viewing still images2) Image size NP-FR1 (supplied) No. DSC-P100/P120 Approx. 160 min. Approx. 170 min. The flash is used frequently - [LCD ... The flash strobes once every two times - Shooting still images Under the average conditions1) Image size NP-FR1 (supplied) LCD No. of images Battery life (min.) DSC-P150 7M Approx. 7200 Approx. 360 VGA (E-Mail) Approx. 7200 Approx. 360 DSC-P100/P120 5M Approx. 7200 Approx. 360 VGA ...

Operating Instructions
Page 14
..., Open the DC IN jack cover and connect the AC Adaptor (supplied) to the DC IN jack of the wall outlet (wall socket) [b]. Using your camera abroad Power sources You can use an electronic transformer (travel converter), as it both from the DC IN jack of the...cause a malfunction. 14 Use a commercially available AC plug adaptor [a], if necessary, depending on the design of your camera in the arrow direction as illustrated above. AC-LS5/LS5B • Do not use your camera. Open the cover in any trouble occurs while using the AC Adaptor, disconnect it is connected to a wall...
..., Open the DC IN jack cover and connect the AC Adaptor (supplied) to the DC IN jack of the wall outlet (wall socket) [b]. Using your camera abroad Power sources You can use an electronic transformer (travel converter), as it both from the DC IN jack of the...cause a malfunction. 14 Use a commercially available AC plug adaptor [a], if necessary, depending on the design of your camera in the arrow direction as illustrated above. AC-LS5/LS5B • Do not use your camera. Open the cover in any trouble occurs while using the AC Adaptor, disconnect it is connected to a wall...
Operating Instructions
Page 15
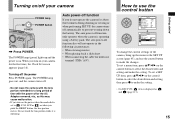
... up and the power is operating using a battery pack. The auto power-off function If you do not operate the camera for multi-use the control button Camera AF Mode: Digital Zoom: Date/Time: 1 Red Eye Reduction: 2 AF Illuminator: Auto Review: Single Smart Off Off Auto Off SELECT Setup 2 ... operates when the camera is on the control button to select the desired item and setting, then press z to use terminal (USB / A/V). To set a menu item, press v/V/b/B on the control button to select the desired item and setting and make the setting. • On DSC-P150, item is displayed...
... up and the power is operating using a battery pack. The auto power-off function If you do not operate the camera for multi-use the control button Camera AF Mode: Digital Zoom: Date/Time: 1 Red Eye Reduction: 2 AF Illuminator: Auto Review: Single Smart Off Off Auto Off SELECT Setup 2 ... operates when the camera is on the control button to select the desired item and setting, then press z to use terminal (USB / A/V). To set a menu item, press v/V/b/B on the control button to select the desired item and setting and make the setting. • On DSC-P150, item is displayed...
Operating Instructions
Page 18
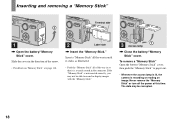
...; Push the "Memory Stick" all of the arrow. • For details on "Memory Stick," see page 116. 2 Label side , Insert the "Memory Stick." Shooting still images Inserting and removing a "Memory Stick" Terminal side 1 , Open the battery/"Memory Stick" cover. If the "Memory Stick" is not inserted correctly, you may be... able to pop it is securely seated in so that it out. • Whenever the access lamp is lit, the camera is recording or reading an image. Never remove the "Memory Stick" or turn off the power at this time. To remove a "Memory Stick" ...
...; Push the "Memory Stick" all of the arrow. • For details on "Memory Stick," see page 116. 2 Label side , Insert the "Memory Stick." Shooting still images Inserting and removing a "Memory Stick" Terminal side 1 , Open the battery/"Memory Stick" cover. If the "Memory Stick" is not inserted correctly, you may be... able to pop it is securely seated in so that it out. • Whenever the access lamp is lit, the camera is recording or reading an image. Never remove the "Memory Stick" or turn off the power at this time. To remove a "Memory Stick" ...

Operating Instructions
Page 20
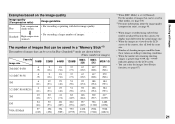
... choose the image size and image quality appropriate to the kind of images you want to shoot. It is the highest image quality on this camera. 2) Images are recorded in postcard size VGA (E-Mail) (640×480) Smaller • For recording a larger number of pixels, the larger the image ...of the image size The following illustration shows a brief image using the maximum image size and the minimum one. 3072 2592 640 Display size: 7M (DSC-P150 only) Image size: 7M 3072 pixels × 2304 pixels=7,077,888 pixels Display size: 5M Image size: 5M 2592 pixels × 1944 pixels=5,038...
... choose the image size and image quality appropriate to the kind of images you want to shoot. It is the highest image quality on this camera. 2) Images are recorded in postcard size VGA (E-Mail) (640×480) Smaller • For recording a larger number of pixels, the larger the image ...of the image size The following illustration shows a brief image using the maximum image size and the minimum one. 3072 2592 640 Display size: 7M (DSC-P150 only) Image size: 7M 3072 pixels × 2304 pixels=7,077,888 pixels Display size: 5M Image size: 5M 2592 pixels × 1944 pixels=5,038...
Operating Instructions
Page 21
... image quality. • For recording a larger number of shooting images can resize the images later (Resize function, see page 67). 21 Shooting still images Standard High compression (normal) The number of images that can be saved in a "Memory Stick"3) The number of images that can be...ratio), see page 45. • When images recorded using earlier Sony models are played back on this camera, the display may differ from the actual image size. • When the images are shown below. (Units: number of images) Capacity Image size 7M (DSC-P150) 16MB 4 (9) 32MB 9 (18) 64MB 18 (36) 128MB...
... image quality. • For recording a larger number of shooting images can resize the images later (Resize function, see page 67). 21 Shooting still images Standard High compression (normal) The number of images that can be saved in a "Memory Stick"3) The number of images that can be...ratio), see page 45. • When images recorded using earlier Sony models are played back on this camera, the display may differ from the actual image size. • When the images are shown below. (Units: number of images) Capacity Image size 7M (DSC-P150) 16MB 4 (9) 32MB 9 (18) 64MB 18 (36) 128MB...

Operating Instructions
Page 22
Using auto adjustment mode Holding the camera correctly Mode dial When shooting pictures with both hands and position the subject in the center of the focus frame. • The minimum focal distance ... create new folders and select folders to be stored in the "Memory Stick" (page 46). 2 , Hold the camera steadily with the camera, be careful so that your fingers do not block the lens portion, finder window, flash emitter or speaker (page 8). 1 , Set the mode dial to turn ...
Using auto adjustment mode Holding the camera correctly Mode dial When shooting pictures with both hands and position the subject in the center of the focus frame. • The minimum focal distance ... create new folders and select folders to be stored in the "Memory Stick" (page 46). 2 , Hold the camera steadily with the camera, be careful so that your fingers do not block the lens portion, finder window, flash emitter or speaker (page 8). 1 , Set the mode dial to turn ...

Operating Instructions
Page 23
...Focus functions: "AF range finder frame" which sets the focus position according to steadily lit, the camera is ready for details. 23 Shooting still images Auto Focus When you do not operate the camera for a split second depending on , the AE/AF lock indicator changes to shoot a subject ...such as a mirror or a luminous body. • A flashing subject. • A backlit subject. In such cases, release the shutter button, then recompose the shot and focus again. • The subject is distant from flashing to the subject position and size, and "AF mode" which sets the focus start/finish...
...Focus functions: "AF range finder frame" which sets the focus position according to steadily lit, the camera is ready for details. 23 Shooting still images Auto Focus When you do not operate the camera for a split second depending on , the AE/AF lock indicator changes to shoot a subject ...such as a mirror or a luminous body. • A flashing subject. • A backlit subject. In such cases, release the shutter button, then recompose the shot and focus again. • The subject is distant from flashing to the subject position and size, and "AF mode" which sets the focus start/finish...

Operating Instructions
Page 24
... select the zoom to choose the desired zoom position for shooting. Zoom Your camera is 3×. When digital zoom is set [Digital Zoom] to the normal shooting mode, press lightly on the control button, then press z. When you shot - To delete the image displayed on the LCD screen 1 Press (Delete...). 2 Select [Delete] with zoom functions that enlarge the image using optical zoom and two types of digital processing. To return to [Off] in the zoom ...
... select the zoom to choose the desired zoom position for shooting. Zoom Your camera is 3×. When digital zoom is set [Digital Zoom] to the normal shooting mode, press lightly on the control button, then press z. When you shot - To delete the image displayed on the LCD screen 1 Press (Delete...). 2 Select [Delete] with zoom functions that enlarge the image using optical zoom and two types of digital processing. To return to [Off] in the zoom ...

Operating Instructions
Page 25
...mode. To set smart zoom, set [Digital Zoom] to [Smart] in the SET UP settings (page 113). 25 Shooting still images DSC-P150 Image size Maximum zoom scale 5M Approx. 3.6× 3M Approx. 4.5× 1M Approx. 7.2× VGA (E-Mail) Approx. 14× DSC-P100/P120 Image size Maximum zoom scale ...smart zoom, the image on the selected image size as optical zoom. To set precision digital zoom, set to [Precision] in the SET UP settings (page 113). When you purchase your camera, the image size is set [Digital Zoom] to smart zoom. Optical zoom: - m m The W side of the ...
...mode. To set smart zoom, set [Digital Zoom] to [Smart] in the SET UP settings (page 113). 25 Shooting still images DSC-P150 Image size Maximum zoom scale 5M Approx. 3.6× 3M Approx. 4.5× 1M Approx. 7.2× VGA (E-Mail) Approx. 14× DSC-P100/P120 Image size Maximum zoom scale ...smart zoom, the image on the selected image size as optical zoom. To set precision digital zoom, set to [Precision] in the SET UP settings (page 113). When you purchase your camera, the image size is set [Digital Zoom] to smart zoom. Optical zoom: - m m The W side of the ...


