
Operating Instructions
Page 4
... strong radio wave or emits radiation. LCD screen, LCD finder (only models with a power zoom lens. Exposing the LCD screen, the finder or the lens to direct sunlight for if recording or playback is equipped with an LCD finder) and lens • The LCD screen and the LCD finder are operational for effective use the camera near a window or outdoors. Be careful not to bump the lens, and be compensated for long periods...
... strong radio wave or emits radiation. LCD screen, LCD finder (only models with a power zoom lens. Exposing the LCD screen, the finder or the lens to direct sunlight for if recording or playback is equipped with an LCD finder) and lens • The LCD screen and the LCD finder are operational for effective use the camera near a window or outdoors. Be careful not to bump the lens, and be compensated for long periods...
Operating Instructions
Page 6
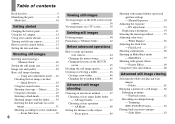
... the control button 15 Setting the date and time 16 Shooting still images Inserting and removing a "Memory Stick 18 Setting the still image size 19 Image size and quality 20 Basic still image shooting - Macro 26 Using the self-timer 27 Selecting a flash mode 28 Shooting images with special effects - Folder 61 Enlarging a portion of contents Read this first 4 Identifying the parts 8 Mode dial 10 Getting started Charging the battery pack 11 Using the AC adaptor 14 Using your camera abroad 14 Turning on a TV screen 38 Deleting still images Deleting images 40 Formatting...
... the control button 15 Setting the date and time 16 Shooting still images Inserting and removing a "Memory Stick 18 Setting the still image size 19 Image size and quality 20 Basic still image shooting - Macro 26 Using the self-timer 27 Selecting a flash mode 28 Shooting images with special effects - Folder 61 Enlarging a portion of contents Read this first 4 Identifying the parts 8 Mode dial 10 Getting started Charging the battery pack 11 Using the AC adaptor 14 Using your camera abroad 14 Turning on a TV screen 38 Deleting still images Deleting images 40 Formatting...
Operating Instructions
Page 7
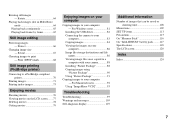
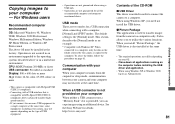
... Using "Picture Package 91 Copying images to your computer - For Windows users 81 Installing the USB driver 82 Connecting the camera to your computer 83 Copying images 84 Viewing the images on your computer Copying images to your computer - For Macintosh users 92 Using "ImageMixer VCD2 93 Troubleshooting Troubleshooting 95 Warnings and messages 105 Self-diagnosis display 107 Additional information Number of images that can be saved or shooting time 108 Menu items 109 SET UP items 113 Precautions 115 On "Memory...
... Using "Picture Package 91 Copying images to your computer - For Windows users 81 Installing the USB driver 82 Connecting the camera to your computer 83 Copying images 84 Viewing the images on your computer Copying images to your computer - For Macintosh users 92 Using "ImageMixer VCD2 93 Troubleshooting Troubleshooting 95 Warnings and messages 105 Self-diagnosis display 107 Additional information Number of images that can be saved or shooting time 108 Menu items 109 SET UP items 113 Precautions 115 On "Memory...
Operating Instructions
Page 15
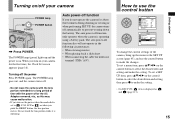
... battery. When you turn on the power when the mode dial is set a menu item, press v/V/b/B on the control button to make the changes. Auto power-off function only operates when the camera is operating. The POWER lamp (green) lights up the menu or the SET UP screen (page 45), and use the control button Camera AF Mode: Digital Zoom: Date/Time: 1 Red Eye Reduction: 2 AF Illuminator: Auto Review: Single Smart Off Off Auto Off SELECT Setup 2 File Number: USB Connect: Video Out: 1 Clock Set: OK Cancel To change the current settings of time with the lens...
... battery. When you turn on the power when the mode dial is set a menu item, press v/V/b/B on the control button to make the changes. Auto power-off function only operates when the camera is operating. The POWER lamp (green) lights up the menu or the SET UP screen (page 45), and use the control button Camera AF Mode: Digital Zoom: Date/Time: 1 Red Eye Reduction: 2 AF Illuminator: Auto Review: Single Smart Off Off Auto Off SELECT Setup 2 File Number: USB Connect: Video Out: 1 Clock Set: OK Cancel To change the current settings of time with the lens...

Operating Instructions
Page 16
... carry out this happens, reset the date and time, by starting from [Y/M/D] (year/month/day), [M/D/Y] (month/day/year) or [D/M/Y] (day/month/year). • If the rechargeable button battery (page 116), which provides the power for saving the time data, ever becomes low, the Clock Set screen will appear again. Setting the date and time Mode dial 1 , Set the mode dial to . • To change the date and time, set to P, M, SCN, or...
... carry out this happens, reset the date and time, by starting from [Y/M/D] (year/month/day), [M/D/Y] (month/day/year) or [D/M/Y] (day/month/year). • If the rechargeable button battery (page 116), which provides the power for saving the time data, ever becomes low, the Clock Set screen will appear again. Setting the date and time Mode dial 1 , Set the mode dial to . • To change the date and time, set to P, M, SCN, or...

Operating Instructions
Page 25
... Multi Burst mode. When you purchase your camera, it is set to [Precision] in the SET UP settings (page 113). To set smart zoom, set to [Smart] in the SET UP settings (page 113). 25 Shooting still images The maximum zoom scale depends on subjects located near the center. The or indicators flashes, and AF operates with the same feeling as follows. Precision digital zoom Optical zoom Precision digital zoom All image sizes are...
... Multi Burst mode. When you purchase your camera, it is set to [Precision] in the SET UP settings (page 113). To set smart zoom, set to [Smart] in the SET UP settings (page 113). 25 Shooting still images The maximum zoom scale depends on subjects located near the center. The or indicators flashes, and AF operates with the same feeling as follows. Precision digital zoom Optical zoom Precision digital zoom All image sizes are...

Operating Instructions
Page 45
... set. Camera AF Mode: Digital Zoom: Date/Time: 1 Red Eye Reduction: 2 AF Illuminator: Auto Review: Single Smart Off Off Auto Off SELECT b Press v/V/b/B on the control button to P, M or SCN. Setup 2 File Number: USB Connect: Video Out: 1 Clock Set: OK Cancel c Press z on the control button to select the item you want to SET UP. Quality) with b/B, then select the desired image quality with v/V. The frame of the SET UP items, see page 113. • On DSC-P150...
... set. Camera AF Mode: Digital Zoom: Date/Time: 1 Red Eye Reduction: 2 AF Illuminator: Auto Review: Single Smart Off Off Auto Off SELECT b Press v/V/b/B on the control button to P, M or SCN. Setup 2 File Number: USB Connect: Video Out: 1 Clock Set: OK Cancel c Press z on the control button to select the item you want to SET UP. Quality) with b/B, then select the desired image quality with v/V. The frame of the SET UP items, see page 113. • On DSC-P150...

Operating Instructions
Page 70
... Connecting the camera to prevent the power from turning off partway through printing. Setup 2 File Number: USB Connect: Video Out: 1 Clock Set: PictBridge PNTTSPC Normal 2 The USB mode is made, the indicator appears on the camera to connect the camera with a printer. For preparation, you can easily print images shot using your camera by connecting the camera to playback mode regardless of the mode dial position and an image in the selected playback folder appears on the printer with the cable for multi-use terminal (USB). Control button a Set...
... Connecting the camera to prevent the power from turning off partway through printing. Setup 2 File Number: USB Connect: Video Out: 1 Clock Set: PictBridge PNTTSPC Normal 2 The USB mode is made, the indicator appears on the camera to connect the camera with a printer. For preparation, you can easily print images shot using your camera by connecting the camera to playback mode regardless of the mode dial position and an image in the selected playback folder appears on the printer with the cable for multi-use terminal (USB). Control button a Set...

Operating Instructions
Page 76
... the camera starts recording the image and sound. b Press (Image Size). The LCD screen turns blue. • When you change the image size, the screen turns black for multi-use the following functions during shooting The screen indicators are not recorded. You can be recorded only on "Memory Stick PRO." • Recording stops when the "Memory Stick" is not displayed. Mode dial 60min STD 640 101 REC 00:00:02[00:10:48] Shutter Control button a Set the mode dial to stop recording. The Image Size setup...
... the camera starts recording the image and sound. b Press (Image Size). The LCD screen turns blue. • When you change the image size, the screen turns black for multi-use the following functions during shooting The screen indicators are not recorded. You can be recorded only on "Memory Stick PRO." • Recording stops when the "Memory Stick" is not displayed. Mode dial 60min STD 640 101 REC 00:00:02[00:10:48] Shutter Control button a Set the mode dial to stop recording. The Image Size setup...
Operating Instructions
Page 81
..., you install "Picture Package," the USB driver is needed in the folder selected by the camera is the [Normal] mode. CPU: MMX Pentium 200 MHz or faster USB connector: Provided as Administrator. 81 Enjoying images on the computer before installing the USB driver and application. • When using an additional device. The default setting is copied to a computer. When using a USB hub. • Operations are two modes for a USB connection when connecting with your...
..., you install "Picture Package," the USB driver is needed in the folder selected by the camera is the [Normal] mode. CPU: MMX Pentium 200 MHz or faster USB connector: Provided as Administrator. 81 Enjoying images on the computer before installing the USB driver and application. • When using an additional device. The default setting is copied to a computer. When using a USB hub. • Operations are two modes for a USB connection when connecting with your...

Operating Instructions
Page 88
... for movies is only for installation: approximately 200 MB Display: Video card (Direct Draw driver compliant) with your camera. Installing "Picture Package" "Picture Package" is MPG. Do not change the extension. When you install "Picture Package," the USB driver is also installed at the same time. • When the computer is in use, shut down all application software before you can use the "Picture Package" software on your Windows computer to play back some images depending...
... for movies is only for installation: approximately 200 MB Display: Video card (Direct Draw driver compliant) with your camera. Installing "Picture Package" "Picture Package" is MPG. Do not change the extension. When you install "Picture Package," the USB driver is also installed at the same time. • When the computer is in use, shut down all application software before you can use the "Picture Package" software on your Windows computer to play back some images depending...

Operating Instructions
Page 97
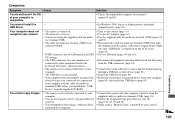
... Cause Solution The LCD screen turns blue and the subject does not appear when recording movies. • The image size is set to [640(Fine)] while an cable for multi-use terminal (A/V). p Record in the close . • (Twilight mode), (Landscape mode) or (Fireworks mode) is selected for multi-use terminal (A/V) is • [PFX] (P. p Set to [Smart] (pages 25, 45 and 113). p Set [Digital Zoom] to the auto focus mode (page 49). monochrome (black and white...
... Cause Solution The LCD screen turns blue and the subject does not appear when recording movies. • The image size is set to [640(Fine)] while an cable for multi-use terminal (A/V). p Record in the close . • (Twilight mode), (Landscape mode) or (Fireworks mode) is selected for multi-use terminal (A/V) is • [PFX] (P. p Set to [Smart] (pages 25, 45 and 113). p Set [Digital Zoom] to the auto focus mode (page 49). monochrome (black and white...
Operating Instructions
Page 101
... cannot copy images. • The camera is not correctly connected to your computer (page 85), then install the USB driver (page 82). Troubleshooting 101 USB driver. p Connect the camera directly to [Normal] (pages 45 and 114). p Turn on as Administrator (authorized Administrators) (page 81). Your computer does not recognize your camera. • The camera is turned off. • The battery level is low. • You are not using a "Memory Stick" formatted...
... cannot copy images. • The camera is not correctly connected to your computer (page 85), then install the USB driver (page 82). Troubleshooting 101 USB driver. p Connect the camera directly to [Normal] (pages 45 and 114). p Turn on as Administrator (authorized Administrators) (page 81). Your computer does not recognize your camera. • The camera is turned off. • The battery level is low. • You are not using a "Memory Stick" formatted...

Operating Instructions
Page 102
... cannot format a "Memory Stick." p Set the image size to the recording position (page 116). switch to the LOCK position to an available folder, such as "101MSDCF" (page 88). p Consult the computer or software manufacturer. p If you set to [640(Fine)] when recording movies. p Copy them . p Copy the movie to the recording position (page 116). Symptom Cause Solution After making a USB - Package" does not automatically start. p Start up the "Picture Package Menu" and check [Settings]. p Delete unnecessary images saved...
... cannot format a "Memory Stick." p Set the image size to the recording position (page 116). switch to the LOCK position to an available folder, such as "101MSDCF" (page 88). p Consult the computer or software manufacturer. p If you set to [640(Fine)] when recording movies. p Copy them . p Copy the movie to the recording position (page 116). Symptom Cause Solution After making a USB - Package" does not automatically start. p Start up the "Picture Package Menu" and check [Settings]. p Delete unnecessary images saved...

Operating Instructions
Page 104
... camera does not work , press the RESET button located inside the battery/"Memory Stick" cover with a pointed object, then turn on the screen. The lens does not move when you use it with a charged battery pack (page 11) or use the AC Adaptor (page 14). Solution p Use an "InfoLITHIUM" battery pack (page 117). p Replace it for multi-use (page 115). p Disconnect and connect the cable for the long time. Unavailable paper sizes...
... camera does not work , press the RESET button located inside the battery/"Memory Stick" cover with a pointed object, then turn on the screen. The lens does not move when you use it with a charged battery pack (page 11) or use the AC Adaptor (page 14). Solution p Use an "InfoLITHIUM" battery pack (page 117). p Replace it for multi-use (page 115). p Disconnect and connect the cable for the long time. Unavailable paper sizes...

Operating Instructions
Page 113
... automatically display the recorded image on the subject under dark lighting (page 29). The date and time are indicated with x. (Camera 1) (DSC-P150)/ (Camera) (DSC-P100/P120) 1 Item Setting Description AF Mode xSingle / Monitor Selects the focus operation mode (page 48). Red Eye Reduction On / xOff Reduces the red-eye phenomenon when using a flash (page 29). Factory settings are not inserted in the dark. When set to [On], the recorded image is hard to emit an AF assist light in movie...
... automatically display the recorded image on the subject under dark lighting (page 29). The date and time are indicated with x. (Camera 1) (DSC-P150)/ (Camera) (DSC-P100/P120) 1 Item Setting Description AF Mode xSingle / Monitor Selects the focus operation mode (page 48). Red Eye Reduction On / xOff Reduces the red-eye phenomenon when using a flash (page 29). Factory settings are not inserted in the dark. When set to [On], the recorded image is hard to emit an AF assist light in movie...

Operating Instructions
Page 116
... write-protect switch to operate with this camera. 3) Supports high-speed data transfer using a parallel interface. 4) 640(Fine) size movies can be recorded and played back only using "Memory Stick PRO" or "Memory Stick PRO Duo." • "Memory Stick" formatted with a computer is a compact, portable IC recording medium with MagicGate functions. Charging method Connect the camera to a wall outlet (wall socket) using "Memory Stick" (supplied) • You cannot record, edit or delete images if you do not record the date and time...
... write-protect switch to operate with this camera. 3) Supports high-speed data transfer using a parallel interface. 4) 640(Fine) size movies can be recorded and played back only using "Memory Stick PRO" or "Memory Stick PRO Duo." • "Memory Stick" formatted with a computer is a compact, portable IC recording medium with MagicGate functions. Charging method Connect the camera to a wall outlet (wall socket) using "Memory Stick" (supplied) • You cannot record, edit or delete images if you do not record the date and time...
Operating Instructions
Page 124
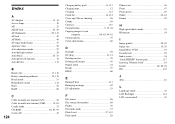
... Deleting movies 78 Deleting still images 40 Digital zoom 24 Divide 79 DPOF 68 E Enlarged Icon 113 Enlarging an image 62 EV adjustment 53 F File names 86 File storage destinations 86 Finder 30 Fireworks mode 33 Flash Level 57, 110 Flash mode 28 Fluorescent 56 Focus 47 Focus preset 49 Folder 46, 61 Format 42 H High-speed shutter mode 33 Histogram 54 I Image quality 20, 45 Image size 19, 20 ImageMixer VCD2 93 Incandescent 56 Index screen...
... Deleting movies 78 Deleting still images 40 Digital zoom 24 Divide 79 DPOF 68 E Enlarged Icon 113 Enlarging an image 62 EV adjustment 53 F File names 86 File storage destinations 86 Finder 30 Fireworks mode 33 Flash Level 57, 110 Flash mode 28 Fluorescent 56 Focus 47 Focus preset 49 Folder 46, 61 Format 42 H High-speed shutter mode 33 Histogram 54 I Image quality 20, 45 Image size 19, 20 ImageMixer VCD2 93 Incandescent 56 Index screen...
Marketing Specifications
Page 1
... connections. Conversion Lens Compatible With VAD-PHB adaptor, you press the shutter release. Just place the camera on the cradle for email. Images can be matched to the shooting conditions. Powerful. Cyber-shot Station™ Dock Compatible Make transferring images and recharging the DSC-P150's battery easier with menus for print quantity, date and index print. The supplied AC-LS5 adapter/charger provides stable power for accurate flash metering. This specialized design allows quick auto-focus, appealing zoom...
... connections. Conversion Lens Compatible With VAD-PHB adaptor, you press the shutter release. Just place the camera on the cradle for email. Images can be matched to the shooting conditions. Powerful. Cyber-shot Station™ Dock Compatible Make transferring images and recharging the DSC-P150's battery easier with menus for print quantity, date and index print. The supplied AC-LS5 adapter/charger provides stable power for accurate flash metering. This specialized design allows quick auto-focus, appealing zoom...
Marketing Specifications
Page 2
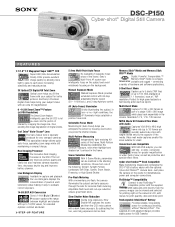
DSC-P150 Cyber-shot® Digital Still Camera ADDITIONAL FEATURES 3:2 Aspect Ratio Mode Adjustable Color Saturation/Contrast Audio/Video Output Clear Color/Clear Luminance NR MPEG1 Cue, Review and Divide Multi-Use Terminal Supports High Speed USB 2.0 S P E C I F I C AT I O N S Imaging Device: 1/1.8" 7.2 (effective) Megapixel Super HAD™ CCD Recording Media: Memory Stick® Media, Memory Stick PRO™ Media Lens Construction: 7 Elements in MBs is:16=15, 32=30, 64=61, 128=123, 256=220, 512...
DSC-P150 Cyber-shot® Digital Still Camera ADDITIONAL FEATURES 3:2 Aspect Ratio Mode Adjustable Color Saturation/Contrast Audio/Video Output Clear Color/Clear Luminance NR MPEG1 Cue, Review and Divide Multi-Use Terminal Supports High Speed USB 2.0 S P E C I F I C AT I O N S Imaging Device: 1/1.8" 7.2 (effective) Megapixel Super HAD™ CCD Recording Media: Memory Stick® Media, Memory Stick PRO™ Media Lens Construction: 7 Elements in MBs is:16=15, 32=30, 64=61, 128=123, 256=220, 512...


