Operating Instructions
Page 84
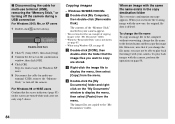
...see page 85. • When using Windows XP, see page 85. When an image with your camera appear. • This section describes an example of copying images to copy are stored. Double-click here 2 Click (Sony DSC), then click [Stop]. 3 Confirm the device on the screen are copied to the desired name and... an image file to the computer without overwriting, change the file name, you want to the "My Documents" folder. • When the "Removable Disk" icon is deleted. For Windows 98 or 98SE users Confirm that if you change the file name to the "My Documents" folder. The image files are...
...see page 85. • When using Windows XP, see page 85. When an image with your camera appear. • This section describes an example of copying images to copy are stored. Double-click here 2 Click (Sony DSC), then click [Stop]. 3 Confirm the device on the screen are copied to the desired name and... an image file to the computer without overwriting, change the file name, you want to the "My Documents" folder. • When the "Removable Disk" icon is deleted. For Windows 98 or 98SE users Confirm that if you change the file name to the "My Documents" folder. The image files are...

Operating Instructions
Page 85
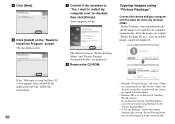
...multi-use terminal (USB) and reconnect it . 1 Right-click [ Sony DSC]. 2 Click [Uninstall]. Image copying starts. I'm finished working with these pictures], then click [Next]. Try the USB driver installation again using Microsoft Scanner and Camera Wizard], then click [OK]. Click [Copy pictures to a folder ...the [Device Manager] tab. 3 If [ Sony DSC] is completed, the "Other Options" screen appears. The "Scanner and Camera Wizard" screen appears. c Click the checkbox of images that you do not want to copy to your computer When a removable disk icon is not shown 1 Right-click [My ...
...multi-use terminal (USB) and reconnect it . 1 Right-click [ Sony DSC]. 2 Click [Uninstall]. Image copying starts. I'm finished working with these pictures], then click [Next]. Try the USB driver installation again using Microsoft Scanner and Camera Wizard], then click [OK]. Click [Copy pictures to a folder ...the [Device Manager] tab. 3 If [ Sony DSC] is completed, the "Other Options" screen appears. The "Scanner and Camera Wizard" screen appears. c Click the checkbox of images that you do not want to copy to your computer When a removable disk icon is not shown 1 Right-click [My ...
Operating Instructions
Page 90
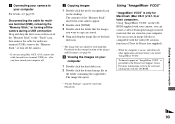
...Menu" and "Picture Package destination Folder" are displayed. "Picture Package" starts up and the images copied are displayed. The installation starts. The shortcut icons of "Yes, I want to Install the Program" screen. If the "Welcome to the computer automatically. h Remove the CD-ROM. If you ... Normally "Picture Package" and "Date" folders are created inside the "My Picture" folder, and all of the image files recorded with the camera are copied to setup for multi-use terminal (USB). After the images are copied, "Picture Package Viewer" starts up automatically and the images ...
...Menu" and "Picture Package destination Folder" are displayed. "Picture Package" starts up and the images copied are displayed. The installation starts. The shortcut icons of "Yes, I want to Install the Program" screen. If the "Welcome to the computer automatically. h Remove the CD-ROM. If you ... Normally "Picture Package" and "Date" folders are created inside the "My Picture" folder, and all of the image files recorded with the camera are copied to setup for multi-use terminal (USB). After the images are copied, "Picture Package Viewer" starts up automatically and the images ...
Operating Instructions
Page 93
... image file opens. • "Picture Package" cannot be used with Macintosh. b Copying images 1 Double-click the newly recognized icon on the CDROM supplied with your camera, you can create an image file that the images you want to copy are stored. 4 Drag and drop the image files ... Disconnecting the cable for multi-use , shut down all other application software before you have turned your computer off the camera during a USB connection Drag and drop the drive icon or the icon of "ImageMixer VCD2" is provided by Roxio (not supplied). • When the computer is only for Macintosh (Mac...
... image file opens. • "Picture Package" cannot be used with Macintosh. b Copying images 1 Double-click the newly recognized icon on the CDROM supplied with your camera, you can create an image file that the images you want to copy are stored. 4 Drag and drop the image files ... Disconnecting the cable for multi-use , shut down all other application software before you have turned your computer off the camera during a USB connection Drag and drop the drive icon or the icon of "ImageMixer VCD2" is provided by Roxio (not supplied). • When the computer is only for Macintosh (Mac...
Operating Instructions
Page 94
...,000 colors or higher. 2 Insert the CD-ROM (supplied) into the CD-ROM drive. 3 Double-click the CD-ROM icon. 4 Copy the [IMXINST.SIT] file in the [MAC] folder to the hard disk icon. 5 Double-click the [IMXINST.SIT] file in the video CD format. Toast by Roxio (not supplied) is recommended...
...,000 colors or higher. 2 Insert the CD-ROM (supplied) into the CD-ROM drive. 3 Double-click the CD-ROM icon. 4 Copy the [IMXINST.SIT] file in the [MAC] folder to the hard disk icon. 5 Double-click the [IMXINST.SIT] file in the video CD format. Toast by Roxio (not supplied) is recommended...

Operating Instructions
Page 113
...digital zoom mode (page 24). Date/time Day&Time / Date / xOff Selects whether to SET UP. You cannot shoot the next image during recording. SET UP items Set the mode dial to superimpose the date or time onto the image (page 31). Auto Review xOn / Off (DSC-P150) On / xOff (DSC...On DSC-P150, when you press the shutter button halfway down, the recorded image display disappears and you can immediately shoot the next image. (Camera 2) (DSC-P150 only) 2 Item Setting Enlarged Icon xOn / Off Description Selects whether to focus on the LCD screen immediately after shooting a still ...
...digital zoom mode (page 24). Date/time Day&Time / Date / xOff Selects whether to SET UP. You cannot shoot the next image during recording. SET UP items Set the mode dial to superimpose the date or time onto the image (page 31). Auto Review xOn / Off (DSC-P150) On / xOff (DSC...On DSC-P150, when you press the shutter button halfway down, the recorded image display disappears and you can immediately shoot the next image. (Camera 2) (DSC-P150 only) 2 Item Setting Enlarged Icon xOn / Off Description Selects whether to focus on the LCD screen immediately after shooting a still ...
Operating Instructions
Page 124
... 9, 15, 44 Copying images to your computer 84, 85, 90, 92 Cutting movies 79 Cyber-shot Station 60 D Daylight 56 DC plug 11, 14 Deleting movies 78 Deleting still images 40 Digital zoom 24 Divide 79 DPOF 68 E Enlarged Icon 113 Enlarging an image 62 EV adjustment 53 F File names 86 File storage destinations 86...
... 9, 15, 44 Copying images to your computer 84, 85, 90, 92 Cutting movies 79 Cyber-shot Station 60 D Daylight 56 DC plug 11, 14 Deleting movies 78 Deleting still images 40 Digital zoom 24 Divide 79 DPOF 68 E Enlarged Icon 113 Enlarging an image 62 EV adjustment 53 F File names 86 File storage destinations 86...
