
Operating Instructions
Page 7
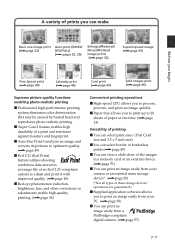
x Paper tray allows you to process, preview, and print an image quickly. x Auto Fine Print 3 analyses an image and corrects its pictures to optimum quality. (.page 49) x Exif... A variety of prints you can make Before you to print an image easily from a PictBridge-compliant digital camera. (.page 57) 7 GB xYou can select border or borderless prints (.page 49) x You ...Card print (.page 45) Split images print (.page 46) Supreme picture quality functions enabling photo-realistic printing x Professional high-performance printing system eliminates color deterioration that may be ...
x Paper tray allows you to process, preview, and print an image quickly. x Auto Fine Print 3 analyses an image and corrects its pictures to optimum quality. (.page 49) x Exif... A variety of prints you can make Before you to print an image easily from a PictBridge-compliant digital camera. (.page 57) 7 GB xYou can select border or borderless prints (.page 49) x You ...Card print (.page 45) Split images print (.page 46) Supreme picture quality functions enabling photo-realistic printing x Professional high-performance printing system eliminates color deterioration that may be ...
Operating Instructions
Page 8
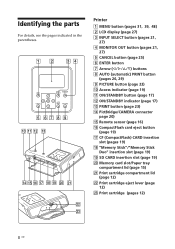
Memory card slot/Paper tray compartment lid (page 15) wa Print cartridge compartment lid (page 12) ws Print cartridge eject lever (page 12) wd Print cartridge (pages 12) 8 GB Identifying the parts For details, see the pages indicated in the parentheses. Printer 1 MENU button (pages 31, 39, 48) ...2 LCD display (page 27) 3 INPUT SELECT button (pages 21, 27) 4 MONITOR OUT button (pages 21, 27) 5 CANCEL button (page 25) 6 ENTER button 7 Arrow (g/G/f/F) buttons 8 AUTO (automatic) PRINT button (pages 26, 29) 9 PICTURE button (page 23)...
Memory card slot/Paper tray compartment lid (page 15) wa Print cartridge compartment lid (page 12) ws Print cartridge eject lever (page 12) wd Print cartridge (pages 12) 8 GB Identifying the parts For details, see the pages indicated in the parentheses. Printer 1 MENU button (pages 31, 39, 48) ...2 LCD display (page 27) 3 INPUT SELECT button (pages 21, 27) 4 MONITOR OUT button (pages 21, 27) 5 CANCEL button (page 25) 6 ENTER button 7 Arrow (g/G/f/F) buttons 8 AUTO (automatic) PRINT button (pages 26, 29) 9 PICTURE button (page 23)...
Operating Instructions
Page 9
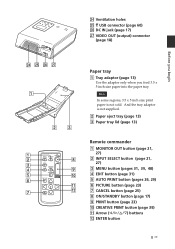
... (page 18) Paper tray 1 Tray adaptor (page 13) Use the adaptor only when you feed 3.5 x 5 inch size paper into the paper tray. Note In some regions, 3.5 x 5 inch size print paper is not supplied. 2 Paper eject tray (page 13) 3 Paper tray lid (page 13...) Remote commander 1 MONITOR OUT button (page 21, 27) 2 INPUT SELECT button (page 21, 27) 3 MENU button (pages 31, 39, 48) 4 EDIT button (page 31) 5 AUTO PRINT button (pages 26, 29) 6 PICTURE...
... (page 18) Paper tray 1 Tray adaptor (page 13) Use the adaptor only when you feed 3.5 x 5 inch size paper into the paper tray. Note In some regions, 3.5 x 5 inch size print paper is not supplied. 2 Paper eject tray (page 13) 3 Paper tray lid (page 13...) Remote commander 1 MONITOR OUT button (page 21, 27) 2 INPUT SELECT button (page 21, 27) 3 MENU button (pages 31, 39, 48) 4 EDIT button (page 31) 5 AUTO PRINT button (pages 26, 29) 6 PICTURE...
Operating Instructions
Page 10
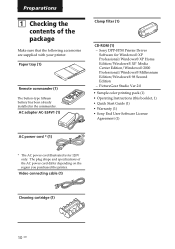
Sony DPP-FP50 Printer Driver Software for 120V only. Paper tray (1) Remote commander (1) The button-type lithium battery has been already installed in the commander. PictureGear Studio Ver.2.0 • Sample color printing pack (1) • Operating Instructions (this booklet, 1) • Quick Start Guide (1) • Warranty (1) • Sony ...Edition - Preparations 1 Checking the contents of the AC power cord differ depending on the region you purchased the printer. Video connecting cable (1) Cleaning cartridge (1) 10 GB The plug shape and specifications of the package Make sure ...
Sony DPP-FP50 Printer Driver Software for 120V only. Paper tray (1) Remote commander (1) The button-type lithium battery has been already installed in the commander. PictureGear Studio Ver.2.0 • Sample color printing pack (1) • Operating Instructions (this booklet, 1) • Quick Start Guide (1) • Warranty (1) • Sony ...Edition - Preparations 1 Checking the contents of the AC power cord differ depending on the region you purchased the printer. Video connecting cable (1) Cleaning cartridge (1) 10 GB The plug shape and specifications of the package Make sure ...
Operating Instructions
Page 13
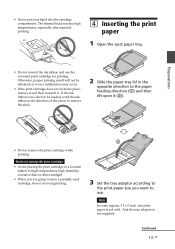
The thermal head reaches high temperatures, especially after repeated printing. 4 Inserting the print paper 1 Open the eject paper tray. • Do not rewind the ink ribbon and use . Notes on storing the print cartridge • Avoid placing the print cartridge in a location subject to ... not be loaded, wind the ink ribbon in the direction of the arrow to remove the slack. 2 Slide the paper tray lid in its original bag. 3 Set the tray adaptor according to the print paper size you are going to store a partially-used cartridge, store it in the opposite direction to be obtained, or...
The thermal head reaches high temperatures, especially after repeated printing. 4 Inserting the print paper 1 Open the eject paper tray. • Do not rewind the ink ribbon and use . Notes on storing the print cartridge • Avoid placing the print cartridge in a location subject to ... not be loaded, wind the ink ribbon in the direction of the arrow to remove the slack. 2 Slide the paper tray lid in its original bag. 3 Set the tray adaptor according to the print paper size you are going to store a partially-used cartridge, store it in the opposite direction to be obtained, or...

Operating Instructions
Page 14
... place (2). Note Do not touch the printing surface. x To use 3.5 x 5 inch size print paper Keep the tray adaptor installed. Insert the protective sheet together with no imprint) facing up to the tray Put the projections of the tray adaptor into the tray. Paper feeding direction Face stamp marker (Post Card size) or arrow imprint (3.5 x 5 inch size...
... place (2). Note Do not touch the printing surface. x To use 3.5 x 5 inch size print paper Keep the tray adaptor installed. Insert the protective sheet together with no imprint) facing up to the tray Put the projections of the tray adaptor into the tray. Paper feeding direction Face stamp marker (Post Card size) or arrow imprint (3.5 x 5 inch size...
Operating Instructions
Page 15
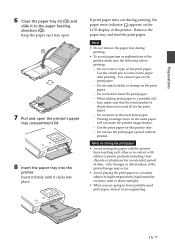
... the oil ink pen to store partially-used print paper. When adding print paper to the paper feeding direction (2). Notes on the same paper will not make sure that the total number of the printer. Keep the paper eject tray open. 7 Pull and open the printer's paper tray compartment lid. 8 Insert the paper tray into place. Do not attach sticker or stamps...
... the oil ink pen to store partially-used print paper. When adding print paper to the paper feeding direction (2). Notes on the same paper will not make sure that the total number of the printer. Keep the paper eject tray open. 7 Pull and open the printer's paper tray compartment lid. 8 Insert the paper tray into place. Do not attach sticker or stamps...
Operating Instructions
Page 23
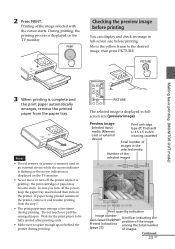
..., the printing process is complete and the print paper automatically emerges, remove the printed paper from the step 1. • The print paper may become stuck. In case you turn on the TV monitor. Do not touch nor pull the emerged paper. PICTURE The selected image is printing; 2 Press PRINT...displayed on the TV monitor. • Never move or turn off the power, keep the paper tray inserted and then turn off the printer while it and resume printing from the paper tray. Checking the preview image before printing. Move the yellow frame to spare enough space behind ...
..., the printing process is complete and the print paper automatically emerges, remove the printed paper from the step 1. • The print paper may become stuck. In case you turn on the TV monitor. Do not touch nor pull the emerged paper. PICTURE The selected image is printing; 2 Press PRINT...displayed on the TV monitor. • Never move or turn off the power, keep the paper tray inserted and then turn off the printer while it and resume printing from the paper tray. Checking the preview image before printing. Move the yellow frame to spare enough space behind ...
Operating Instructions
Page 25
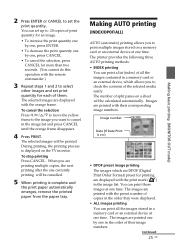
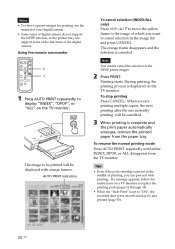
... until the orange frame disappears. 4 Press PRINT. During printing, the printing process is complete and the print paper automatically emerges, remove the printed paper from the paper tray. Images are printed with the orange frame. To cancel the selection Press g/G/f/F to move the yellow frame to...print all the images contained in a memory card or an external device, which are DPOF (Digital Print Order Format) preset for each of their corresponding image numbers. The printer provides the following three AUTO printing methods: • INDEX printing You can print those images at...
... until the orange frame disappears. 4 Press PRINT. During printing, the printing process is complete and the print paper automatically emerges, remove the printed paper from the paper tray. Images are printed with the orange frame. To cancel the selection Press g/G/f/F to move the yellow frame to...print all the images contained in a memory card or an external device, which are DPOF (Digital Print Order Format) preset for each of their corresponding image numbers. The printer provides the following three AUTO printing methods: • INDEX printing You can print those images at...
Operating Instructions
Page 26
.... • Some types of digital camera do not support the DPOF function, or the printer may not support some of the functions of the DPOF preset images. 2 Press PRINT. To resume the normal printing mode Press AUTO PRINT repeatedly until either INDEX, DPOF, or ALL disappears from the paper tray. The orange frame disappears...
.... • Some types of digital camera do not support the DPOF function, or the printer may not support some of the functions of the DPOF preset images. 2 Press PRINT. To resume the normal printing mode Press AUTO PRINT repeatedly until either INDEX, DPOF, or ALL disappears from the paper tray. The orange frame disappears...
Operating Instructions
Page 28
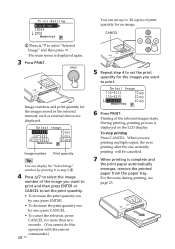
... 6 Press PRINT. Printing of print quantity for the images you are displayed. During printing, printing process is complete and the print paper automatically emerges, remove the printed paper from the paper tray. To stop printing Press CANCEL. Image number Print quantity Tip You can set the print quantity for an image. You can display...
... 6 Press PRINT. Printing of print quantity for the images you are displayed. During printing, printing process is complete and the print paper automatically emerges, remove the printed paper from the paper tray. To stop printing Press CANCEL. Image number Print quantity Tip You can set the print quantity for an image. You can display...
Operating Instructions
Page 29
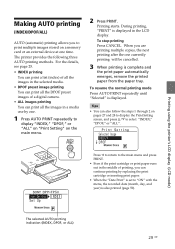
..." on the main menu. 2 Press PRINT. For the details, see page 25. • INDEX printing You can print a list (index) of a digital camera. • ALL images printing You can also follow the steps 1 through 2 on a memory card or an external device at one time. When you... f/F to "ON" with the menu, the recorded date (month, day, and year) is complete and the print paper automatically emerges, remove the printed paper from the paper tray. Printing using the printer's LCD display (LCD mode) Making AUTO printing (INDEX/DPOF/ALL) AUTO (automatic) printing allows you are printing multiple...
..." on the main menu. 2 Press PRINT. For the details, see page 25. • INDEX printing You can print a list (index) of a digital camera. • ALL images printing You can also follow the steps 1 through 2 on a memory card or an external device at one time. When you... f/F to "ON" with the menu, the recorded date (month, day, and year) is complete and the print paper automatically emerges, remove the printed paper from the paper tray. Printing using the printer's LCD display (LCD mode) Making AUTO printing (INDEX/DPOF/ALL) AUTO (automatic) printing allows you are printing multiple...

Operating Instructions
Page 74
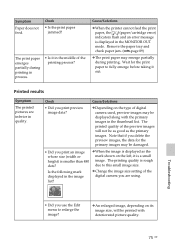
... paper tray? (.page 13) • Did you using print paper that was not designed for the printer? c The standard aspect ratio of the previewed image. may develop trouble. (.page 11) 74 GB Symptom In the Edit menu, there are blank areas at the top and bottom of an image shot with a digital ...camera is 3:4. If you use the tray adaptor...
... paper tray? (.page 13) • Did you using print paper that was not designed for the printer? c The standard aspect ratio of the previewed image. may develop trouble. (.page 11) 74 GB Symptom In the Edit menu, there are blank areas at the top and bottom of an image shot with a digital ...camera is 3:4. If you use the tray adaptor...
Operating Instructions
Page 75
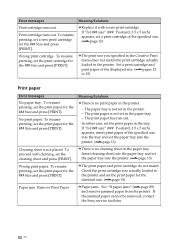
Cause/Solutions c When the printer cannot feed the print paper, the / (paper/cartridge error) indicators flash and an error message is rough due to this small image size. Check Cause/Solutions • Did you print an image ... not feed. Printed results Symptom The printed pictures are using. c Change the image size setting of digital camera used, preview images may emerge partially during printing in process. • Is it in the thumbnail list. Remove the paper tray and check paper jam. (.page 89) c The print paper may be as good as the primary images...
Cause/Solutions c When the printer cannot feed the print paper, the / (paper/cartridge error) indicators flash and an error message is rough due to this small image size. Check Cause/Solutions • Did you print an image ... not feed. Printed results Symptom The printed pictures are using. c Change the image size setting of digital camera used, preview images may emerge partially during printing in process. • Is it in the thumbnail list. Remove the paper tray and check paper jam. (.page 89) c The print paper may be as good as the primary images...
Operating Instructions
Page 88
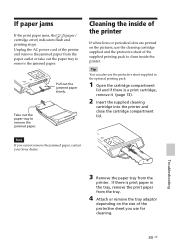
... is no print paper in the tray. The print paper is not set in the printer and set the paper tray into the printer. (.page 13) c There is not placed. If the jammed paper cannot be removed, contact the Sony service facilities. 88 GB c Replace it with cleaning, set the print paper in the printer. - Remove Print Paper. The print paper has run...
... is no print paper in the tray. The print paper is not set in the printer and set the paper tray into the printer. (.page 13) c There is not placed. If the jammed paper cannot be removed, contact the Sony service facilities. 88 GB c Replace it with cleaning, set the print paper in the printer. - Remove Print Paper. The print paper has run...
Operating Instructions
Page 89
... tray adaptor depending on the pictures, use the cleaning cartridge supplied and the protective sheet of the supplied printing pack to clean inside of the printer If white lines or periodical dots are printed on the size of the protective sheet you cannot remove the jammed paper, contact your Sony dealer. Pull out the jammed paper...
... tray adaptor depending on the pictures, use the cleaning cartridge supplied and the protective sheet of the supplied printing pack to clean inside of the printer If white lines or periodical dots are printed on the size of the protective sheet you cannot remove the jammed paper, contact your Sony dealer. Pull out the jammed paper...

Operating Instructions
Page 90
...imprints 6 Set the paper tray into the paper tray. The cleaning cartridge and protective sheet will not improve the printed picture quality. • The maximum cleaning times that you can carry out is automatically ejected. 7 Remove the cleaning cartridge and protective sheet from the printer. Tips • Keep... will clean inside the printer. Notes • Carry out cleaning only when there are white lines or dots on the print paper and carry out cleaning, which may cause paper jam or other troubles. • If a cleaning does not improve printed picture quality, please carry out...
...imprints 6 Set the paper tray into the paper tray. The cleaning cartridge and protective sheet will not improve the printed picture quality. • The maximum cleaning times that you can carry out is automatically ejected. 7 Remove the cleaning cartridge and protective sheet from the printer. Tips • Keep... will clean inside the printer. Notes • Carry out cleaning only when there are white lines or dots on the print paper and carry out cleaning, which may cause paper jam or other troubles. • If a cleaning does not improve printed picture quality, please carry out...

Operating Instructions
Page 91
...8226; Do not use similar packing material so that the ventilation holes are not blocked. Blocking these holes may cause danger. If you transport the printer, remove the print cartridge, paper tray, AC adapter, the memory card, or an external device from the wall outlet. • Do not handle the... printer roughly. • To reduce the risk of the AC adaptor is disconnected or damaged, never use the AC adapter supplied with a mild detergent solution....
...8226; Do not use similar packing material so that the ventilation holes are not blocked. Blocking these holes may cause danger. If you transport the printer, remove the print cartridge, paper tray, AC adapter, the memory card, or an external device from the wall outlet. • Do not handle the... printer roughly. • To reduce the risk of the AC adaptor is disconnected or damaged, never use the AC adapter supplied with a mild detergent solution....

Operating Instructions
Page 96
...service For the customers in Europe: http://www.sonydigitallink.com/ index/index.asp For the customers in Singapore: http://www.css.ap.sony.com 96 GB Compatible image file formats*1 JPEG: DCF*2 2.0 compatible, Exif*3 2.21 compatible, JFIF (Baseline JPEG with its ... 210 mm (7 1/4 x 2 5/8 x 8 3/8 inches) (w/h/d, excluding protruding parts) (360 mm (14 1/4 inches) of depth when the paper tray is installed.) Mass Approx. 1,200 g (2 lb 10 oz) (excluding the 165 g (6 oz) paper tray) Supplied accessories See "Checking the contents of files to be handled 9 999 files for viewing, shot date data and...
...service For the customers in Europe: http://www.sonydigitallink.com/ index/index.asp For the customers in Singapore: http://www.css.ap.sony.com 96 GB Compatible image file formats*1 JPEG: DCF*2 2.0 compatible, Exif*3 2.21 compatible, JFIF (Baseline JPEG with its ... 210 mm (7 1/4 x 2 5/8 x 8 3/8 inches) (w/h/d, excluding protruding parts) (360 mm (14 1/4 inches) of depth when the paper tray is installed.) Mass Approx. 1,200 g (2 lb 10 oz) (excluding the 165 g (6 oz) paper tray) Supplied accessories See "Checking the contents of files to be handled 9 999 files for viewing, shot date data and...
Operating Instructions
Page 100
...card Inserting/removing 19 Notes on use 94 Types 94 Searching an image 53 Selecting an image 41 Selecting the paper size 65, 66 Selecting the print paper 40 Set Up 30, 48 Slideshow 51 Specifications 95 Split images 46 Stamp 42 STANDBY indicator 17 Stop printing... 69 Superimposing characters 35 Supplied accessories 10 System requirements 58 T Thumbnails 56, 72, 98 Transport 91 Tray adaptor 13 Troubleshooting 71 U Undoing the operations 39 Uninstalling Picture Gear Studio 64 Printer driver 61 USB connector 60 V VIDEO OUT connector 18 W Wallpaper 40 Sony Corporation Printed in China
...card Inserting/removing 19 Notes on use 94 Types 94 Searching an image 53 Selecting an image 41 Selecting the paper size 65, 66 Selecting the print paper 40 Set Up 30, 48 Slideshow 51 Specifications 95 Split images 46 Stamp 42 STANDBY indicator 17 Stop printing... 69 Superimposing characters 35 Supplied accessories 10 System requirements 58 T Thumbnails 56, 72, 98 Transport 91 Tray adaptor 13 Troubleshooting 71 U Undoing the operations 39 Uninstalling Picture Gear Studio 64 Printer driver 61 USB connector 60 V VIDEO OUT connector 18 W Wallpaper 40 Sony Corporation Printed in China


