Operating Guide
Page 3
... power-line surges. Cleaning Unplug the set from the wall outlet before cleaning or polishing it from the wall outlet and disconnect the antenna or cable system. Replacement parts When replacement parts are required, be walked on an unstable cart, stand, tripod, bracket, or table. Do not use power-line operated...
... power-line surges. Cleaning Unplug the set from the wall outlet before cleaning or polishing it from the wall outlet and disconnect the antenna or cable system. Replacement parts When replacement parts are required, be walked on an unstable cart, stand, tripod, bracket, or table. Do not use power-line operated...

Operating Guide
Page 5
... interference to radio or television reception, which the receiver is supplied with Part 15 of California, USA only Perchlorate Material - The supplied interface cable must be determined by one or more of the following discs only. - 8cm DVD-RW - 8cm DVD+RW - 8cm DVD-R - 8cm...used in a residential installation. "PMB Guide" for using your camcorder You can radiate radio frequency energy and, if not installed and used with Part 15 of Conformity Trade Name: SONY Model No.: DCR-DVD810 Responsible Party:Sony Electronics Inc. Declaration of the FCC Rules. Increase the separation ...
... interference to radio or television reception, which the receiver is supplied with Part 15 of California, USA only Perchlorate Material - The supplied interface cable must be determined by one or more of the following discs only. - 8cm DVD-RW - 8cm DVD+RW - 8cm DVD-R - 8cm...used in a residential installation. "PMB Guide" for using your camcorder You can radiate radio frequency energy and, if not installed and used with Part 15 of Conformity Trade Name: SONY Model No.: DCR-DVD810 Responsible Party:Sony Electronics Inc. Declaration of the FCC Rules. Increase the separation ...
Operating Guide
Page 6
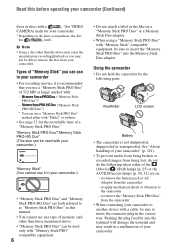
... shock or vibration to as "Memory Stick PRO Duo" in a malfunction of your camcorder. to remove the "Memory Stick PRO Duo" from the camcorder • When connecting your camcorder to another device with a cable, be able to remove the disc from the camcorder - Read this manual. • You cannot use any type of memory card...
... shock or vibration to as "Memory Stick PRO Duo" in a malfunction of your camcorder. to remove the "Memory Stick PRO Duo" from the camcorder • When connecting your camcorder to another device with a cable, be able to remove the disc from the camcorder - Read this manual. • You cannot use any type of memory card...
Operating Guide
Page 20
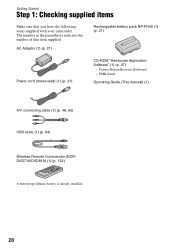
...) (1) (p. 21) CD-ROM "Handycam Application Software" (1) (p. 97) - Picture Motion Browser (Software) - PMB Guide Operating Guide (This manual) (1) A/V connecting cable (1) (p. 48, 62) USB cable (1) (p. 64) Wireless Remote Commander ...(DCRDVD710/DVD810) (1) (p. 132) A button-type lithium battery is already installed. 20 Getting Started Step 1: Checking supplied items Make sure that item supplied. The number in the parentheses indicates the number of that you have the following items supplied with your camcorder...
...) (1) (p. 21) CD-ROM "Handycam Application Software" (1) (p. 97) - Picture Motion Browser (Software) - PMB Guide Operating Guide (This manual) (1) A/V connecting cable (1) (p. 48, 62) USB cable (1) (p. 64) Wireless Remote Commander ...(DCRDVD710/DVD810) (1) (p. 132) A button-type lithium battery is already installed. 20 Getting Started Step 1: Checking supplied items Make sure that item supplied. The number in the parentheses indicates the number of that you have the following items supplied with your camcorder...
Operating Guide
Page 48
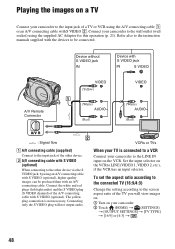
... S VIDEO (optional) When connecting to the other device via the S VIDEO jack, by using an A/V connecting cable with S VIDEO (optional). Connecting only the S VIDEO plug will view images on. 1 Turn on your camcorder. 2 Touch (HOME) t (SETTINGS) t [OUTPUT SETTINGS] t [TV TYPE] t [16:9] or [4:3] t . 48 Set the ...connected TV (16:9/4:3) Change the setting according to the screen aspect ratio of the A/V connecting cable with S VIDEO (optional), higher quality images can be connected. VCRs or TVs When your camcorder to the LINE IN input on the VCR. Connect the white and red plugs (left/right...
... S VIDEO (optional) When connecting to the other device via the S VIDEO jack, by using an A/V connecting cable with S VIDEO (optional). Connecting only the S VIDEO plug will view images on. 1 Turn on your camcorder. 2 Touch (HOME) t (SETTINGS) t [OUTPUT SETTINGS] t [TV TYPE] t [16:9] or [4:3] t . 48 Set the ...connected TV (16:9/4:3) Change the setting according to the screen aspect ratio of the A/V connecting cable with S VIDEO (optional), higher quality images can be connected. VCRs or TVs When your camcorder to the LINE IN input on the VCR. Connect the white and red plugs (left/right...

Operating Guide
Page 49
When your TV is monaural (When your TV has only one audio input jack) Connect the yellow plug of the A/V connecting cable to the video input jack and connect the white (left channel) or the red (right channel) plug to full mode automatically. Refer also to the ... display the counter on a 4:3 TV not compatible with the ID-1/ID-2 system, set [TV TYPE] to [16:9]. Recording/Playback b Notes • When you connect your camcorder to a TV compatible with the 16:9 (wide) signal, set [TV TYPE] to [4:3]. The TV switches to the audio input jack of your TV or VCR.
When your TV is monaural (When your TV has only one audio input jack) Connect the yellow plug of the A/V connecting cable to the video input jack and connect the white (left channel) or the red (right channel) plug to full mode automatically. Refer also to the ... display the counter on a 4:3 TV not compatible with the ID-1/ID-2 system, set [TV TYPE] to [16:9]. Recording/Playback b Notes • When you connect your camcorder to a TV compatible with the 16:9 (wide) signal, set [TV TYPE] to [4:3]. The TV switches to the audio input jack of your TV or VCR.
Operating Guide
Page 50
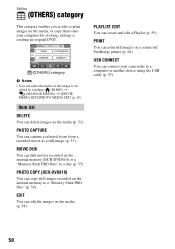
... to a disc (p. 55). PHOTO COPY (DCR-DVD810) You can copy still images recorded on the internal memory to a computer or another device using the USB cable (p. 97). 50 PLAYLIST EDIT You can delete images on the media (p. 51). PHOTO CAPTURE You can edit the images on the media (p. 58). EDIT You... on a connected PictBridge printer (p. 64). Editing (OTHERS) category This category enables you to edit or print images on the media, or copy them onto your camcorder to a "Memory Stick PRO Duo" (p. 56).
... to a disc (p. 55). PHOTO COPY (DCR-DVD810) You can copy still images recorded on the internal memory to a computer or another device using the USB cable (p. 97). 50 PLAYLIST EDIT You can delete images on the media (p. 51). PHOTO CAPTURE You can edit the images on the media (p. 58). EDIT You... on a connected PictBridge printer (p. 64). Editing (OTHERS) category This category enables you to edit or print images on the media, or copy them onto your camcorder to a "Memory Stick PRO Duo" (p. 56).

Operating Guide
Page 62
... also to the instruction manuals supplied with S VIDEO (optional). Connect your camcorder to other recording devices, such as a counter on your camcorder to the wall outlet (wall socket) using an A/V connecting cable with S VIDEO (optional), higher quality movies can dub movies played back ...IN S VIDEO VIDEO (Yellow) VIDEO A/V Remote Connector (White) AUDIO (Red) (White) AUDIO (Red) : Video/Signal flow A A/V connecting cable (supplied) Connect to the input jack of the other device via analog data transfer, the image quality may deteriorate. The yellow plug connection is ...
... also to the instruction manuals supplied with S VIDEO (optional). Connect your camcorder to other recording devices, such as a counter on your camcorder to the wall outlet (wall socket) using an A/V connecting cable with S VIDEO (optional), higher quality movies can dub movies played back ...IN S VIDEO VIDEO (Yellow) VIDEO A/V Remote Connector (White) AUDIO (Red) (White) AUDIO (Red) : Video/Signal flow A A/V connecting cable (supplied) Connect to the input jack of the other device via analog data transfer, the image quality may deteriorate. The yellow plug connection is ...
Operating Guide
Page 63
...the date/time and camera settings data, display them on the screen (p. 84). • When you are connecting your camcorder to a monaural device, connect the yellow plug of the A/V connecting cable to the video input jack, and the red (right channel) or the white (left channel) plug to the audio input... jack on the device. 1 Turn on your camcorder to the wall outlet (wall socket) using the supplied AC Adaptor for details....
...the date/time and camera settings data, display them on the screen (p. 84). • When you are connecting your camcorder to a monaural device, connect the yellow plug of the A/V connecting cable to the video input jack, and the red (right channel) or the white (left channel) plug to the audio input... jack on the device. 1 Turn on your camcorder to the wall outlet (wall socket) using the supplied AC Adaptor for details....
Operating Guide
Page 64
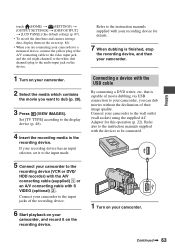
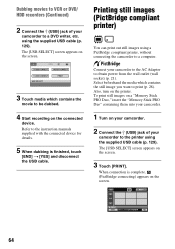
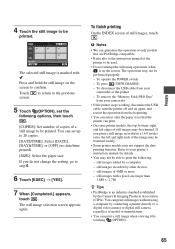
... is complete, (PictBridge connecting) appears on the connected device. Also, turn on the screen. 3 Touch [PRINT]. Connect your camcorder to the printer using the supplied USB cable (p. 129). To print still images on a "Memory Stick PRO Duo," insert the "Memory Stick PRO Duo" containing them into... to print (p. 28). When connection is finished, touch [END] t [YES] and disconnect the USB cable. The [USB SELECT] screen appears on your camcorder. 2 Connect the (USB) jack of your camcorder to a DVD writer, etc. The [USB SELECT] screen appears on the printer. Dubbing movies to VCR...
... is complete, (PictBridge connecting) appears on the connected device. Also, turn on the screen. 3 Touch [PRINT]. Connect your camcorder to the printer using the supplied USB cable (p. 129). To print still images on a "Memory Stick PRO Duo," insert the "Memory Stick PRO Duo" containing them into... to print (p. 28). When connection is finished, touch [END] t [YES] and disconnect the USB cable. The [USB SELECT] screen appears on your camcorder. 2 Connect the (USB) jack of your camcorder to a DVD writer, etc. The [USB SELECT] screen appears on the printer. Dubbing movies to VCR...
Operating Guide
Page 65
The selected still image is marked with a pixel size larger than 3,680 × 2,760 z Tips • PictBridge is on the screen to ...not attempt the following : - To remove the "Memory Stick PRO Duo" from your camcorder • If the printer stops working, disconnect the USB cable, turn the printer off and on again, and restart the operation from your printer's... to print the following operations when is an industry standard established by touching (OPTION). 65 Refer to your camcorder or the printer - Press and hold the still image on the screen. Touch to return to the previous...
The selected still image is marked with a pixel size larger than 3,680 × 2,760 z Tips • PictBridge is on the screen to ...not attempt the following : - To remove the "Memory Stick PRO Duo" from your camcorder • If the printer stops working, disconnect the USB cable, turn the printer off and on again, and restart the operation from your printer's... to print the following operations when is an industry standard established by touching (OPTION). 65 Refer to your camcorder or the printer - Press and hold the still image on the screen. Touch to return to the previous...
Operating Guide
Page 77
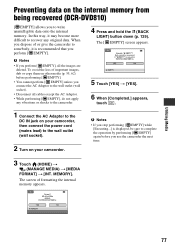
... . (BACK LIGHT) button down (p. 129). To avoid the loss of important images, dub or copy them on other media (p. 55, 62) before you use the camcorder the next time. 3 Touch (HOME) t (MANAGE MEDIA) t [MEDIA FORMAT] t [INT. Utilizing Media 77 Preventing data on the internal memory from being recovered (DCR-DVD810) ... memory. b Notes • If you perform [ EMPTY]. b Notes • If you stop performing [ EMPTY] while [Executing...] is recommended that you perform [ EMPTY], all cables except the AC Adaptor. • While performing [ EMPTY], do not apply any original data. MEMORY].
... . (BACK LIGHT) button down (p. 129). To avoid the loss of important images, dub or copy them on other media (p. 55, 62) before you use the camcorder the next time. 3 Touch (HOME) t (MANAGE MEDIA) t [MEDIA FORMAT] t [INT. Utilizing Media 77 Preventing data on the internal memory from being recovered (DCR-DVD810) ... memory. b Notes • If you perform [ EMPTY]. b Notes • If you stop performing [ EMPTY] while [Executing...] is recommended that you perform [ EMPTY], all cables except the AC Adaptor. • While performing [ EMPTY], do not apply any original data. MEMORY].
Operating Guide
Page 98
The installation is required only for installation. • Close all applications running on the computer before connecting your camcorder is not compatible with the USB cable: - x Installation procedure You need to restart it to install the software. b Notes • Log on as (E:)) may ...the AC Adaptor to a wall outlet (wall socket). 2 Turn on your camcorder. 3 Connect the (USB) jack (p. 129) of your camcorder to the computer using the supplied USB cable. 4 Touch [ USB CONNECT] on the screen of your camcorder. 7 Click [Continue]. 8 Read [License Agreement], select [I accept the...
The installation is required only for installation. • Close all applications running on the computer before connecting your camcorder is not compatible with the USB cable: - x Installation procedure You need to restart it to install the software. b Notes • Log on as (E:)) may ...the AC Adaptor to a wall outlet (wall socket). 2 Turn on your camcorder. 3 Connect the (USB) jack (p. 129) of your camcorder to the computer using the supplied USB cable. 4 Touch [ USB CONNECT] on the screen of your camcorder. 7 Click [Continue]. 8 Read [License Agreement], select [I accept the...

Operating Guide
Page 99
... the Picture Motion Browser • To start "Picture Motion Browser," click [Start] - [All Programs] - [Sony Picture Utility] - [PMB - x Connecting your camcorder to a computer To connect your camcorder and a wall outlet (wall socket). 2 Turn on the screen. If the USB cable is described on the computer environment. Microsoft DirectX 9.0c* Software required to handle movies...
... the Picture Motion Browser • To start "Picture Motion Browser," click [Start] - [All Programs] - [Sony Picture Utility] - [PMB - x Connecting your camcorder to a computer To connect your camcorder and a wall outlet (wall socket). 2 Turn on the screen. If the USB cable is described on the computer environment. Microsoft DirectX 9.0c* Software required to handle movies...

Operating Guide
Page 100
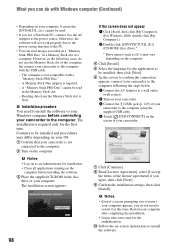
b Notes • Do not disconnect the USB cable while the ACCESS/access lamp is lit. • Before turning off your camcorder, disconnect the USB cable following the proper procedures described above. • Disconnect the USB cable using the proper procedures described above. Otherwise, files stored on the media may cause a malfunction of the media. 100 What you can do with Windows computer (Continued) 6 Disconnect the USB cable from the camcorder and the computer. Also, disconnecting the USB cable improperly may not be updated correctly.
b Notes • Do not disconnect the USB cable while the ACCESS/access lamp is lit. • Before turning off your camcorder, disconnect the USB cable following the proper procedures described above. • Disconnect the USB cable using the proper procedures described above. Otherwise, files stored on the media may cause a malfunction of the media. 100 What you can do with Windows computer (Continued) 6 Disconnect the USB cable from the camcorder and the computer. Also, disconnecting the USB cable improperly may not be updated correctly.
Operating Guide
Page 108
...you connect also the red and white plugs of the A/V connecting cable with S VIDEO (optional) (p. 62). DVD-R - "Picture Motion Browser" does not work correctly. • Finish "Picture Motion Browser" and restart your camcorder. • This is because only the S VIDEO plug is not... case of following movies (p. 51). - Troubleshooting (Continued) Movies cannot be divided. • A movie that you cannot delete movies during Easy Handycam operation (p. 34). • Images protected on another device cannot be divided. DVD-RW (VR mode) - Connecting/Dubbing to other devices. &#...
...you connect also the red and white plugs of the A/V connecting cable with S VIDEO (optional) (p. 62). DVD-R - "Picture Motion Browser" does not work correctly. • Finish "Picture Motion Browser" and restart your camcorder. • This is because only the S VIDEO plug is not... case of following movies (p. 51). - Troubleshooting (Continued) Movies cannot be divided. • A movie that you cannot delete movies during Easy Handycam operation (p. 34). • Images protected on another device cannot be divided. DVD-RW (VR mode) - Connecting/Dubbing to other devices. &#...
Operating Guide
Page 109
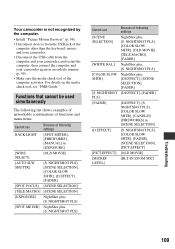
...FADER] [S. NIGHTSHOT PLS] Cannot use Because of following settings BACK LIGHT [SPOT METER], [FIREWORKS], [MANUAL] in [SCENE SELECTION] [D.EFFECT] [S. Your camcorder is not recognized by the computer. • Install "Picture Motion Browser" (p. 98). • Disconnect devices from the USB jack of the computer ...other than the keyboard, mouse, and your camcorder. • Disconnect the USB cable from the computer and your camcorder, and restart the computer, then connect the computer and your camcorder again in an orderly manner (p. 99). • Make sure ...
...FADER] [S. NIGHTSHOT PLS] Cannot use Because of following settings BACK LIGHT [SPOT METER], [FIREWORKS], [MANUAL] in [SCENE SELECTION] [D.EFFECT] [S. Your camcorder is not recognized by the computer. • Install "Picture Motion Browser" (p. 98). • Disconnect devices from the USB jack of the computer ...other than the keyboard, mouse, and your camcorder. • Disconnect the USB cable from the computer and your camcorder, and restart the computer, then connect the computer and your camcorder again in an orderly manner (p. 99). • Make sure ...

Operating Guide
Page 113
Inconsistencies found in Image Database File. Check the printer. • Switch off the printer and switch it on the camcorder and leave it . printing still images Data protected. • The image has been protected with another device. Please wait. • ...This is extremely short. The old recorded images on again, then disconnect the USB cable and reconnect it for about 10 minutes, preventing vibration. 113 Troubleshooting Cannot print. x Others No further selection is 100 when: - editing a Playlist ...
Inconsistencies found in Image Database File. Check the printer. • Switch off the printer and switch it on the camcorder and leave it . printing still images Data protected. • The image has been protected with another device. Please wait. • ...This is extremely short. The old recorded images on again, then disconnect the USB cable and reconnect it for about 10 minutes, preventing vibration. 113 Troubleshooting Cannot print. x Others No further selection is 100 when: - editing a Playlist ...

Operating Guide
Page 116
To enjoy still images or movies by the USB cable (p. 99). • Do not modify the files or folders in the camcorder directly from a computer. The folder name goes up : [101MSDCF] t [102MSDCF] • You can access the media in the camcorder from a computer connected by connecting to record new... is created to a computer, see "PMB Guide" on the media in the camcorder from a computer. • When you cannot record/play back the images correctly. The camcorder may not be played back. • We (Sony) will not be responsible for the results of a file number exceeds 9,999, ...
To enjoy still images or movies by the USB cable (p. 99). • Do not modify the files or folders in the camcorder directly from a computer. The folder name goes up : [101MSDCF] t [102MSDCF] • You can access the media in the camcorder from a computer connected by connecting to record new... is created to a computer, see "PMB Guide" on the media in the camcorder from a computer. • When you cannot record/play back the images correctly. The camcorder may not be played back. • We (Sony) will not be responsible for the results of a file number exceeds 9,999, ...
Operating Guide
Page 136
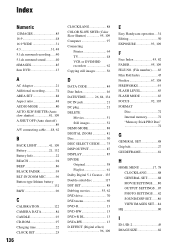
... 74 AREA SET 88 Aspect ratio 48 AUDIO MODE 80 AUTO SLW SHUTTR (Auto slow shutter 81, 109 A.SHUT OFF (Auto shut off 89 A/V connecting cable .....48, 62 B BACK LIGHT 41, 109 Battery 21, 132 Battery Info 22 BEACH 94 BEEP 86 BLACK FADER 95 BLT-IN ZOOM MIC............96 Button... 55, 62 DVD drive 70 DVD menu 69 DVD-R 13 DVD-RW 13 DVD+R DL 13 DVD+RW 13 D.EFFECT (Digital effect 96, 109 E Easy Handycam operation....34 Editing 50 EXPOSURE 93, 109 F Face Index 45, 82 FADER 95, 109 FILE NO. (File number)....... 83 Film Roll Index 45 Finalize 67...
... 74 AREA SET 88 Aspect ratio 48 AUDIO MODE 80 AUTO SLW SHUTTR (Auto slow shutter 81, 109 A.SHUT OFF (Auto shut off 89 A/V connecting cable .....48, 62 B BACK LIGHT 41, 109 Battery 21, 132 Battery Info 22 BEACH 94 BEEP 86 BLACK FADER 95 BLT-IN ZOOM MIC............96 Button... 55, 62 DVD drive 70 DVD menu 69 DVD-R 13 DVD-RW 13 DVD+R DL 13 DVD+RW 13 D.EFFECT (Digital effect 96, 109 E Easy Handycam operation....34 Editing 50 EXPOSURE 93, 109 F Face Index 45, 82 FADER 95, 109 FILE NO. (File number)....... 83 Film Roll Index 45 Finalize 67...


