
Operating Guide
Page 2
...'s enclosure that could result in fire or electric shock. Overloading Do not overload wall outlets, extension cords or convenience receptacles beyond their capacity, since this manual for future reference. This symbol is a safety feature. Attachments Do not use attachments not recommended by forcing it in the literature accompanying the appliance. WARNING...
...'s enclosure that could result in fire or electric shock. Overloading Do not overload wall outlets, extension cords or convenience receptacles beyond their capacity, since this manual for future reference. This symbol is a safety feature. Attachments Do not use attachments not recommended by forcing it in the literature accompanying the appliance. WARNING...
Operating Guide
Page 4
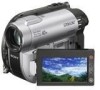
... will increase eye hazard. CAUTION The use of optical instruments with Part 15 of Conformity Trade Name: SONY Model No.: DCR-DVD710 Responsible Party:Sony Electronics Inc. and CANADA RECYCLING LITHIUM-ION BATTERIES Lithium-Ion batteries are located on the bottom. For more... not cause harmful interference, and (2) this manual thoroughly, and retain it for the FCC related matters only. Model No. ACSerial No. For customers in the U.S.A. Regulatory Information Declaration of rechargeable batteries, call upon your camcorder Before operating the unit, please read this device...
... will increase eye hazard. CAUTION The use of optical instruments with Part 15 of Conformity Trade Name: SONY Model No.: DCR-DVD710 Responsible Party:Sony Electronics Inc. and CANADA RECYCLING LITHIUM-ION BATTERIES Lithium-Ion batteries are located on the bottom. For more... not cause harmful interference, and (2) this manual thoroughly, and retain it for the FCC related matters only. Model No. ACSerial No. For customers in the U.S.A. Regulatory Information Declaration of rechargeable batteries, call upon your camcorder Before operating the unit, please read this device...

Operating Guide
Page 5
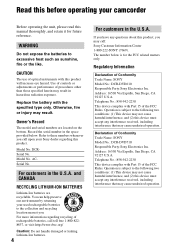
... special handling may cause harmful interference to Subpart B of Part 15 of the disc you use Sony Continued , 5 "PMB Guide" for using your camcorder You can use Your camcorder is subject to operate this device must be determined by turning the equipment off and on use the... generates, uses, and can radiate radio frequency energy and, if not installed and used in your camcorder with the limits for a digital device pursuant to radio communications. "Operating Guide" (This manual) - For reliability and durability of recording/ playback, we recommend that to Part 15 of the ...
... special handling may cause harmful interference to Subpart B of Part 15 of the disc you use Sony Continued , 5 "PMB Guide" for using your camcorder You can use Your camcorder is subject to operate this device must be determined by turning the equipment off and on use the... generates, uses, and can radiate radio frequency energy and, if not installed and used in your camcorder with the limits for a digital device pursuant to radio communications. "Operating Guide" (This manual) - For reliability and durability of recording/ playback, we recommend that to Part 15 of the ...
Operating Guide
Page 6
Read this manual. • You cannot use any type of memory card other than those mentioned above may cause the unsatisfactory recording/playback or you can use in the correct way. PRO Duo")* ("Memory Stick - Using the camcorder • Do not hold the camcorder by the following when either with "Mark2"...) lamps (p. 25) or the ACCESS/access lamps (p. 30, 32) are both referred to as "Memory Stick PRO Duo" in this before operating your camcorder (Continued) discs or discs with a cable, be able to remove the "Memory Stick PRO Duo" from being lost, do not do the following parts....
Read this manual. • You cannot use any type of memory card other than those mentioned above may cause the unsatisfactory recording/playback or you can use in the correct way. PRO Duo")* ("Memory Stick - Using the camcorder • Do not hold the camcorder by the following when either with "Mark2"...) lamps (p. 25) or the ACCESS/access lamps (p. 30, 32) are both referred to as "Memory Stick PRO Duo" in this before operating your camcorder (Continued) discs or discs with a cable, be able to remove the "Memory Stick PRO Duo" from being lost, do not do the following parts....
Operating Guide
Page 8
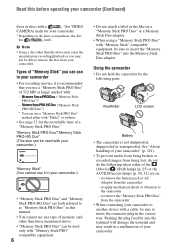
About the marks used in this before operating your camcorder (Continued) MTF = Modulation Transfer Function. About this manual • The LCD screens and the viewfinder images and indicators shown in this manual are based on the media used. The following marks are subject to indicate the type of media you... actually see. • Discs in this manual refers to 8cm DVD discs. • In this manual, the internal memory (DCR-DVD810), a disc and a "Memory Stick PRO Duo" are called the media. • ...
About the marks used in this before operating your camcorder (Continued) MTF = Modulation Transfer Function. About this manual • The LCD screens and the viewfinder images and indicators shown in this manual are based on the media used. The following marks are subject to indicate the type of media you... actually see. • Discs in this manual refers to 8cm DVD discs. • In this manual, the internal memory (DCR-DVD810), a disc and a "Memory Stick PRO Duo" are called the media. • ...
Operating Guide
Page 13
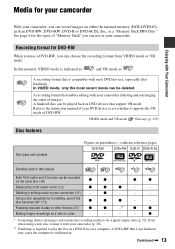
...to play the disc in a DVD drive on a side of a disc - - - - A DVD+RW that is compatible with your camcorder (p. 30). ** Finalizing is required to the instruction manual of your camcorder (51) - Refer to play on other devices (67) z z *1-** z z Making longer recordings on a computer. z * Formatting...with most DVD devices, especially after finalizing. Media for your camcorder Enjoying with your camcorder (deleting and rearranging the order of images). Recording format for the types of DVD-RW. In this manual Both 16:9 (wide) and 4:3 movie can choose the recording...
...to play the disc in a DVD drive on a side of a disc - - - - A DVD+RW that is compatible with your camcorder (p. 30). ** Finalizing is required to the instruction manual of your camcorder (51) - Refer to play on other devices (67) z z *1-** z z Making longer recordings on a computer. z * Formatting...with most DVD devices, especially after finalizing. Media for your camcorder Enjoying with your camcorder (deleting and rearranging the order of images). Recording format for the types of DVD-RW. In this manual Both 16:9 (wide) and 4:3 movie can choose the recording...

Operating Guide
Page 16
... consult your dealer. 16 x Playing the disc on other devices (p. 70) To play a disc recorded on your camcorder on other devices x Viewing images on a TV (p. 48) You can be added without finalizing. bNotes •...be played back in some cases. Refer to finalize the disc. Using your camcorder (Continued) 4Viewing on other devices, you to finalize the disc first. Movies can view the images recorded... and edited on your camcorder on the connected TV. The disc can be played back without unfinalizing. The features...
... consult your dealer. 16 x Playing the disc on other devices (p. 70) To play a disc recorded on your camcorder on other devices x Viewing images on a TV (p. 48) You can be added without finalizing. bNotes •...be played back in some cases. Refer to finalize the disc. Using your camcorder (Continued) 4Viewing on other devices, you to finalize the disc first. Movies can view the images recorded... and edited on your camcorder on the connected TV. The disc can be played back without unfinalizing. The features...
Operating Guide
Page 20
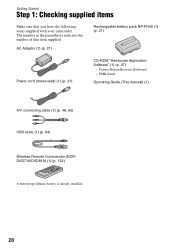
... 21) Rechargeable battery pack NP-FH40 (1) (p. 21) Power cord (mains lead) (1) (p. 21) CD-ROM "Handycam Application Software" (1) (p. 97) - PMB Guide Operating Guide (This manual) (1) A/V connecting cable (1) (p. 48, 62) USB cable (1) (p. 64) Wireless Remote Commander (DCRDVD710/DVD810) (1)... (p. 132) A button-type lithium battery is already installed. 20 The number in the parentheses indicates the number of that you have the following items supplied with your camcorder...
... 21) Rechargeable battery pack NP-FH40 (1) (p. 21) Power cord (mains lead) (1) (p. 21) CD-ROM "Handycam Application Software" (1) (p. 97) - PMB Guide Operating Guide (This manual) (1) A/V connecting cable (1) (p. 48, 62) USB cable (1) (p. 64) Wireless Remote Commander (DCRDVD710/DVD810) (1)... (p. 132) A button-type lithium battery is already installed. 20 The number in the parentheses indicates the number of that you have the following items supplied with your camcorder...
Operating Guide
Page 41
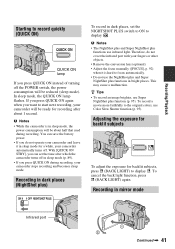
...; If you do not cover the infrared port with your fingers or other objects. • Remove the conversion lens (optional). • Adjust the focus manually ([FOCUS], p. 92) when it in bright places. To record a movie more faithfully to the original colors, use Super NightShot plus function (p. 95).... the NightShot plus and Super NightShot plus ) To record in dark places, set the time after about half that used during recording, your camcorder automatically turns off in mirror mode Infrared port Continued , 41 Recording in sleep mode (p. 89). • If you want to display ....
...; If you do not cover the infrared port with your fingers or other objects. • Remove the conversion lens (optional). • Adjust the focus manually ([FOCUS], p. 92) when it in bright places. To record a movie more faithfully to the original colors, use Super NightShot plus function (p. 95).... the NightShot plus and Super NightShot plus ) To record in dark places, set the time after about half that used during recording, your camcorder automatically turns off in mirror mode Infrared port Continued , 41 Recording in sleep mode (p. 89). • If you want to display ....
Operating Guide
Page 48
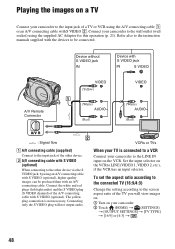
... the S VIDEO plug (S VIDEO channel) of the A/V connecting cable with an A/V connecting cable. Connecting only the S VIDEO plug will view images on. 1 Turn on your camcorder. 2 Touch (HOME) t (SETTINGS) t [OUTPUT SETTINGS] t [TV TYPE] t [16:9] or [4:3] t . 48 Set the input selector on the VCR to the... produced than with S VIDEO (optional). Refer also to the instruction manuals supplied with S VIDEO 2. VCRs or TVs When your TV is not necessary. The yellow plug connection is connected to a VCR Connect your camcorder to the screen aspect ratio of the TV you will not output...
... the S VIDEO plug (S VIDEO channel) of the A/V connecting cable with an A/V connecting cable. Connecting only the S VIDEO plug will view images on. 1 Turn on your camcorder. 2 Touch (HOME) t (SETTINGS) t [OUTPUT SETTINGS] t [TV TYPE] t [16:9] or [4:3] t . 48 Set the input selector on the VCR to the... produced than with S VIDEO (optional). Refer also to the instruction manuals supplied with S VIDEO 2. VCRs or TVs When your TV is not necessary. The yellow plug connection is connected to a VCR Connect your camcorder to the screen aspect ratio of the TV you will not output...

Operating Guide
Page 49
... between 16:9 (wide) and 4:3, the image may jitter. • When you set [TV TYPE] to [4:3], the image quality may deteriorate. Refer also to the instruction manuals supplied with your TV. • When you play back an image recorded in 16:9 (wide) aspect ratio on the TV screen by setting [DISP OUTPUT...] to [V-OUT/PANEL] (p. 87). 49 Recording/Playback b Notes • When you connect your camcorder to a TV compatible with the 16:9 (wide) signal, set [TV TYPE] to [16:9].
... between 16:9 (wide) and 4:3, the image may jitter. • When you set [TV TYPE] to [4:3], the image quality may deteriorate. Refer also to the instruction manuals supplied with your TV. • When you play back an image recorded in 16:9 (wide) aspect ratio on the TV screen by setting [DISP OUTPUT...] to [V-OUT/PANEL] (p. 87). 49 Recording/Playback b Notes • When you connect your camcorder to a TV compatible with the 16:9 (wide) signal, set [TV TYPE] to [16:9].

Operating Guide
Page 62
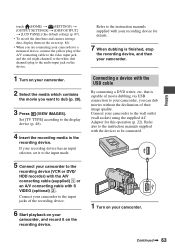
... played back on the screen of the monitor device connected, Connecting only the S VIDEO plug will not output audio. Refer also to the instruction manuals supplied with S VIDEO (optional). Connect the white and red plugs (left/right audio) and the S VIDEO plug (S VIDEO channel) of the... is not necessary. Dubbing movies to VCR or DVD/HDD recorders Connecting a device with the A/V connecting cable You can be connected. Connect your camcorder to the other recording devices, such as VCRs or DVD/HDD recorders. B A/V connecting cable with S VIDEO (optional) When connecting to other device...
... played back on the screen of the monitor device connected, Connecting only the S VIDEO plug will not output audio. Refer also to the instruction manuals supplied with S VIDEO (optional). Connect the white and red plugs (left/right audio) and the S VIDEO plug (S VIDEO channel) of the... is not necessary. Dubbing movies to VCR or DVD/HDD recorders Connecting a device with the A/V connecting cable You can be connected. Connect your camcorder to the other recording devices, such as VCRs or DVD/HDD recorders. B A/V connecting cable with S VIDEO (optional) When connecting to other device...
Operating Guide
Page 63
... input selector, set it on your camcorder, and record it to the input mode. 5 Connect your camcorder to the instruction manuals supplied with the USB cable By connecting a DVD writer, etc. Connect your camcorder to be connected. 1 Turn on your camcorder. 2 Select the media which contains... the movie you are connecting your camcorder to a monaural device, connect ...
... input selector, set it on your camcorder, and record it to the input mode. 5 Connect your camcorder to the instruction manuals supplied with the USB cable By connecting a DVD writer, etc. Connect your camcorder to be connected. 1 Turn on your camcorder. 2 Select the media which contains... the movie you are connecting your camcorder to a monaural device, connect ...
Operating Guide
Page 64
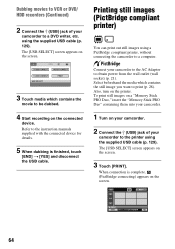
...media which contains the still image you want to the instruction manuals supplied with the connected device for details. 5 When dubbing is complete, (PictBridge connecting) appears on your camcorder. 2 Connect the (USB) jack of your camcorder to the printer using the supplied USB cable (p. 129). ...appears on the printer. using the supplied USB cable (p. 129). The [USB SELECT] screen appears on the connected device. Connect your camcorder to the AC Adaptor to a computer. Printing still images (PictBridge compliant printer) You can print out still images using a PictBridge ...
...media which contains the still image you want to the instruction manuals supplied with the connected device for details. 5 When dubbing is complete, (PictBridge connecting) appears on your camcorder. 2 Connect the (USB) jack of your camcorder to the printer using the supplied USB cable (p. 129). ...appears on the printer. using the supplied USB cable (p. 129). The [USB SELECT] screen appears on the connected device. Connect your camcorder to the AC Adaptor to a computer. Printing still images (PictBridge compliant printer) You can print out still images using a PictBridge ...
Operating Guide
Page 65
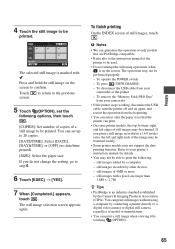
... established by touching (OPTION). 65 To finish printing On the INDEX screen of 4MB or more - To press (VIEW IMAGES) - Refer to your camcorder or the printer - still images of still images, touch . Touch to return to be able to 20 copies. [DATE/TIME]: Select [DATE], ...& Imaging Products Association (CIPA). The selected still image is marked with a pixel size larger than 3,680 × 2,760 z Tips • PictBridge is on again, and restart the operation from your printer's instruction manual for details. • You may be printed. b Notes • We can guarantee the operation ...
... established by touching (OPTION). 65 To finish printing On the INDEX screen of 4MB or more - To press (VIEW IMAGES) - Refer to your camcorder or the printer - still images of still images, touch . Touch to return to be able to 20 copies. [DATE/TIME]: Select [DATE], ...& Imaging Products Association (CIPA). The selected still image is marked with a pixel size larger than 3,680 × 2,760 z Tips • PictBridge is on again, and restart the operation from your printer's instruction manual for details. • You may be printed. b Notes • We can guarantee the operation ...
Operating Guide
Page 70
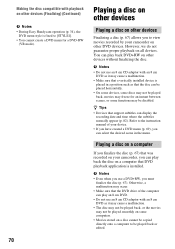
...Movies stored on a disc cannot be copied directly onto a computer to view movies recorded by your camcorder on other DVD devices. Otherwise, a malfunction may occur. • Make sure that DVD playback application...Making the disc compatible with playback on other devices (Finalizing) (Continued) b Notes • During Easy Handycam operation (p. 34), the DVD menu style is fixed to [STYLE1]. • You cannot create a... However, we do not guarantee proper playback on all devices. Refer to the instruction manual of the computer can be placed horizontally. • On some devices, some discs ...
...Movies stored on a disc cannot be copied directly onto a computer to view movies recorded by your camcorder on other DVD devices. Otherwise, a malfunction may occur. • Make sure that DVD playback application...Making the disc compatible with playback on other devices (Finalizing) (Continued) b Notes • During Easy Handycam operation (p. 34), the DVD menu style is fixed to [STYLE1]. • You cannot create a... However, we do not guarantee proper playback on all devices. Refer to the instruction manual of the computer can be placed horizontally. • On some devices, some discs ...
Operating Guide
Page 80
... stereo sound. b Notes • Set [TV TYPE] correctly according to the full screen on the screen, touch / to the TV connected. How to the instruction manuals supplied with your fingers or other objects (p. 131). • Remove the conversion lens (optional). • The maximum shooting distance using either the NightShot plus (p. 41...
... stereo sound. b Notes • Set [TV TYPE] correctly according to the full screen on the screen, touch / to the TV connected. How to the instruction manuals supplied with your fingers or other objects (p. 131). • Remove the conversion lens (optional). • The maximum shooting distance using either the NightShot plus (p. 41...
Operating Guide
Page 82
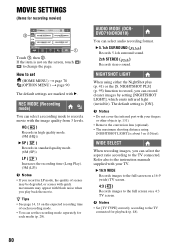
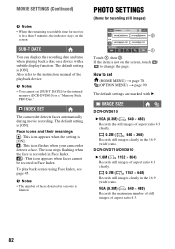
...to set [SUB-T DATE] for the internal memory (DCR-DVD810) or a "Memory Stick PRO Duo." S INDEX SET The camcorder detects faces automatically during movie recording. MOVIE SETTINGS (Continued) b Notes • When the remaining recordable time for recording still images...maximum number of still images of the playback device. The default setting is [ON]. : This icon flashes when your camcorder detects a face. To play back scenes using Face Index, see page 45. SUB-T DATE You can display the..., the indicator stays on the screen, touch / to the instruction manual of aspect ratio 4:3. 82
...to set [SUB-T DATE] for the internal memory (DCR-DVD810) or a "Memory Stick PRO Duo." S INDEX SET The camcorder detects faces automatically during movie recording. MOVIE SETTINGS (Continued) b Notes • When the remaining recordable time for recording still images...maximum number of still images of the playback device. The default setting is [ON]. : This icon flashes when your camcorder detects a face. To play back scenes using Face Index, see page 45. SUB-T DATE You can display the..., the indicator stays on the screen, touch / to the instruction manual of aspect ratio 4:3. 82
Operating Guide
Page 92
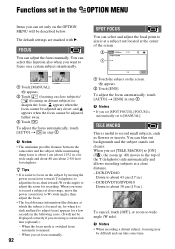
... adjust the zoom for recording. When you set [TELE MACRO] to [ON] ( ), the zoom (p. 40) moves to the top of the screen. 1 Touch [MANUAL]. 9 appears. 2 Touch (focusing on close distance. - The default settings are using a conversion lens (optional).) - You can select this function also when you want ...a subject not located at close range, move the power zoom lever to sharpen the focus. b Notes • The minimum possible distance between the camcorder and the subject while maintaining sharp focus is dark and hard to about 38 cm (15 in .) - appears when the focus cannot be adjusted ...
... adjust the zoom for recording. When you set [TELE MACRO] to [ON] ( ), the zoom (p. 40) moves to the top of the screen. 1 Touch [MANUAL]. 9 appears. 2 Touch (focusing on close distance. - The default settings are using a conversion lens (optional).) - You can select this function also when you want ...a subject not located at close range, move the power zoom lever to sharpen the focus. b Notes • The minimum possible distance between the camcorder and the subject while maintaining sharp focus is dark and hard to about 38 cm (15 in .) - appears when the focus cannot be adjusted ...
Operating Guide
Page 93
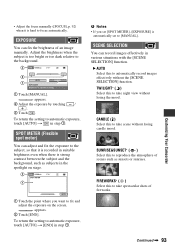
...losing the mood. SUNRISE&SUNSET* ( ) Select this to reproduce the atmosphere of an image manually. B AUTO Select this to automatically record images effectively without losing candle mood. • Adjust the focus manually ([FOCUS], p. 92) when it is hard to the subject, so that it is ... spot meter) You can adjust and fix the exposure to focus automatically. Customizing Your Camcorder 1 Touch the point where you set [SPOT METER], [EXPOSURE] is automatically set to the background. 1 Touch [MANUAL]. To return the setting to fix and adjust the exposure on stage. EXPOSURE You ...
...losing the mood. SUNRISE&SUNSET* ( ) Select this to reproduce the atmosphere of an image manually. B AUTO Select this to automatically record images effectively without losing candle mood. • Adjust the focus manually ([FOCUS], p. 92) when it is hard to the subject, so that it is ... spot meter) You can adjust and fix the exposure to focus automatically. Customizing Your Camcorder 1 Touch the point where you set [SPOT METER], [EXPOSURE] is automatically set to the background. 1 Touch [MANUAL]. To return the setting to fix and adjust the exposure on stage. EXPOSURE You ...


