Operating Guide
Page 9
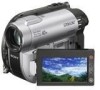
...Finalizing 67 Playing a disc on , and setting the date and time 25 Changing the language setting .. 26 Step 4: Making adjustments before operating your camcorder 15 " HOME" and " OPTION" - Table of Contents Read this before recording 26 Step 5: Selecting media 28 Step 6: Inserting a disc or... a "Memory Stick PRO Duo 30 Recording/Playback Recording and playing back with ease (Easy Handycam operation) ....... 34 Recording 38 Zooming 40 Recording sound with more presence (5.1ch surround recording) (DCR-DVD710/ DVD810 40 Starting to record ...
...Finalizing 67 Playing a disc on , and setting the date and time 25 Changing the language setting .. 26 Step 4: Making adjustments before operating your camcorder 15 " HOME" and " OPTION" - Table of Contents Read this before recording 26 Step 5: Selecting media 28 Step 6: Inserting a disc or... a "Memory Stick PRO Duo 30 Recording/Playback Recording and playing back with ease (Easy Handycam operation) ....... 34 Recording 38 Zooming 40 Recording sound with more presence (5.1ch surround recording) (DCR-DVD710/ DVD810 40 Starting to record ...

Operating Guide
Page 17
... MEDIA INFO 71 MEDIA FORMAT*1 72 UNFINALIZE 74 DISC SELECT GUIDE 75 REPAIR IMG.DB F. 76 (SETTINGS) category*1 To customize your camcorder (p. 78). *1 You can also set these items during Easy Handycam operation (p. 34) when you select [INT. MEMORY] (DCR-DVD810) or [MEMORY STICK] on [MOVIE MEDIA SET] (p. 28). *3 You may not...
... MEDIA INFO 71 MEDIA FORMAT*1 72 UNFINALIZE 74 DISC SELECT GUIDE 75 REPAIR IMG.DB F. 76 (SETTINGS) category*1 To customize your camcorder (p. 78). *1 You can also set these items during Easy Handycam operation (p. 34) when you select [INT. MEMORY] (DCR-DVD810) or [MEMORY STICK] on [MOVIE MEDIA SET] (p. 28). *3 You may not...
Operating Guide
Page 20
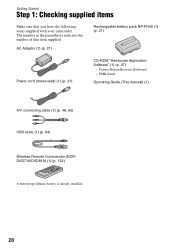
... battery pack NP-FH40 (1) (p. 21) Power cord (mains lead) (1) (p. 21) CD-ROM "Handycam Application Software" (1) (p. 97) - Picture Motion Browser (Software) - The number in the parentheses indicates the number of that you have the following items supplied with your camcorder. Getting Started Step 1: Checking supplied items Make sure that item supplied. PMB Guide...
... battery pack NP-FH40 (1) (p. 21) Power cord (mains lead) (1) (p. 21) CD-ROM "Handycam Application Software" (1) (p. 97) - Picture Motion Browser (Software) - The number in the parentheses indicates the number of that you have the following items supplied with your camcorder. Getting Started Step 1: Checking supplied items Make sure that item supplied. PMB Guide...
Operating Guide
Page 31
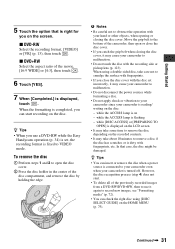
... hand or other objects, when opening or closing the disc cover, it again to use a DVD-RW while the Easy Handycam operation (p. 34) is set incorrectly, it may cause your camcorder to malfunction. • Do not disconnect the power sources while formatting a disc. • Do not apply shock or ...does not start recording on the disc: - while the ACCESS lamp is displayed, touch . In that is right for you use it may cause your camcorder is completed, you catch the grip belt when closing the disc cover. Getting Started 5 Touch the option that case, the disc might be damaged. x...
... hand or other objects, when opening or closing the disc cover, it again to use a DVD-RW while the Easy Handycam operation (p. 34) is set incorrectly, it may cause your camcorder to malfunction. • Do not disconnect the power sources while formatting a disc. • Do not apply shock or ...does not start recording on the disc: - while the ACCESS lamp is displayed, touch . In that is right for you use it may cause your camcorder is completed, you catch the grip belt when closing the disc cover. Getting Started 5 Touch the option that case, the disc might be damaged. x...
Operating Guide
Page 70
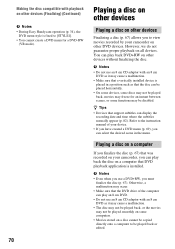
...; Devices that the disc can play back DVD+RW on a disc cannot be copied directly onto a computer to view movies recorded by your camcorder on all devices. Refer to the instruction manual of the computer can be placed horizontally. • On some devices, some discs may not ... Make sure that DVD playback application is installed. Making the disc compatible with playback on other devices (Finalizing) (Continued) b Notes • During Easy Handycam operation (p. 34), the DVD menu style is fixed to [STYLE1]. • You cannot create a DVD menu for an instant between scenes, or some...
...; Devices that the disc can play back DVD+RW on a disc cannot be copied directly onto a computer to view movies recorded by your camcorder on all devices. Refer to the instruction manual of the computer can be placed horizontally. • On some devices, some discs may not ... Make sure that DVD playback application is installed. Making the disc compatible with playback on other devices (Finalizing) (Continued) b Notes • During Easy Handycam operation (p. 34), the DVD menu style is fixed to [STYLE1]. • You cannot create a DVD menu for an instant between scenes, or some...
Operating Guide
Page 73
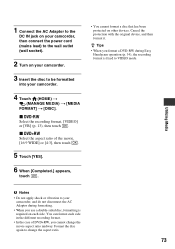
... to be formatted into your camcorder, and do not disconnect the AC Adaptor during formatting. • When you use a double-sided disc, formatting is required on each side in the different recording format. • In the case of DVD+RW, you format a DVD-RW during Easy Handycam operation (p. 34), the recording format...
... to be formatted into your camcorder, and do not disconnect the AC Adaptor during formatting. • When you use a double-sided disc, formatting is required on each side in the different recording format. • In the case of DVD+RW, you format a DVD-RW during Easy Handycam operation (p. 34), the recording format...
Operating Guide
Page 79
... MODE 88 CALIBRATION 122 A.SHUT OFF 89 QUICK ON STBY 89 REMOTE CTRL*1 89 *1 DCR-DVD710/DVD810 *2 You can set these items also during Easy Handycam operation (p. 34). *3 [SOUND SETTINGS] during Easy Handycam operation (p. 34) Customizing Your Camcorder 79
... MODE 88 CALIBRATION 122 A.SHUT OFF 89 QUICK ON STBY 89 REMOTE CTRL*1 89 *1 DCR-DVD710/DVD810 *2 You can set these items also during Easy Handycam operation (p. 34). *3 [SOUND SETTINGS] during Easy Handycam operation (p. 34) Customizing Your Camcorder 79
Operating Guide
Page 90
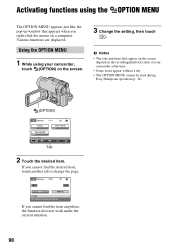
... right-click the mouse on the screen. 3 Change the setting, then touch . Activating functions using your camcorder at the time. • Some items appear without a tab. • The OPTION MENU cannot be used during Easy Handycam operation (p. 34). (OPTION) Tab 2 Touch the desired item. Various functions are displayed. Using the OPTION MENU...
... right-click the mouse on the screen. 3 Change the setting, then touch . Activating functions using your camcorder at the time. • Some items appear without a tab. • The OPTION MENU cannot be used during Easy Handycam operation (p. 34). (OPTION) Tab 2 Touch the desired item. Various functions are displayed. Using the OPTION MENU...
Operating Guide
Page 101
...recording mode: [SP] - [DATA CODE]: [DATE/TIME] - If the problem persists, disconnect the power source and contact your Sony dealer. • Overall operations/Easy Handycam operation/ Remote Commander 101 • Batteries/Power sources 102 • LCD screen/Viewfinder 103 • Media 103 • Recording 104... to a computer 108 • Functions that cannot be used simultaneously 109 Overall operations/Easy Handycam operation/Remote Commander The power does not turn on and off your camcorder and leave it after the power is not displayed. • The OPTION MENU cannot be...
...recording mode: [SP] - [DATA CODE]: [DATE/TIME] - If the problem persists, disconnect the power source and contact your Sony dealer. • Overall operations/Easy Handycam operation/ Remote Commander 101 • Batteries/Power sources 102 • LCD screen/Viewfinder 103 • Media 103 • Recording 104... to a computer 108 • Functions that cannot be used simultaneously 109 Overall operations/Easy Handycam operation/Remote Commander The power does not turn on and off your camcorder and leave it after the power is not displayed. • The OPTION MENU cannot be...
Operating Guide
Page 102
... such as they were set with [QUICK ON STBY] (p. 89) has elapsed in sleep mode, your camcorder turns off your camcorder and leave it for a while in your hand or a faint sound is heard during Easy Handycam operation (p. 34). - [MOVIE MEDIA SET] - [PHOTO MEDIA SET]* - [AUDIO MODE]** - [WIDE SELECT] - [SUB-T DATE] - [ INDEX SET...
... such as they were set with [QUICK ON STBY] (p. 89) has elapsed in sleep mode, your camcorder turns off your camcorder and leave it for a while in your hand or a faint sound is heard during Easy Handycam operation (p. 34). - [MOVIE MEDIA SET] - [PHOTO MEDIA SET]* - [AUDIO MODE]** - [WIDE SELECT] - [SUB-T DATE] - [ INDEX SET...
Operating Guide
Page 108
... additional images on a disc using other devices. "Picture Motion Browser" does not work correctly. • Finish "Picture Motion Browser" and restart your camcorder (p. 55). Images cannot be deleted. • You cannot delete following discs: - DVD-RW (VIDEO mode) - DVD-RW (VR mode) -...to your camcorder. • Set [TV TYPE] depending on the TV connected to finalize. • Use the AC Adaptor for saving still images (p. 53). In the case of the A/V connecting cable with S VIDEO (optional) (p. 62). Make sure that you cannot delete movies during Easy Handycam operation (p....
... additional images on a disc using other devices. "Picture Motion Browser" does not work correctly. • Finish "Picture Motion Browser" and restart your camcorder (p. 55). Images cannot be deleted. • You cannot delete following discs: - DVD-RW (VIDEO mode) - DVD-RW (VR mode) -...to your camcorder. • Set [TV TYPE] depending on the TV connected to finalize. • Use the AC Adaptor for saving still images (p. 53). In the case of the A/V connecting cable with S VIDEO (optional) (p. 62). Make sure that you cannot delete movies during Easy Handycam operation (p....


