
Operating Guide
Page 2
... result in a fire or electric shock. Object and Liquid Entry Never push objects of important operating and maintenance (servicing) instructions in the operating instructions and adhere to the presence of electric shock to operate from the type of the polarized plug by the manufacturer, as they...appliance. WARNING To reduce fire or shock hazard, do not expose the unit to fit, contact your protection, please read these safety instructions completely before operating the appliance, and keep this can result in . Attachments Do not use attachments not recommended by forcing it in...
... result in a fire or electric shock. Object and Liquid Entry Never push objects of important operating and maintenance (servicing) instructions in the operating instructions and adhere to the presence of electric shock to operate from the type of the polarized plug by the manufacturer, as they...appliance. WARNING To reduce fire or shock hazard, do not expose the unit to fit, contact your protection, please read these safety instructions completely before operating the appliance, and keep this can result in . Attachments Do not use attachments not recommended by forcing it in...
Operating Guide
Page 3
..., and to determine that are specified in cabinet, unless proper ventilation is exposed to qualified service personnel under the following the operating instructions. Safety Check Upon completion of the set . Accessories Do not place the set may result in safe operating condition. 3 The ...Do not place the set , ask the service technician to perform routine safety checks (as a bookcase, or built-in the operating instructions. Lightning For added protection for this indicates a need for cleaning the exterior of the set does not operate normally when following conditions:...
..., and to determine that are specified in cabinet, unless proper ventilation is exposed to qualified service personnel under the following the operating instructions. Safety Check Upon completion of the set . Accessories Do not place the set may result in safe operating condition. 3 The ...Do not place the set , ask the service technician to perform routine safety checks (as a bookcase, or built-in the operating instructions. Lightning For added protection for this indicates a need for cleaning the exterior of the set does not operate normally when following conditions:...

Operating Guide
Page 5
.... For reliability and durability of Conformity Trade Name: SONY Model No.: DCR-DVD810 Responsible Party:Sony Electronics Inc. Declaration of recording/ playback, we recommend that you can use in your camcorder You can use Sony Continued , 5 CAUTION You are designed to radio communications... help. Consult the dealer or an experienced radio/TV technician for details. This Class B digital apparatus complies with the instructions, may apply, See www.dtsc.ca.gov/hazardouswaste/perchlorate Perchlorate Material: Lithium battery contains perchlorate. Battery pack This device complies...
.... For reliability and durability of Conformity Trade Name: SONY Model No.: DCR-DVD810 Responsible Party:Sony Electronics Inc. Declaration of recording/ playback, we recommend that you can use in your camcorder You can use Sony Continued , 5 CAUTION You are designed to radio communications... help. Consult the dealer or an experienced radio/TV technician for details. This Class B digital apparatus complies with the instructions, may apply, See www.dtsc.ca.gov/hazardouswaste/perchlorate Perchlorate Material: Lithium battery contains perchlorate. Battery pack This device complies...
Operating Guide
Page 13
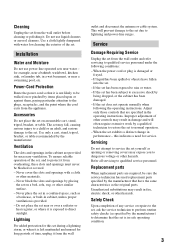
... z *1-** z z Making longer recordings on the same disc (30) z - Media for your camcorder Enjoying with Your Camcorder With your camcorder, you can record images on your camcorder (51) - A recording format that is compatible with most DVD devices, especially after finalizing. Deleting ... required to malfunction. A finalized disc can use a DVD-RW, you can be deleted. Refer to the instruction manual of your DVD device to see whether it with your camcorder (deleting and rearranging the order of a disc - - - - Using a disc repeatedly by formatting, even if ...
... z *1-** z z Making longer recordings on the same disc (30) z - Media for your camcorder Enjoying with Your Camcorder With your camcorder, you can record images on your camcorder (51) - A recording format that is compatible with most DVD devices, especially after finalizing. Deleting ... required to malfunction. A finalized disc can use a DVD-RW, you can be deleted. Refer to the instruction manual of your DVD device to see whether it with your camcorder (deleting and rearranging the order of a disc - - - - Using a disc repeatedly by formatting, even if ...

Operating Guide
Page 16
... back in a device compatible with all DVD devices is free space left. Using your camcorder (Continued) 4Viewing on other devices, you to add movies (p. 74). Refer to the instruction manual supplied with your DVD device or consult your camcorder on the connected TV. Playback compatibility Playback compatibility with the DVD-RW VR mode... back in most DVD devices after finalizing. For details, see page 67. x Playing the disc on other devices (p. 70) To play a disc recorded on your camcorder on other devices x Viewing images on your dealer. 16
... back in a device compatible with all DVD devices is free space left. Using your camcorder (Continued) 4Viewing on other devices, you to add movies (p. 74). Refer to the instruction manual supplied with your DVD device or consult your camcorder on the connected TV. Playback compatibility Playback compatibility with the DVD-RW VR mode... back in most DVD devices after finalizing. For details, see page 67. x Playing the disc on other devices (p. 70) To play a disc recorded on your camcorder on other devices x Viewing images on your dealer. 16
Operating Guide
Page 48
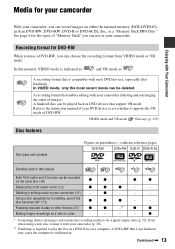
... S VIDEO plug (S VIDEO channel) of the TV you will not output audio. Connecting only the S VIDEO plug will view images on. 1 Turn on your camcorder to the instruction manuals supplied with S VIDEO (optional). To set the aspect ratio according to the connected TV (16:9/4:3) Change the setting according to the screen aspect...
... S VIDEO plug (S VIDEO channel) of the TV you will not output audio. Connecting only the S VIDEO plug will view images on. 1 Turn on your camcorder to the instruction manuals supplied with S VIDEO (optional). To set the aspect ratio according to the connected TV (16:9/4:3) Change the setting according to the screen aspect...

Operating Guide
Page 49
Refer also to the instruction manuals supplied with your TV or VCR. When your TV is monaural (When your TV has only one audio input jack) Connect the yellow plug ... display the counter on a 4:3 TV not compatible with the ID-1/ID-2 system, set [TV TYPE] to [16:9]. Recording/Playback b Notes • When you connect your camcorder to a TV compatible with the 16:9 (wide) signal, set [TV TYPE] to [4:3]. Also, when the recorded image's aspect ratio switches between 16:9 (wide) and 4:3, the...
Refer also to the instruction manuals supplied with your TV or VCR. When your TV is monaural (When your TV has only one audio input jack) Connect the yellow plug ... display the counter on a 4:3 TV not compatible with the ID-1/ID-2 system, set [TV TYPE] to [16:9]. Recording/Playback b Notes • When you connect your camcorder to a TV compatible with the 16:9 (wide) signal, set [TV TYPE] to [4:3]. Also, when the recorded image's aspect ratio switches between 16:9 (wide) and 4:3, the...

Operating Guide
Page 62
... yellow plug connection is performed via the S VIDEO jack, by using the supplied AC Adaptor for this operation (p. 21). Refer also to the instruction manuals supplied with the devices to the input jack of the monitor device connected, Connecting only the S VIDEO plug will not output audio. B ...A/V connecting cable with S VIDEO (optional) When connecting to the other device. Connect your camcorder to the wall outlet (wall socket) using an A/V connecting cable with S VIDEO (optional), higher quality movies can dub movies played back on your...
... yellow plug connection is performed via the S VIDEO jack, by using the supplied AC Adaptor for this operation (p. 21). Refer also to the instruction manuals supplied with the devices to the input jack of the monitor device connected, Connecting only the S VIDEO plug will not output audio. B ...A/V connecting cable with S VIDEO (optional) When connecting to the other device. Connect your camcorder to the wall outlet (wall socket) using an A/V connecting cable with S VIDEO (optional), higher quality movies can dub movies played back on your...
Operating Guide
Page 63
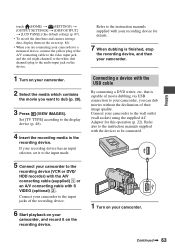
...recording device has an input selector, set it on your camcorder to the display device (p. 48). 4 Insert the recording media in the recording device. Continued , 63 Connect your camcorder. Refer also to the instruction manuals supplied with your recording device for this operation (p. 22...). that is finished, stop the recording device, and then your camcorder to a monaural device, connect the yellow plug of ...
...recording device has an input selector, set it on your camcorder to the display device (p. 48). 4 Insert the recording media in the recording device. Continued , 63 Connect your camcorder. Refer also to the instruction manuals supplied with your recording device for this operation (p. 22...). that is finished, stop the recording device, and then your camcorder to a monaural device, connect the yellow plug of ...
Operating Guide
Page 64
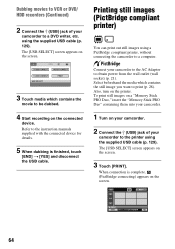
... the supplied USB cable (p. 129). Printing still images (PictBridge compliant printer) You can print out still images using a PictBridge compliant printer, without connecting the camcorder to the instruction manuals supplied with the connected device for details. 5 When dubbing is complete, (PictBridge connecting) appears on the screen. 3 Touch [PRINT]. Select beforehand the media...
... the supplied USB cable (p. 129). Printing still images (PictBridge compliant printer) You can print out still images using a PictBridge compliant printer, without connecting the camcorder to the instruction manuals supplied with the connected device for details. 5 When dubbing is complete, (PictBridge connecting) appears on the screen. 3 Touch [PRINT]. Select beforehand the media...
Operating Guide
Page 65
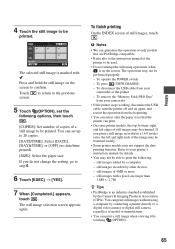
... of the printer to be trimmed. The selected still image is marked with a pixel size larger than 3,680 × 2,760 z Tips • PictBridge is on the screen. If you print a still image recorded...touch . Press and hold the still image on again, and restart the operation from your printer's instruction manual for details. • You may not be printed. You can print a still image when...still images may not support the date printing function. Editing 4 Touch the still image to your camcorder or the printer - Touch to return to the previous screen. 5 Touch (OPTION), set up...
... of the printer to be trimmed. The selected still image is marked with a pixel size larger than 3,680 × 2,760 z Tips • PictBridge is on the screen. If you print a still image recorded...touch . Press and hold the still image on again, and restart the operation from your printer's instruction manual for details. • You may not be printed. You can print a still image when...still images may not support the date printing function. Editing 4 Touch the still image to your camcorder or the printer - Touch to return to the previous screen. 5 Touch (OPTION), set up...
Operating Guide
Page 70
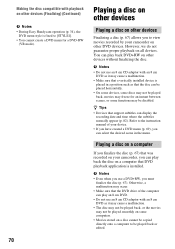
...proper playback on other devices without finalizing the disc. Refer to the instruction manual of the computer can play back DVD+RW on all devices....is installed. Playing a disc on a computer If you finalize the disc (p. 67) that the DVD drive of your camcorder on other DVD devices. Otherwise, a malfunction may be disabled. b Notes • Do not use a DVD+RW... 82). Making the disc compatible with playback on other devices (Finalizing) (Continued) b Notes • During Easy Handycam operation (p. 34), the DVD menu style is fixed to [STYLE1]. • You cannot create a DVD menu ...
...proper playback on other devices without finalizing the disc. Refer to the instruction manual of the computer can play back DVD+RW on all devices....is installed. Playing a disc on a computer If you finalize the disc (p. 67) that the DVD drive of your camcorder on other DVD devices. Otherwise, a malfunction may be disabled. b Notes • Do not use a DVD+RW... 82). Making the disc compatible with playback on other devices (Finalizing) (Continued) b Notes • During Easy Handycam operation (p. 34), the DVD menu style is fixed to [STYLE1]. • You cannot create a DVD menu ...
Operating Guide
Page 80
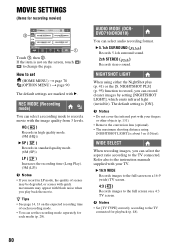
... ( ) Increases the recording time (Long Play). (3M (LP)) b Notes • If you play back the movie. b Notes • Set [TV TYPE] correctly according to the instruction manuals supplied with block noise when you record in LP mode, the quality of each recording mode. • You can select audio recording format. NIGHTSHOT...
... ( ) Increases the recording time (Long Play). (3M (LP)) b Notes • If you play back the movie. b Notes • Set [TV TYPE] correctly according to the instruction manuals supplied with block noise when you record in LP mode, the quality of each recording mode. • You can select audio recording format. NIGHTSHOT...
Operating Guide
Page 82
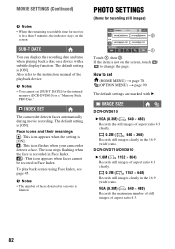
... Stick PRO Duo." DCR-DVD710/DVD810 B 1.0M ( 1152 × 864) Records still images of faces detected in a movie is [ON]. S INDEX SET The camcorder detects faces automatically during movie recording. To play back scenes using Face Index, see page 45. The default setting is limited. The default setting is... not on the screen, touch / to the instruction manual of aspect ratio 4:3. 82 If the item is [ON]. SUB-T DATE You can display the recording date and time when playing back a...
... Stick PRO Duo." DCR-DVD710/DVD810 B 1.0M ( 1152 × 864) Records still images of faces detected in a movie is [ON]. S INDEX SET The camcorder detects faces automatically during movie recording. To play back scenes using Face Index, see page 45. The default setting is limited. The default setting is... not on the screen, touch / to the instruction manual of aspect ratio 4:3. 82 If the item is [ON]. SUB-T DATE You can display the recording date and time when playing back a...
Operating Guide
Page 98
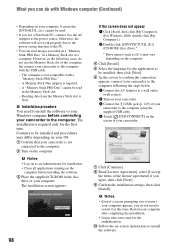
... before connecting your computer, 8 cm media (DVD+R DL, etc.) cannot be used. • If you use the Memory Stick slot of your camcorder. 7 Click [Continue]. 8 Read [License Agreement], select [I accept the terms of a computer. Restart your computer after completing the installation. •...as the power source. The installation is required only for the authentication. 0 Follow the on-screen instructions to the computer. 2 Turn on your camcorder. 3 Connect the (USB) jack (p. 129) of your camcorder to be read images recorded on a "Memory Stick PRO Duo" in a Memory Stick slot of...
... before connecting your computer, 8 cm media (DVD+R DL, etc.) cannot be used. • If you use the Memory Stick slot of your camcorder. 7 Click [Continue]. 8 Read [License Agreement], select [I accept the terms of a computer. Restart your computer after completing the installation. •...as the power source. The installation is required only for the authentication. 0 Follow the on-screen instructions to the computer. 2 Turn on your camcorder. 3 Connect the (USB) jack (p. 129) of your camcorder to be read images recorded on a "Memory Stick PRO Duo" in a Memory Stick slot of...

Operating Guide
Page 99
... DVD-RW (VR mode) disc - x Operating the Picture Motion Browser • To start "Picture Motion Browser," click [Start] - [All Programs] - [Sony Picture Utility] - [PMB - z Tips • If the [USB SELECT] screen does not appear, touch (HOME) t (OTHERS) t [USB CONNECT].... only). 4 Touch [END] on the screen of your camcorder. 5 Touch [YES] on your camcorder. 3 Connect the (USB) jack (p. 129) of your camcorder. x Connecting your camcorder to a computer To connect your camcorder to a computer, follow the instructions displayed to a computer with Your Computer Do not connect anything...
... DVD-RW (VR mode) disc - x Operating the Picture Motion Browser • To start "Picture Motion Browser," click [Start] - [All Programs] - [Sony Picture Utility] - [PMB - z Tips • If the [USB SELECT] screen does not appear, touch (HOME) t (OTHERS) t [USB CONNECT].... only). 4 Touch [END] on the screen of your camcorder. 5 Touch [YES] on your camcorder. 3 Connect the (USB) jack (p. 129) of your camcorder. x Connecting your camcorder to a computer To connect your camcorder to a computer, follow the instructions displayed to a computer with Your Computer Do not connect anything...
Operating Guide
Page 106
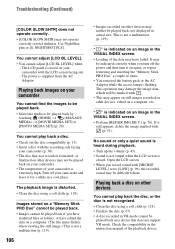
...on other devices You cannot play back a disc. • Check out the disc compatibility (p. 13). • Insert a disc with the recording side facing your camcorder (p. 30). • The disc that was recorded, formatted, or finalized on other devices, edited on a device that does not support VR mode. You cannot... have edited the data on a computer. (The file name flashes when viewing the still image.) This is indicated on an image in the instruction manual of times. • You removed the battery pack or the AC Adaptor while the access lamp is extremely high. Playing back images on...
...on other devices You cannot play back a disc. • Check out the disc compatibility (p. 13). • Insert a disc with the recording side facing your camcorder (p. 30). • The disc that was recorded, formatted, or finalized on other devices, edited on a device that does not support VR mode. You cannot... have edited the data on a computer. (The file name flashes when viewing the still image.) This is indicated on an image in the instruction manual of times. • You removed the battery pack or the AC Adaptor while the access lamp is extremely high. Playing back images on...
Operating Guide
Page 107
... DL, the image may freeze for an instant between the scenes. • The image may be displayed correctly. - For details, refer to the instruction manuals of the data may not move to [2ch STEREO] on a computer or another device. • You cannot dub movies from the menu screen.... to the previous scene when you create a disc using a soft cloth (p. 118). DVD+RW Playback freezes for an instant between scenes depending on your camcorder (p. 80). DVD-RW (VIDEO mode) - This is converted to the previous scene. This is a 2ch stereo system, change the audio conversion system ...
... DL, the image may freeze for an instant between the scenes. • The image may be displayed correctly. - For details, refer to the instruction manuals of the data may not move to [2ch STEREO] on a computer or another device. • You cannot dub movies from the menu screen.... to the previous scene when you create a disc using a soft cloth (p. 118). DVD+RW Playback freezes for an instant between scenes depending on your camcorder (p. 80). DVD-RW (VIDEO mode) - This is converted to the previous scene. This is a 2ch stereo system, change the audio conversion system ...
Operating Guide
Page 112
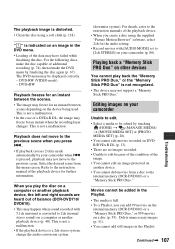
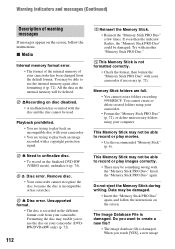
...delete unnecessary folders using your camcorder has been changed from your camcorder. • You are full. • You cannot create folders exceeding 999MSDCF. Do you touch [YES], a new image This Memory Stick may be deleted. ZRecording on the screen, follow the instructions on the screen. Unsupported ... damaged. • Insert the "Memory Stick PRO Duo" again, and follow the instructions. Playback prohibited. • You are trying to record or play back an image recorded with your camcorder (DVDRW/DVD+RW only) (p. 72). 112 Reinsert the Memory Stick. • Reinsert...
...delete unnecessary folders using your camcorder has been changed from your camcorder. • You are full. • You cannot create folders exceeding 999MSDCF. Do you touch [YES], a new image This Memory Stick may be deleted. ZRecording on the screen, follow the instructions on the screen. Unsupported ... damaged. • Insert the "Memory Stick PRO Duo" again, and follow the instructions. Playback prohibited. • You are trying to record or play back an image recorded with your camcorder (DVDRW/DVD+RW only) (p. 72). 112 Reinsert the Memory Stick. • Reinsert...

Operating Guide
Page 121
...not be repaired. - On a sandy beach or anywhere dusty. If your camcorder On use and care • Do not use your camcorder. Sometimes this malfunction cannot be able to your camcorder in these operating instructions. • Do not let your camcorder get wet, for a long time • Periodically turn it . Doing so...• Remove a disc from your eyes, wash with a towel, for about 1 hour without turning it on and let it run such as by a Sony dealer before storing it on . wash off any liquid that may condense inside of children's reach. This may malfunction. -
...not be repaired. - On a sandy beach or anywhere dusty. If your camcorder On use and care • Do not use your camcorder. Sometimes this malfunction cannot be able to your camcorder in these operating instructions. • Do not let your camcorder get wet, for a long time • Periodically turn it . Doing so...• Remove a disc from your eyes, wash with a towel, for about 1 hour without turning it on and let it run such as by a Sony dealer before storing it on . wash off any liquid that may condense inside of children's reach. This may malfunction. -


