Operating Instructions
Page 1
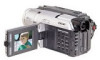
AC- Refer to these numbers whenever you call upon your Sony dealer regarding this manual thoroughly, and retain it for future reference. Serial No. DCR-TRV Model No. Model No. DCR-TRV520 DCR-TRV520/TRV525 ©2000 Sony Corporation Serial No. Record the serial number in the space provided below. 3-059-561-11 (2) Digital Video Camera Recorder Operating Instructions Before operating the unit, please read this product. Owner's Record The model and serial numbers are located on the bottom.
AC- Refer to these numbers whenever you call upon your Sony dealer regarding this manual thoroughly, and retain it for future reference. Serial No. DCR-TRV Model No. Model No. DCR-TRV520 DCR-TRV520/TRV525 ©2000 Sony Corporation Serial No. Record the serial number in the space provided below. 3-059-561-11 (2) Digital Video Camera Recorder Operating Instructions Before operating the unit, please read this product. Owner's Record The model and serial numbers are located on the bottom.

Operating Instructions
Page 8
...TRV520 B/W TRV525 Color Before using your camcorder With your digital camcorder, you read through this manual are for the two models listed in the text, for example, "DCR-TRV520 only." Set the POWER switch to country. You, however, cannot use Hi8 /Digital8 video cassettes. To...CAMERA. - Using this manual The instructions in this manual, buttons and settings on page 49 to 56 for illustration purposes. Type of your camcorder are clearly indicated in the table below. Unauthorized recording of the copyright laws. 8 Copyright precautions Television programs, films, video ...
...TRV520 B/W TRV525 Color Before using your camcorder With your digital camcorder, you read through this manual are for the two models listed in the text, for example, "DCR-TRV520 only." Set the POWER switch to country. You, however, cannot use Hi8 /Digital8 video cassettes. To...CAMERA. - Using this manual The instructions in this manual, buttons and settings on page 49 to 56 for illustration purposes. Type of your camcorder are clearly indicated in the table below. Unauthorized recording of the copyright laws. 8 Copyright precautions Television programs, films, video ...
Operating Instructions
Page 24
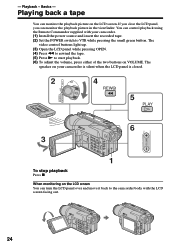
..., you can monitor the playback picture on the LCD screen. Basics - The speaker on your camcorder. (1) Install the power source and insert the recorded tape. (2) Set the POWER switch to start playback. (6) To adjust the volume, press either of the two buttons on the LCD screen You ... move it back to the camcorder body with your camcorder is silent when the LCD panel is closed. 2 VTR 4 REW OFF CAMERA MEMORY 5 PLAY VOLUME 6 3 1 To stop playback Press x. The video control buttons light up. (3) Open the LCD panel while pressing OPEN. (4) Press m to rewind the tape. (5) Press N ...
..., you can monitor the playback picture on the LCD screen. Basics - The speaker on your camcorder. (1) Install the power source and insert the recorded tape. (2) Set the POWER switch to start playback. (6) To adjust the volume, press either of the two buttons on the LCD screen You ... move it back to the camcorder body with your camcorder is silent when the LCD panel is closed. 2 VTR 4 REW OFF CAMERA MEMORY 5 PLAY VOLUME 6 3 1 To stop playback Press x. The video control buttons light up. (3) Open the LCD panel while pressing OPEN. (4) Press m to rewind the tape. (5) Press N ...
Operating Instructions
Page 29
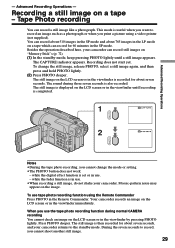
...recording function using a video printer (not supplied). You can record still images on the LCD screen or in the Remote Commander. while the fader function is recorded for about seven seconds, and your camcorder returns to record... while the digital effect function is set or in use the tape photo recording function during those seven seconds is then recorded for 60 ... The sound during normal CAMERA recording You cannot check an image on the image. Press PHOTO deeper. Advanced Recording Operations - Tape Photo recording You can record for about seven seconds....
...recording function using a video printer (not supplied). You can record still images on the LCD screen or in the Remote Commander. while the fader function is recorded for about seven seconds, and your camcorder returns to record... while the digital effect function is set or in use the tape photo recording function during those seven seconds is then recorded for 60 ... The sound during normal CAMERA recording You cannot check an image on the image. Press PHOTO deeper. Advanced Recording Operations - Tape Photo recording You can record for about seven seconds....
Operating Instructions
Page 69
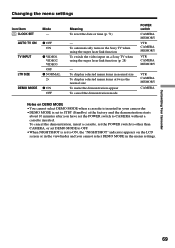
... VTR CAMERA MEMORY VTR CAMERA MEMORY VTR CAMERA MEMORY CAMERA Notes on DEMO MODE •You cannot select DEMO MODE when a cassette is inserted in your camcorder. •DEMO MODE is set to ON, the "NIGHTSHOT" indicator appears on a Sony TV when using the super laser link function (p. 28) - AUTO TV ...MODE in the viewfinder and you have set the POWER switch to CAMERA without a cassette inserted. Customizing Your Camcorder 69 To automatically turn on the Sony TV when using the super laser link function To switch the video input on the LCD screen or in the menu settings. Changing ...
... VTR CAMERA MEMORY VTR CAMERA MEMORY VTR CAMERA MEMORY CAMERA Notes on DEMO MODE •You cannot select DEMO MODE when a cassette is inserted in your camcorder. •DEMO MODE is set to ON, the "NIGHTSHOT" indicator appears on a Sony TV when using the super laser link function (p. 28) - AUTO TV ...MODE in the viewfinder and you have set the POWER switch to CAMERA without a cassette inserted. Customizing Your Camcorder 69 To automatically turn on the Sony TV when using the super laser link function To switch the video input on the LCD screen or in the menu settings. Changing ...
Operating Instructions
Page 92
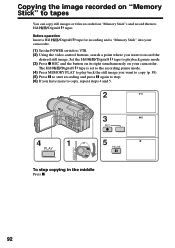
... on its right simultaneously on "Memory Stick"s and record them to copy, repeat steps 4 and 5. 2 4 1 PLAY VTR 3 REC 5 PAUSE OFF (CHARGE) MEMORY CAMERA To stop . (6) If you want to copy (p. 89). (5) Press X to start recording and press X again to stop copying in the ...middle Press x. 92 Copying the image recorded on "Memory Stick" to tapes You can copy still images or titles recorded on your camcorder. (1) Set the POWER switch to VTR. (2) Using the video...
... on its right simultaneously on "Memory Stick"s and record them to copy, repeat steps 4 and 5. 2 4 1 PLAY VTR 3 REC 5 PAUSE OFF (CHARGE) MEMORY CAMERA To stop . (6) If you want to copy (p. 89). (5) Press X to start recording and press X again to stop copying in the ...middle Press x. 92 Copying the image recorded on "Memory Stick" to tapes You can copy still images or titles recorded on your camcorder. (1) Set the POWER switch to VTR. (2) Using the video...
Operating Instructions
Page 102
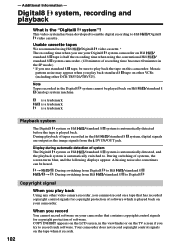
... Mosaic pattern noise may appear when you play back standard 8 tape on other VCRs (including other video camera recorder, you cannnot record on a tape that has recorded copyright control signals for copyright protection of system The Digital8 system or Hi8 /standard 8 system is ...records. This video system has been developed to enable digital recording to Hi8 /standard 8 / t : During switching from the DV IN/OUT jack. Note Tapes recorded in the Hi8 /standard 8 system, digital signals are output as the image signals from Hi8 /standard 8 to play back Using any other DCR-TRV520/TRV525...
... Mosaic pattern noise may appear when you play back standard 8 tape on other VCRs (including other video camera recorder, you cannnot record on a tape that has recorded copyright control signals for copyright protection of system The Digital8 system or Hi8 /standard 8 system is ...records. This video system has been developed to enable digital recording to Hi8 /standard 8 / t : During switching from the DV IN/OUT jack. Note Tapes recorded in the Hi8 /standard 8 system, digital signals are output as the image signals from Hi8 /standard 8 to play back Using any other DCR-TRV520/TRV525...

Operating Instructions
Page 109
...can also cancel DEMO MODE. (p. 69) • NIGHTSHOT is activated. c Clean the heads using the Sony V8-25CLD cleaning cassette (not supplied). (p. 118) No sound or only a low sound is heard ... Set it to OFF. (p. 20) • NIGHTSHOT is not clear or does not appear. • The video head may be dirty. c Set it to STEREO. (p. 64) • The volume is displayed on the ... If 10 minutes elapse after you shoot a very bright subject. • This is recorded in the viewfinder. c Set it to CAMERA, MEMORY or OFF (CHARGE). c Rewind the tape. (p. 24) There are horizontal lines...
...can also cancel DEMO MODE. (p. 69) • NIGHTSHOT is activated. c Clean the heads using the Sony V8-25CLD cleaning cassette (not supplied). (p. 118) No sound or only a low sound is heard ... Set it to OFF. (p. 20) • NIGHTSHOT is not clear or does not appear. • The video head may be dirty. c Set it to STEREO. (p. 64) • The volume is displayed on the ... If 10 minutes elapse after you shoot a very bright subject. • This is recorded in the viewfinder. c Set it to CAMERA, MEMORY or OFF (CHARGE). c Rewind the tape. (p. 24) There are horizontal lines...
Operating Instructions
Page 122
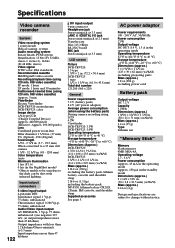
...DIGITAL I/O jack Stereo mini-minijack (ø 2.5 mm) Transfer rate: Max 115.2 Kbps RS-232C based MIC jack Stereo minijack (ø 3.5 mm) LCD screen Picture DCR-TRV520: 3.5 type 2 7/8 × 2 in. (72.2 × 50.4 mm) DCR-TRV525...) Average power consumption (when using the battery pack) During camera recording using LCD 4.2W Viewfinder DCR-TRV520: 3.3W DCR-TRV525: 3.0W Operating temperature 32 °F to 104 °F...battery CR2025, 120min. Specifications Video camera recorder System Video recording system 2 rotary heads Helical scaning system Audio recording system Rotary heads, PCM ...
...DIGITAL I/O jack Stereo mini-minijack (ø 2.5 mm) Transfer rate: Max 115.2 Kbps RS-232C based MIC jack Stereo minijack (ø 3.5 mm) LCD screen Picture DCR-TRV520: 3.5 type 2 7/8 × 2 in. (72.2 × 50.4 mm) DCR-TRV525...) Average power consumption (when using the battery pack) During camera recording using LCD 4.2W Viewfinder DCR-TRV520: 3.3W DCR-TRV525: 3.0W Operating temperature 32 °F to 104 °F...battery CR2025, 120min. Specifications Video camera recorder System Video recording system 2 rotary heads Helical scaning system Audio recording system Rotary heads, PCM ...
Operating Instructions
Page 124
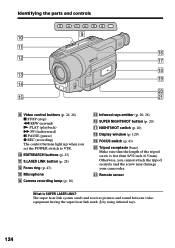
... having the super laser link mark by using infrared rays. 124 qg wa 9 Video control buttons (p. 24, 26) x STOP (stop) m REW (rewind) N PLAY (playback) M FF (fastforward) X PAUSE (pause) z REC (recording) The control buttons light up when you cannot attach the tripod securely and the screw ... Otherwise, you set the POWER switch to VTR. 0 EDITSEARCH buttons (p. 23) qa S.LASER LINK button (p. 28) qs Focus ring (p. 43) qd Microphone qf Camera recording lamp (p. 16) qg Infrared rays emitter (p. 20, 28) qh SUPER NIGHTSHOT button (p. 20) qj NIGHTSHOT switch (p. 20) qk Display window (p. 129) ql ...
... having the super laser link mark by using infrared rays. 124 qg wa 9 Video control buttons (p. 24, 26) x STOP (stop) m REW (rewind) N PLAY (playback) M FF (fastforward) X PAUSE (pause) z REC (recording) The control buttons light up when you cannot attach the tripod securely and the screw ... Otherwise, you set the POWER switch to VTR. 0 EDITSEARCH buttons (p. 23) qa S.LASER LINK button (p. 28) qs Focus ring (p. 43) qd Microphone qf Camera recording lamp (p. 16) qg Infrared rays emitter (p. 20, 28) qh SUPER NIGHTSHOT button (p. 20) qj NIGHTSHOT switch (p. 20) qk Display window (p. 129) ql ...
Operating Instructions
Page 131
...27, 31, 57, 86 BACK LIGHT 20 Battery pack 10 BEEP 70 BOUNCE 33 C, D Camera chromakey 82 Charging battery 11 Clock set 71 Connection (viewing on TV 27 (dubbing a tape 57... Connection to your PC .......... 59 Data code 25 Date search 53 DEMO 69 DIGITAL EFFECT 37, 50 Digital 8 system 102 DIGITAL I/O 127 DISPLAY 25 DOT 33 Dual sound track tape .......... 103 Dubbing a tape 57... Sub sound 66 SUPER LASER LINK ..... 28, 124 SUPER NIGHTSHOT 21 S video jack 27 T, U, V Tape counter 19 Tape photo recording 29 Telephote 18 Time code 19 Title 44 TRAIL 37 Transition 17 TV color...
...27, 31, 57, 86 BACK LIGHT 20 Battery pack 10 BEEP 70 BOUNCE 33 C, D Camera chromakey 82 Charging battery 11 Clock set 71 Connection (viewing on TV 27 (dubbing a tape 57... Connection to your PC .......... 59 Data code 25 Date search 53 DEMO 69 DIGITAL EFFECT 37, 50 Digital 8 system 102 DIGITAL I/O 127 DISPLAY 25 DOT 33 Dual sound track tape .......... 103 Dubbing a tape 57... Sub sound 66 SUPER LASER LINK ..... 28, 124 SUPER NIGHTSHOT 21 S video jack 27 T, U, V Tape counter 19 Tape photo recording 29 Telephote 18 Time code 19 Title 44 TRAIL 37 Transition 17 TV color...
PictureGear v4.1 Lite User Guide
Page 3
... other than the Samples 14 Viewing a Slide Enlarged 15 Playing a Movie 15 Using with External Devices Using a Video Camera 16 Connections and Settings 16 Using the First Time 18 Storing Images 18 Using a Digital Still Camera or Memory Stick Serial Port Adaptor (for Handycams 19 Using the Memory Stick Slot 20 Loading Images 20...
... other than the Samples 14 Viewing a Slide Enlarged 15 Playing a Movie 15 Using with External Devices Using a Video Camera 16 Connections and Settings 16 Using the First Time 18 Storing Images 18 Using a Digital Still Camera or Memory Stick Serial Port Adaptor (for Handycams 19 Using the Memory Stick Slot 20 Loading Images 20...
PictureGear v4.1 Lite User Guide
Page 5
... Movie Playback Window MPEG1 and AVI format movie files can be transferred between PictureGear and the camera. Play Movies in a separate window (Single-Image View). Use with the devices for MS) from Sony. If the PC you are using does not have a Memory Stick Slot, you can... shows which image formats are only applicable to the devices with which the accessory kit bundle is bundled (or with Video and Digital Still Cameras By connecting a Sony video or digital still camera to the PC, photographic images can be printed, either singly or as multiple slides per page. Print Slides Slides ...
... Movie Playback Window MPEG1 and AVI format movie files can be transferred between PictureGear and the camera. Play Movies in a separate window (Single-Image View). Use with the devices for MS) from Sony. If the PC you are using does not have a Memory Stick Slot, you can... shows which image formats are only applicable to the devices with which the accessory kit bundle is bundled (or with Video and Digital Still Cameras By connecting a Sony video or digital still camera to the PC, photographic images can be printed, either singly or as multiple slides per page. Print Slides Slides ...

PictureGear v4.1 Lite User Guide
Page 16
...point to Various Settings - Using a Video Camera With a Sony video camera connected to the device with which the software was bundled (or with the devices for more details. Refer to "Memory", etc.). Other devices are not compatible. Device Settings, and click Video Camera. 16 GB Using with External Devices ...between the PC and the camera. Connections and Settings 1 Turn off the video camera and PC power. 2 Connect one end of the connection cable to a PC serial port, and the other end to the DIGITAL I/O jack on the video camera. 3 Turn on the video camera, and set it to communicate...
...point to Various Settings - Using a Video Camera With a Sony video camera connected to the device with which the software was bundled (or with the devices for more details. Refer to "Memory", etc.). Other devices are not compatible. Device Settings, and click Video Camera. 16 GB Using with External Devices ...between the PC and the camera. Connections and Settings 1 Turn off the video camera and PC power. 2 Connect one end of the connection cable to a PC serial port, and the other end to the DIGITAL I/O jack on the video camera. 3 Turn on the video camera, and set it to communicate...

PictureGear v4.1 Lite User Guide
Page 17
... Rate: The default rate is checked, images can be changed during connection with External Devices The Video Camera Settings dialog box appears. The settings are refreshed and the Video Camera Settings dialog box closes. Serial Port: Select the PC port that can be used if serial communications problems occur. z Hint &#...at 115200 bps. Refer to the on , the size of images in memory to 640 × 480" box is loaded back into the video camera will vary from the menu to the connection in the "limit size of images that corresponds to momentarily cut the connection. 6 Make the ...
... Rate: The default rate is checked, images can be changed during connection with External Devices The Video Camera Settings dialog box appears. The settings are refreshed and the Video Camera Settings dialog box closes. Serial Port: Select the PC port that can be used if serial communications problems occur. z Hint &#...at 115200 bps. Refer to the on , the size of images in memory to 640 × 480" box is loaded back into the video camera will vary from the menu to the connection in the "limit size of images that corresponds to momentarily cut the connection. 6 Make the ...
PictureGear v4.1 Lite User Guide
Page 18
...procedure from step 1. - Note If an image has been read in the View Area. The "Memory Stick" for the video camera has been removed or inserted. The Video Camera folder icon appears in the folder list, and images in the folder appear in the background while using another application, connection ...to re-read the images. • As the video camera and the PC are busy communicating until all image are read, do not disconnect the cable during this occurs, deactivate the "Background Download" ...
...procedure from step 1. - Note If an image has been read in the View Area. The "Memory Stick" for the video camera has been removed or inserted. The Video Camera folder icon appears in the folder list, and images in the folder appear in the background while using another application, connection ...to re-read the images. • As the video camera and the PC are busy communicating until all image are read, do not disconnect the cable during this occurs, deactivate the "Background Download" ...
PictureGear v4.1 Lite User Guide
Page 21
... the destination. For the correct folder and file names for each device with External Devices Storing Images from External Devices Images read from external devices (Video Camera, Digital Still Camera, and MS Serial Port Adaptor) can be selected from the File menu. Note When saving images in the "Memory Stick" are using. 5 Click [OK...
... the destination. For the correct folder and file names for each device with External Devices Storing Images from External Devices Images read from external devices (Video Camera, Digital Still Camera, and MS Serial Port Adaptor) can be selected from the File menu. Note When saving images in the "Memory Stick" are using. 5 Click [OK...


