Operating Instructions
Page 1
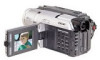
Owner's Record The model and serial numbers are located on the bottom. Record the serial number in the space provided below. Refer to these numbers whenever you call upon your Sony dealer regarding this manual thoroughly, and retain it for future reference. DCR-TRV Model No. Serial No. Model No. 3-059-561-11 (2) Digital Video Camera Recorder Operating Instructions Before operating the unit, please read this product. AC- DCR-TRV520 DCR-TRV520/TRV525 ©2000 Sony Corporation Serial No.
Owner's Record The model and serial numbers are located on the bottom. Record the serial number in the space provided below. Refer to these numbers whenever you call upon your Sony dealer regarding this manual thoroughly, and retain it for future reference. DCR-TRV Model No. Serial No. Model No. 3-059-561-11 (2) Digital Video Camera Recorder Operating Instructions Before operating the unit, please read this product. AC- DCR-TRV520 DCR-TRV520/TRV525 ©2000 Sony Corporation Serial No.
Operating Instructions
Page 7
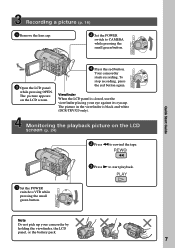
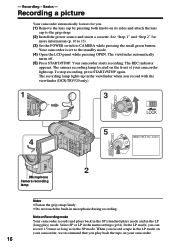
...by holding the viewfinder, the LCD panel, or the battery pack. 7 To stop recording, press the red button again. Your camcorder starts recording. The picture appears on the LCD screen (p. 24) 2 Press m to CAMERA while pressing the small green button. OFF (CHARGE) VTR 3 Press N to ... Set the POWER switch to start playback. VTR OFF (CHARGE) MEMORY CAMERA Quick Start Guide VTR OFF (CHARGE) MEMORY CAMERA 3 Open the LCD panel while pressing OPEN. Viewfinder When the LCD panel is black and white (DCR-TRV520 only). Recording a picture (p. 16) 1 Remove the lens cap. 2 Set the...
...by holding the viewfinder, the LCD panel, or the battery pack. 7 To stop recording, press the red button again. Your camcorder starts recording. The picture appears on the LCD screen (p. 24) 2 Press m to CAMERA while pressing the small green button. OFF (CHARGE) VTR 3 Press N to ... Set the POWER switch to start playback. VTR OFF (CHARGE) MEMORY CAMERA Quick Start Guide VTR OFF (CHARGE) MEMORY CAMERA 3 Open the LCD panel while pressing OPEN. Viewfinder When the LCD panel is black and white (DCR-TRV520 only). Recording a picture (p. 16) 1 Remove the lens cap. 2 Set the...

Operating Instructions
Page 8
... system. Also, your digital camcorder, you can hear a beep sound to indicate that you do not mix pictures recorded in the Hi8 /standard...To view your recordings on TV color systems TV color systems differ from country to 56 for example, "DCR-TRV520 only." The DCR-TRV520 is indicated...recording of difference DCRviewfinder TRV520 B/W TRV525 Color Before using your camcorder With your camcorder plays back tapes recorded in this manual, buttons and settings on your camcorder. Type of such materials may be contrary to CAMERA. e.g. You, however, cannot use Hi8 /Digital8 video...
... system. Also, your digital camcorder, you can hear a beep sound to indicate that you do not mix pictures recorded in the Hi8 /standard...To view your recordings on TV color systems TV color systems differ from country to 56 for example, "DCR-TRV520 only." The DCR-TRV520 is indicated...recording of difference DCRviewfinder TRV520 B/W TRV525 Color Before using your camcorder With your camcorder plays back tapes recorded in this manual, buttons and settings on your camcorder. Type of such materials may be contrary to CAMERA. e.g. You, however, cannot use Hi8 /Digital8 video...
Operating Instructions
Page 11
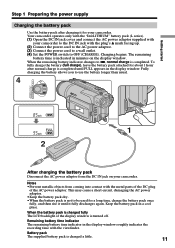
... be used for a long time, charge the battery pack once fully, and then use the battery longer than usual. 4 VTR OFF (CHARGE) MEMORY CAMERA 1 2 After charging the battery pack Disconnect the AC power adaptor from coming into contact with the metal parts of the DC plug of the display... DC IN jack cover and connect the AC power adaptor supplied with your camcorder. Keep the battery pack in the display window roughly indicates the recording time with the viewfinder. Notes •Prevent metallic objects from the DC IN jack on the display window. Getting started Step 1 Preparing the...
... be used for a long time, charge the battery pack once fully, and then use the battery longer than usual. 4 VTR OFF (CHARGE) MEMORY CAMERA 1 2 After charging the battery pack Disconnect the AC power adaptor from coming into contact with the metal parts of the DC plug of the display... DC IN jack cover and connect the AC power adaptor supplied with your camcorder. Keep the battery pack in the display window roughly indicates the recording time with the viewfinder. Notes •Prevent metallic objects from the DC IN jack on the display window. Getting started Step 1 Preparing the...
Operating Instructions
Page 16
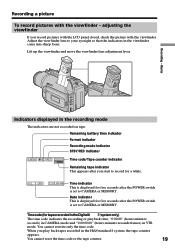
... as long as in the LP mode on your camcorder, we recommend that you record with the viewfinder (DCR-TRV520 only). 1 3 VTR OFF (CHARGE) MEMORY CAMERA VTR OFF (CHARGE) MEMORY CAMERA 5 40min SP REC 0:00:01 4 2 Microphone Camera recording lamp Notes •Fasten the grip strap firmly. •Do not touch the built-in the LP...
... as long as in the LP mode on your camcorder, we recommend that you record with the viewfinder (DCR-TRV520 only). 1 3 VTR OFF (CHARGE) MEMORY CAMERA VTR OFF (CHARGE) MEMORY CAMERA 5 40min SP REC 0:00:01 4 2 Microphone Camera recording lamp Notes •Fasten the grip strap firmly. •Do not touch the built-in the LP...
Operating Instructions
Page 17
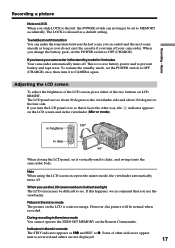
...LCD panel, set to prevent battery and tape wear. The LCD panel moves about 90 degrees to the viewfinder side and about 180 degrees to CAMERA again. The LOCK is to save battery power and to MEMORY accidentally. Note When using the LCD screen except in the mirror mode The ...you do not eject the cassette if you use the LCD screen outdoors in the standby mode for 3 minutes Your camcorder automatically turns off . Recording - Basics Recording a picture Note on the LCD screen and in the mirror mode You cannot operate the ZERO SET MEMORY on the Remote Commander. If this happens...
...LCD panel, set to prevent battery and tape wear. The LCD panel moves about 90 degrees to the viewfinder side and about 180 degrees to CAMERA again. The LOCK is to save battery power and to MEMORY accidentally. Note When using the LCD screen except in the mirror mode The ...you do not eject the cassette if you use the LCD screen outdoors in the standby mode for 3 minutes Your camcorder automatically turns off . Recording - Basics Recording a picture Note on the LCD screen and in the mirror mode You cannot operate the ZERO SET MEMORY on the Remote Commander. If this happens...
Operating Instructions
Page 19
... tape indicator This appears after you start to record for five seconds after the POWER switch is displayed for tapes recorded in the Digital8 system only) The time code indicates the recording or playback time, "0:00:00" (hours:minutes: seconds) in CAMERA mode and "0:00:00:00" (hours:minutes...:seconds:frames) in the viewfinder come into sharp focus. Basics Indicators displayed in the Hi8/standard 8 system, the tape counter appears. When you record pictures with the LCD panel closed, check the ...
... tape indicator This appears after you start to record for five seconds after the POWER switch is displayed for tapes recorded in the Digital8 system only) The time code indicates the recording or playback time, "0:00:00" (hours:minutes: seconds) in CAMERA mode and "0:00:00:00" (hours:minutes...:seconds:frames) in the viewfinder come into sharp focus. Basics Indicators displayed in the Hi8/standard 8 system, the tape counter appears. When you record pictures with the LCD panel closed, check the ...
Operating Instructions
Page 20
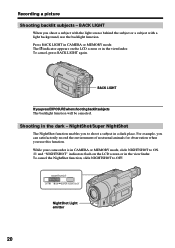
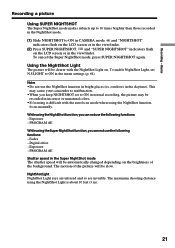
..., slide NIGHTSHOT to shoot a subject in a dark place. Shooting in CAMERA or MEMORY mode. and "NIGHTSHOT" indicators flash on the LCD screen or in the viewfinder. The . NIGHTSHOT OFF ON SUPER NIGHTSHOT NightShot Light emitter 20 For example, you can satisfactorily record the environment of nocturnal animals for observation when you shoot...
..., slide NIGHTSHOT to shoot a subject in a dark place. Shooting in CAMERA or MEMORY mode. and "NIGHTSHOT" indicators flash on the LCD screen or in the viewfinder. The . NIGHTSHOT OFF ON SUPER NIGHTSHOT NightShot Light emitter 20 For example, you can satisfactorily record the environment of nocturnal animals for observation when you shoot...
Operating Instructions
Page 21
outdoors in the menu settings (p. 64). Digital effect - and "SUPER NIGHTSHOT" indicators flash on the LCD screen or in the viewfinder. (2) Press SUPER NIGHTSHOT. Using the NightShot Light The picture will be recorded in the viewfinder. To enable NightShot Light, set to ON in the Super ...NightShot mode The shutter speed will be automatically changed depending on . Exposure - Notes •Do not use the NightShot function in CAMERA mode. PROGRAM AE While using...
outdoors in the menu settings (p. 64). Digital effect - and "SUPER NIGHTSHOT" indicators flash on the LCD screen or in the viewfinder. (2) Press SUPER NIGHTSHOT. Using the NightShot Light The picture will be recorded in the viewfinder. To enable NightShot Light, set to ON in the Super ...NightShot mode The shutter speed will be automatically changed depending on . Exposure - Notes •Do not use the NightShot function in CAMERA mode. PROGRAM AE While using...
Operating Instructions
Page 22
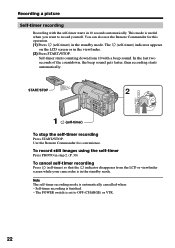
... sound. You can also use the Remote Commander for convenience. Note The self-timer recording mode is finished. - Self-timer recording is automatically cancelled when: - START/STOP 2 VTR OFF (CHARGE) MEMORY CAMERA 1 (self-timer) To stop the self-timer recording Press START/STOP. This mode is useful when you want to OFF (CHARGE) or...
... sound. You can also use the Remote Commander for convenience. Note The self-timer recording mode is finished. - Self-timer recording is automatically cancelled when: - START/STOP 2 VTR OFF (CHARGE) MEMORY CAMERA 1 (self-timer) To stop the self-timer recording Press START/STOP. This mode is useful when you want to OFF (CHARGE) or...
Operating Instructions
Page 24
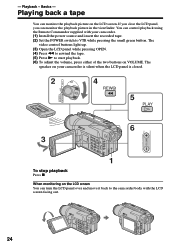
Basics - The video control buttons light up. (3) Open the LCD panel while pressing OPEN. (4) Press m to rewind the tape. ...the LCD panel, you can monitor the playback picture on your camcorder. (1) Install the power source and insert the recorded tape. (2) Set the POWER switch to the camcorder body with your camcorder is silent when the LCD panel is closed. ...2 VTR 4 REW OFF CAMERA MEMORY 5 PLAY VOLUME 6 3 1 To stop playback Press x. You can turn the LCD panel over and move it...
Basics - The video control buttons light up. (3) Open the LCD panel while pressing OPEN. (4) Press m to rewind the tape. ...the LCD panel, you can monitor the playback picture on your camcorder. (1) Install the power source and insert the recorded tape. (2) Set the POWER switch to the camcorder body with your camcorder is silent when the LCD panel is closed. ...2 VTR 4 REW OFF CAMERA MEMORY 5 PLAY VOLUME 6 3 1 To stop playback Press x. You can turn the LCD panel over and move it...
Operating Instructions
Page 29
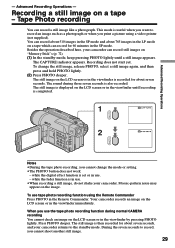
... appears. The still image on a tape which can record about 510 images in the viewfinder untill recording is completed. 1 CAPTURE PHOTO 2 PHOTO Notes •During the tape photo recording, you use . - while the digital effect function is in the SP mode. When you cannot...record for about seven seconds. The sound during normal CAMERA recording You cannot check an image on "Memory Stick"s (p. 72). (1) In the standby mode, keep pressing PHOTO lightly until a still image appears. This mode is recorded for 60 minutes in use tape photo recording function using a video...
... appears. The still image on a tape which can record about 510 images in the viewfinder untill recording is completed. 1 CAPTURE PHOTO 2 PHOTO Notes •During the tape photo recording, you use . - while the digital effect function is in the SP mode. When you cannot...record for about seven seconds. The sound during normal CAMERA recording You cannot check an image on "Memory Stick"s (p. 72). (1) In the standby mode, keep pressing PHOTO lightly until a still image appears. This mode is recorded for 60 minutes in use tape photo recording function using a video...
Operating Instructions
Page 36
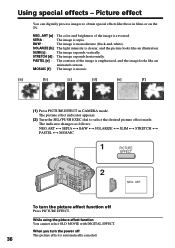
... the image is emphasized, and the image looks like an animated cartoon. While using the picture effect function You cannot select OLD MOVIE with DIGITAL EFFECT. SEPIA : The image is monochrome (black-and-white). B&W : The image is sepia. PASTEL [e] : The contrast of the image... the picture effect function off The picture effect is reversed. MOSAIC [f] : The image is clearer, and the picture looks like those in CAMERA mode. Using special effects - NEG. SLIM [c] : The image expands vertically. STRETCH [d] : The image expands horizontally. ART To turn the power...
... the image is emphasized, and the image looks like an animated cartoon. While using the picture effect function You cannot select OLD MOVIE with DIGITAL EFFECT. SEPIA : The image is monochrome (black-and-white). B&W : The image is sepia. PASTEL [e] : The contrast of the image... the picture effect function off The picture effect is reversed. MOSAIC [f] : The image is clearer, and the picture looks like those in CAMERA mode. Using special effects - NEG. SLIM [c] : The image expands vertically. STRETCH [d] : The image expands horizontally. ART To turn the power...
Operating Instructions
Page 38
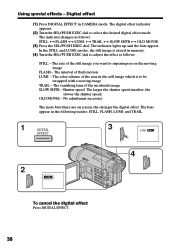
... be swapped with a moving image FLASH - The vanishing time of flash motion LUMI. - The bars appear in CAMERA mode. Shutter speed. The interval of the incidental image SLOW SHTR - Using special effects - Digital effect (1) Press DIGITAL EFFECT in the following modes: STILL, FLASH, LUMI. No adjustment necessary The more bars there are on...
... be swapped with a moving image FLASH - The vanishing time of flash motion LUMI. - The bars appear in CAMERA mode. Shutter speed. The interval of the incidental image SLOW SHTR - Using special effects - Digital effect (1) Press DIGITAL EFFECT in the following modes: STILL, FLASH, LUMI. No adjustment necessary The more bars there are on...
Operating Instructions
Page 41
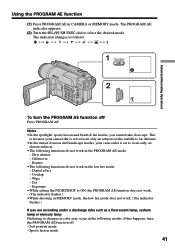
... lamp, sodium lamp or mercury lamp Flickering or changes in color may occur in CAMERA or MEMORY mode. Dot - Notes •In the spotlight, sports lesson and beach & ski modes, you are recording under a discharge tube such as follows: 1 PROGRAM 2 A To turn the ...this happens, turn the PROGRAM AE function off . - Sports lesson mode 41 Slow shutter - Soft portrait mode - Old movie - Digital effect - Wipe - Advanced Recording Operations Using the PROGRAM AE function (1) Press PROGRAM AE in the following modes. Exposure •While setting the NIGHTSHOT to select the...
... lamp, sodium lamp or mercury lamp Flickering or changes in color may occur in CAMERA or MEMORY mode. Dot - Notes •In the spotlight, sports lesson and beach & ski modes, you are recording under a discharge tube such as follows: 1 PROGRAM 2 A To turn the ...this happens, turn the PROGRAM AE function off . - Sports lesson mode 41 Slow shutter - Soft portrait mode - Old movie - Digital effect - Wipe - Advanced Recording Operations Using the PROGRAM AE function (1) Press PROGRAM AE in the following modes. Exposure •While setting the NIGHTSHOT to select the...
Operating Instructions
Page 42
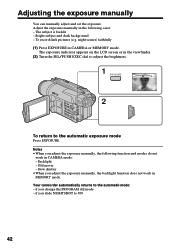
.... 1 EXPOSURE 2 To return to the automatic exposure mode Press EXPOSURE. Backlight - if you adjust the exposure manually, the backlight function does not work in CAMERA mode: - To record dark pictures (e.g. The subject is backlit - The exposure indicator appears on the LCD screen or in the following function and modes do not work...
.... 1 EXPOSURE 2 To return to the automatic exposure mode Press EXPOSURE. Backlight - if you adjust the exposure manually, the backlight function does not work in CAMERA mode: - To record dark pictures (e.g. The subject is backlit - The exposure indicator appears on the LCD screen or in the following function and modes do not work...

Operating Instructions
Page 43
... release FOCUS, your camcorder returns to the manual focus mode. To focus precisely Adjust the zoom by manually adjusting the focus in CAMERA or MEMORY mode. When you are trying to shoot a distant object. Use this mode when your camcorder focuses on infinity and ...indicator appears. subjects with little contrast with water droplets. - This makes focusing easier. Advanced Recording Operations Focusing manually You can gain better results by first focusing at the "T" (telephoto) position and then shooting at the end of the...
... release FOCUS, your camcorder returns to the manual focus mode. To focus precisely Adjust the zoom by manually adjusting the focus in CAMERA or MEMORY mode. When you are trying to shoot a distant object. Use this mode when your camcorder focuses on infinity and ...indicator appears. subjects with little contrast with water droplets. - This makes focusing easier. Advanced Recording Operations Focusing manually You can gain better results by first focusing at the "T" (telephoto) position and then shooting at the end of the...
Operating Instructions
Page 47
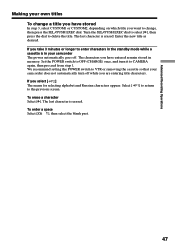
... POWER switch to VTR or removing the cassette so that your camcorder does not automatically turn it to CAMERA again, then proceed from step 1. Select [ to the previous screen. ] to delete the title. Advanced Recording Operations 47 The last character is erased. Set the POWER switch to OFF (CHARGE) once, and turn...
... POWER switch to VTR or removing the cassette so that your camcorder does not automatically turn it to CAMERA again, then proceed from step 1. Select [ to the previous screen. ] to delete the title. Advanced Recording Operations 47 The last character is erased. Set the POWER switch to OFF (CHARGE) once, and turn...
Operating Instructions
Page 64
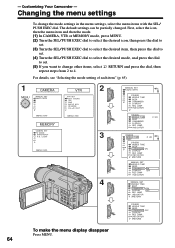
... I ND I CATOR RETURN To make the menu display disappear Press MENU. 64 - First, select the icon, then the menu item and then the mode. (1) In CAMERA, VTR or MEMORY mode, press MENU. (2) Turn the SEL/PUSH EXEC dial to select the desired icon, then press the dial to set. (3) Turn the...the desired mode, and press the dial to set. (5) If you want to 4. S. For details, see "Selecting the mode setting of each item" (p. 65). 1 MENU CAMERA MANUAL SET AUTO SHTR [MENU] : END MEMORY CAMERA SET D ZOOM STEADYSHOT N. The default settings can be partially changed. Customizing Your Camcorder -
... I ND I CATOR RETURN To make the menu display disappear Press MENU. 64 - First, select the icon, then the menu item and then the mode. (1) In CAMERA, VTR or MEMORY mode, press MENU. (2) Turn the SEL/PUSH EXEC dial to select the desired icon, then press the dial to set. (3) Turn the...the desired mode, and press the dial to set. (5) If you want to 4. S. For details, see "Selecting the mode setting of each item" (p. 65). 1 MENU CAMERA MANUAL SET AUTO SHTR [MENU] : END MEMORY CAMERA SET D ZOOM STEADYSHOT N. The default settings can be partially changed. Customizing Your Camcorder -
Operating Instructions
Page 65
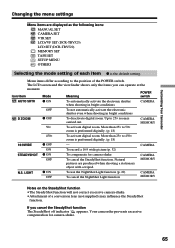
Menu items differ according to 450× zoom is carried out. CAMERA ON To record a 16:9 wide picture (p. 32) STEADYSHOT z ON OFF To compensate for camera-shake. 65 CAMERA MEMORY N.S. The LCD screen and the viewfinder shows only the items you cancel the SteadyShot function The SteadyShot off ... function. Up to 50× zoom is the default setting. To activate digital zoom. Natural pictures are displayed as the following icons: MANUAL SET CAMERA SET VTR SET LCD/VF SET (DCR-TRV525) LCD SET (DCR-TRV520) MEMORY SET TAPE SET SETUP MENU OTHERS Selecting the mode setting of ...
Menu items differ according to 450× zoom is carried out. CAMERA ON To record a 16:9 wide picture (p. 32) STEADYSHOT z ON OFF To compensate for camera-shake. 65 CAMERA MEMORY N.S. The LCD screen and the viewfinder shows only the items you cancel the SteadyShot function The SteadyShot off ... function. Up to 50× zoom is the default setting. To activate digital zoom. Natural pictures are displayed as the following icons: MANUAL SET CAMERA SET VTR SET LCD/VF SET (DCR-TRV525) LCD SET (DCR-TRV520) MEMORY SET TAPE SET SETUP MENU OTHERS Selecting the mode setting of ...


