
Camera Operations Guide
Page 2
Read this first Before operating the unit, please read this manual thoroughly, and retain it for future reference. RECYCLING LITHIUM-ION BATTERIES Lithium-Ion batteries are recyclable. For more information regarding recycling of important operating and maintenance (servicing) instructions in the U.S.A. b Notice •..., MATCH WIDE BLADE OF PLUG TO WIDE SLOT, FULLY INSERT. You can help preserve our environment by returning your used rechargeable batteries to rain or moisture. For customers in the literature accompanying the appliance. WARNING To prevent fire or shock hazard, do not ...
Read this first Before operating the unit, please read this manual thoroughly, and retain it for future reference. RECYCLING LITHIUM-ION BATTERIES Lithium-Ion batteries are recyclable. For more information regarding recycling of important operating and maintenance (servicing) instructions in the U.S.A. b Notice •..., MATCH WIDE BLADE OF PLUG TO WIDE SLOT, FULLY INSERT. You can help preserve our environment by returning your used rechargeable batteries to rain or moisture. For customers in the literature accompanying the appliance. WARNING To prevent fire or shock hazard, do not ...
Camera Operations Guide
Page 4
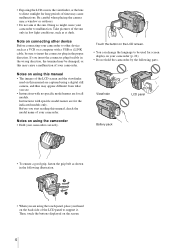
...using a digital still camera, and thus may appear different from what you are for all models. Then, touch the buttons displayed on using this manual, check the model name of your camcorder. Before you insert the connector plug forcibly in the following parts. Viewfinder LCD panel Battery pack &#...8226; To ensure a good grip, fasten the grip belt as shown in the wrong direction, the terminal may be used on connecting other device Before connecting your camcorder to other device such as at the sun....
...using a digital still camera, and thus may appear different from what you are for all models. Then, touch the buttons displayed on using this manual, check the model name of your camcorder. Before you insert the connector plug forcibly in the following parts. Viewfinder LCD panel Battery pack &#...8226; To ensure a good grip, fasten the grip belt as shown in the wrong direction, the terminal may be used on connecting other device Before connecting your camcorder to other device such as at the sun....
Camera Operations Guide
Page 5
... Stick" while recording movies on a tape ....... 32 Recording with ease 12 Getting started Step 1: Checking supplied items 13 Step 2: Charging the battery pack 14 Using an outside power source 17 Step 3: Turning the power on 17 Step 4: Adjusting the LCD panel and viewfinder 18 Adjusting the... Stick 21 Step 7: Setting the screen language 22 Recording Recording movies 24 Recording for "Memory Stick" only. Table of Easy Handycam operation 34 ,continued 5 Read this first 2 Quick Start Guide Recording movies 8 Recording still images 10 Recording/Playing back with ease - Easy...
... Stick" while recording movies on a tape ....... 32 Recording with ease 12 Getting started Step 1: Checking supplied items 13 Step 2: Charging the battery pack 14 Using an outside power source 17 Step 3: Turning the power on 17 Step 4: Adjusting the LCD panel and viewfinder 18 Adjusting the... Stick 21 Step 7: Setting the screen language 22 Recording Recording movies 24 Recording for "Memory Stick" only. Table of Easy Handycam operation 34 ,continued 5 Read this first 2 Quick Start Guide Recording movies 8 Recording still images 10 Recording/Playing back with ease - Easy...
Camera Operations Guide
Page 7
... END SEARCH/TITLE, etc. ........73 Using the (STANDARD SET) menu - APPLI.) menu - Digital program editing 91 Deleting recorded pictures 98 Marking recorded images with your camcorder: • Editing images with specific information - EFFECT/SLIDE SHOW/ FRAME REC/INTERVAL REC, etc ... Troubleshooting 103 Warning indicators and messages ...110 Additional Information Using your camcorder abroad ..........114 Usable cassette tapes 115 About the "Memory Stick 116 About the "InfoLITHIUM" battery pack 118 About i.LINK 119 Maintenance and precautions ..........120 Specification 123...
... END SEARCH/TITLE, etc. ........73 Using the (STANDARD SET) menu - APPLI.) menu - Digital program editing 91 Deleting recorded pictures 98 Marking recorded images with your camcorder: • Editing images with specific information - EFFECT/SLIDE SHOW/ FRAME REC/INTERVAL REC, etc ... Troubleshooting 103 Warning indicators and messages ...110 Additional Information Using your camcorder abroad ..........114 Usable cassette tapes 115 About the "Memory Stick 116 About the "InfoLITHIUM" battery pack 118 About i.LINK 119 Maintenance and precautions ..........120 Specification 123...
Camera Operations Guide
Page 8
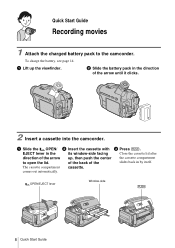
... cassette. OPEN/EJECT lever Window-side 8 Quick Start Guide b Slide the battery pack in by itself. Quick Start Guide Recording movies 1 Attach the charged battery pack to open the lid. a Lift up , then push the center the cassette compartment to the camcorder. EJECT lever in the its window-side facing Close the cassette...
... cassette. OPEN/EJECT lever Window-side 8 Quick Start Guide b Slide the battery pack in by itself. Quick Start Guide Recording movies 1 Attach the charged battery pack to open the lid. a Lift up , then push the center the cassette compartment to the camcorder. EJECT lever in the its window-side facing Close the cassette...
Camera Operations Guide
Page 10
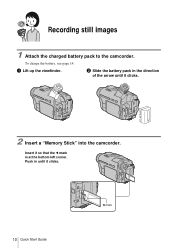
Push in the direction of the arrow until it so that the b mark is at the bottom left corner. To charge the battery, see page 14. a Lift up the viewfinder. Insert it clicks. 10 Quick Start Guide b mark b Slide the battery pack in until it clicks. 2 Insert a "Memory Stick" into the camcorder. Recording still images 1 Attach the charged battery pack to the camcorder.
Push in the direction of the arrow until it so that the b mark is at the bottom left corner. To charge the battery, see page 14. a Lift up the viewfinder. Insert it clicks. 10 Quick Start Guide b mark b Slide the battery pack in until it clicks. 2 Insert a "Memory Stick" into the camcorder. Recording still images 1 Attach the charged battery pack to the camcorder.

Camera Operations Guide
Page 13
...) "Memory Stick" media is only supplied with DCR-TRV460. There is already installed. Wireless Remote Commander (1) A button-type lithium battery is no "Memory Stick" media supplied with DCR-TRV361. Getting started Step 1: Checking supplied items Make sure you have following items supplied with your camcorder. The number in parentheses indicates the number of that item...
...) "Memory Stick" media is only supplied with DCR-TRV460. There is already installed. Wireless Remote Commander (1) A button-type lithium battery is no "Memory Stick" media supplied with DCR-TRV361. Getting started Step 1: Checking supplied items Make sure you have following items supplied with your camcorder. The number in parentheses indicates the number of that item...
Camera Operations Guide
Page 14
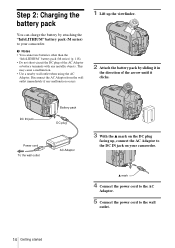
... DC plug AC Adaptor 3 With the v mark on the DC plug facing up the viewfinder. 2 Attach the battery pack by attaching the "InfoLITHIUM" battery pack (M series) to your camcorder. v mark 4 Connect the power cord to the AC Adaptor. 5 Connect the power cord to the wall outlet. 14 Getting ...any metallic objects. Step 2: Charging the battery pack You can charge the battery by sliding it in the direction of the AC Adaptor or battery terminals with any malfunction occurs. 1 Lift up , connect the AC Adaptor to the DC IN jack on your camcorder. This may cause a malfunction. •...
... DC plug AC Adaptor 3 With the v mark on the DC plug facing up the viewfinder. 2 Attach the battery pack by attaching the "InfoLITHIUM" battery pack (M series) to your camcorder. v mark 4 Connect the power cord to the AC Adaptor. 5 Connect the power cord to the wall outlet. 14 Getting ...any metallic objects. Step 2: Charging the battery pack You can charge the battery by sliding it in the direction of the AC Adaptor or battery terminals with any malfunction occurs. 1 Lift up , connect the AC Adaptor to the DC IN jack on your camcorder. This may cause a malfunction. •...
Camera Operations Guide
Page 15
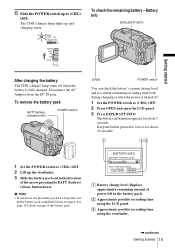
...; If you do not use up the battery pack completely before storing it for about 7 seconds. Keep the button pressed to (CHG) OFF. 2 Lift up the viewfinder. 3 Slide the battery pack out in the battery pack. BATTERY INFO BATTERY CHARGE LEVEL 0% 50% 100% REC TIME... AVAILABLE LCD SCREEN: 72 min VIEWFINDER: 95 min A Battery charge level: Displays approximate remaining amount of the battery pack. To check the remaining battery - 6 Slide the POWER switch up...
...; If you do not use up the battery pack completely before storing it for about 7 seconds. Keep the button pressed to (CHG) OFF. 2 Lift up the viewfinder. 3 Slide the battery pack out in the battery pack. BATTERY INFO BATTERY CHARGE LEVEL 0% 50% 100% REC TIME... AVAILABLE LCD SCREEN: 72 min VIEWFINDER: 95 min A Battery charge level: Displays approximate remaining amount of the battery pack. To check the remaining battery - 6 Slide the POWER switch up...

Camera Operations Guide
Page 16
... connected to change the power mode, and zoom. For DCR-TRV460: The playing time of tapes recorded on Approximate number of minutes available when you repeatedly record, start/stop, slide the POWER switch to the DC IN jack of your camcorder in following conditions. - The battery pack is reduced by about 20%. The actual...
... connected to change the power mode, and zoom. For DCR-TRV460: The playing time of tapes recorded on Approximate number of minutes available when you repeatedly record, start/stop, slide the POWER switch to the DC IN jack of your camcorder in following conditions. - The battery pack is reduced by about 20%. The actual...
Camera Operations Guide
Page 17
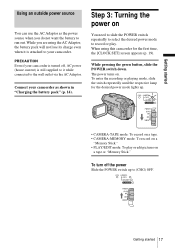
... via the AC Adaptor. Getting started 17 Getting started Using an outside power source You can use the AC Adaptor as shown in "Charging the battery pack" (p. 14). To turn off , AC power (house current) is still supplied to it is turned off the power Slide the POWER ...time, the [CLOCK SET] screen appears (p. 19). Connect your camcorder as the power source when you are using this camcorder for the desired power mode lights up to your camcorder is attached to (CHG) OFF. PRECAUTION Even if your camcorder. While pressing the green button, slide the POWER switch down.
... via the AC Adaptor. Getting started 17 Getting started Using an outside power source You can use the AC Adaptor as shown in "Charging the battery pack" (p. 14). To turn off , AC power (house current) is still supplied to it is turned off the power Slide the POWER ...time, the [CLOCK SET] screen appears (p. 19). Connect your camcorder as the power source when you are using this camcorder for the desired power mode lights up to your camcorder is attached to (CHG) OFF. PRECAUTION Even if your camcorder. While pressing the green button, slide the POWER switch down.
Camera Operations Guide
Page 18
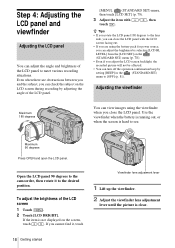
... the LCD panel 90 degrees to the desired position. If the item is clear. 18 Getting started If you cannot find it to the camcorder, then rotate it , touch Viewfinder lens adjustment lever 1 Lift up the viewfinder. 2 Adjust the viewfinder lens adjustment lever until the picture is... recording situations. Maximum 90 degrees Press OPEN and open the LCD panel. Adjusting the viewfinder Maximum 180 degrees You can view images using the battery pack for power source, you close the LCD panel with / , then touch . Step 4: Adjusting the LCD panel and viewfinder Adjusting the...
... the LCD panel 90 degrees to the desired position. If the item is clear. 18 Getting started If you cannot find it to the camcorder, then rotate it , touch Viewfinder lens adjustment lever 1 Lift up the viewfinder. 2 Adjust the viewfinder lens adjustment lever until the picture is... recording situations. Maximum 90 degrees Press OPEN and open the LCD panel. Adjusting the viewfinder Maximum 180 degrees You can view images using the battery pack for power source, you close the LCD panel with / , then touch . Step 4: Adjusting the LCD panel and viewfinder Adjusting the...
Camera Operations Guide
Page 19
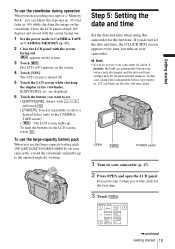
Step 5: Setting the date and time Set the date and time when using this camcorder for about 3 months, the built-in rechargeable button-type battery gets discharged and the date and time settings may be cleared from the memory. EXPO- are recording on a tape or a "Memory Stick", you ... . 5 Touch the LCD screen while checking the display in the CAMERA- To hide the buttons on your camcorder (p. 17). 2 Press OPEN and open the LCD panel. To use the large-capacity battery pack When you set the clock for viewing. To use the viewfinder during operation When you are displayed. 6...
Step 5: Setting the date and time Set the date and time when using this camcorder for about 3 months, the built-in rechargeable button-type battery gets discharged and the date and time settings may be cleared from the memory. EXPO- are recording on a tape or a "Memory Stick", you ... . 5 Touch the LCD screen while checking the display in the CAMERA- To hide the buttons on your camcorder (p. 17). 2 Press OPEN and open the LCD panel. To use the large-capacity battery pack When you set the clock for viewing. To use the viewfinder during operation When you are displayed. 6...
Camera Operations Guide
Page 22
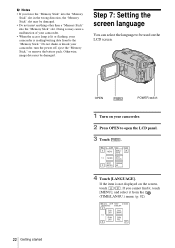
Step 7: Setting the screen language You can select the language to be damaged. Do not shake or knock your camcorder. 2 Press OPEN to the "Memory Stick." SURE 1/3 FADER SPOT FOCUS SPOT PRGRAM METER AE 4 Touch [LANGUAGE]. Otherwise, image data may be used on the ... the wrong direction, the "Memory Stick" slot may cause a malfunction of your camcorder. • When the access lamp is lit or flashing, your camcorder is not displayed on your camcorder, turn the power off, eject the "Memory Stick," or remove the battery pack. b Notes • If you cannot find it, touch [MENU], and ...
Step 7: Setting the screen language You can select the language to be damaged. Do not shake or knock your camcorder. 2 Press OPEN to the "Memory Stick." SURE 1/3 FADER SPOT FOCUS SPOT PRGRAM METER AE 4 Touch [LANGUAGE]. Otherwise, image data may be used on the ... the wrong direction, the "Memory Stick" slot may cause a malfunction of your camcorder. • When the access lamp is lit or flashing, your camcorder is not displayed on your camcorder, turn the power off, eject the "Memory Stick," or remove the battery pack. b Notes • If you cannot find it, touch [MENU], and ...
Camera Operations Guide
Page 25
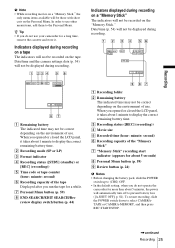
...counter (hour: minute: second) F Recording capacity of the tape Displayed after you do not operate the camcorder for more than about 1 minute to display the correct remaining battery time. Recording b Note • While recording movies on a "Memory Stick," the only menu items ...use. G Personal Menu button (p. 59) H END SEARCH/EDIT SEARCH/Rec review display switch button (p. 44) A Recording folder B Remaining battery The indicated time may not be correct depending on the Personal Menu. Indicators displayed during recording. When you opened or closed the LCD panel,...
...counter (hour: minute: second) F Recording capacity of the tape Displayed after you do not operate the camcorder for more than about 1 minute to display the correct remaining battery time. Recording b Note • While recording movies on a "Memory Stick," the only menu items ...use. G Personal Menu button (p. 59) H END SEARCH/EDIT SEARCH/Rec review display switch button (p. 44) A Recording folder B Remaining battery The indicated time may not be correct depending on the Personal Menu. Indicators displayed during recording. When you opened or closed the LCD panel,...
Camera Operations Guide
Page 27
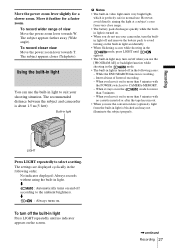
... the END SEARCH function is about 1.5 m (5 feet). When you use the conversion lens (optional), light from very close range. • The battery pack discharges quickly while the built- The settings are displayed cyclically in light is turned on. • When you use your shooting situation. To turn... the tape has run out. • When you leave it further for more than 5 minutes. - The recommended distance between the subject and camcorder is working. - When you leave it stays on in the mode for more than 5 minutes with the POWER switch set to avoid turning on...
... the END SEARCH function is about 1.5 m (5 feet). When you use the conversion lens (optional), light from very close range. • The battery pack discharges quickly while the built- The settings are displayed cyclically in light is turned on. • When you use your shooting situation. To turn... the tape has run out. • When you leave it further for more than 5 minutes. - The recommended distance between the subject and camcorder is working. - When you leave it stays on in the mode for more than 5 minutes with the POWER switch set to avoid turning on...
Camera Operations Guide
Page 47
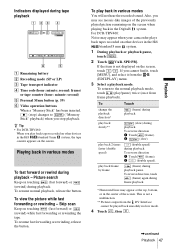
...1 Touch (frame). 2 (slow). Indicators displayed during tape playback 60min 0:00:00:15 P-MENU A Remaining battery B Recording mode (SP or LP) C Tape transport indicator D Time code (hour: minute: second: frame...z Tip • For DCR-TRV460: When you cannot find it, touch [MENU], and select it from the (EDIT/PLAY) menu. 3 Select a playback mode. For DCR-TRV460: Noise may appear at ...change the playback direction* (frame) during frame playback. * Horizontal lines may appear when your camcorder plays back tapes recorded on other devices in slow mode. 4 Touch , then . ,...
...1 Touch (frame). 2 (slow). Indicators displayed during tape playback 60min 0:00:00:15 P-MENU A Remaining battery B Recording mode (SP or LP) C Tape transport indicator D Time code (hour: minute: second: frame...z Tip • For DCR-TRV460: When you cannot find it, touch [MENU], and select it from the (EDIT/PLAY) menu. 3 Select a playback mode. For DCR-TRV460: Noise may appear at ...change the playback direction* (frame) during frame playback. * Horizontal lines may appear when your camcorder plays back tapes recorded on other devices in slow mode. 4 Touch , then . ,...
Camera Operations Guide
Page 50
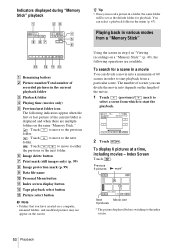
... the playback. 60min 320 MOV00002 MPEG 2 / 10 101 MEMORY PLAY P-MENU 2 Touch . Index Screen Touch . Playing back in various modes from a "Memory Stick" P-MENU A Remaining battery B Picture number/Total number of the movie. 1 Touch (previous)/ (next) to select a scene from which to start playback from a particular scene. To search for playback...
... the playback. 60min 320 MOV00002 MPEG 2 / 10 101 MEMORY PLAY P-MENU 2 Touch . Index Screen Touch . Playing back in various modes from a "Memory Stick" P-MENU A Remaining battery B Picture number/Total number of the movie. 1 Touch (previous)/ (next) to select a scene from which to start playback from a particular scene. To search for playback...
Camera Operations Guide
Page 72
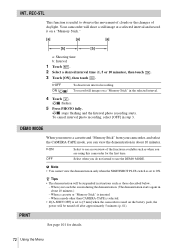
...set to see an overview of daylight. When a mode other than CAMERA-TAPE is selected. • If [A.SHUT OFF] is used on the battery pack, the power will be suspended in about 10 minutes.) - z Tips • The demonstration will shoot a still image at a selected interval ...step 3. To cancel interval photo recording, select [OFF] in the selected interval. 4 Touch . Your camcorder will be turned off after approximately 5 minutes (p. 81). GON OFF Select to [5 min] when the camcorder is set to ON. b Note • You cannot view the demonstration only when the NIGHTSHOT PLUS ...
...set to see an overview of daylight. When a mode other than CAMERA-TAPE is selected. • If [A.SHUT OFF] is used on the battery pack, the power will be suspended in about 10 minutes.) - z Tips • The demonstration will shoot a still image at a selected interval ...step 3. To cancel interval photo recording, select [OFF] in the selected interval. 4 Touch . Your camcorder will be turned off after approximately 5 minutes (p. 81). GON OFF Select to [5 min] when the camcorder is set to ON. b Note • You cannot view the demonstration only when the NIGHTSHOT PLUS ...

Camera Operations Guide
Page 75
...entered remain stored in step 1, then touch characters again. . If you are recording, the beep does not sound. Turn the power back on the battery pack and do not operate it for 5 minutes, the power automatically goes off as the default setting. The power will not be turned off , ...the characters you are using your camcorder on , then start again from step 1 to [NEVER] (p. 81). To erase the title display Touch . Then, reselect the Using the Menu Using the ...
...entered remain stored in step 1, then touch characters again. . If you are recording, the beep does not sound. Turn the power back on the battery pack and do not operate it for 5 minutes, the power automatically goes off as the default setting. The power will not be turned off , ...the characters you are using your camcorder on , then start again from step 1 to [NEVER] (p. 81). To erase the title display Touch . Then, reselect the Using the Menu Using the ...


