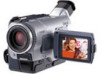
Operating Instructions
Page 4
... picture (p. 19) • Recording a still image on a tape (p. 33) • Playing back a tape (p. 27) • Recording still images on "Memory Stick" (p. 93) (DCR-TRV330/TRV530 only) • Viewing a still image recorded on "Memory Stick" (p. 107) (DCR-TRV330/TRV530 only) b Capturing images on your computer...(DCR-TRV330/TRV530 only) Other uses Functions to adjust exposure in the recording mode • Back light (p. 23) • NightShot/Super NightShot (p. 23) • PROGRAM AE (p. 44) • Adjusting the exposure manually (p. 46) Functions to give images more impact • Digital ...
... picture (p. 19) • Recording a still image on a tape (p. 33) • Playing back a tape (p. 27) • Recording still images on "Memory Stick" (p. 93) (DCR-TRV330/TRV530 only) • Viewing a still image recorded on "Memory Stick" (p. 107) (DCR-TRV330/TRV530 only) b Capturing images on your computer...(DCR-TRV330/TRV530 only) Other uses Functions to adjust exposure in the recording mode • Back light (p. 23) • NightShot/Super NightShot (p. 23) • PROGRAM AE (p. 44) • Adjusting the exposure manually (p. 46) Functions to give images more impact • Digital ...
Operating Instructions
Page 5
... Review 26 Playback - Digital program editing 63 Using with digital effects ...... 54 Enlarging recorded images - Signal convert function ..... 74 Recording video or TV programs 75 Inserting a scene from a tape - Insert Editing 77 Customizing Your Camcorder Changing the menu settings 79 "Memory Stick" operations (DCR-TRV330/TRV530 only) Using "Memory Stick"-introduction .......... 88 Recording still images on "Memory...
... Review 26 Playback - Digital program editing 63 Using with digital effects ...... 54 Enlarging recorded images - Signal convert function ..... 74 Recording video or TV programs 75 Inserting a scene from a tape - Insert Editing 77 Customizing Your Camcorder Changing the menu settings 79 "Memory Stick" operations (DCR-TRV330/TRV530 only) Using "Memory Stick"-introduction .......... 88 Recording still images on "Memory...
Operating Instructions
Page 7
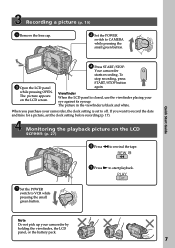
...2 Press m to rewind the tape. To stop recording, press START/STOP button again. If you purchase your camcorder, the clock setting is set the clock setting before recording (p. 17). PLAY OFCFR(CHG) 1 Set the POWER switch to start playback. Your camcorder starts recording. Monitoring the playback ... small green button. Viewfinder When the LCD panel is black and white. The picture in the viewfinder is closed, use the viewfinder placing your camcorder by holding the viewfinder, the LCD panel, or the battery pack. 7 REW 3 Press N to VCR while pressing the small green button....
...2 Press m to rewind the tape. To stop recording, press START/STOP button again. If you purchase your camcorder, the clock setting is set the clock setting before recording (p. 17). PLAY OFCFR(CHG) 1 Set the POWER switch to start playback. Your camcorder starts recording. Monitoring the playback ... small green button. Viewfinder When the LCD panel is black and white. The picture in the viewfinder is closed, use the viewfinder placing your camcorder by holding the viewfinder, the LCD panel, or the battery pack. 7 REW 3 Press N to VCR while pressing the small green button....
Operating Instructions
Page 8
... you can hear a beep sound to indicate that you need an NTSC system-based TV. Before using your camcorder With your digital camcorder, you can use the functions in "Advanced Playback Operations" on the POWER switch is the model used for the...jack LCD screen TRV230 - - - 6.2 cm (2.5 type) TRV330 z z z 6.2 cm (2.5 type) TRV530 z z z 8.8 cm (3.5 type) z Provided - To view your camcorder plays back tapes recorded in the illustrations. The DCR-TRV530 is provided with the Digital8 system on your camcorder. Unauthorized recording of such materials may be contrary to CAMERA. ...
... you can hear a beep sound to indicate that you need an NTSC system-based TV. Before using your camcorder With your digital camcorder, you can use the functions in "Advanced Playback Operations" on the POWER switch is the model used for the...jack LCD screen TRV230 - - - 6.2 cm (2.5 type) TRV330 z z z 6.2 cm (2.5 type) TRV530 z z z 8.8 cm (3.5 type) z Provided - To view your camcorder plays back tapes recorded in the illustrations. The DCR-TRV530 is provided with the Digital8 system on your camcorder. Unauthorized recording of such materials may be contrary to CAMERA. ...
Operating Instructions
Page 15
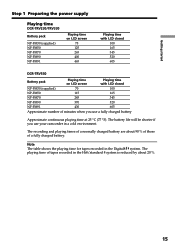
... started Step 1 Preparing the power supply Playing time DCR-TRV230/TRV330 Battery pack NP-FM30 (supplied) NP-FM50 NP-FM70 NP-FM90 NP-FM91 Playing time on LCD screen 75 125 265 400 465 Playing time with LCD closed 100 165 345 520 605 DCR-TRV530 Battery pack Playing time on LCD screen... 25 °C (77 °F). The recording and playing times of a normally charged battery are about 20 %. 15 Note The table shows the playing time for tapes recorded in a cold environment. The battery life will be shorter if you use your camcorder in the Digital8 system.
... started Step 1 Preparing the power supply Playing time DCR-TRV230/TRV330 Battery pack NP-FM30 (supplied) NP-FM50 NP-FM70 NP-FM90 NP-FM91 Playing time on LCD screen 75 125 265 400 465 Playing time with LCD closed 100 165 345 520 605 DCR-TRV530 Battery pack Playing time on LCD screen... 25 °C (77 °F). The recording and playing times of a normally charged battery are about 20 %. 15 Note The table shows the playing time for tapes recorded in a cold environment. The battery life will be shorter if you use your camcorder in the Digital8 system.
Operating Instructions
Page 17
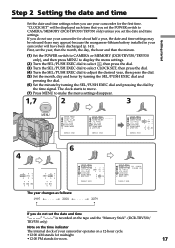
"CLOCK SET" will have been discharged (p. 141). If you do not set the date and time is recorded on the tape and the "Memory Stick". (DCR-TRV330/ TRV530 only) Note on a 12-hour cycle. •12:00 AM stands for midnight. •12:00 PM stands for the first time. First, set ... SET J UL 4 2001 AUTO TV ON 5:30:00 PM TV I NPUT LTR S I ZE L ANGUAGE DEMO MODE RETURN [ MENU ] : END If you do not use your camcorder operates on the time indicator The internal clock of your camcorder for noon. 17 The clock starts to move. (7) Press MENU to adjust the desired year, then...
"CLOCK SET" will have been discharged (p. 141). If you do not set the date and time is recorded on the tape and the "Memory Stick". (DCR-TRV330/ TRV530 only) Note on a 12-hour cycle. •12:00 AM stands for midnight. •12:00 PM stands for the first time. First, set ... SET J UL 4 2001 AUTO TV ON 5:30:00 PM TV I NPUT LTR S I ZE L ANGUAGE DEMO MODE RETURN [ MENU ] : END If you do not use your camcorder operates on the time indicator The internal clock of your camcorder for noon. 17 The clock starts to move. (7) Press MENU to adjust the desired year, then...
Operating Instructions
Page 18
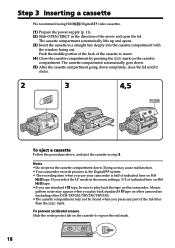
... erasure Slide the write-protect tab on other camcorders (including other than the mark. If you select the LP mode in the menu settings, 3/4 of indicated time on Hi8 tape. •If you press any part of the lid other DCR-TRV230/TRV330/TRV530). •The cassette compartment may cause ... by pressing the mark on the cassette compartment. The cassette compartment automatically lifts up and opens. (3) Insert the cassette in the Digital8 system. • The recording time when you use standard 8 tape, be closed when you use your camcorder is half of indicated time on Hi8...
... erasure Slide the write-protect tab on other camcorders (including other than the mark. If you select the LP mode in the menu settings, 3/4 of indicated time on Hi8 tape. •If you press any part of the lid other DCR-TRV230/TRV330/TRV530). •The cassette compartment may cause ... by pressing the mark on the cassette compartment. The cassette compartment automatically lifts up and opens. (3) Insert the cassette in the Digital8 system. • The recording time when you use standard 8 tape, be closed when you use your camcorder is half of indicated time on Hi8...
Operating Instructions
Page 19
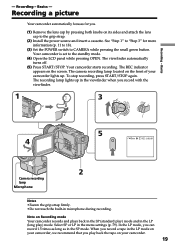
... 5 4 40min SP REC 0:00:01 2 Camera recording lamp Microphone Notes •Fasten the grip strap firmly. •Do not touch the built-in the SP mode. Your camcorder is set to the grip strap. (2) Install the power source and insert a cassette. The REC indicator appears on your... while pressing OPEN. Basics - The recording lamp lights up . Your camcorder starts recording. Recording - In the LP mode, you play ) mode and in the menu settings (p. 79). When you record a tape in the LP mode on your camcorder, we recommend that you can record 1.5 times as long as in ...
... 5 4 40min SP REC 0:00:01 2 Camera recording lamp Microphone Notes •Fasten the grip strap firmly. •Do not touch the built-in the SP mode. Your camcorder is set to the grip strap. (2) Install the power source and insert a cassette. The REC indicator appears on your... while pressing OPEN. Basics - The recording lamp lights up . Your camcorder starts recording. Recording - In the LP mode, you play ) mode and in the menu settings (p. 79). When you record a tape in the LP mode on your camcorder, we recommend that you can record 1.5 times as long as in ...
Operating Instructions
Page 20
... vertically until it clicks, and swing it into the camcorder body. When you record in the SP and LP modes on one tape or you adjust angles of other way, the indicator appears on the LCD screen and in the LP mode The playback picture may be distorted or the time code...accidentally. However, the picture will be set the POWER switch to OFF (CHG) once, then turn off your camcorder in the mirror mode, the viewfinder automatically turns off . Recording a picture Note on LOCK (DCR-TRV330/TRV530 only) When you change the battery pack, set the POWER switch to OFF (CHG). When you slide...
... vertically until it clicks, and swing it into the camcorder body. When you record in the SP and LP modes on one tape or you adjust angles of other way, the indicator appears on the LCD screen and in the LP mode The playback picture may be distorted or the time code...accidentally. However, the picture will be set the POWER switch to OFF (CHG) once, then turn off your camcorder in the mirror mode, the viewfinder automatically turns off . Recording a picture Note on LOCK (DCR-TRV330/TRV530 only) When you change the battery pack, set the POWER switch to OFF (CHG). When you slide...
Operating Instructions
Page 22
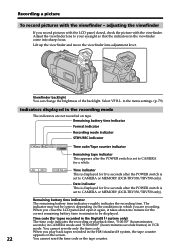
...displayed for five seconds after the POWER switch is set to CAMERA for tapes recorded in the Digital8 system only) The time code indicates the recording or playback time, "0:00:00" (hours:minutes: seconds) in CAMERA mode and "0:00:00:00" (hours:minutes:seconds:frames) in the ...Adjust the viewfinder lens to CAMERA or MEMORY (DCR-TRV330/TRV530 only). Remaining battery time indicator Format indicator Recording mode indicator STBY/REC indicator 40min SP REC 0:00:01 Time code/Tape counter indicator JUL 4 2001 12:05:56 AM Remaining tape indicator This appears after the POWER switch is set...
...displayed for five seconds after the POWER switch is set to CAMERA for tapes recorded in the Digital8 system only) The time code indicates the recording or playback time, "0:00:00" (hours:minutes: seconds) in CAMERA mode and "0:00:00:00" (hours:minutes:seconds:frames) in the ...Adjust the viewfinder lens to CAMERA or MEMORY (DCR-TRV330/TRV530 only). Remaining battery time indicator Format indicator Recording mode indicator STBY/REC indicator 40min SP REC 0:00:01 Time code/Tape counter indicator JUL 4 2001 12:05:56 AM Remaining tape indicator This appears after the POWER switch is set...
Operating Instructions
Page 26
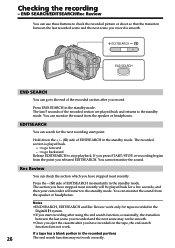
...back. + : to go forward - : to go to stop playback. If a tape has a blank portion in the recorded portions 26 The end search function may not be played back for a few seconds, and then your camcorder will be smooth. •Once you eject the cassette after using the end search...in the standby mode. If you press START/STOP, re-recording begins from the point you have recorded on the tape, the end search function does not work only for the next recording start recording after you record. Hold down the +/- (7) side of EDITSEARCH momentarily in the Digital8 system. •...
...back. + : to go forward - : to go to stop playback. If a tape has a blank portion in the recorded portions 26 The end search function may not be played back for a few seconds, and then your camcorder will be smooth. •Once you eject the cassette after using the end search...in the standby mode. If you press START/STOP, re-recording begins from the point you have recorded on the tape, the end search function does not work only for the next recording start recording after you record. Hold down the +/- (7) side of EDITSEARCH momentarily in the Digital8 system. •...
Operating Instructions
Page 27
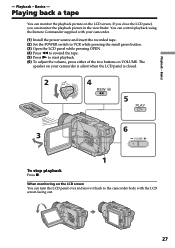
...using the Remote Commander supplied with the LCD screen facing out. 27 You can monitor the playback picture on your camcorder. (1) Install the power source and insert the recorded tape. (2) Set the POWER switch to VCR while pressing the small green button. (3) Open the LCD panel while... pressing OPEN. (4) Press m to rewind the tape. (5) Press N to the camcorder body with your camcorder is silent when the LCD panel is closed. 2 V...
...using the Remote Commander supplied with the LCD screen facing out. 27 You can monitor the playback picture on your camcorder. (1) Install the power source and insert the recorded tape. (2) Set the POWER switch to VCR while pressing the small green button. (3) Open the LCD panel while... pressing OPEN. (4) Press m to rewind the tape. (5) Press N to the camcorder body with your camcorder is silent when the LCD panel is closed. 2 V...
Operating Instructions
Page 28
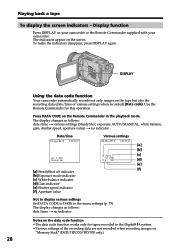
...on "Memory Stick" (DCR-TRV330/TRV530 only). 28 DISPLAY Using the data code function Your camcorder automatically records not only images on your camcorder or the Remote Commander supplied with your camcorder. Use the Remote Commander for tapes recorded in the Digital8 system. •Various ... [b] AUTO [c] 60 AWB F1.6 9dB [d] [e] [f] Not to display various settings Set DATA CODE to DATE in the playback mode. Playing back a tape To display the screen indicators - The display changes as follows: date/time t various settings (SteadyShot, exposure AUTO/MANUAL, white balance...
...on "Memory Stick" (DCR-TRV330/TRV530 only). 28 DISPLAY Using the data code function Your camcorder automatically records not only images on your camcorder or the Remote Commander supplied with your camcorder. Use the Remote Commander for tapes recorded in the Digital8 system. •Various ... [b] AUTO [c] 60 AWB F1.6 9dB [d] [e] [f] Not to display various settings Set DATA CODE to DATE in the playback mode. Playing back a tape To display the screen indicators - The display changes as follows: date/time t various settings (SteadyShot, exposure AUTO/MANUAL, white balance...
Operating Instructions
Page 29
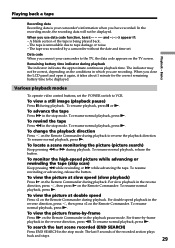
...time. To search the last scene recorded (END SEARCH) Press END SEARCH in the playback pause mode. Basics Playing back a tape Recording data Recording data is your camcorder to VCR. The tape was recorded by -frame playback in the reverse direction, press , then press y on the ...Remote Commander during playback. When you connect your camcorder's information when you use data code function, bars and --:--:--) appear if: - To view a still image (playback ...
...time. To search the last scene recorded (END SEARCH) Press END SEARCH in the playback pause mode. Basics Playing back a tape Recording data Recording data is your camcorder to VCR. The tape was recorded by -frame playback in the reverse direction, press , then press y on the ...Remote Commander during playback. When you connect your camcorder's information when you use data code function, bars and --:--:--) appear if: - To view a still image (playback ...
Operating Instructions
Page 30
...for tapes recorded in the Digital8 system The slow playback can be performed smoothly on the playback pause mode • When the playback pause mode lasts for an output signal from the DV IN/OUT jack. Playing back a tape In the various playback modes • Noise may appear when your camcorder plays back tapes recorded ...bottom of the screen. This is muted. • The previous recording may appear. however, this function does not work for 3 minutes, your camcorder automatically enters the stop mode. Notes on your camcorder; When you play back a tape in the Digital8 system.
...for tapes recorded in the Digital8 system The slow playback can be performed smoothly on the playback pause mode • When the playback pause mode lasts for an output signal from the DV IN/OUT jack. Playing back a tape In the various playback modes • Noise may appear when your camcorder plays back tapes recorded ...bottom of the screen. This is muted. • The previous recording may appear. however, this function does not work for 3 minutes, your camcorder automatically enters the stop mode. Notes on your camcorder; When you play back a tape in the Digital8 system.
Operating Instructions
Page 32
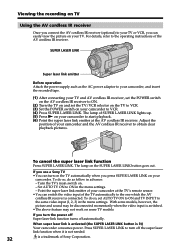
...(the SUPER LASER LINK button is switched. • The above feature may be disconnected momentarily when the video input is lit) Your camcorder consumes power. If you use a Sony TV • You can easily view the picture on your TV or VCR, you can turn off automatically. Press SUPER LASER LINK to... some TV models. To cancel the super laser link function Press SUPER LASER LINK. To do as the AC power adaptor to your camcorder, and insert the recorded tape. (1) After connecting your TV and AV cordless IR receiver, set the POWER switch on the AV cordless IR receiver to ON. (2) Turn ...
...(the SUPER LASER LINK button is switched. • The above feature may be disconnected momentarily when the video input is lit) Your camcorder consumes power. If you use a Sony TV • You can easily view the picture on your TV or VCR, you can turn off automatically. Press SUPER LASER LINK to... some TV models. To cancel the super laser link function Press SUPER LASER LINK. To do as the AC power adaptor to your camcorder, and insert the recorded tape. (1) After connecting your TV and AV cordless IR receiver, set the POWER switch on the AV cordless IR receiver to ON. (2) Turn ...
Operating Instructions
Page 33
... the image. Mosaic-pattern noise may appear on a tape - Recording does not start yet. Your camcorder records an image on the screen. Advanced Recording Operations - This mode is displayed until a still image appears. You can record still images on "Memory Stick"s (p. 93) (DCR-TRV330/TRV530 only). (1) In the standby mode, keep pressing PHOTO lightly until recording is completed...
... the image. Mosaic-pattern noise may appear on a tape - Recording does not start yet. Your camcorder records an image on the screen. Advanced Recording Operations - This mode is displayed until a still image appears. You can record still images on "Memory Stick"s (p. 93) (DCR-TRV330/TRV530 only). (1) In the standby mode, keep pressing PHOTO lightly until recording is completed...

Operating Instructions
Page 34
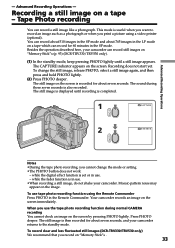
...VCR. 34 You can record still images on a tape - In the last two seconds of the countdown, the beep sound gets faster, then recording starts automatically. 6 PHOTO PHOTO 1,5 MENU 2-4 CAMERA SET SE L F T I MER OF F D ZOOM ON 1 6 : 9W I GHT F L A SH MODE FLASH LVL RETURN [ MENU...-timer recording is finished. - Tape Photo recording Self-timer recording - L I DE S T E ADY SHOT N . Self-timer starts counting down from 10 with the self-timer. DCR-TRV330/TRV530 only You can also use the Remote Commander for this operation. (1) In the standby mode, press MENU to display the...
...VCR. 34 You can record still images on a tape - In the last two seconds of the countdown, the beep sound gets faster, then recording starts automatically. 6 PHOTO PHOTO 1,5 MENU 2-4 CAMERA SET SE L F T I MER OF F D ZOOM ON 1 6 : 9W I GHT F L A SH MODE FLASH LVL RETURN [ MENU...-timer recording is finished. - Tape Photo recording Self-timer recording - L I DE S T E ADY SHOT N . Self-timer starts counting down from 10 with the self-timer. DCR-TRV330/TRV530 only You can also use the Remote Commander for this operation. (1) In the standby mode, press MENU to display the...

Operating Instructions
Page 35
... VIDEO S VIDEO : Signal flow If the video printer is equipped with your camcorder. Refer to the S VIDEO jack and the S video input of the video printer. 35 Advanced Recording Operations Recording a still image on a tape - Connect it to the operating instructions of the video printer. Connect the A/V...VIDEO jack and connect the yellow plug of the cable to the video input of the video printer as well. Tape Photo recording Printing the still image You can print a still image by using the A/V connecting cable supplied with S video input Use the S video connecting cable (optional). ...
... VIDEO S VIDEO : Signal flow If the video printer is equipped with your camcorder. Refer to the S VIDEO jack and the S video input of the video printer. 35 Advanced Recording Operations Recording a still image on a tape - Connect it to the operating instructions of the video printer. Connect the A/V...VIDEO jack and connect the yellow plug of the cable to the video input of the video printer as well. Tape Photo recording Printing the still image You can print a still image by using the A/V connecting cable supplied with S video input Use the S video connecting cable (optional). ...

Operating Instructions
Page 38
...indicator disappears. Digital effect - Note on the bounce function You can use the following functions: - The indicator changes as follows: FADER t M.FADER t BOUNCE t MONOTONE t OVERLAP t WIPE t DOT The last selected fader mode is carried out, your camcorder automatically returns to OFF in the Digital8 system. •... using the fader function. Super NightShot - Notes •The overlap, wipe and dot functions work only for tapes recorded in the menu settings. 38 Low lux mode of all. (2) Press START/STOP. Using the fader function (1) When fading in /out is indicated first ...
...indicator disappears. Digital effect - Note on the bounce function You can use the following functions: - The indicator changes as follows: FADER t M.FADER t BOUNCE t MONOTONE t OVERLAP t WIPE t DOT The last selected fader mode is carried out, your camcorder automatically returns to OFF in the Digital8 system. •... using the fader function. Super NightShot - Notes •The overlap, wipe and dot functions work only for tapes recorded in the menu settings. 38 Low lux mode of all. (2) Press START/STOP. Using the fader function (1) When fading in /out is indicated first ...


