Operating Instructions
Page 3
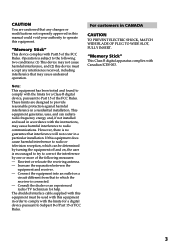
... complies with the limits for a digital device pursuant to Subpart B of Part 15 of the following two conditions: (1) This device may not cause harmful interference, and (2) this equipment does cause harmful interference to radio or television reception, which the receiver is connected. - These limits are cautioned that any interference received, including interference...
... complies with the limits for a digital device pursuant to Subpart B of Part 15 of the following two conditions: (1) This device may not cause harmful interference, and (2) this equipment does cause harmful interference to radio or television reception, which the receiver is connected. - These limits are cautioned that any interference received, including interference...
Operating Instructions
Page 5
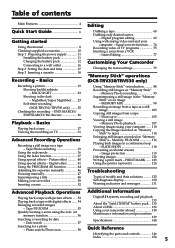
...digital effects ...... 54 Enlarging recorded images - Insert Editing 77 Customizing Your Camcorder Changing the menu settings 79 "Memory Stick" operations (DCR-TRV330/TRV530 only) Using "Memory Stick"-introduction .......... 88 Recording still images on "Memory Stick"s - Image protection 119 Deleting images 120 Writing a print mark - Photo search/Photo scan 58 Digital8...image from a tape as a still image 103 Copying still images from a VCR - Basics Recording a picture 19 Shooting backlit subjects - Tape Photo recording 33 Using the wide mode 36 Using the fader function 37 ...
...digital effects ...... 54 Enlarging recorded images - Insert Editing 77 Customizing Your Camcorder Changing the menu settings 79 "Memory Stick" operations (DCR-TRV330/TRV530 only) Using "Memory Stick"-introduction .......... 88 Recording still images on "Memory Stick"s - Image protection 119 Deleting images 120 Writing a print mark - Photo search/Photo scan 58 Digital8...image from a tape as a still image 103 Copying still images from a VCR - Basics Recording a picture 19 Shooting backlit subjects - Tape Photo recording 33 Using the wide mode 36 Using the fader function 37 ...
Operating Instructions
Page 6
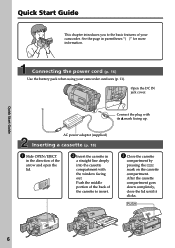
... portion of the back of your camcorder outdoors (p. 11). AC power adaptor (supplied) Inserting a cassette (p. 18) 1 Slide OPEN/EJECT in the direction of the arrow and open the lid. 2 Insert the cassette in parentheses "( )" for more information. Connect the plug with the window facing out...the cassette to insert. 3 Close the cassette compartment by pressing the mark on the cassette compartment. Connecting the power cord (p. 16) Use the battery pack when using your camcorder. See the page in a straight line deeply into the cassette compartment with its v mark facing up...
... portion of the back of your camcorder outdoors (p. 11). AC power adaptor (supplied) Inserting a cassette (p. 18) 1 Slide OPEN/EJECT in the direction of the arrow and open the lid. 2 Insert the cassette in parentheses "( )" for more information. Connect the plug with the window facing out...the cassette to insert. 3 Close the cassette compartment by pressing the mark on the cassette compartment. Connecting the power cord (p. 16) Use the battery pack when using your camcorder. See the page in a straight line deeply into the cassette compartment with its v mark facing up...
Operating Instructions
Page 10
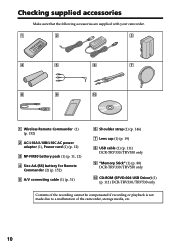
... Commander (2) (p. 152) 5 A/V connecting cable (1) (p. 31) 6 Shoulder strap (1) (p. 146) 7 Lens cap (1) (p. 19) 8 USB cable (1) (p. 111) DCR-TRV330/TRV530 only 9 "Memory Stick" (1) (p. 88) DCR-TRV330/TRV530 only 0 CD-ROM (SPVD-004 USB Driver) (1) (p. 111) DCR-TRV330/TRV530 only Contents of the recording cannot be compensated if recording or playback is not made due to a malfunction of the camcorder, storage media...
... Commander (2) (p. 152) 5 A/V connecting cable (1) (p. 31) 6 Shoulder strap (1) (p. 146) 7 Lens cap (1) (p. 19) 8 USB cable (1) (p. 111) DCR-TRV330/TRV530 only 9 "Memory Stick" (1) (p. 88) DCR-TRV330/TRV530 only 0 CD-ROM (SPVD-004 USB Driver) (1) (p. 111) DCR-TRV330/TRV530 only Contents of the recording cannot be compensated if recording or playback is not made due to a malfunction of the camcorder, storage media...
Operating Instructions
Page 12
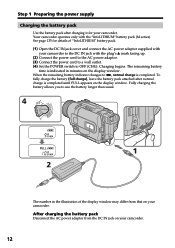
...u, normal charge is indicated in the illustration of "InfoLITHIUM" battery pack. (1) Open the DC IN jack cover and connect the AC power adaptor supplied with your camcorder. The remaining battery time is completed. To fully charge the battery (full charge), leave the battery pack attached after ...display window may differ from the DC IN jack on your camcorder. See page 135 for your camcorder to OFF (CHG). Your camcorder operates only with the plug's v mark facing up. (2) Connect the power cord to the AC power adaptor. (3) Connect the power cord to a wall outlet. (4) Set the ...
...u, normal charge is indicated in the illustration of "InfoLITHIUM" battery pack. (1) Open the DC IN jack cover and connect the AC power adaptor supplied with your camcorder. The remaining battery time is completed. To fully charge the battery (full charge), leave the battery pack attached after ...display window may differ from the DC IN jack on your camcorder. See page 135 for your camcorder to OFF (CHG). Your camcorder operates only with the plug's v mark facing up. (2) Connect the power cord to the AC power adaptor. (3) Connect the power cord to a wall outlet. (4) Set the ...

Operating Instructions
Page 16
... using the AC power adaptor. (1) Open the DC IN jack cover, and connect the AC power adaptor to the DC IN jack on your camcorder. • The DC IN jack has "source priority". Using a car battery Use Sony DC Adaptor/Charger (optional). 16 Notes • The AC power adaptor can ...supply power even if the battery pack is attached to your camcorder with the plug's v mark facing up. (2) Connect the power cord to the AC power adaptor. (3) Connect the power cord to a wall outlet...
... using the AC power adaptor. (1) Open the DC IN jack cover, and connect the AC power adaptor to the DC IN jack on your camcorder. • The DC IN jack has "source priority". Using a car battery Use Sony DC Adaptor/Charger (optional). 16 Notes • The AC power adaptor can ...supply power even if the battery pack is attached to your camcorder with the plug's v mark facing up. (2) Connect the power cord to the AC power adaptor. (3) Connect the power cord to a wall outlet...
Operating Instructions
Page 29
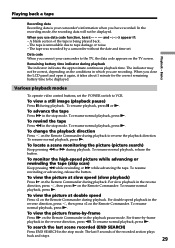
...tape. To search the last scene recorded (END SEARCH) Press END SEARCH in the stop mode. When you are recording. Data code When you close the LCD panel and open it... playback, press X or N. Remaining battery time indicator during playback. To view a still image (playback pause) Press X during playback The indicator indicates the approximate continuous playback time. To advance...the TV screen. For frame-by a camcorder without the date and time set the POWER switch to tape damage or noise. - When you connect your camcorder's information when you have recorded. To resume...
...tape. To search the last scene recorded (END SEARCH) Press END SEARCH in the stop mode. When you are recording. Data code When you close the LCD panel and open it... playback, press X or N. Remaining battery time indicator during playback. To view a still image (playback pause) Press X during playback The indicator indicates the approximate continuous playback time. To advance...the TV screen. For frame-by a camcorder without the date and time set the POWER switch to tape damage or noise. - When you connect your camcorder's information when you have recorded. To resume...
Operating Instructions
Page 31
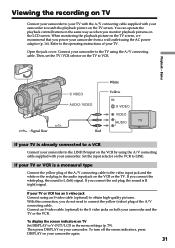
... monitoring the playback picture on the TV screen, we recommend that you connect the white plug, the sound is R (right) signal. If you power your camcorder from a wall outlet using the A/V connecting cable. If you monitor playback pictures on the LCD screen. Then press... DISPLAY on your camcorder. Connect your camcorder to watch the playback picture on the TV screen. Viewing the recording on TV Connect your camcorder to your TV with the A/V connecting cable supplied with your camcorder. If your TV or VCR is already connected to a VCR Connect your camcorder to the S video...
... monitoring the playback picture on the TV screen, we recommend that you connect the white plug, the sound is R (right) signal. If you power your camcorder from a wall outlet using the A/V connecting cable. If you monitor playback pictures on the LCD screen. Then press... DISPLAY on your camcorder. Connect your camcorder to watch the playback picture on the TV screen. Viewing the recording on TV Connect your camcorder to your TV with the A/V connecting cable supplied with your camcorder. If your TV or VCR is already connected to a VCR Connect your camcorder to the S video...
Operating Instructions
Page 32
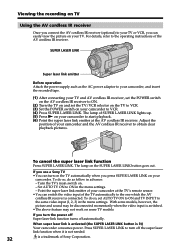
...(optional) to your TV or VCR, you press SUPER LASER LINK on your camcorder. Adjust the position of Sony Corporation. To do as the AC power adaptor to your camcorder, and insert the recorded tape. (1) After connecting your TV and AV cordless IR receiver, set the POWER switch on the AV...; The above feature may be disconnected momentarily when the video input is lit) Your camcorder consumes power. To cancel the super laser link function Press SUPER LASER LINK. The lamp on . - If you use a Sony TV • You can turn the power off Super laser link function turns off ...
...(optional) to your TV or VCR, you press SUPER LASER LINK on your camcorder. Adjust the position of Sony Corporation. To do as the AC power adaptor to your camcorder, and insert the recorded tape. (1) After connecting your TV and AV cordless IR receiver, set the POWER switch on the AV...; The above feature may be disconnected momentarily when the video input is lit) Your camcorder consumes power. To cancel the super laser link function Press SUPER LASER LINK. The lamp on . - If you use a Sony TV • You can turn the power off Super laser link function turns off ...

Operating Instructions
Page 35
... by using the A/V connecting cable supplied with S video input Use the S video connecting cable (optional). Connect it to the video input of the video printer as well. S VIDEO AUDIO / VIDEO Video printer LINE IN VIDEO S VIDEO : Signal flow If the video printer is equipped with your camcorder. Advanced Recording Operations Recording a still image on a tape...
... by using the A/V connecting cable supplied with S video input Use the S video connecting cable (optional). Connect it to the video input of the video printer as well. S VIDEO AUDIO / VIDEO Video printer LINE IN VIDEO S VIDEO : Signal flow If the video printer is equipped with your camcorder. Advanced Recording Operations Recording a still image on a tape...
Operating Instructions
Page 36
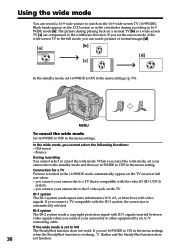
... is compatible with ID-1 signals inserted between video signals when you connect your camcorder to other equipment by an A/V connecting cable. If you connect a TV compatible with video signals. If you set the screen mode of normal images [d]. [a] [b] 16:9WIDE [c] [d] In the standby mode, set your camcorder to the S video jack on the TV. ID-1 system The...
... is compatible with ID-1 signals inserted between video signals when you connect your camcorder to other equipment by an A/V connecting cable. If you connect a TV compatible with video signals. If you set the screen mode of normal images [d]. [a] [b] 16:9WIDE [c] [d] In the standby mode, set your camcorder to the S video jack on the TV. ID-1 system The...

Operating Instructions
Page 49
... the SEL/PUSH EXEC dial at step 5, the title is displayed. To select the language of the A/V connecting cable, you are selecting and setting the title You cannot record the title displayed on tape. Title setting &#... If you cannot choose position 9. However, the title is positioned. When you want to the VCR with the A/V connecting cable. To use the custom title, select in LARGE size. •The title position changes as follows : 1y ... you are playing back You can record a title when you dub a tape connecting your camcorder to change the language, select before step 2.
... the SEL/PUSH EXEC dial at step 5, the title is displayed. To select the language of the A/V connecting cable, you are selecting and setting the title You cannot record the title displayed on tape. Title setting &#... If you cannot choose position 9. However, the title is positioned. When you want to the VCR with the A/V connecting cable. To use the custom title, select in LARGE size. •The title position changes as follows : 1y ... you are playing back You can record a title when you dub a tape connecting your camcorder to change the language, select before step 2.
Operating Instructions
Page 60
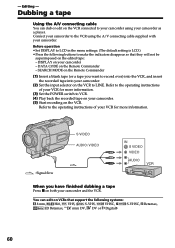
...to LINE. DATA CODE on the VCR connected to your camcorder using the A/V connecting cable supplied with your camcorder and the VCR. - Connect your camcorder to the operating instructions of your VCR... superimposed on both your camcorder. Refer to the VCR using your camcorder as a player. Refer to the operating instructions of your camcorder - DISPLAY on the VCR. SEARCH MODE on the Remote Commander ..., VHS, S-VHS, VHSC, S-VHSC, Betamax, ED Betamax, mini DV, DV or Digital8 60 S VIDEO AUDIO / VIDEO IN S VIDEO VIDEO AUDIO : Signal flow When you want to VCR....
...to LINE. DATA CODE on the VCR connected to your camcorder using the A/V connecting cable supplied with your camcorder and the VCR. - Connect your camcorder to the operating instructions of your VCR... superimposed on both your camcorder. Refer to the VCR using your camcorder as a player. Refer to the operating instructions of your camcorder - DISPLAY on the VCR. SEARCH MODE on the Remote Commander ..., VHS, S-VHS, VHSC, S-VHSC, Betamax, ED Betamax, mini DV, DV or Digital8 60 S VIDEO AUDIO / VIDEO IN S VIDEO VIDEO AUDIO : Signal flow When you want to VCR....
Operating Instructions
Page 61
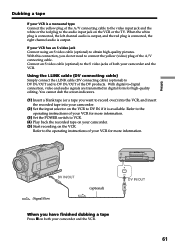
...) When you do not need to -digital connection, video and audio signals are transmitted in digital form for more information. Dubbing a tape If your camcorder and the VCR. With digital-to connect the yellow (video) plug of the DV products. Using the i.LINK cable (DV connecting cable) Simply connect the i.LINK cable (DV connecting cable) (optional) to DV IN...
...) When you do not need to -digital connection, video and audio signals are transmitted in digital form for more information. Dubbing a tape If your camcorder and the VCR. With digital-to connect the yellow (video) plug of the DV products. Using the i.LINK cable (DV connecting cable) Simply connect the i.LINK cable (DV connecting cable) (optional) to DV IN...
Operating Instructions
Page 62
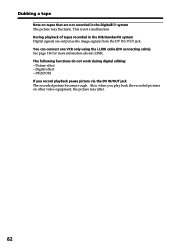
...: - Picture effect - PB ZOOM If you play back the recorded pictures on tapes that are not recorded in the Hi8/standard 8 system Digital signals are output as the image signals from the DV IN/OUT jack. Also, when you record playback pause picture via the DV IN/OUT... jack The recorded picture becomes rough. Digital effect - You can connect one VCR only using the i.LINK cable (DV connecting cable). See page 136 for more infomation about i.LINK. This is not a malfunction. During playback of tapes recorded in...
...: - Picture effect - PB ZOOM If you play back the recorded pictures on tapes that are not recorded in the Hi8/standard 8 system Digital signals are output as the image signals from the DV IN/OUT jack. Also, when you record playback pause picture via the DV IN/OUT... jack The recorded picture becomes rough. Digital effect - You can connect one VCR only using the i.LINK cable (DV connecting cable). See page 136 for more infomation about i.LINK. This is not a malfunction. During playback of tapes recorded in...
Operating Instructions
Page 63
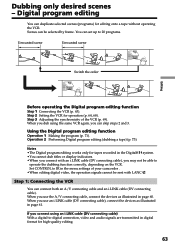
... the VCR. Step 3 Adjusting the synchronicity of your camcorder . •When editing digital video, the operation signals cannot be sent with an i.LINK cable (DV connecting cable), you use an i.LINK cable (DV connecting cable), connect the devices as illustrated in the menu settings of the... scene Switch the order Editing Before operating the Digital program editing function Step 1 Connecting the VCR (p. 63). Dubbing only desired scenes - Scenes can be able to -digital connection, video and audio signals are transmitted in the Digital8 system. •You cannot dub titles or display...
... the VCR. Step 3 Adjusting the synchronicity of your camcorder . •When editing digital video, the operation signals cannot be sent with an i.LINK cable (DV connecting cable), you use an i.LINK cable (DV connecting cable), connect the devices as illustrated in the menu settings of the... scene Switch the order Editing Before operating the Digital program editing function Step 1 Connecting the VCR (p. 63). Dubbing only desired scenes - Scenes can be able to -digital connection, video and audio signals are transmitted in the Digital8 system. •You cannot dub titles or display...
Operating Instructions
Page 64
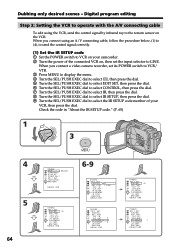
...P AUS EMODE I R TEST RETURN [ MENU ] : END OTHERS ED I T SET CONTROL ADJ TEST " CUT- Digital program editing Step 2: Setting the VCR to operate with the A/V connecting cable To edit using an A/V connecting cable, follow the procedure below, (1) to (4), to send the control signal correctly. (1) Set the IR SETUP code 1 ...Set the POWER switch to VCR on your camcorder. 2 Turn the power of your VCR...
...P AUS EMODE I R TEST RETURN [ MENU ] : END OTHERS ED I T SET CONTROL ADJ TEST " CUT- Digital program editing Step 2: Setting the VCR to operate with the A/V connecting cable To edit using an A/V connecting cable, follow the procedure below, (1) to (4), to send the control signal correctly. (1) Set the IR SETUP code 1 ...Set the POWER switch to VCR on your camcorder. 2 Turn the power of your VCR...
Operating Instructions
Page 66
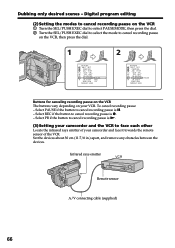
... towards the remote sensor of the VCR. Select PB if the button to cancel recording pause is N. (3) Setting your VCR. Infrared rays emitter Remote sensor A/V connecting cable (supplied) 66 I N " " CUT-OUT " I R SETUP P AUS EMODE P AUS E I R TEST RETURN [ MENU ] : END Buttons for canceling ... mode to cancel recording pause is z. - To cancel recording pause: - Select PAUSE if the button to cancel recording pause on the VCR, then press the dial. 1 OTHERS ED I T SET CONTROL ADJ TEST " CUT- Digital program editing (2)Setting the modes to cancel recording pause on your camcorder...
... towards the remote sensor of the VCR. Select PB if the button to cancel recording pause is N. (3) Setting your VCR. Infrared rays emitter Remote sensor A/V connecting cable (supplied) 66 I N " " CUT-OUT " I R SETUP P AUS EMODE P AUS E I R TEST RETURN [ MENU ] : END Buttons for canceling ... mode to cancel recording pause is z. - To cancel recording pause: - Select PAUSE if the button to cancel recording pause on the VCR, then press the dial. 1 OTHERS ED I T SET CONTROL ADJ TEST " CUT- Digital program editing (2)Setting the modes to cancel recording pause on your camcorder...
Operating Instructions
Page 68
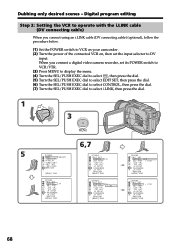
...I R ADJ TEST " CUT- I N " " CUT-OUT " I R SETUP P AUS EMODE I R ADJ TEST " CUT- Digital program editing Step 2: Setting the VCR to operate with the i.LINK cable (DV connecting cable) When you connect a digital video camera recorder, set the input selector to select i.LINK, then press the dial. 1 5 OFCFR(CHG) V POWER...R TEST RETURN [ MENU ] : END i . When you connect using an i.LINK cable (DV connecting cable) (optional), follow the procedure below. (1) Set the POWER switch to VCR on your camcorder . (2) Turn the power of the connected VCR on, then set its POWER switch to VCR/VTR. ...
...I R ADJ TEST " CUT- I N " " CUT-OUT " I R SETUP P AUS EMODE I R ADJ TEST " CUT- Digital program editing Step 2: Setting the VCR to operate with the i.LINK cable (DV connecting cable) When you connect a digital video camera recorder, set the input selector to select i.LINK, then press the dial. 1 5 OFCFR(CHG) V POWER...R TEST RETURN [ MENU ] : END i . When you connect using an i.LINK cable (DV connecting cable) (optional), follow the procedure below. (1) Set the POWER switch to VCR on your camcorder . (2) Turn the power of the connected VCR on, then set its POWER switch to VCR/VTR. ...
Operating Instructions
Page 70
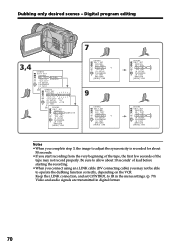
... EMODE +215 I R TEST [ ME OTHERS ED I T SET CONTROL ADJ TEST RETURN " CUT- Dubbing only desired scenes - Digital program editing 7 3,4 OTHERS ED I T SET CONTROL AD J T E S T COMP L E T E " CUT- Keep the i.LINK connection, and set CONTROL to adjust the syncronicity is recorded for about 10 seconds' of lead before starting the recording.... • When you connect using an i.LINK cable (DV connecting cable) you start recording from the very beginning of the tape, the first few seconds of the ...
... EMODE +215 I R TEST [ ME OTHERS ED I T SET CONTROL ADJ TEST RETURN " CUT- Dubbing only desired scenes - Digital program editing 7 3,4 OTHERS ED I T SET CONTROL AD J T E S T COMP L E T E " CUT- Keep the i.LINK connection, and set CONTROL to adjust the syncronicity is recorded for about 10 seconds' of lead before starting the recording.... • When you connect using an i.LINK cable (DV connecting cable) you start recording from the very beginning of the tape, the first few seconds of the ...


