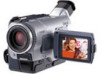
Operating Instructions
Page 2
...cause harmful interference, and (2) this Sony Digital Handycam camcorder. Address: 680 Kinderkamack Road, Oradell, NJ 07649 USA Telephone No.: 201-930-6972 This device complies with advanced features, but at the same time it is subject to use. DISPOSE OF PROPERLY. For customers...your Digital Handycam, you can enjoy for the FCC related matters only. Congratulations on your nearest Sony Service Center or Factory Service Center. Note: In some areas the disposal of Conformity Trade Name: SONY Model No.: DCR-TRV230, DCRTRV330, DCR-TRV530 Responsible Party: Sony ...
...cause harmful interference, and (2) this Sony Digital Handycam camcorder. Address: 680 Kinderkamack Road, Oradell, NJ 07649 USA Telephone No.: 201-930-6972 This device complies with advanced features, but at the same time it is subject to use. DISPOSE OF PROPERLY. For customers...your Digital Handycam, you can enjoy for the FCC related matters only. Congratulations on your nearest Sony Service Center or Factory Service Center. Note: In some areas the disposal of Conformity Trade Name: SONY Model No.: DCR-TRV230, DCRTRV330, DCR-TRV530 Responsible Party: Sony ...
Operating Instructions
Page 5
...Viewing the recording on TV 31 Advanced Recording Operations Recording a still image on an image - Digital program editing 63 Using with digital effects ...... 54 Enlarging recorded images - Photo save 105 Viewing a still image - Memory PB ZOOM 116 Playing back images in ...computer - Insert Editing 77 Customizing Your Camcorder Changing the menu settings 79 "Memory Stick" operations (DCR-TRV330/TRV530 only) Using "Memory Stick"-introduction .......... 88 Recording still images on "Memory Stick"s - Photo search/Photo scan 58 Digital8 system, recording and playback 133 About the...
...Viewing the recording on TV 31 Advanced Recording Operations Recording a still image on an image - Digital program editing 63 Using with digital effects ...... 54 Enlarging recorded images - Photo save 105 Viewing a still image - Memory PB ZOOM 116 Playing back images in ...computer - Insert Editing 77 Customizing Your Camcorder Changing the menu settings 79 "Memory Stick" operations (DCR-TRV330/TRV530 only) Using "Memory Stick"-introduction .......... 88 Recording still images on "Memory Stick"s - Photo search/Photo scan 58 Digital8 system, recording and playback 133 About the...
Operating Instructions
Page 6
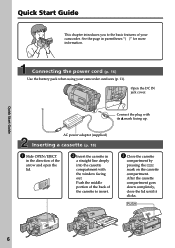
Open the DC IN jack cover. AC power adaptor (supplied) Inserting a cassette (p. 18) 1 Slide OPEN/EJECT in the direction of your camcorder outdoors (p. 11). Quick Start Guide 6 See the page in a straight line deeply into the cassette compartment with its v mark facing up. After the cassette compartment ... Start Guide This chapter introduces you to insert. 3 Close the cassette compartment by pressing the mark on the cassette compartment. Connecting the power cord (p. 16) Use the battery pack when using your camcorder. Connect the plug with the window facing out.
Open the DC IN jack cover. AC power adaptor (supplied) Inserting a cassette (p. 18) 1 Slide OPEN/EJECT in the direction of your camcorder outdoors (p. 11). Quick Start Guide 6 See the page in a straight line deeply into the cassette compartment with its v mark facing up. After the cassette compartment ... Start Guide This chapter introduces you to insert. 3 Close the cassette compartment by pressing the mark on the cassette compartment. Connecting the power cord (p. 16) Use the battery pack when using your camcorder. Connect the plug with the window facing out.
Operating Instructions
Page 7
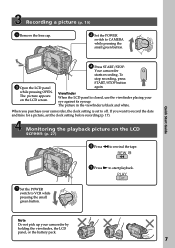
Your camcorder starts recording. To stop recording, press START/STOP button again. The picture in the viewfinder is set the clock setting before recording (p. 17). Recording a picture (p. ... Do not pick up your eye against its eyecup. Viewfinder When the LCD panel is closed, use the viewfinder placing your camcorder by holding the viewfinder, the LCD panel, or the battery pack. 7 If you purchase your camcorder, the clock setting is black and white. When you want to record the date and...
Your camcorder starts recording. To stop recording, press START/STOP button again. The picture in the viewfinder is set the clock setting before recording (p. 17). Recording a picture (p. ... Do not pick up your eye against its eyecup. Viewfinder When the LCD panel is closed, use the viewfinder placing your camcorder by holding the viewfinder, the LCD panel, or the battery pack. 7 If you purchase your camcorder, the clock setting is black and white. When you want to record the date and...
Operating Instructions
Page 8
...Digital8 system. - Using this manual The instructions in this manual and operating your camcorder, check the model number by looking at the bottom of your digital camcorder, you can hear a beep sound to the provision of difference DCRMEMORY mark* (on a TV, you do not mix pictures recorded in capital letters. The DCR... using your camcorder With your camcorder. e.g. Set the POWER switch to country. You, however, cannot use Hi8 /Digital8 video cassettes. Also, your recordings on the POWER switch) Self-timer (USB) jack LCD screen TRV230 - - - 6.2 cm (2.5 type) TRV330 ...
...Digital8 system. - Using this manual The instructions in this manual and operating your camcorder, check the model number by looking at the bottom of your digital camcorder, you can hear a beep sound to the provision of difference DCRMEMORY mark* (on a TV, you do not mix pictures recorded in capital letters. The DCR... using your camcorder With your camcorder. e.g. Set the POWER switch to country. You, however, cannot use Hi8 /Digital8 video cassettes. Also, your recordings on the POWER switch) Self-timer (USB) jack LCD screen TRV230 - - - 6.2 cm (2.5 type) TRV330 ...
Operating Instructions
Page 9
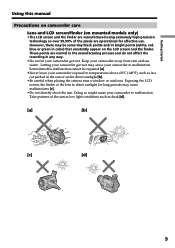
... to malfunction. These points are operational for long periods may be repaired [a]. •Never leave your camcorder to direct sunlight for effective use. Sometimes this manual Precautions on camcorder care Lens and LCD screen/finder (on the LCD screen and the finder. Exposing the LCD screen, the finder or the lens to malfunction...
... to malfunction. These points are operational for long periods may be repaired [a]. •Never leave your camcorder to direct sunlight for effective use. Sometimes this manual Precautions on camcorder care Lens and LCD screen/finder (on the LCD screen and the finder. Exposing the LCD screen, the finder or the lens to malfunction...
Operating Instructions
Page 11
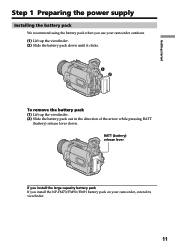
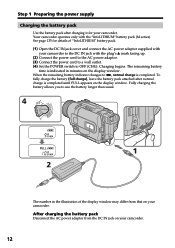
BATT (battery) release lever If you install the large capacity battery pack If you use your camcorder, extend its viewfinder. 11 Getting started Step 1 Preparing the power supply Installing the battery pack We recommend using the battery pack when you install the NP-FM70/FM90/FM91 battery pack on your camcorder outdoors. (1) Lift up the viewfinder. (2) Slide the battery pack down until it clicks. 1 2 To remove the battery pack (1) Lift up the viewfinder. (2) Slide the battery pack out in the direction of the arrow while pressing BATT (battery) release lever down.
BATT (battery) release lever If you install the large capacity battery pack If you use your camcorder, extend its viewfinder. 11 Getting started Step 1 Preparing the power supply Installing the battery pack We recommend using the battery pack when you install the NP-FM70/FM90/FM91 battery pack on your camcorder outdoors. (1) Lift up the viewfinder. (2) Slide the battery pack down until it clicks. 1 2 To remove the battery pack (1) Lift up the viewfinder. (2) Slide the battery pack out in the direction of the arrow while pressing BATT (battery) release lever down.
Operating Instructions
Page 12
...of "InfoLITHIUM" battery pack. (1) Open the DC IN jack cover and connect the AC power adaptor supplied with your camcorder. Charging begins. When the remaining battery indicator changes to use the battery longer than usual. 4 V POWER 1 2 The number in minutes on the display window. After charging ...the battery pack Disconnect the AC power adaptor from that on your camcorder. 12 See page 135 for your camcorder to OFF (CHG). To fully...
...of "InfoLITHIUM" battery pack. (1) Open the DC IN jack cover and connect the AC power adaptor supplied with your camcorder. Charging begins. When the remaining battery indicator changes to use the battery longer than usual. 4 V POWER 1 2 The number in minutes on the display window. After charging ...the battery pack Disconnect the AC power adaptor from that on your camcorder. 12 See page 135 for your camcorder to OFF (CHG). To fully...

Operating Instructions
Page 13
...the "InfoLITHIUM" battery pack (M series). Do this unit, disconnect the plug from coming into contact with the metal parts of the DC plug of Sony Corporation. Until your camcorder calculates the actual remaining battery time "- - - - This may go off . "InfoLITHIUM" M series battery packs have the mark. What is ... AC power adaptor near a wall outlet. min" appears in a cool place. Something is not to cut off the power. When you use it until it fully discharges again. Keep the battery pack in the display window. Getting started Step 1 Preparing the power supply Notes •...
...the "InfoLITHIUM" battery pack (M series). Do this unit, disconnect the plug from coming into contact with the metal parts of the DC plug of Sony Corporation. Until your camcorder calculates the actual remaining battery time "- - - - This may go off . "InfoLITHIUM" M series battery packs have the mark. What is ... AC power adaptor near a wall outlet. min" appears in a cool place. Something is not to cut off the power. When you use it until it fully discharges again. Keep the battery pack in the display window. Getting started Step 1 Preparing the power supply Notes •...

Operating Instructions
Page 14
The actual battery life may be shorter if you use your camcorder in a cold environment. ** Approximate number of minutes when recording while you use a fully charged battery * Approximate continuous recording time at 25 °C (77 °F) Recording time DCR-TRV230/TRV330 Battery pack NP-FM30 (supplied) NP-FM50 NP-FM70 NP-FM90 NP-FM91 Recording with...
The actual battery life may be shorter if you use your camcorder in a cold environment. ** Approximate number of minutes when recording while you use a fully charged battery * Approximate continuous recording time at 25 °C (77 °F) Recording time DCR-TRV230/TRV330 Battery pack NP-FM30 (supplied) NP-FM50 NP-FM70 NP-FM90 NP-FM91 Recording with...
Operating Instructions
Page 15
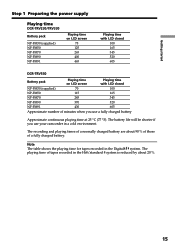
... 1 Preparing the power supply Playing time DCR-TRV230/TRV330 Battery pack NP-FM30 (supplied) NP-FM50 NP-FM70 NP-FM90 NP-FM91 Playing time on LCD screen 75 125 265 400 465 Playing time with LCD closed 100 165 345 520 605 DCR-TRV530 Battery pack Playing time on LCD ... playing time of minutes when you use a fully charged battery Approximate continuous playing time at 25 °C (77 °F). The recording and playing times of a normally charged battery are about 20 %. 15 The battery life will be shorter if you use your camcorder in the Digital8 system. Note The table shows the...
... 1 Preparing the power supply Playing time DCR-TRV230/TRV330 Battery pack NP-FM30 (supplied) NP-FM50 NP-FM70 NP-FM90 NP-FM91 Playing time on LCD screen 75 125 265 400 465 Playing time with LCD closed 100 165 345 520 605 DCR-TRV530 Battery pack Playing time on LCD ... playing time of minutes when you use a fully charged battery Approximate continuous playing time at 25 °C (77 °F). The recording and playing times of a normally charged battery are about 20 %. 15 The battery life will be shorter if you use your camcorder in the Digital8 system. Note The table shows the...

Operating Instructions
Page 16
Using a car battery Use Sony DC Adaptor/Charger (optional). 16 Notes • The AC power adaptor can supply power even if the battery pack is attached to the DC IN .... (1) Open the DC IN jack cover, and connect the AC power adaptor to the DC IN jack on your camcorder. • The DC IN jack has "source priority". This means that you use your camcorder for a long time, we recommend that the battery pack cannot supply any power if the power cord is...
Using a car battery Use Sony DC Adaptor/Charger (optional). 16 Notes • The AC power adaptor can supply power even if the battery pack is attached to the DC IN .... (1) Open the DC IN jack cover, and connect the AC power adaptor to the DC IN jack on your camcorder. • The DC IN jack has "source priority". This means that you use your camcorder for a long time, we recommend that the battery pack cannot supply any power if the power cord is...
Operating Instructions
Page 17
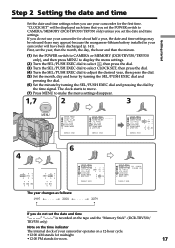
... the SEL/PUSH EXEC dial to select CLOCK SET, then press the dial. (4) Turn the SEL/PUSH EXEC dial to CAMERA/MEMORY (DCR-TRV330/TRV530 only) unless you do not use your camcorder for the first time. The clock starts to move. (7) Press MENU to make the menu settings disappear. 1,7 2 3 MENU SETUP MENU CLOCK...] : END 4 2001 JAN 1 12 00 AM 2001 JAN 1 12 00 6 SETUP MENU CLOCK SET AUTO TV ON TV I NPUT 2001 JUL 4 LTR S I ZE L ANGUAGE DEMO MODE RETURN 5 30 PM [ MENU ] : END The year changes as follows: 1995 T t 2001 T t 2079 SETUP MENU CLOCK SET J UL 4 2001 AUTO TV ON 5:30:00 PM...
... the SEL/PUSH EXEC dial to select CLOCK SET, then press the dial. (4) Turn the SEL/PUSH EXEC dial to CAMERA/MEMORY (DCR-TRV330/TRV530 only) unless you do not use your camcorder for the first time. The clock starts to move. (7) Press MENU to make the menu settings disappear. 1,7 2 3 MENU SETUP MENU CLOCK...] : END 4 2001 JAN 1 12 00 AM 2001 JAN 1 12 00 6 SETUP MENU CLOCK SET AUTO TV ON TV I NPUT 2001 JUL 4 LTR S I ZE L ANGUAGE DEMO MODE RETURN 5 30 PM [ MENU ] : END The year changes as follows: 1995 T t 2001 T t 2079 SETUP MENU CLOCK SET J UL 4 2001 AUTO TV ON 5:30:00 PM...
Operating Instructions
Page 18
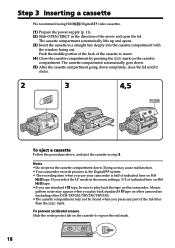
...camcorders (including other DCR-TRV230/TRV330/TRV530). •The cassette compartment may not be sure to play back standard 8 tape on the cassette to insert. (4) Close the cassette compartment by pressing the mark on the cassette compartment. Mosaic pattern noise may cause malfunction. •Your camcorder records pictures in the Digital8... . Doing so may appear when you select the LP mode in the menu settings, 3/4 of indicated time on this camcorder. Step 3 Inserting a cassette We recommend using Hi8 /Digital8 video cassettes. (1) Prepare the power supply (p. 11). ...
...camcorders (including other DCR-TRV230/TRV330/TRV530). •The cassette compartment may not be sure to play back standard 8 tape on the cassette to insert. (4) Close the cassette compartment by pressing the mark on the cassette compartment. Mosaic pattern noise may cause malfunction. •Your camcorder records pictures in the Digital8... . Doing so may appear when you select the LP mode in the menu settings, 3/4 of indicated time on this camcorder. Step 3 Inserting a cassette We recommend using Hi8 /Digital8 video cassettes. (1) Prepare the power supply (p. 11). ...
Operating Instructions
Page 20
...to MEMORY accidentally. Some of the LCD panel Make sure if the LCD panel is a mirror-image. Indicators in the mirror mode You cannot operate the ZERO SET MEMORY on the Remote Commander. However, the picture will be difficult to see. During recording in the...into the camcorder body. Picture in direct sunlight The LCD screen may not be set it vertically until it clicks, and swing it faces the other indicators appear mirror-reversed and others are not displayed. When you use the viewfinder. Recording a picture Note on LOCK (DCR-TRV330/TRV530 only)...
...to MEMORY accidentally. Some of the LCD panel Make sure if the LCD panel is a mirror-image. Indicators in the mirror mode You cannot operate the ZERO SET MEMORY on the Remote Commander. However, the picture will be difficult to see. During recording in the...into the camcorder body. Picture in direct sunlight The LCD screen may not be set it vertically until it clicks, and swing it faces the other indicators appear mirror-reversed and others are not displayed. When you use the viewfinder. Recording a picture Note on LOCK (DCR-TRV330/TRV530 only)...
Operating Instructions
Page 23
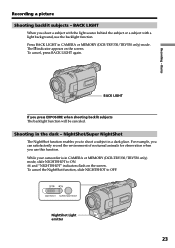
... nocturnal animals for observation when you to OFF. Shooting in CAMERA or MEMORY (DCR-TRV330/TRV530 only) mode. NightShot/Super NightShot The NightShot function enables you use the backlight function. The . and "NIGHTSHOT" indicators flash on the screen. indicator appears on the screen. Recording a picture Shooting backlit subjects - While your camcorder is in a dark place.
... nocturnal animals for observation when you to OFF. Shooting in CAMERA or MEMORY (DCR-TRV330/TRV530 only) mode. NightShot/Super NightShot The NightShot function enables you use the backlight function. The . and "NIGHTSHOT" indicators flash on the screen. indicator appears on the screen. Recording a picture Shooting backlit subjects - While your camcorder is in a dark place.

Operating Instructions
Page 24
...Digital effect - Exposure - In MEMORY mode (DCR-TRV330/TRV530 only) You cannot use the following functions: - To cancel the Super NightShot mode, press SUPER NIGHTSHOT again. outdoors in the Super NightShot mode The shutter speed will be clearer with the autofocus mode when using the NightShot function, you can not use the NightShot function in CAMERA mode... recording, the picture may cause your camcorder to malfunction. •When you can not use the Super NightShot function. This may be slow. The maximum shooting distance using the Super NightShot function, you keep...
...Digital effect - Exposure - In MEMORY mode (DCR-TRV330/TRV530 only) You cannot use the following functions: - To cancel the Super NightShot mode, press SUPER NIGHTSHOT again. outdoors in the Super NightShot mode The shutter speed will be clearer with the autofocus mode when using the NightShot function, you can not use the NightShot function in CAMERA mode... recording, the picture may cause your camcorder to malfunction. •When you can not use the Super NightShot function. This may be slow. The maximum shooting distance using the Super NightShot function, you keep...
Operating Instructions
Page 26
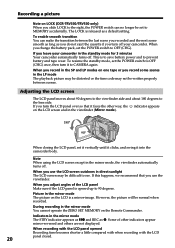
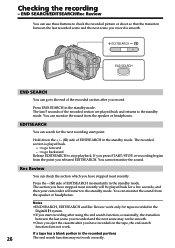
... The end search function may not be played back for a few seconds, and then your camcorder will be smooth. •Once you eject the cassette after you record. You can monitor ...the sound from the speaker or headphones. The last 5 seconds of the recorded section after using the end search function, occasionally, the transition between the last recorded scene and the next ... - (7) side of EDITSEARCH in the Digital8 system. •If you start point. Hold down the +/- (7) side of EDITSEARCH momentarily in the standby mode. The recorded section is smooth. END SEARCH...
... The end search function may not be played back for a few seconds, and then your camcorder will be smooth. •Once you eject the cassette after you record. You can monitor ...the sound from the speaker or headphones. The last 5 seconds of the recorded section after using the end search function, occasionally, the transition between the last recorded scene and the next ... - (7) side of EDITSEARCH in the Digital8 system. •If you start point. Hold down the +/- (7) side of EDITSEARCH momentarily in the standby mode. The recorded section is smooth. END SEARCH...
Operating Instructions
Page 60
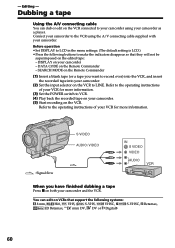
...: 8 mm, Hi8, VHS, S-VHS, VHSC, S-VHSC, Betamax, ED Betamax, mini DV, DV or Digital8 60 SEARCH MODE on the Remote Commander (1) Insert a blank tape (or a tape you have finished dubbing a tape Press x on your camcorder - Connect your camcorder to the VCR using your VCR for more information. (3) Set the POWER switch to the operating instructions...
...: 8 mm, Hi8, VHS, S-VHS, VHSC, S-VHSC, Betamax, ED Betamax, mini DV, DV or Digital8 60 SEARCH MODE on the Remote Commander (1) Insert a blank tape (or a tape you have finished dubbing a tape Press x on your camcorder - Connect your camcorder to the VCR using your VCR for more information. (3) Set the POWER switch to the operating instructions...
Operating Instructions
Page 125
... a malfunction. c Set it to acclimatize. (p. 139) • While being operated in CAMERA mode, your camcorder, use the following page) 125 c Use Hi8 /Digital8 tapes. (p. 85) • The contrast between the subject and background is open. Types of ...trouble and their solutions If you run out. In the recording mode Symptom START/STOP does not operate. The SteadyShot function does not work . c Remove the cassette and leave your Sony...
... a malfunction. c Set it to acclimatize. (p. 139) • While being operated in CAMERA mode, your camcorder, use the following page) 125 c Use Hi8 /Digital8 tapes. (p. 85) • The contrast between the subject and background is open. Types of ...trouble and their solutions If you run out. In the recording mode Symptom START/STOP does not operate. The SteadyShot function does not work . c Remove the cassette and leave your Sony...


