Operating Guide
Page 1
3-098-548-11(1) Digital Video Camera Recorder Operating Guide DCR-SR42/SR62/SR82/SR200/SR300 For details on the advanced operations, please refer to "Handycam Handbook" (PDF). © 2007 Sony Corporation
3-098-548-11(1) Digital Video Camera Recorder Operating Guide DCR-SR42/SR62/SR82/SR200/SR300 For details on the advanced operations, please refer to "Handycam Handbook" (PDF). © 2007 Sony Corporation
Operating Guide
Page 3
... conditions: - Cleaning Unplug the set from the wall outlet before cleaning or polishing it from overheating, these slots and openings must never be blocked or covered. - Ventilation The slots and openings in the operating instructions. Never place the set , ask the service technician to normal operation. - Safety Check Upon completion of time, unplug it is damaged or frayed. - Do not use power-line operated sets near...
... conditions: - Cleaning Unplug the set from the wall outlet before cleaning or polishing it from overheating, these slots and openings must never be blocked or covered. - Ventilation The slots and openings in the operating instructions. Never place the set , ask the service technician to normal operation. - Safety Check Upon completion of time, unplug it is damaged or frayed. - Do not use power-line operated sets near...
Operating Guide
Page 5
..., CA 92127 U.S.A Telephone number: 858-942-2230 This device complies with Part 15 of Conformity Trade Name: SONY Model No.: DCR-SR300 Responsible Party: Sony Electronics Inc. Declaration of the FCC Rules. Increase the separation between the equipment and receiver. - Notes DCR-SR42, DCR-SR62, DCR-SR82, DCR-SR200 and DCR-SR300 are to be used in accordance with the Handycam Station Model DCRA-C171 and...
..., CA 92127 U.S.A Telephone number: 858-942-2230 This device complies with Part 15 of Conformity Trade Name: SONY Model No.: DCR-SR300 Responsible Party: Sony Electronics Inc. Declaration of the FCC Rules. Increase the separation between the equipment and receiver. - Notes DCR-SR42, DCR-SR62, DCR-SR82, DCR-SR200 and DCR-SR300 are to be used in accordance with the Handycam Station Model DCRA-C171 and...

Operating Guide
Page 7
... sensor function*. When the camcorder is recommended that you save the image data on a disc such as DVD-R using the camcorder at high altitudes • Do not turn on the camcorder in such situations. Note on disposal/transfer • If you perform [ FORMAT]* or formatting the hard disk of your image data periodically, after recording. Change the screen language before using a computer. On the drop sensor • To protect the internal hard disk from the hard disk completely...
... sensor function*. When the camcorder is recommended that you save the image data on a disc such as DVD-R using the camcorder at high altitudes • Do not turn on the camcorder in such situations. Note on disposal/transfer • If you perform [ FORMAT]* or formatting the hard disk of your image data periodically, after recording. Change the screen language before using a computer. On the drop sensor • To protect the internal hard disk from the hard disk completely...

Operating Guide
Page 12
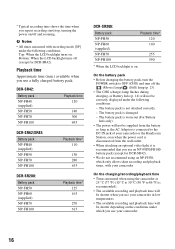
... is turned off and zooming. On the charging/recording/playback time • Times measured when using your camcorder. NP-FH40: (Unit:min.) DCR-SR42 Charging time 125 Recording time*1 Continuous 105 recording time Typical recording time*4 50 Playback time 120 DCR-SR62/ SR82 125 90*2 100*3 45*2 50*3 110*2 12 NP-FH60: (Unit:min.) DCR-SR200 DCR-SR300 Charging time 135 135 Recording time*1 Continuous recording time 115*2 120*3 95*2 100*3 Typical 55*2 45*2 recording time*4 60*3 50*3 Playback time*2 165 160 *1 When [REC MODE] is set...
... is turned off and zooming. On the charging/recording/playback time • Times measured when using your camcorder. NP-FH40: (Unit:min.) DCR-SR42 Charging time 125 Recording time*1 Continuous 105 recording time Typical recording time*4 50 Playback time 120 DCR-SR62/ SR82 125 90*2 100*3 45*2 50*3 110*2 12 NP-FH60: (Unit:min.) DCR-SR200 DCR-SR300 Charging time 135 135 Recording time*1 Continuous recording time 115*2 120*3 95*2 100*3 Typical 55*2 45*2 recording time*4 60*3 50*3 Playback time*2 165 160 *1 When [REC MODE] is set...

Operating Guide
Page 16
... your camcorder is reading/writing data. For details, see "Handycam Handbook" (PDF). • You can perform recording or playing back operation without detailed settings. The number of recordable images varies depending on the recording environment. • The number of still images 1 Touch (OPTION) t tab t [STILL MEDIA]. 2 Select the media in ( )); Your camcorder returns to your camcorder, and do not remove the battery or AC Adaptor. • You can use some buttons/functions during movie recording (DCR-SR200...
... your camcorder is reading/writing data. For details, see "Handycam Handbook" (PDF). • You can perform recording or playing back operation without detailed settings. The number of recordable images varies depending on the recording environment. • The number of still images 1 Touch (OPTION) t tab t [STILL MEDIA]. 2 Select the media in ( )); Your camcorder returns to your camcorder, and do not remove the battery or AC Adaptor. • You can use some buttons/functions during movie recording (DCR-SR200...
Operating Guide
Page 23
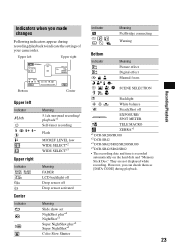
... *4 DCR-SR42/SR62/SR82 • The recording date and time is recorded automatically on the hard disk and "Memory Stick Duo." Indicators when you can check them as [DATA CODE] during recording/playback to indicate the settings of your camcorder. Backlight n White balance SteadyShot off Drop sensor activated Meaning Slide show set NightShot plus*4 NightShot*1 Super NightShot plus*4 Super NightShot*1 Color Slow Shutter Indicator E Meaning PictBridge connecting Warning Bottom Indicator 9 Meaning Picture effect Digital effect Manual focus SCENE...
... *4 DCR-SR42/SR62/SR82 • The recording date and time is recorded automatically on the hard disk and "Memory Stick Duo." Indicators when you can check them as [DATA CODE] during recording/playback to indicate the settings of your camcorder. Backlight n White balance SteadyShot off Drop sensor activated Meaning Slide show set NightShot plus*4 NightShot*1 Super NightShot plus*4 Super NightShot*1 Color Slow Shutter Indicator E Meaning PictBridge connecting Warning Bottom Indicator 9 Meaning Picture effect Digital effect Manual focus SCENE...
Operating Guide
Page 26
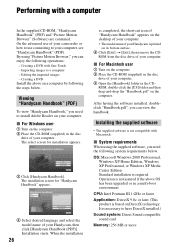
... the disc drive of your computer. 3 Open the [Handbook] folder in the disc drive of your Handycam is printed on the computer. 2 Place the CD-ROM (supplied) in the CD- Installing the supplied software • The supplied software is required. Importing images to have DirectX installed.) Sound system: Direct Sound compatible sound card Memory: 256 MB or more When the installation 26 is necessary to a computer - x System requirements When using "Picture Motion Browser," you need the...
... the disc drive of your computer. 3 Open the [Handbook] folder in the disc drive of your Handycam is printed on the computer. 2 Place the CD-ROM (supplied) in the CD- Installing the supplied software • The supplied software is required. Importing images to have DirectX installed.) Sound system: Direct Sound compatible sound card Memory: 256 MB or more When the installation 26 is necessary to a computer - x System requirements When using "Picture Motion Browser," you need the...

Operating Guide
Page 27
...]. 8 Set the camcorder onto the Handycam Station, then turn the POWER switch to turn on the computer. 4 Click [Install]. 5 Select the language for the application to the power saving function of your computer using the supplied USB cable, then click [Next] on as the power source. However, imported images and images on computers fulfilling the above system requirements. • Picture Motion Browser does not support 5.1ch surround sound reproduction. Recording/Playback Hard disk: Available free hard disk space for installation required...
...]. 8 Set the camcorder onto the Handycam Station, then turn the POWER switch to turn on the computer. 4 Click [Install]. 5 Select the language for the application to the power saving function of your computer using the supplied USB cable, then click [Next] on as the power source. However, imported images and images on computers fulfilling the above system requirements. • Picture Motion Browser does not support 5.1ch surround sound reproduction. Recording/Playback Hard disk: Available free hard disk space for installation required...

Operating Guide
Page 28
...). If the installation screen appears, follow the instructions to complete the installation. The short-cut icons, such as [ ] (Picture Motion Browser), appear on the screen, touch v/V to create a DVD - For details, see "Handycam Handbook" (PDF). Microsoft DirectX 9.0c Software required to handle movies Restart the computer if required to install the required software. - Windows Media Format 9 Series Runtime (Windows 2000 only) Software required to change the recording functions and the operating settings for your camcorder, then...
...). If the installation screen appears, follow the instructions to complete the installation. The short-cut icons, such as [ ] (Picture Motion Browser), appear on the screen, touch v/V to create a DVD - For details, see "Handycam Handbook" (PDF). Microsoft DirectX 9.0c Software required to handle movies Restart the computer if required to install the required software. - Windows Media Format 9 Series Runtime (Windows 2000 only) Software required to change the recording functions and the operating settings for your camcorder, then...
Operating Guide
Page 30
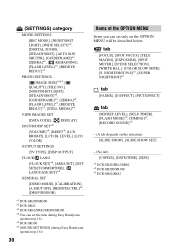
... MOVIE SETTINGS [REC MODE], [NIGHTSHOT LIGHT], [WIDE SELECT]*2, [DIGITAL ZOOM], [STEADYSHOT], [AUTO SLW SHUTTR], [GUIDEFRAME]*1, [ZEBRA]*1, [ REMAINING], [FLASH LEVEL]*1, [REDEYE REDUC]*1 PHOTO SETTINGS [ IMAGE SIZE]*3*4, [ QUALITY], [FILE NO.], [NIGHTSHOT LIGHT], [STEADYSHOT]*5, [GUIDEFRAME]*1, [ZEBRA]*1, [FLASH LEVEL]*3, [REDEYE REDUC]*3, [STILL MEDIA]*4 VIEW IMAGES SET [DATA CODE], [ DISPLAY] SOUND/DISP SET*6 [VOLUME]*4, [BEEP]*4, [LCD BRIGHT], [LCD BL LEVEL], [LCD COLOR] OUTPUT SETTINGS [TV TYPE], [DISP OUTPUT] CLOCK/ LANG [CLOCK SET]*4, [AREA SET], [DST SET]/[SUMMERTIME], [ LANGUAGE SET...
... MOVIE SETTINGS [REC MODE], [NIGHTSHOT LIGHT], [WIDE SELECT]*2, [DIGITAL ZOOM], [STEADYSHOT], [AUTO SLW SHUTTR], [GUIDEFRAME]*1, [ZEBRA]*1, [ REMAINING], [FLASH LEVEL]*1, [REDEYE REDUC]*1 PHOTO SETTINGS [ IMAGE SIZE]*3*4, [ QUALITY], [FILE NO.], [NIGHTSHOT LIGHT], [STEADYSHOT]*5, [GUIDEFRAME]*1, [ZEBRA]*1, [FLASH LEVEL]*3, [REDEYE REDUC]*3, [STILL MEDIA]*4 VIEW IMAGES SET [DATA CODE], [ DISPLAY] SOUND/DISP SET*6 [VOLUME]*4, [BEEP]*4, [LCD BRIGHT], [LCD BL LEVEL], [LCD COLOR] OUTPUT SETTINGS [TV TYPE], [DISP OUTPUT] CLOCK/ LANG [CLOCK SET]*4, [AREA SET], [DST SET]/[SUMMERTIME], [ LANGUAGE SET...

Operating Guide
Page 31
... troubleshoot the problem. Be sure to save the data on the internal hard disk (see "Handycam Handbook" (PDF)) on the camcorder. The camcorder does not operate even when the power is because the power has been turned on for a while, then turn on Easy Handycam operation, refer to "Handycam Handbook" (PDF). Turn off . • When approximately 5 minutes have just shot on the problem. Buttons do not work , press the RESET button (p.20) using your camcorder to recording standby (p.15). • Your camcorder...
... troubleshoot the problem. Be sure to save the data on the internal hard disk (see "Handycam Handbook" (PDF)) on the camcorder. The camcorder does not operate even when the power is because the power has been turned on for a while, then turn on Easy Handycam operation, refer to "Handycam Handbook" (PDF). Turn off . • When approximately 5 minutes have just shot on the problem. Buttons do not work , press the RESET button (p.20) using your camcorder to recording standby (p.15). • Your camcorder...
Operating Guide
Page 35
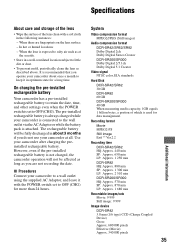
... not recording the date. x Procedures Connect your camcorder at all. System Video compression format MPEG2/JPEG (Still images) Audio compression format DCR-SR42/SR62/SR82 Dolby Digital 2ch Dolby Digital Stereo Creator DCR-SR200/SR300 Dolby Digital 2/5.1ch Dolby Digital 5.1 Creator Video signal NTSC color, EIA standards Hard Disk DCR-SR42/SR62 30 GB DCR-SR82 60 GB DCR-SR200/SR300 40 GB When measuring media capacity, 1GB equals 1 billion bytes, a portion of the lens clean with the POWER switch set...
... not recording the date. x Procedures Connect your camcorder at all. System Video compression format MPEG2/JPEG (Still images) Audio compression format DCR-SR42/SR62/SR82 Dolby Digital 2ch Dolby Digital Stereo Creator DCR-SR200/SR300 Dolby Digital 2/5.1ch Dolby Digital 5.1 Creator Video signal NTSC color, EIA standards Hard Disk DCR-SR42/SR62 30 GB DCR-SR82 60 GB DCR-SR200/SR300 40 GB When measuring media capacity, 1GB equals 1 billion bytes, a portion of the lens clean with the POWER switch set...
Handycam® Handbook
Page 4
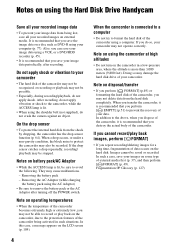
... camcorder using the Hard Disk Drive Handycam Save all your camcorder • The hard disk of the camcorder. On the drop sensor • To protect the internal hard disk from the hard disk completely. Removing the AC Adaptor (while charging the battery pack using the AC Adaptor) • Be sure to avoid the following. In addition to your recorded images on external media. Images cannot be recognized, or recording or playback may cause malfunctions. - In this case, a message...
... camcorder using the Hard Disk Drive Handycam Save all your camcorder • The hard disk of the camcorder. On the drop sensor • To protect the internal hard disk from the hard disk completely. Removing the AC Adaptor (while charging the battery pack using the AC Adaptor) • Be sure to avoid the following. In addition to your recorded images on external media. Images cannot be recognized, or recording or playback may cause malfunctions. - In this case, a message...
Handycam® Handbook
Page 5
... Step 2: Charging the battery pack 13 Step 3: Turning the power on, and setting the date and time .... 17 Changing the language setting 18 Step 4: Preparing for recording .... 19 Recording/Playback Recording and playback with ease (Easy Handycam operation) ......... 20 Recording 23 Zooming 25 Recording sound with more presence (5.1ch surround recording) (DCR-SR200/SR300 25 Using the flash (DCR-SR200/ SR300 26 Capturing high quality still images during movie recording (Dual Rec) (DCR-SR200/SR300 26 Recording still images on a "Memory Stick Duo 27 Recording in dark...
... Step 2: Charging the battery pack 13 Step 3: Turning the power on, and setting the date and time .... 17 Changing the language setting 18 Step 4: Preparing for recording .... 19 Recording/Playback Recording and playback with ease (Easy Handycam operation) ......... 20 Recording 23 Zooming 25 Recording sound with more presence (5.1ch surround recording) (DCR-SR200/SR300 25 Using the flash (DCR-SR200/ SR300 26 Capturing high quality still images during movie recording (Dual Rec) (DCR-SR200/SR300 26 Recording still images on a "Memory Stick Duo 27 Recording in dark...
Handycam® Handbook
Page 6
... 77 Importing images to a computer ... 81 Deleting images recorded on the camcorder through the computer 85 Viewing images imported to a computer 86 Editing the imported images ......... 88 Creating and copying a DVD ........ 90 Manipulating still images 93 Troubleshooting Troubleshooting 94 Warning indicators and messages 104 Additional Information Using your camcorder abroad .... 108 Files on the camcorder hard disk/ folder structure 110 Maintenance and precautions .... 111 Quick Reference Identifying parts and controls ..... 118 Indicators displayed during recording/playback 123...
... 77 Importing images to a computer ... 81 Deleting images recorded on the camcorder through the computer 85 Viewing images imported to a computer 86 Editing the imported images ......... 88 Creating and copying a DVD ........ 90 Manipulating still images 93 Troubleshooting Troubleshooting 94 Warning indicators and messages 104 Additional Information Using your camcorder abroad .... 108 Files on the camcorder hard disk/ folder structure 110 Maintenance and precautions .... 111 Quick Reference Identifying parts and controls ..... 118 Indicators displayed during recording/playback 123...
Handycam® Handbook
Page 16
... zooming. On the battery pack • Before changing the battery pack, turn the POWER switch to OFF (CHG) and turn off the (Movie) lamp/ (Still) lamp (p. 23). • The CHG (charge) lamp flashes during charging, or Battery Info (p. 14) will not be shorter when you use a fully charged battery pack. DCR-SR42: Battery pack NP-FH40 (supplied) NP-FH50 NP-FH70 NP-FH100 Playback time 120 140 300 695 DCR-SR62/SR82: Battery...
... zooming. On the battery pack • Before changing the battery pack, turn the POWER switch to OFF (CHG) and turn off the (Movie) lamp/ (Still) lamp (p. 23). • The CHG (charge) lamp flashes during charging, or Battery Info (p. 14) will not be shorter when you use a fully charged battery pack. DCR-SR42: Battery pack NP-FH40 (supplied) NP-FH50 NP-FH70 NP-FH100 Playback time 120 140 300 695 DCR-SR62/SR82: Battery...
Handycam® Handbook
Page 77
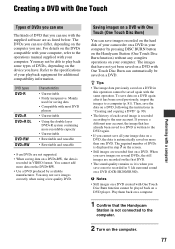
... to play back some types of DVDs, depending on the device you save images recorded on the hard disk of DVDs is not connected to the user account. When you have not yet been saved on a DVD with most DVD players • Unrewritable • Using the double layer DVD+R system containing more data on the DVD+RW. • Use a DVD produced by pressing DISC BURN button on the Handycam Station (One Touch Disc Burn function) without...
... to play back some types of DVDs, depending on the device you save images recorded on the hard disk of DVDs is not connected to the user account. When you have not yet been saved on a DVD with most DVD players • Unrewritable • Using the double layer DVD+R system containing more data on the DVD+RW. • Use a DVD produced by pressing DISC BURN button on the Handycam Station (One Touch Disc Burn function) without...
Marketing Specifications
Page 1
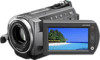
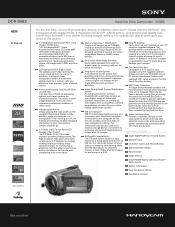
... a button. DCR-SR62 NEW Step-up Hard Disk Drive Camcorder - 30GB5 For the first time, record High Definition directly to Memory Stick Duo™ media with other image stabilization systems. USB 2.0 Interface3 USB 2.0 interface provides an easy way to connect your Hard Disk Handycam Camcorder to the computer for fast transfer of video and still images to your footage. In addition, the Digital Zoom interpolation means that extreme digital zooming is then recorded to the Hard Disk Drive. This results in 16:9 mode...
... a button. DCR-SR62 NEW Step-up Hard Disk Drive Camcorder - 30GB5 For the first time, record High Definition directly to Memory Stick Duo™ media with other image stabilization systems. USB 2.0 Interface3 USB 2.0 interface provides an easy way to connect your Hard Disk Handycam Camcorder to the computer for fast transfer of video and still images to your footage. In addition, the Digital Zoom interpolation means that extreme digital zooming is then recorded to the Hard Disk Drive. This results in 16:9 mode...
Marketing Specifications
Page 2
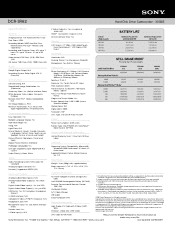
... the image recorded. 3. DCR-SR62 Hard Disk Drive Camcorder - 30GB5 Specifications General Imaging Device: 1/6" Advanced HAD™ CCD Pixel Gross: 1070K Recording Media: 30GB5 Hard Disk Drive, Memory Stick PRO Duo™ Media (sold separately) Recording and Playback Times: HQ: up to 7 hours, SP: up to 10 hours, LP: up to chipset variations. 4. Carl Zeiss and Vario-Tessar are trademarks of CIPA. PictBridge is used for data management function. 6. Telemacro Mode - 380mm Focus: Full Range Auto/Manual (Touch Panel) Progressive Shutter Mode: Yes Shutter Speed: Auto...
... the image recorded. 3. DCR-SR62 Hard Disk Drive Camcorder - 30GB5 Specifications General Imaging Device: 1/6" Advanced HAD™ CCD Pixel Gross: 1070K Recording Media: 30GB5 Hard Disk Drive, Memory Stick PRO Duo™ Media (sold separately) Recording and Playback Times: HQ: up to 7 hours, SP: up to 10 hours, LP: up to chipset variations. 4. Carl Zeiss and Vario-Tessar are trademarks of CIPA. PictBridge is used for data management function. 6. Telemacro Mode - 380mm Focus: Full Range Auto/Manual (Touch Panel) Progressive Shutter Mode: Yes Shutter Speed: Auto...


