

Operating Guide
Page 7
...video tapes, and other accessories are from being activated in this manual are based on DCR-SR300. • The screenshots are subject to change without any problems. • Compensation for illustrating the operating procedures. The scenes may not be able to record or play back may damage the hard disk drive of your camcorder...copyright laws. To view your recorded images on the camcorder in this manual were taken with a digital still camera, and may look different from what you actually see. • Design and specifications of the camcorder, it is not dustproofed, ...
...video tapes, and other accessories are from being activated in this manual are based on DCR-SR300. • The screenshots are subject to change without any problems. • Compensation for illustrating the operating procedures. The scenes may not be able to record or play back may damage the hard disk drive of your camcorder...copyright laws. To view your recorded images on the camcorder in this manual were taken with a digital still camera, and may look different from what you actually see. • Design and specifications of the camcorder, it is not dustproofed, ...

Operating Guide
Page 16
...camcorder returns to a "Memory Stick Duo." To cancel Easy Handycam operation, press EASY again. • You cannot use only a "Memory Stick Duo" marked with or . You can check the free hard disk space by touching (HOME) t (MANAGE HDD/MEMORY) t [ INFO]. • If the ACCESS lamp is lit or flashing after recording... images by Sony Corporation. The number of recordable images varies depending on the recording environment. •...recording standby mode. • You can use some buttons/functions during movie recording (DCR-SR200/ SR300). • The maximum continuous recordable...
...camcorder returns to a "Memory Stick Duo." To cancel Easy Handycam operation, press EASY again. • You cannot use only a "Memory Stick Duo" marked with or . You can check the free hard disk space by touching (HOME) t (MANAGE HDD/MEMORY) t [ INFO]. • If the ACCESS lamp is lit or flashing after recording... images by Sony Corporation. The number of recordable images varies depending on the recording environment. •...recording standby mode. • You can use some buttons/functions during movie recording (DCR-SR200/ SR300). • The maximum continuous recordable...

Operating Guide
Page 24
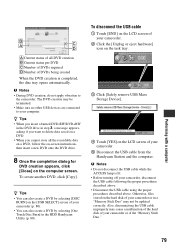
... One Touch (One Touch Disc Burn) You can save the image data to VCR or DVD/HDD devices. You can dub images to some type of your camcorder. Due to the limited capacity of the internal hard disk, make sure that you save images recorded on the camcorder directly to be deleted. ... be deleted. The selected still image is marked with ease. You can save the images recorded on a DVD or the hard disk of a computer. To delete all still images on a DVD. For details, see "Handycam Handbook" (PDF). Saving images by connecting your computer on the "Memory Stick Duo," in...
... One Touch (One Touch Disc Burn) You can save the image data to VCR or DVD/HDD devices. You can dub images to some type of your camcorder. Due to the limited capacity of the internal hard disk, make sure that you save images recorded on the camcorder directly to be deleted. ... be deleted. The selected still image is marked with ease. You can save the images recorded on a DVD or the hard disk of a computer. To delete all still images on a DVD. For details, see "Handycam Handbook" (PDF). Saving images by connecting your computer on the "Memory Stick Duo," in...
Operating Guide
Page 25
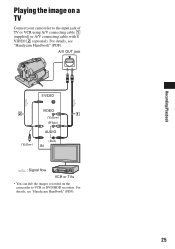
For details, see "Handycam Handbook" (PDF). 25 For details, see "Handycam Handbook" (PDF). Recording/Playback Playing the image on the camcorder to the input jack of TV or VCR using A/V connecting cable 1 (supplied) or A/V connecting cable with S VIDEO 2 (optional). A/V OUT jack S VIDEO VIDEO (Yellow) (White) AUDIO (Yellow) (Red) IN : Signal flow VCR or TVs • You can dub the images recorded on a TV Connect your camcorder to VCR or DVD/HDD recorders.
For details, see "Handycam Handbook" (PDF). 25 For details, see "Handycam Handbook" (PDF). Recording/Playback Playing the image on the camcorder to the input jack of TV or VCR using A/V connecting cable 1 (supplied) or A/V connecting cable with S VIDEO 2 (optional). A/V OUT jack S VIDEO VIDEO (Yellow) (White) AUDIO (Yellow) (Red) IN : Signal flow VCR or TVs • You can dub the images recorded on a TV Connect your camcorder to VCR or DVD/HDD recorders.
Operating Guide
Page 29
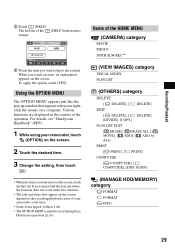
...of the operation. Various functions are displayed in the context of the HOME MENU (CAMERA) category MOVIE PHOTO SMTH SLW REC*1 (VIEW IMAGES) category VISUAL INDEX PLAYLIST (OTHERS... [ PRINT], [ PRINT] COMPUTER [ COMPUTER], [ COMPUTER], [DISC BURN] (MANAGE HDD/MEMORY) category FORMAT FORMAT INFO 29 Recording/Playback 2 Touch (HELP). The bottom of your camcorder, touch (OPTION) on the screen. 2 Touch the desired item...Handycam Handbook" (PDF). 1 While using your camcorder at the time. • Some items appear without a tab. • The OPTION MENU cannot be used during Easy Handycam...
...of the operation. Various functions are displayed in the context of the HOME MENU (CAMERA) category MOVIE PHOTO SMTH SLW REC*1 (VIEW IMAGES) category VISUAL INDEX PLAYLIST (OTHERS... [ PRINT], [ PRINT] COMPUTER [ COMPUTER], [ COMPUTER], [DISC BURN] (MANAGE HDD/MEMORY) category FORMAT FORMAT INFO 29 Recording/Playback 2 Touch (HELP). The bottom of your camcorder, touch (OPTION) on the screen. 2 Touch the desired item...Handycam Handbook" (PDF). 1 While using your camcorder at the time. • Some items appear without a tab. • The OPTION MENU cannot be used during Easy Handycam...
Handycam® Handbook
Page 4
...recording/playback, do not crash the camera against an object. If the drop sensor catches a drop repeatedly, recording/ playback may cause malfunctions. - They may be recorded. In this case, a message appears on a disc such as DVD-R using your computer (p. 77). Images cannot be recognized, or recording... the hard disk of the camcorder may not be saved or recorded. Fragmentation 1 Glossary (p. 127) After recording, do so, your camcorder may damage the hard disk drive of the camcorder. Notes on using the Hard Disk Drive Handycam Save all your recorded images on the camcorder in...
...recording/playback, do not crash the camera against an object. If the drop sensor catches a drop repeatedly, recording/ playback may cause malfunctions. - They may be recorded. In this case, a message appears on a disc such as DVD-R using your computer (p. 77). Images cannot be recognized, or recording... the hard disk of the camcorder may not be saved or recorded. Fragmentation 1 Glossary (p. 127) After recording, do so, your camcorder may damage the hard disk drive of the camcorder. Notes on using the Hard Disk Drive Handycam Save all your recorded images on the camcorder in...
Handycam® Handbook
Page 5
... 42 Dubbing to VCR or DVD/HDD recorders 45 Printing recorded images (PictBridge compliant printer 46 Utilizing recording media (MANAGE HDD/MEMORY) category 49 Formatting the hard disk or the "Memory Stick Duo 49 Checking the hard disk information 50 Preventing data on using the Hard Disk Drive Handycam 4 Subject examples and solutions ..... 7 Enjoying your camcorder Operation flow 8 " HOME" and " OPTION...
... 42 Dubbing to VCR or DVD/HDD recorders 45 Printing recorded images (PictBridge compliant printer 46 Utilizing recording media (MANAGE HDD/MEMORY) category 49 Formatting the hard disk or the "Memory Stick Duo 49 Checking the hard disk information 50 Preventing data on using the Hard Disk Drive Handycam 4 Subject examples and solutions ..... 7 Enjoying your camcorder Operation flow 8 " HOME" and " OPTION...
Handycam® Handbook
Page 9
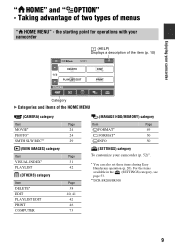
..., see page 53. **DCR-SR200/SR300 9 the starting point for operations with your camcorder (HELP) Displays a description of the item (p. 10) Enjoying your camcorder Category B Categories and items of menus " HOME MENU" - Taking advantage of two types of the HOME MENU (CAMERA) category Item MOVIE* PHOTO...Page 38 40, 41 42 46 73 (MANAGE HDD/MEMORY) category Item Page FORMAT* 49 FORMAT* 50 INFO 50 (SETTINGS) category To customize your camcorder OPTION" - " HOME" and " Enjoying your camcorder (p. 52)*. * You can also set these items during Easy Handycam operation (p. 20).
..., see page 53. **DCR-SR200/SR300 9 the starting point for operations with your camcorder (HELP) Displays a description of the item (p. 10) Enjoying your camcorder Category B Categories and items of menus " HOME MENU" - Taking advantage of two types of the HOME MENU (CAMERA) category Item MOVIE* PHOTO...Page 38 40, 41 42 46 73 (MANAGE HDD/MEMORY) category Item Page FORMAT* 49 FORMAT* 50 INFO 50 (SETTINGS) category To customize your camcorder OPTION" - " HOME" and " Enjoying your camcorder (p. 52)*. * You can also set these items during Easy Handycam operation (p. 20).

Handycam® Handbook
Page 45
...HDD recorders. Device without an S VIDEO jack IN Device with an S VIDEO jack IN S VIDEO Editing VIDEO (Yellow) VIDEO A/V OUT jack A/V OUT : Video/Signal flow (White) AUDIO (Red) (White) AUDIO (Red) (Yellow) VCRs or DVD/ HDD recorders A A/V connecting cable (supplied) The Handycam Station and your camcorder are connecting your camcorder... • To record the date/time and camera settings data, display them on the screen of the A/V connecting cable to the video input jack, and the red (right channel) or the white (left /right audio) and the S VIDEO plug (S VIDEO channel) of the ...
...HDD recorders. Device without an S VIDEO jack IN Device with an S VIDEO jack IN S VIDEO Editing VIDEO (Yellow) VIDEO A/V OUT jack A/V OUT : Video/Signal flow (White) AUDIO (Red) (White) AUDIO (Red) (Yellow) VCRs or DVD/ HDD recorders A A/V connecting cable (supplied) The Handycam Station and your camcorder are connecting your camcorder... • To record the date/time and camera settings data, display them on the screen of the A/V connecting cable to the video input jack, and the red (right channel) or the white (left /right audio) and the S VIDEO plug (S VIDEO channel) of the ...

Handycam® Handbook
Page 46
... on . 3 Connect the (USB) jack of the recording device. 4 Start the playback on your camcorder, and record it to the input mode. 3 Connect your camcorder. Refer to the instruction manuals supplied with S VIDEO (optional) 2. Connect your camcorder to the input jacks of the Handycam Station to the recording device (VCR or DVD/ HDD recorder) with the A/V connecting cable (supplied) 1 or...
... on . 3 Connect the (USB) jack of the recording device. 4 Start the playback on your camcorder, and record it to the input mode. 3 Connect your camcorder. Refer to the instruction manuals supplied with S VIDEO (optional) 2. Connect your camcorder to the input jacks of the Handycam Station to the recording device (VCR or DVD/ HDD recorder) with the A/V connecting cable (supplied) 1 or...
Handycam® Handbook
Page 79
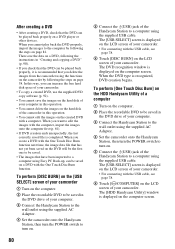
... the computer screen. To create another DVD, click [Copy]. z Tips • You can also create a DVD by selecting [DISC BURN] on the hard disk of your camcorder or in a "Memory Stick Duo" may be updated correctly. The DVD creation may not be terminated. • Make sure no...drive in the HDD Handycam Utility (p. 80). Performing with a computer A Current status of all the recordable data on a DVD, follow the on-screen instructions, then insert a new DVD onto the DVD drive. 8 Once the completion dialog for DVD creation appears, click [Close] on the LCD screen of your camcorder....
... the computer screen. To create another DVD, click [Copy]. z Tips • You can also create a DVD by selecting [DISC BURN] on the hard disk of your camcorder or in a "Memory Stick Duo" may be updated correctly. The DVD creation may not be terminated. • Make sure no...drive in the HDD Handycam Utility (p. 80). Performing with a computer A Current status of all the recordable data on a DVD, follow the on-screen instructions, then insert a new DVD onto the DVD drive. 8 Once the completion dialog for DVD creation appears, click [Close] on the LCD screen of your camcorder....
Handycam® Handbook
Page 80
... screen of the Handycam Station to turn the POWER switch to a computer using the supplied USB cable. To perform [One Touch Disc Burn] on the HDD Handycam Utility of a computer 1 Turn on the computer. 2 Place the recordable DVD to be saved in the DVD drive of the Handycam Station to be ...saved in the DVD drive of your computer in this operation. • You cannot delete the images on the hard disk of your camcorder. ...
... screen of the Handycam Station to turn the POWER switch to a computer using the supplied USB cable. To perform [One Touch Disc Burn] on the HDD Handycam Utility of a computer 1 Turn on the computer. 2 Place the recordable DVD to be saved in the DVD drive of the Handycam Station to be ...saved in the DVD drive of your computer in this operation. • You cannot delete the images on the hard disk of your camcorder. ...
Handycam® Handbook
Page 81
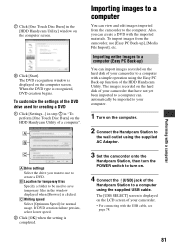
...camcorder to the computer. A Drive settings Select the drive you can import images recorded on the LCD screen of the HDD Handycam Utility. C Writing speed Select [Optimum Speed] for creating a DVD 1 Click [Settings...] in step 7 in "To perform [One Touch Disc Burn] on the HDD Handycam Utility of your camcorder.... • For connecting with a simple operation using the supplied AC Adaptor. The [USB SELECT] screen is displayed on the hard disk of a computer". To import images from the camcorder to a ...
...camcorder to the computer. A Drive settings Select the drive you can import images recorded on the LCD screen of the HDD Handycam Utility. C Writing speed Select [Optimum Speed] for creating a DVD 1 Click [Settings...] in step 7 in "To perform [One Touch Disc Burn] on the HDD Handycam Utility of your camcorder.... • For connecting with a simple operation using the supplied AC Adaptor. The [USB SELECT] screen is displayed on the hard disk of a computer". To import images from the camcorder to a ...

Handycam® Handbook
Page 82
...can import selected images on your camcorder to a computer with [Media File Import] on the HDD Handycam Utility. 1 Turn on the computer. 2 Connect the Handycam Station to the wall outlet using the supplied AC Adaptor. 3 Set the camcorder onto the Handycam Station, then turn on the camcorder. 5 Touch [ COMPUTER] on.... 6 Click [Easy PC Back-up automatically and the imported images are automatically imported to be terminated. The [HDD Handycam Utility] window is set to your camcorder. The image that have not been imported to turn the POWER switch to a computer are displayed in the...
...can import selected images on your camcorder to a computer with [Media File Import] on the HDD Handycam Utility. 1 Turn on the computer. 2 Connect the Handycam Station to the wall outlet using the supplied AC Adaptor. 3 Set the camcorder onto the Handycam Station, then turn on the camcorder. 5 Touch [ COMPUTER] on.... 6 Click [Easy PC Back-up automatically and the imported images are automatically imported to be terminated. The [HDD Handycam Utility] window is set to your camcorder. The image that have not been imported to turn the POWER switch to a computer are displayed in the...

Handycam® Handbook
Page 83
... Duo" into the Memory Stick slot of selected images starts. Movies and still images recorded on the camcorder are displayed as [Viewed folder] in the window that is displayed on the computer screen. 6 Click [Media File Import] in the [HDD Handycam Utility] window on each tab. 7 To import movies, click [Movies] tab, or to...
... Duo" into the Memory Stick slot of selected images starts. Movies and still images recorded on the camcorder are displayed as [Viewed folder] in the window that is displayed on the computer screen. 6 Click [Media File Import] in the [HDD Handycam Utility] window on each tab. 7 To import movies, click [Movies] tab, or to...

Handycam® Handbook
Page 85
... the images you want to delete. 9 Click [Delete]. The [HDD Handycam Utility] window is displayed. The deleting confirmation screen appears. 10Click [Yes]. Performing with the USB cable, see page 79. Deleting images recorded on the camcorder through the computer You can delete images recorded on the camcorder using the supplied USB cable. z Tips • For disconnecting...
... the images you want to delete. 9 Click [Delete]. The [HDD Handycam Utility] window is displayed. The deleting confirmation screen appears. 10Click [Yes]. Performing with the USB cable, see page 79. Deleting images recorded on the camcorder through the computer You can delete images recorded on the camcorder using the supplied USB cable. z Tips • For disconnecting...
Handycam® Handbook
Page 91
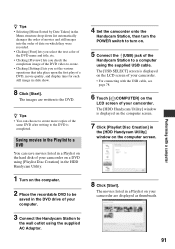
... of date on which they were recorded. • Clicking [Font] lets you select the text color of the DVD name and title, etc. • Clicking [Preview] lets you check the completion image of the DVD video to create. • Clicking [...drive of your computer. 3 Connect the Handycam Station to the wall outlet using the supplied AC Adaptor. 4 Set the camcorder onto the Handycam Station, then turn the POWER switch to turn on. 5 Connect the (USB) jack of the Handycam Station to a computer using [Playlist Disc Creation] in the HDD Handycam Utility. 1 Turn on the computer. 2 Place the recordable...
... of date on which they were recorded. • Clicking [Font] lets you select the text color of the DVD name and title, etc. • Clicking [Preview] lets you check the completion image of the DVD video to create. • Clicking [...drive of your computer. 3 Connect the Handycam Station to the wall outlet using the supplied AC Adaptor. 4 Set the camcorder onto the Handycam Station, then turn the POWER switch to turn on. 5 Connect the (USB) jack of the Handycam Station to a computer using [Playlist Disc Creation] in the HDD Handycam Utility. 1 Turn on the computer. 2 Place the recordable...
Handycam® Handbook
Page 128
... 115 CAMERA DATA ...HDD recorders 45 COPIES 47 COPY 41, 92 COPY by date 42 Copyright 3, 116 D DATA CODE 60, 126 Date Index 33 DATE/TIME.... 18, 47, 60, 126 DC plug 13 DELETE by date 39 Hard disk 38, 85 "Memory Stick Duo".... 39 DELETE ALL 39 DEMO MODE 64 DIGITAL ZOOM 55 DISC... BURN 78, 80 DISP OUTPUT 63 DISPLAY 61 Display indicators 123 DIVIDE 40 Dolby Digital 5.1 Creator .... 25 DROP SENSOR 64 DST SET 63 Dual Rec 26 Dubbing 45 DVD 77, 90 D.EFFECT (Digital effect 71 E Easy Handycam 20 Easy PC Back-up 81 EDIT 40, 41 Editing 38 On the camcorder...
... 115 CAMERA DATA ...HDD recorders 45 COPIES 47 COPY 41, 92 COPY by date 42 Copyright 3, 116 D DATA CODE 60, 126 Date Index 33 DATE/TIME.... 18, 47, 60, 126 DC plug 13 DELETE by date 39 Hard disk 38, 85 "Memory Stick Duo".... 39 DELETE ALL 39 DEMO MODE 64 DIGITAL ZOOM 55 DISC... BURN 78, 80 DISP OUTPUT 63 DISPLAY 61 Display indicators 123 DIVIDE 40 Dolby Digital 5.1 Creator .... 25 DROP SENSOR 64 DST SET 63 Dual Rec 26 Dubbing 45 DVD 77, 90 D.EFFECT (Digital effect 71 E Easy Handycam 20 Easy PC Back-up 81 EDIT 40, 41 Editing 38 On the camcorder...


