
Operating Guide
Page 3
... the set has been exposed to the plugs, receptacles, and the point where the cord exits from the wall outlet and disconnect the antenna or cable system. Refer all servicing to direct sunlight. Use a cloth lightly dampened with a cloth or other hazards. To ensure reliable operation of the set from overheating...
... the set has been exposed to the plugs, receptacles, and the point where the cord exits from the wall outlet and disconnect the antenna or cable system. Refer all servicing to direct sunlight. Use a cloth lightly dampened with a cloth or other hazards. To ensure reliable operation of the set from overheating...
Operating Guide
Page 5
... the separation between the equipment and receiver. - The supplied interface cable must accept any interference received, including interference that to which can...DCR-SR42, DCR-SR62, DCR-SR82, DCR-SR200 and DCR-SR300 are to be determined by one or more of the FCC Rules. If this device must be used with the limits for a digital...in a particular installation. Declaration of Conformity Trade Name: SONY Model No.: DCR-SR300 Responsible Party: Sony Electronics Inc. Reorient or relocate the receiving antenna. -...Handycam Station Model DCRA-C171 and AC Adaptor Model AC-L200/L200B.
... the separation between the equipment and receiver. - The supplied interface cable must accept any interference received, including interference that to which can...DCR-SR42, DCR-SR62, DCR-SR82, DCR-SR200 and DCR-SR300 are to be determined by one or more of the FCC Rules. If this device must be used with the limits for a digital...in a particular installation. Declaration of Conformity Trade Name: SONY Model No.: DCR-SR300 Responsible Party: Sony Electronics Inc. Reorient or relocate the receiving antenna. -...Handycam Station Model DCRA-C171 and AC Adaptor Model AC-L200/L200B.

Operating Guide
Page 9
... parentheses indicates the number of that you have the following items supplied with your camcorder. Rechargeable battery pack NP-FH40 (1) (p.11) (DCR-SR42/SR62/ SR82) NP-FH60 (1) (p.11) (DCR-SR200/SR300) Handycam Station (1) (p.11) A/V connecting cable (1) (p.25) USB cable (1) (p.27) CD-ROM "Handycam Application Software" (1) (p.26) - Getting Started Step 1: Checking supplied items Make sure that item supplied.
... parentheses indicates the number of that you have the following items supplied with your camcorder. Rechargeable battery pack NP-FH40 (1) (p.11) (DCR-SR42/SR62/ SR82) NP-FH60 (1) (p.11) (DCR-SR200/SR300) Handycam Station (1) (p.11) A/V connecting cable (1) (p.25) USB cable (1) (p.27) CD-ROM "Handycam Application Software" (1) (p.26) - Getting Started Step 1: Checking supplied items Make sure that item supplied.

Operating Guide
Page 20
...Shoulder belt hook Attach the shoulder belt (optional). Connecting to other devices 3 A/V OUT jack Connect with the A/V connecting cable. 4 REMOTE jack*3 Connect other optional accessories. 5 Active Interface Shoe *3 The Active Interface Shoe supplies power to the ... optional accessories such as you can magnify still images from the speaker while playing back. qh NIGHTSHOT switch*2 To record in dark places, set to ON. ( 20 appears.) qk Tripod receptacle (Bottom surface) Attach the tripod (... operate the POWER switch on or off as a video light, a flash, or a microphone.
...Shoulder belt hook Attach the shoulder belt (optional). Connecting to other devices 3 A/V OUT jack Connect with the A/V connecting cable. 4 REMOTE jack*3 Connect other optional accessories. 5 Active Interface Shoe *3 The Active Interface Shoe supplies power to the ... optional accessories such as you can magnify still images from the speaker while playing back. qh NIGHTSHOT switch*2 To record in dark places, set to ON. ( 20 appears.) qk Tripod receptacle (Bottom surface) Attach the tripod (... operate the POWER switch on or off as a video light, a flash, or a microphone.
Operating Guide
Page 21
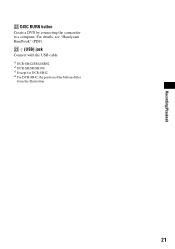
wd (USB) jack Connect with the USB cable. *1 DCR-SR42/SR62/SR82 *2 DCR-SR200/SR300 *3 Except for DCR-SR42 *4 For DCR-SR42, the position of the buttons differ from the illustration. 21 Recording/Playback ws DISC BURN button Create a DVD by connecting the camcorder to a computer. For details, see "Handycam Handbook" (PDF).
wd (USB) jack Connect with the USB cable. *1 DCR-SR42/SR62/SR82 *2 DCR-SR200/SR300 *3 Except for DCR-SR42 *4 For DCR-SR42, the position of the buttons differ from the illustration. 21 Recording/Playback ws DISC BURN button Create a DVD by connecting the camcorder to a computer. For details, see "Handycam Handbook" (PDF).
Operating Guide
Page 25
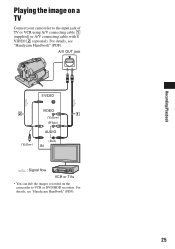
Recording/Playback Playing the image on the camcorder to the input jack of TV or VCR using A/V connecting cable 1 (supplied) or A/V connecting cable with S VIDEO 2 (optional). A/V OUT jack S VIDEO VIDEO (Yellow) (White) AUDIO (Yellow) (Red) IN : Signal flow VCR or TVs • You can dub the images recorded on a TV Connect your camcorder to VCR or DVD/HDD recorders. For details, see "Handycam Handbook" (PDF). 25 For details, see "Handycam Handbook" (PDF).
Recording/Playback Playing the image on the camcorder to the input jack of TV or VCR using A/V connecting cable 1 (supplied) or A/V connecting cable with S VIDEO 2 (optional). A/V OUT jack S VIDEO VIDEO (Yellow) (White) AUDIO (Yellow) (Red) IN : Signal flow VCR or TVs • You can dub the images recorded on a TV Connect your camcorder to VCR or DVD/HDD recorders. For details, see "Handycam Handbook" (PDF). 25 For details, see "Handycam Handbook" (PDF).

Operating Guide
Page 27
...Disc drive that can burn DVDs (CD-ROM drive required for software installation) • Even in a computer environment where the operations are not guaranteed, even on the connection confirmation screen. The installation screen appears. Provide the camcorder and the Handycam Station, and a USB cable...your computer after completing the installation. 27 Recording/Playback Hard disk: Available free hard disk space for installation required: Approximately 600 MB (for creating a DVD, 5 GB or more may be required) Display: DirectX 7 or later-compatible video card, Minimum 1024 × 768 dots,...
...Disc drive that can burn DVDs (CD-ROM drive required for software installation) • Even in a computer environment where the operations are not guaranteed, even on the connection confirmation screen. The installation screen appears. Provide the camcorder and the Handycam Station, and a USB cable...your computer after completing the installation. 27 Recording/Playback Hard disk: Available free hard disk space for installation required: Approximately 600 MB (for creating a DVD, 5 GB or more may be required) Display: DirectX 7 or later-compatible video card, Minimum 1024 × 768 dots,...

Operating Guide
Page 28
.... - qa Remove the CD-ROM from the disc drive of each item on the website, you register on the HOME MENU (HELP) 1 Press (HOME). 28 For details, see "Handycam Handbook" (PDF). 1 Turn on your computer. • For disconnecting the USB cable, see the explanation of the function of your ...• To hide the HOME MENU screen, touch . • You cannot select or activate simultaneously the grayed items in the current recording/playback situation. q; http://www.sony.net/registration/di/ • For the information about Picture Motion Browser, visit the following URL: http://www...
.... - qa Remove the CD-ROM from the disc drive of each item on the website, you register on the HOME MENU (HELP) 1 Press (HOME). 28 For details, see "Handycam Handbook" (PDF). 1 Turn on your computer. • For disconnecting the USB cable, see the explanation of the function of your ...• To hide the HOME MENU screen, touch . • You cannot select or activate simultaneously the grayed items in the current recording/playback situation. q; http://www.sony.net/registration/di/ • For the information about Picture Motion Browser, visit the following URL: http://www...
Handycam® Handbook
Page 2
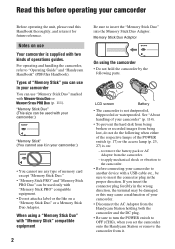
...OFF (CHG), when you set the camcorder onto the Handycam Station or remove the camcorder from being lost, do not do the following parts. If you can use in your camcorder" (p. 114). • To prevent the hard disk from being broken or recorded images from it. Notes on : - When using the...and the DC plug. • Be sure to turn the POWER switch to "Operating Guide" and "Handycam Handbook" (PDF/this Handbook). Read this before operating your camcorder to another device with a USB cable etc., be sure to insert the connector plug in the proper direction. "Memory Stick Duo" (This ...
...OFF (CHG), when you set the camcorder onto the Handycam Station or remove the camcorder from being lost, do not do the following parts. If you can use in your camcorder" (p. 114). • To prevent the hard disk from being broken or recorded images from it. Notes on : - When using the...and the DC plug. • Be sure to turn the POWER switch to "Operating Guide" and "Handycam Handbook" (PDF/this Handbook). Read this before operating your camcorder to another device with a USB cable etc., be sure to insert the connector plug in the proper direction. "Memory Stick Duo" (This ...
Handycam® Handbook
Page 12
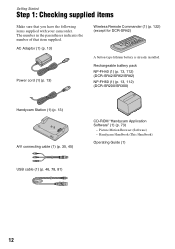
... Step 1: Checking supplied items Make sure that item supplied. Handycam Handbook (This Handbook) Operating Guide (1) USB cable (1) (p. 46, 78, 81) 12 Rechargeable battery pack NP-FH40 (1) (p. 13, 112) (DCR-SR42/SR62/SR82) NP-FH60 (1) (p. 13, 112) (DCR-SR200/SR300) Handycam Station (1) (p. 13) A/V connecting cable (1) (p. 35, 45) CD-ROM "Handycam Application Software" (1) (p. 73) - The number in the parentheses indicates...
... Step 1: Checking supplied items Make sure that item supplied. Handycam Handbook (This Handbook) Operating Guide (1) USB cable (1) (p. 46, 78, 81) 12 Rechargeable battery pack NP-FH40 (1) (p. 13, 112) (DCR-SR42/SR62/SR82) NP-FH60 (1) (p. 13, 112) (DCR-SR200/SR300) Handycam Station (1) (p. 13) A/V connecting cable (1) (p. 35, 45) CD-ROM "Handycam Application Software" (1) (p. 73) - The number in the parentheses indicates...
Handycam® Handbook
Page 35
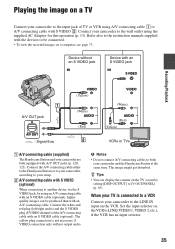
... connected to a VCR Connect your camcorder to [V-OUT/PANEL] (p. 63). Device without an S VIDEO jack IN Device with an S VIDEO jack IN S VIDEO Recording/Playback A/V OUT jack A/V OUT : Signal flow VIDEO (Yellow) (White) AUDIO (Red) VIDEO (White) AUDIO (Red) (Yellow) VCRs or TVs 1 A/V connecting cable (supplied) The Handycam Station and your camcorder are both your camcorder and the...
... connected to a VCR Connect your camcorder to [V-OUT/PANEL] (p. 63). Device without an S VIDEO jack IN Device with an S VIDEO jack IN S VIDEO Recording/Playback A/V OUT jack A/V OUT : Signal flow VIDEO (Yellow) (White) AUDIO (Red) VIDEO (White) AUDIO (Red) (Yellow) VCRs or TVs 1 A/V connecting cable (supplied) The Handycam Station and your camcorder are both your camcorder and the...
Handycam® Handbook
Page 36
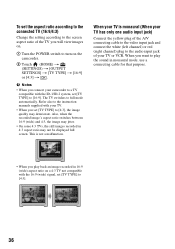
... screen aspect ratio of your TV or VCR. Also, when the recorded image's aspect ratio switches between 16:9 (wide) and 4:3, the image may jitter. • On some 4:3 TVs..., the still images recorded in 16:9 (wide) aspect ratio on the camcorder. 2 Touch (HOME) t (SETTINGS) t [OUTPUT SETTINGS] t [TV ...(When your TV has only one audio input jack) Connect the yellow plug of the A/V connecting cable to the video input jack and connect the white (left channel) or red (right channel) plug to the audio ...
... screen aspect ratio of your TV or VCR. Also, when the recorded image's aspect ratio switches between 16:9 (wide) and 4:3, the image may jitter. • On some 4:3 TVs..., the still images recorded in 16:9 (wide) aspect ratio on the camcorder. 2 Touch (HOME) t (SETTINGS) t [OUTPUT SETTINGS] t [TV ...(When your TV has only one audio input jack) Connect the yellow plug of the A/V connecting cable to the video input jack and connect the white (left channel) or red (right channel) plug to the audio ...

Handycam® Handbook
Page 45
... wall outlet using an A/V connecting cable with an S VIDEO jack IN S VIDEO Editing VIDEO (Yellow) VIDEO A/V OUT jack A/V OUT : Video/Signal flow (White) AUDIO (Red) (White) AUDIO (Red) (Yellow) VCRs or DVD/ HDD recorders A A/V connecting cable (supplied) The Handycam Station and your camcorder are connecting ...(the default setting) on the HOME MENU (p. 63). • To record the date/time and camera settings data, display them on the screen (p. 60). • When you are both equipped with an S VIDEO cable (optional). b Notes • Since dubbing is not necessary. Connect the...
... wall outlet using an A/V connecting cable with an S VIDEO jack IN S VIDEO Editing VIDEO (Yellow) VIDEO A/V OUT jack A/V OUT : Video/Signal flow (White) AUDIO (Red) (White) AUDIO (Red) (Yellow) VCRs or DVD/ HDD recorders A A/V connecting cable (supplied) The Handycam Station and your camcorder are connecting ...(the default setting) on the HOME MENU (p. 63). • To record the date/time and camera settings data, display them on the screen (p. 60). • When you are both equipped with an S VIDEO cable (optional). b Notes • Since dubbing is not necessary. Connect the...

Handycam® Handbook
Page 46
... to the recording device (VCR or DVD/ HDD recorder) with the A/V connecting cable (supplied) 1 or an A/V connecting cable with your recording device for details. 5 When dubbing is finished, stop the recording device, and then your camcorder to the printer 1 Connect the Handycam Station to the... manuals supplied with S VIDEO (optional) 2. Connect your camcorder to the input jacks of the Handycam Station to the printer using a PictBridge compliant printer, without connecting the camcorder to the display device (p. 62). 2 Insert the recording media in the recording device. 1 Turn on...
... to the recording device (VCR or DVD/ HDD recorder) with the A/V connecting cable (supplied) 1 or an A/V connecting cable with your recording device for details. 5 When dubbing is finished, stop the recording device, and then your camcorder to the printer 1 Connect the Handycam Station to the... manuals supplied with S VIDEO (optional) 2. Connect your camcorder to the input jacks of the Handycam Station to the printer using a PictBridge compliant printer, without connecting the camcorder to the display device (p. 62). 2 Insert the recording media in the recording device. 1 Turn on...

Handycam® Handbook
Page 47
...the printer to be printed. To press (VIEW IMAGES) button - To disconnect the USB cable (supplied) from the Handycam Station - To remove the "Memory Stick Duo" from your camcorder from the Handycam Station or the printer - You can select only the paper sizes that are PictBridge compatible...printed). [SIZE]: Select the paper size. When connection is marked with . Editing [USB SELECT] appears on the screen automatically. 4 Touch [ PRINT] (hard disk) or [ PRINT] ("Memory Stick Duo") depending on the media of the image to be used. • Do not attempt the following options, then...
...the printer to be printed. To press (VIEW IMAGES) button - To disconnect the USB cable (supplied) from the Handycam Station - To remove the "Memory Stick Duo" from your camcorder from the Handycam Station or the printer - You can select only the paper sizes that are PictBridge compatible...printed). [SIZE]: Select the paper size. When connection is marked with . Editing [USB SELECT] appears on the screen automatically. 4 Touch [ PRINT] (hard disk) or [ PRINT] ("Memory Stick Duo") depending on the media of the image to be used. • Do not attempt the following options, then...

Handycam® Handbook
Page 51
...operation (p. 13) b Notes • If you perform [ EMPTY], all cables except the AC Adaptor. z Tips • You can perform this way...[ EMPTY] screen appears. 4 Touch [YES] t [YES]. 5 When [Completed.] appears, touch . DCR-SR200/SR300: approx. 40 minutes • If you stop performing [ EMPTY] between step 4 and 5, be saved... turn the POWER switch to turn on the hard disk of the camcorder from being recovered [ EMPTY] allows you connect ...onto the hard disk of the camcorder. DCR-SR42/SR62: approx. 30 minutes - b Notes • The actual performing time for a few seconds. DCR-SR82: ...
...operation (p. 13) b Notes • If you perform [ EMPTY], all cables except the AC Adaptor. z Tips • You can perform this way...[ EMPTY] screen appears. 4 Touch [YES] t [YES]. 5 When [Completed.] appears, touch . DCR-SR200/SR300: approx. 40 minutes • If you stop performing [ EMPTY] between step 4 and 5, be saved... turn the POWER switch to turn on the hard disk of the camcorder from being recovered [ EMPTY] allows you connect ...onto the hard disk of the camcorder. DCR-SR42/SR62: approx. 30 minutes - b Notes • The actual performing time for a few seconds. DCR-SR82: ...

Handycam® Handbook
Page 74
..., even on which still images are guaranteed, frames may be provided as it may damage the cable or your camcorder. • Be sure to use a Notebook computer, connect it to the ..." and your computer is used. The scenes may be required) Display: DirectX 7 or later-compatible video card, Minimum 1024 × 768 dots, High Color (16 bit color) Others: USB port (this...(CD-ROM drive is necessary for creating a DVD, 5 GB or more Hard disk: Available free hard disk space for installation required: Approximately 600 MB (for installation) When playing still images recorded on the camcorder...
..., even on which still images are guaranteed, frames may be provided as it may damage the cable or your camcorder. • Be sure to use a Notebook computer, connect it to the ..." and your computer is used. The scenes may be required) Display: DirectX 7 or later-compatible video card, Minimum 1024 × 768 dots, High Color (16 bit color) Others: USB port (this...(CD-ROM drive is necessary for creating a DVD, 5 GB or more Hard disk: Available free hard disk space for installation required: Approximately 600 MB (for installation) When playing still images recorded on the camcorder...
Handycam® Handbook
Page 75
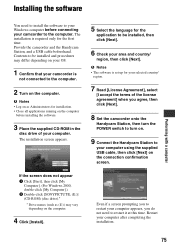
... connecting your camcorder to the computer. Provide the camcorder and the Handycam Station, and a USB cable beforehand. If the screen does not appear 1 Click [Start], then click [My Computer]. (For Windows 2000, double-click [My Computer].) 2 Double-click [SONYPICTUTIL (E:)] (CD-ROM) (disc drive).* * Drive names (such as Administrators for your selected country/ region. 7 Read [License...
... connecting your camcorder to the computer. Provide the camcorder and the Handycam Station, and a USB cable beforehand. If the screen does not appear 1 Click [Start], then click [My Computer]. (For Windows 2000, double-click [My Computer].) 2 Double-click [SONYPICTUTIL (E:)] (CD-ROM) (disc drive).* * Drive names (such as Administrators for your selected country/ region. 7 Read [License...

Handycam® Handbook
Page 76
...for the customers registration website is created on the desktop. • Once you register on the desktop. z Tips • For disconnecting the USB cable, see page 79. 76 The short-cut icons, such as [ ] (Picture Motion Browser), appear on the website, you can get secure and... Software required to handle movies Restart the computer if required to install the required software. http://www.sony.net/registration/di/ • For the information about Picture Motion Browser, visit the following URL: http://www.sony.net/support-disoft/ 11Remove the CD-ROM from the disc drive of your computer.
...for the customers registration website is created on the desktop. • Once you register on the desktop. z Tips • For disconnecting the USB cable, see page 79. 76 The short-cut icons, such as [ ] (Picture Motion Browser), appear on the website, you can get secure and... Software required to handle movies Restart the computer if required to install the required software. http://www.sony.net/registration/di/ • For the information about Picture Motion Browser, visit the following URL: http://www.sony.net/support-disoft/ 11Remove the CD-ROM from the disc drive of your computer.

Handycam® Handbook
Page 78
... that you use a new recordable DVD. • If any software starts on . z Tips • Your camcorder is recognized, DVD creation begins. The DVD recognition window is lit. 6 Press DISC BURN button on the Handycam Station. 7 Connect the (USB) jack of the Handycam Station to turn the POWER .... 5 Set the camcorder onto the Handycam Station, then turn on the computer automatically, close it may damage the cable, the Handycam Station or your computer. 3 Place the recordable DVD to a computer, make sure you insert the connector in the DVD drive of your computer. Do not insert ...
... that you use a new recordable DVD. • If any software starts on . z Tips • Your camcorder is recognized, DVD creation begins. The DVD recognition window is lit. 6 Press DISC BURN button on the Handycam Station. 7 Connect the (USB) jack of the Handycam Station to turn the POWER .... 5 Set the camcorder onto the Handycam Station, then turn on the computer automatically, close it may damage the cable, the Handycam Station or your computer. 3 Place the recordable DVD to a computer, make sure you insert the connector in the DVD drive of your computer. Do not insert ...


