Operating Guide
Page 6
...8226; To prevent the hard disk from being broken or recorded images from the camcorder - Removing the battery pack or AC Adaptor from being lost, do not do the followings when either of the respective lamps...the receiving antenna. - Notes on : - If you call your Sony dealer regarding this may cause a malfunction of your camcorder to another device with the limits for help. However, there is.... "Computer Application Guide" On using the camcorder • Do not hold the camcorder by one or more of operations guides. - Model No. DCR-SR100 Serial No. Read this equipment does cause...
...8226; To prevent the hard disk from being broken or recorded images from the camcorder - Removing the battery pack or AC Adaptor from being lost, do not do the followings when either of the respective lamps...the receiving antenna. - Notes on : - If you call your Sony dealer regarding this may cause a malfunction of your camcorder to another device with the limits for help. However, there is.... "Computer Application Guide" On using the camcorder • Do not hold the camcorder by one or more of operations guides. - Model No. DCR-SR100 Serial No. Read this equipment does cause...
Operating Guide
Page 8
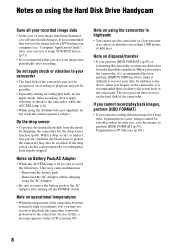
... than 3,000 meters (9,800 feet). Removing the AC Adaptor (while charging using the Hard Disk Drive Handycam Save all your image data periodically after turning off the POWER switch. Note on using the shoulder belt (not supplied), do not apply vibration or shock to protect the camcorder may prevent data recovery on the LCD...
... than 3,000 meters (9,800 feet). Removing the AC Adaptor (while charging using the Hard Disk Drive Handycam Save all your image data periodically after turning off the POWER switch. Note on using the shoulder belt (not supplied), do not apply vibration or shock to protect the camcorder may prevent data recovery on the LCD...

Operating Guide
Page 15
The number in the parentheses indicates the number of that you have following items supplied with your camcorder. AC Adaptor (1) (p.16) Rechargeable battery pack NP-FP60 (1) (p.17) Power cord (1) (p.16) CD-ROM "ImageMixer for HDD Camcorder" (1) "Camera Operating Guide" (This manual) (1) "Computer Application Guide" (1) A/V connecting cable (1) (p.42, 71, 73) USB cable (1) (p.75, 77) Wireless Remote Commander (1) (p.41) A button-type lithium battery is already installed. 15 Getting Started Getting Started Step 1: Checking supplied items Make sure that item supplied.
The number in the parentheses indicates the number of that you have following items supplied with your camcorder. AC Adaptor (1) (p.16) Rechargeable battery pack NP-FP60 (1) (p.17) Power cord (1) (p.16) CD-ROM "ImageMixer for HDD Camcorder" (1) "Camera Operating Guide" (This manual) (1) "Computer Application Guide" (1) A/V connecting cable (1) (p.42, 71, 73) USB cable (1) (p.75, 77) Wireless Remote Commander (1) (p.41) A button-type lithium battery is already installed. 15 Getting Started Getting Started Step 1: Checking supplied items Make sure that item supplied.

Operating Guide
Page 16
...cover DC plug Battery pack Power cord AC Adaptor To the wall outlet 1 Slide the battery pack in the direction of the arrow until it to the AC Adaptor and the wall outlet. Jack cover Face down the v mark to match the v mark of the camcorder. 4 Connect the power cord to OFF... (CHG) (The default setting). MODEON(COHFGF) POWER 3 Connect the AC Adaptor to camcorder malfunction such as deterioration in battery pack performance or difficulty in the direction of the arrow...
...cover DC plug Battery pack Power cord AC Adaptor To the wall outlet 1 Slide the battery pack in the direction of the arrow until it to the AC Adaptor and the wall outlet. Jack cover Face down the v mark to match the v mark of the camcorder. 4 Connect the power cord to OFF... (CHG) (The default setting). MODEON(COHFGF) POWER 3 Connect the AC Adaptor to camcorder malfunction such as deterioration in battery pack performance or difficulty in the direction of the arrow...

Operating Guide
Page 17
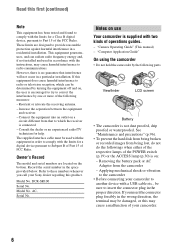
... when you do not intend to the following conditions. - Top: When the LCD backlight turns on your camcorder. • Remove the AC Adaptor holding both your camcorder and the DC plug. Continued , 17 Getting Started Remove the AC Adaptor from the DC IN jack on . - Battery pack NP-FP50 NP-FP60 (supplied) NP-FP70 NP-FP71...
... when you do not intend to the following conditions. - Top: When the LCD backlight turns on your camcorder. • Remove the AC Adaptor holding both your camcorder and the DC plug. Continued , 17 Getting Started Remove the AC Adaptor from the DC IN jack on . - Battery pack NP-FP50 NP-FP60 (supplied) NP-FP70 NP-FP71...
Operating Guide
Page 18
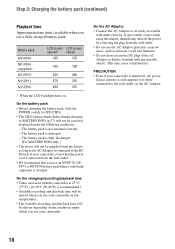
...be supplied from the battery as long as between a wall and furniture. • Do not short-circuit the DC plug of the AC Adaptor or battery terminal with the camcorder at 25 °C (77°F). (10-30°C (50-86°F) is recommended.) • Available recording and playback time...a video light (optional) is still supplied to it while connected to the DC IN jack of your camcorder in a narrow space, such as the AC Adaptor is connected to the wall outlet via the AC Adaptor. 18 The battery pack is not attached correctly. - Step 2: Charging the battery pack (continued) Playback...
...be supplied from the battery as long as between a wall and furniture. • Do not short-circuit the DC plug of the AC Adaptor or battery terminal with the camcorder at 25 °C (77°F). (10-30°C (50-86°F) is recommended.) • Available recording and playback time...a video light (optional) is still supplied to it while connected to the DC IN jack of your camcorder in a narrow space, such as the AC Adaptor is connected to the wall outlet via the AC Adaptor. 18 The battery pack is not attached correctly. - Step 2: Charging the battery pack (continued) Playback...

Operating Guide
Page 30
... fully B. Zoom lever START/STOP B 1 Slide the POWER switch in the direction of the arrow repeatedly to light up to your camcorder, and do not remove the battery pack or AC Adaptor. • You cannot record movies and still images at the same time. • A recordable time of movies in a succession is still...
... fully B. Zoom lever START/STOP B 1 Slide the POWER switch in the direction of the arrow repeatedly to light up to your camcorder, and do not remove the battery pack or AC Adaptor. • You cannot record movies and still images at the same time. • A recordable time of movies in a succession is still...
Operating Guide
Page 42
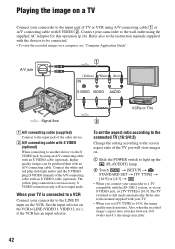
...Set the input selector on the VCR to the LINE IN input on the VCR. Playing the image on a TV Connect your camcorder to the wall outlet using the supplied AC Adaptor for this operation (p.16). Connect your TV. • When you will not output audio. Refer also to the manual supplied ...with your camcorder to the input jack of the TV you set [TV TYPE] to another device via an S VIDEO jack, set [TV TYPE...
...Set the input selector on the VCR to the LINE IN input on the VCR. Playing the image on a TV Connect your camcorder to the wall outlet using the supplied AC Adaptor for this operation (p.16). Connect your TV. • When you will not output audio. Refer also to the manual supplied ...with your camcorder to the input jack of the TV you set [TV TYPE] to another device via an S VIDEO jack, set [TV TYPE...
Operating Guide
Page 59
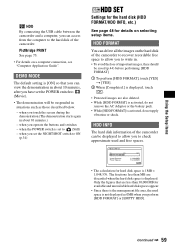
...is set the POWER switch to (Movie). • The demonstration will be suspended in . • To avoid the loss of the camcorder can access from the computer to check approximate used space is not displayed as those described below. - HDD INFO The hard disk information of... cable between the camcorder and a computer, you can be saved (p.44) before performing [HDD FORMAT]. 1 To perform [HDD FORMAT], touch [YES] t [YES]. 2 When [Completed.] is displayed, touch . • Protected images are also deleted. • While [HDD FORMAT] is activated, do not remove the AC Adaptor or the battery ...
...is set the POWER switch to (Movie). • The demonstration will be suspended in . • To avoid the loss of the camcorder can access from the computer to check approximate used space is not displayed as those described below. - HDD INFO The hard disk information of... cable between the camcorder and a computer, you can be saved (p.44) before performing [HDD FORMAT]. 1 To perform [HDD FORMAT], touch [YES] t [YES]. 2 When [Completed.] is displayed, touch . • Protected images are also deleted. • While [HDD FORMAT] is activated, do not remove the AC Adaptor or the battery ...

Operating Guide
Page 60
... may become more than five minutes. To avoid the loss of the camcorder. While pressing DISP/BATT INFO, slide the POWER switch to turn on the switch, [EMPTY HDD] cannot be saved (p.44) before performing [EMPTY HDD]. 1 Be sure the AC Adaptor is connected. HDD SET (continued) DROP SENSOR The [DROP SENSOR] is...
... may become more than five minutes. To avoid the loss of the camcorder. While pressing DISP/BATT INFO, slide the POWER switch to turn on the switch, [EMPTY HDD] cannot be saved (p.44) before performing [EMPTY HDD]. 1 Be sure the AC Adaptor is connected. HDD SET (continued) DROP SENSOR The [DROP SENSOR] is...
Operating Guide
Page 62
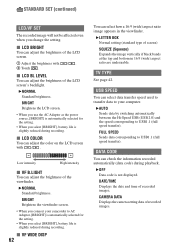
... with / . DATE/TIME Displays the date and time of recorded images. BRIGHT Brightens the LCD screen. • When you use the AC Adaptor as the power source, [BRIGHT] is automatically selected for the setting. • When you connect your computer. x VF WIDE DISP 62... aspect ratio are undesirable. Low intensity High intensity x VF B.LIGHT You can select data transfer speed used to transfer data to your camcorder to AC Adaptor, [BRIGHT] is automatically selected for the setting. • When you change the setting. FULL SPEED Sends data corresponding to USB1.1 ...
... with / . DATE/TIME Displays the date and time of recorded images. BRIGHT Brightens the LCD screen. • When you use the AC Adaptor as the power source, [BRIGHT] is automatically selected for the setting. • When you connect your computer. x VF WIDE DISP 62... aspect ratio are undesirable. Low intensity High intensity x VF B.LIGHT You can select data transfer speed used to transfer data to your camcorder to AC Adaptor, [BRIGHT] is automatically selected for the setting. • When you change the setting. FULL SPEED Sends data corresponding to USB1.1 ...
Operating Guide
Page 67
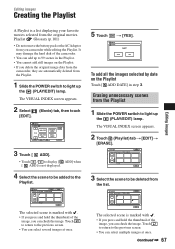
...If you can select several images at once. ERASE Press and hold : PREVIEW END OK The selected scene is marked with . • If you camcorder while editing the Playlist. Touch to return to the previous screen. • You can add up to 99 scenes in step 3. Erasing unnecessary scenes ... the scene to be deleted from the list. Playlist Glossary (p.101) • Do not remove the battery pack or the AC Adaptor from you press and hold the thumbnail of the camcorder. • You can select multiple images at once. ADD DATE Press and hold : PREVIEW END OK 3 Select the scene...
...If you can select several images at once. ERASE Press and hold : PREVIEW END OK The selected scene is marked with . • If you camcorder while editing the Playlist. Touch to return to the previous screen. • You can add up to 99 scenes in step 3. Erasing unnecessary scenes ... the scene to be deleted from the list. Playlist Glossary (p.101) • Do not remove the battery pack or the AC Adaptor from you press and hold the thumbnail of the camcorder. • You can select multiple images at once. ADD DATE Press and hold : PREVIEW END OK 3 Select the scene...

Operating Guide
Page 71
... (optional). The yellow plug connection is not necessary. Connect the white and red plug (left channel) plug to the wall outlet using the supplied AC Adaptor for this operation (p.16). S VIDEO connection only will not output audio. • To hide the screen indicators (such as a counter, etc.)... can save DVD using a computer, see "Computer Application Guide". • You cannot use the i.LINK cable. • Since you are connecting your camcorder to a monaural device, connect the yellow plug of the A/V connecting cable to the video input jack, and the red (right channel) or the white...
... (optional). The yellow plug connection is not necessary. Connect the white and red plug (left channel) plug to the wall outlet using the supplied AC Adaptor for this operation (p.16). S VIDEO connection only will not output audio. • To hide the screen indicators (such as a counter, etc.)... can save DVD using a computer, see "Computer Application Guide". • You cannot use the i.LINK cable. • Since you are connecting your camcorder to a monaural device, connect the yellow plug of the A/V connecting cable to the video input jack, and the red (right channel) or the white...
Operating Guide
Page 73
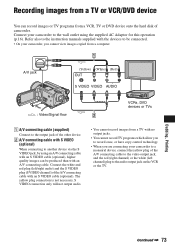
... (Red) OUT S VIDEO VIDEO AUDIO : Video/Signal flow VCRs, DVD devices or TVs 1 A/V connecting cable (supplied) Connect to the output jack of camcorder. S VIDEO connection only will not output audio. • You cannot record images from a TV with no output jacks. • You cannot record TV ...also to the instruction manuals supplied with the devices to be connected. • On your camcorder, you are connecting your camcorder to another device via the S VIDEO jack, by using the supplied AC Adaptor for this operation (p.16). Connect the white and red plug (left/right audio) and ...
... (Red) OUT S VIDEO VIDEO AUDIO : Video/Signal flow VCRs, DVD devices or TVs 1 A/V connecting cable (supplied) Connect to the output jack of camcorder. S VIDEO connection only will not output audio. • You cannot record images from a TV with no output jacks. • You cannot record TV ...also to the instruction manuals supplied with the devices to be connected. • On your camcorder, you are connecting your camcorder to another device via the S VIDEO jack, by using the supplied AC Adaptor for this operation (p.16). Connect the white and red plug (left/right audio) and ...
Operating Guide
Page 75
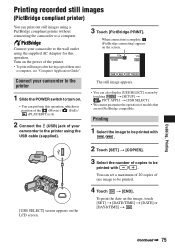
..., Printing Continued , 75 You can print out still images using a PictBridge compliant printer without connecting the camcorder to a computer. Printing 1 Select the image to be printed with / . APPLI. Connect your camcorder to the printer using the supplied AC Adaptor for this operation. t [USB SELECT]. • We cannot guarantee the operation of the printer. •...
..., Printing Continued , 75 You can print out still images using a PictBridge compliant printer without connecting the camcorder to a computer. Printing 1 Select the image to be printed with / . APPLI. Connect your camcorder to the printer using the supplied AC Adaptor for this operation. t [USB SELECT]. • We cannot guarantee the operation of the printer. •...
Operating Guide
Page 78
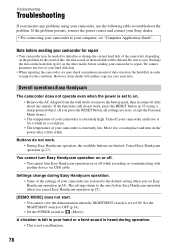
... into any loss of your hard disk data. • When repairing the camcorder, we may be deleted. Move it to your camcorder to a warm place and turn Easy Handycam operation on . • Remove the AC Adaptor from the wall outlet or remove the battery pack, then reconnect it for... repair • Your camcorder may check a minimum amount of your camcorder is set to improve the condition. If the problem persists, remove the power source and contact your Sony ...
... into any loss of your hard disk data. • When repairing the camcorder, we may be deleted. Move it to your camcorder to a warm place and turn Easy Handycam operation on . • Remove the AC Adaptor from the wall outlet or remove the battery pack, then reconnect it for... repair • Your camcorder may check a minimum amount of your camcorder is set to improve the condition. If the problem persists, remove the power source and contact your Sony ...
Operating Guide
Page 79
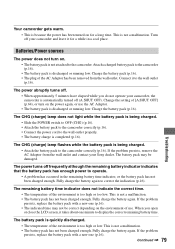
...; The battery pack has not been charged enough. The battery pack is automatically turned off your camcorder, the camcorder is quickly discharged. • The temperature of the AC Adaptor has been removed from the wall outlet and contact your Sony dealer. Fully charge the battery again. The power abruptly turns off frequently although the remaining...
...; The battery pack has not been charged enough. The battery pack is automatically turned off your camcorder, the camcorder is quickly discharged. • The temperature of the AC Adaptor has been removed from the wall outlet and contact your Sony dealer. Fully charge the battery again. The power abruptly turns off frequently although the remaining...

Operating Guide
Page 80
Troubleshooting (continued) A problem occurs when the camcorder is not a malfunction. This is connected to the AC Adaptor. • Turn off . • During Easy Handycam operation (p.24), you change the aspect ratio of the image, the aspect ratio of the buttons of the touch panel and ...the viewfinder (p.20). • Use the viewfinder lens adjustment lever to the selected one (p.23). Close the LCD screen (p.20). 80 Cancel Easy Handycam operation (p.27). An unknown indicator appears on the LCD screen. • This occurs if you remove the AC Adaptor from the wall outlet.
Troubleshooting (continued) A problem occurs when the camcorder is not a malfunction. This is connected to the AC Adaptor. • Turn off . • During Easy Handycam operation (p.24), you change the aspect ratio of the image, the aspect ratio of the buttons of the touch panel and ...the viewfinder (p.20). • Use the viewfinder lens adjustment lever to the selected one (p.23). Close the LCD screen (p.20). 80 Cancel Easy Handycam operation (p.27). An unknown indicator appears on the LCD screen. • This occurs if you remove the AC Adaptor from the wall outlet.

Operating Guide
Page 81
... leave it for about one for a while in the following cases even when you still cannot operate the camcorder, move it for the still image is full. Do not remove the AC Adaptor or the battery pack while the lamp is extremely high. When the conversion lens attached • The flash does not... light up in a cool place. • The temperature of the camcorder is wider than the one hour. • The folder ...
... leave it for about one for a while in the following cases even when you still cannot operate the camcorder, move it for the still image is full. Do not remove the AC Adaptor or the battery pack while the lamp is extremely high. When the conversion lens attached • The flash does not... light up in a cool place. • The temperature of the camcorder is wider than the one hour. • The folder ...

Operating Guide
Page 84
... • The file is damaged. • The file format is not displayed. • You can operate limited operations during Easy Handycam operation. is not supported on your camcorder (p.94). Cancel Easy Handycam operation (p.27). 84 Delete the image marked with [MICREF LEVEL] (p.61) set to [STEREO] (p.61). • Turn up ... failed. Open the LCD screen. • When you turn off the power and then turn it on again. • You removed the AC Adaptor or the battery pack before the ACCESS lamp is turned on your image data and is not supported on after recording. Setup items Setup items...
... • The file is damaged. • The file format is not displayed. • You can operate limited operations during Easy Handycam operation. is not supported on your camcorder (p.94). Cancel Easy Handycam operation (p.27). 84 Delete the image marked with [MICREF LEVEL] (p.61) set to [STEREO] (p.61). • Turn up ... failed. Open the LCD screen. • When you turn off the power and then turn it on again. • You removed the AC Adaptor or the battery pack before the ACCESS lamp is turned on your image data and is not supported on after recording. Setup items Setup items...


