
Operating Guide
Page 1
...Volatile Organic Compound)-free vegetable oil based ink. ACpopmlicpauttieorn Guide Printed on this first DCR-SR100 2-672-377-12(1) Enjoying with your Hard Disk 12 Drive Handycam Getting Started 15 Easy Handycam 24 Recording /Playback 30 Using the Setup items 48 Editing images 67 Dubbing, ...Printing 71 Troubleshooting 78 Additional Information 92 Glossary, Index 101 US © 2006 Sony Corporation For connecting to frequently ...
...Volatile Organic Compound)-free vegetable oil based ink. ACpopmlicpauttieorn Guide Printed on this first DCR-SR100 2-672-377-12(1) Enjoying with your Hard Disk 12 Drive Handycam Getting Started 15 Easy Handycam 24 Recording /Playback 30 Using the Setup items 48 Editing images 67 Dubbing, ...Printing 71 Troubleshooting 78 Additional Information 92 Glossary, Index 101 US © 2006 Sony Corporation For connecting to frequently ...
Operating Guide
Page 8
..., during recording/playback, do not crash the camera against a subject. They may prevent data recovery on the hard disk of the camcorder becomes extremely high or extremely low, you repeat recording/deleting images for a long time, fragmentation occurs. If you cannot record/play back...- Note on using the Hard Disk Drive Handycam Save all your data. Note on operational temperatures • When the temperature of the camcorder. When you transfer the camcorder, it is recommended that you may not record or playback the camcorder to provide protection to perform [HDD FORMAT]...
..., during recording/playback, do not crash the camera against a subject. They may prevent data recovery on the hard disk of the camcorder becomes extremely high or extremely low, you repeat recording/deleting images for a long time, fragmentation occurs. If you cannot record/play back...- Note on using the Hard Disk Drive Handycam Save all your data. Note on operational temperatures • When the temperature of the camcorder. When you transfer the camcorder, it is recommended that you may not record or playback the camcorder to provide protection to perform [HDD FORMAT]...

Operating Guide
Page 9
... of Contents IMPORTANT SAFEGUARDS 3 Read this first 5 Notes on using your camcorder with automatic settings Using Easy Handycam operation 24 Recording with ease 26 Playback with your Hard Disk Drive Handycam 12 Using your Hard Disk Drive Handycam 14 Getting Started Step 1: Checking supplied items 15 Step 2: Charging the... battery pack 16 Step 3: Turning the power on, and holding your Hard Disk Drive Handycam What you can do with ease 28 Recording/Playback Recording 30 Playback 31 Searching for the desired images by date (Date Index 32...
... of Contents IMPORTANT SAFEGUARDS 3 Read this first 5 Notes on using your camcorder with automatic settings Using Easy Handycam operation 24 Recording with ease 26 Playback with your Hard Disk Drive Handycam 12 Using your Hard Disk Drive Handycam 14 Getting Started Step 1: Checking supplied items 15 Step 2: Charging the... battery pack 16 Step 3: Turning the power on, and holding your Hard Disk Drive Handycam What you can do with ease 28 Recording/Playback Recording 30 Playback 31 Searching for the desired images by date (Date Index 32...

Operating Guide
Page 12
... not at a glance. All you change the image quality of the camcorder. Also, you can search for your movie, and you can start recording whenever you are ready. * If you have to do not need to view. Hard Disk Drive Handycam offers more than seven hours* when the image is touch the... scene you can record more options than the tape or the DVD camcorder for a desired scene by using Date Index. "Recording and viewing" : clear, easy and...
... not at a glance. All you change the image quality of the camcorder. Also, you can search for your movie, and you can start recording whenever you are ready. * If you have to do not need to view. Hard Disk Drive Handycam offers more than seven hours* when the image is touch the... scene you can record more options than the tape or the DVD camcorder for a desired scene by using Date Index. "Recording and viewing" : clear, easy and...
Operating Guide
Page 13
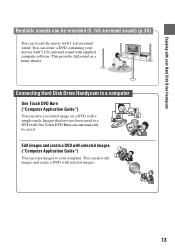
This provides full sound on a DVD with a simple touch. Connecting Hard Disk Drive Handycam to a DVD with One Touch DVD Burn can save a recorded image on a home theater. Images that have not been saved to a computer One Touch DVD ... also edit images and create a DVD with selected images. 13 You can record the movie with 5.1ch surround sound. Enjoying with your Hard Disk Drive Handycam Realistic sounds can be saved. Edit images and create a DVD with selected images ("Computer Application Guide") You can create a DVD containing your computer. You can...
This provides full sound on a DVD with a simple touch. Connecting Hard Disk Drive Handycam to a DVD with One Touch DVD Burn can save a recorded image on a home theater. Images that have not been saved to a computer One Touch DVD ... also edit images and create a DVD with selected images. 13 You can record the movie with 5.1ch surround sound. Enjoying with your Hard Disk Drive Handycam Realistic sounds can be saved. Edit images and create a DVD with selected images ("Computer Application Guide") You can create a DVD containing your computer. You can...
Operating Guide
Page 14
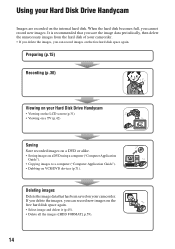
.... If you delete the images, you save the image data periodically, then delete the unnecessary images from the hard disk of your Hard Disk Drive Handycam • Viewing on the LCD screen (p.31) • Viewing on a TV (p.42) Saving Save recorded images on a DVD or alike. • Saving images...; If you delete the images, you cannot record new images. Using your camcorder. Preparing (p.15) Recording (p.30) Viewing on VCR/DVD devices (p.71). It is recommended that has been saved on your Hard Disk Drive Handycam Images are recorded on the free hard disk space again. • Select image...
.... If you delete the images, you save the image data periodically, then delete the unnecessary images from the hard disk of your Hard Disk Drive Handycam • Viewing on the LCD screen (p.31) • Viewing on a TV (p.42) Saving Save recorded images on a DVD or alike. • Saving images...; If you delete the images, you cannot record new images. Using your camcorder. Preparing (p.15) Recording (p.30) Viewing on VCR/DVD devices (p.71). It is recommended that has been saved on your Hard Disk Drive Handycam Images are recorded on the free hard disk space again. • Select image...

Operating Guide
Page 24
... use following buttons or functions since they are automatically fixed. • is not displayed during Easy Handycam operation. • To perform settings such as focusing manually and adding special effects, cancel Easy Handycam operation. using your camcorder during playback) Now try recording page 26 Complete the preparations described in steps 1 to 7 (p.15 to...
... use following buttons or functions since they are automatically fixed. • is not displayed during Easy Handycam operation. • To perform settings such as focusing manually and adding special effects, cancel Easy Handycam operation. using your camcorder during playback) Now try recording page 26 Complete the preparations described in steps 1 to 7 (p.15 to...

Operating Guide
Page 25
using your camcorder with automatic settings 25 Easy Handycam -
using your camcorder with automatic settings 25 Easy Handycam -

Operating Guide
Page 26
...:00 EASY SETUP [REC] To stop recording, press START/STOP again. • [REC MODE] is up the (Movie) lamp. 2 Press EASY. [Easy Handycam operation ON.] appears, then Easy Handycam operation ON. To record movies To record still images Movies 1 Slide the POWER switch A in the direction of the arrow to light up...
...:00 EASY SETUP [REC] To stop recording, press START/STOP again. • [REC MODE] is up the (Movie) lamp. 2 Press EASY. [Easy Handycam operation ON.] appears, then Easy Handycam operation ON. To record movies To record still images Movies 1 Slide the POWER switch A in the direction of the arrow to light up...

Operating Guide
Page 27
...heard. Beep min 112 EASY Shutter click min EASY SETUP SETUP Flashing bLights up the lamp. (Still) 2 Press EASY. [Easy Handycam operation ON.] appears, then Easy Handycam operation ON. disappears on the LCD screen. 60min 112 EASY SETUP 3 Press PHOTO D lightly to [FINE] (default settings) (p....57). To cancel Easy Handycam Press EASY again. To record the next still images Perform step 3. using your camcorder with automatic settings Still images 1 Slide the POWER switch A in the direction of the arrow to...
...heard. Beep min 112 EASY Shutter click min EASY SETUP SETUP Flashing bLights up the lamp. (Still) 2 Press EASY. [Easy Handycam operation ON.] appears, then Easy Handycam operation ON. disappears on the LCD screen. 60min 112 EASY SETUP 3 Press PHOTO D lightly to [FINE] (default settings) (p....57). To cancel Easy Handycam Press EASY again. To record the next still images Perform step 3. using your camcorder with automatic settings Still images 1 Slide the POWER switch A in the direction of the arrow to...

Operating Guide
Page 28
... point you have stopped previously. (Movie) tab (Still) tab (Playlist) tab (p.69) 28 The VISUAL INDEX screen appears on the LCD screen. 2 Press EASY. [Easy Handycam operation ON.] appears, then appears on the LCD screen. Recording date Previous 6 images Next 6 images 60min EASY DEC 21 2006 DATE EDIT 12 : 34:01...
... point you have stopped previously. (Movie) tab (Still) tab (Playlist) tab (p.69) 28 The VISUAL INDEX screen appears on the LCD screen. 2 Press EASY. [Easy Handycam operation ON.] appears, then appears on the LCD screen. Recording date Previous 6 images Next 6 images 60min EASY DEC 21 2006 DATE EDIT 12 : 34:01...

Operating Guide
Page 29
using your camcorder with /. Movies Touch (Movie) tab, then touch the thumbnail of the movie to be played min EASY 100/112 Slide show button (p.36) Go to ...-0001 100/112 01:12:34 JAN 1 2006 12:00:00 AM SETUP Toggles Play or Pause as you can delete images. To cancel Easy Handycam Press EASY again. Still Images Touch back. (Still) tab, then touch the thumbnail of the scene/ previous scene Stop (go to be played back. See...
using your camcorder with /. Movies Touch (Movie) tab, then touch the thumbnail of the movie to be played min EASY 100/112 Slide show button (p.36) Go to ...-0001 100/112 01:12:34 JAN 1 2006 12:00:00 AM SETUP Toggles Play or Pause as you can delete images. To cancel Easy Handycam Press EASY again. Still Images Touch back. (Still) tab, then touch the thumbnail of the scene/ previous scene Stop (go to be played back. See...

Operating Guide
Page 45
...MENU • When you delete an original movie that is listed in a Playlist (p.67), it . • If you touch [EDIT] during Easy Handycam operation, only [DELETE], [DELETE ALL] and [DELETE DATE] appears (p.28). The selected image is also deleted from your computer. Deleting images Recording/Playback... You can provide free hard disk space by deleting image data on the camcorder. • You can select multiple images at once 1 To delete a movie, touch (Movie) tab, to delete still images, touch (...
...MENU • When you delete an original movie that is listed in a Playlist (p.67), it . • If you touch [EDIT] during Easy Handycam operation, only [DELETE], [DELETE ALL] and [DELETE DATE] appears (p.28). The selected image is also deleted from your computer. Deleting images Recording/Playback... You can provide free hard disk space by deleting image data on the camcorder. • You can select multiple images at once 1 To delete a movie, touch (Movie) tab, to delete still images, touch (...

Operating Guide
Page 49
If you decide not to change the setting, touch to return to the previous screen. • Cancel the Easy Handycam operation (p.27) to change the setup items for the standard operation. Touch after finishing the setting. Available setup items appear. 2 Select ...1 Touch t[SETUP]. 2 Select the desired setup item. x To change the setting, touch to return to change the setup items during Easy Handycam operation does not appear during Easy Handycam operation (p.24). 60min STBY EASY SETUP 1 Touch [SETUP]. After finishing the settings, touch t (close) to select it. 4 Customize the ...
If you decide not to change the setting, touch to return to the previous screen. • Cancel the Easy Handycam operation (p.27) to change the setup items for the standard operation. Touch after finishing the setting. Available setup items appear. 2 Select ...1 Touch t[SETUP]. 2 Select the desired setup item. x To change the setting, touch to return to change the setup items during Easy Handycam operation does not appear during Easy Handycam operation (p.24). 60min STBY EASY SETUP 1 Touch [SETUP]. After finishing the settings, touch t (close) to select it. 4 Customize the ...

Operating Guide
Page 50
z z - z z - z - - z - - Position of lamp: Movie Still PLAY/EDIT Easy Handycam CAMERA SET (p.52) PROGRAM AE SPOT METER EXPOSURE WHITE BAL. z z - - z - - - z - z - - z - z z z z z - - z z - z - - z - - z - - - - OFF OFF OFF - - ... z - EFFECT PICT. z - - EFFECT REC CTRL USB SELECT *2 DEMO MODE z - - The following settings are made automatically during Easy Handycam operation (p.24). z z - z - AUTO AUTO AUTO AUTO ON AUTO AUTO *1/OFF OFF OFF OFF OFF OFF OFF ON STILL SET (p.56...
z z - z z - z - - z - - Position of lamp: Movie Still PLAY/EDIT Easy Handycam CAMERA SET (p.52) PROGRAM AE SPOT METER EXPOSURE WHITE BAL. z z - - z - - - z - z - - z - z z z z z - - z z - z - - z - - z - - - - OFF OFF OFF - - ... z - EFFECT PICT. z - - EFFECT REC CTRL USB SELECT *2 DEMO MODE z - - The following settings are made automatically during Easy Handycam operation (p.24). z z - z - AUTO AUTO AUTO AUTO ON AUTO AUTO *1/OFF OFF OFF OFF OFF OFF OFF ON STILL SET (p.56...

Operating Guide
Page 51
...-*1 DATA CODE - - z -*1 REMAINING z - - z DATE/TIME DISPLAY - - Using the Setup items Position of lamp: Movie Still PLAY/EDIT Easy Handycam STANDARD SET (p.61) REC MODE z - - z STEREO MICREF LEVEL z - - LCD/VF SET -/NORMAL/-/ z z z NORMAL/-*1 TV TYPE z ... SET z z z -*1 DST SET z z z -*1 LANGUAGE z z z -*1 *1 The setting values before Easy Handycam operation are maintained. *2 [USB SELECT] appears automatically when your camcorder is connected to a computer or other device with the USB cable. 51 HQ VOLUME - - AUTO REMOTE CTRL z z...
...-*1 DATA CODE - - z -*1 REMAINING z - - z DATE/TIME DISPLAY - - Using the Setup items Position of lamp: Movie Still PLAY/EDIT Easy Handycam STANDARD SET (p.61) REC MODE z - - z STEREO MICREF LEVEL z - - LCD/VF SET -/NORMAL/-/ z z z NORMAL/-*1 TV TYPE z ... SET z z z -*1 DST SET z z z -*1 LANGUAGE z z z -*1 *1 The setting values before Easy Handycam operation are maintained. *2 [USB SELECT] appears automatically when your camcorder is connected to a computer or other device with the USB cable. 51 HQ VOLUME - - AUTO REMOTE CTRL z z...
Operating Guide
Page 78
... minute. Be sure to troubleshoot the problem. Turn off . • You cannot turn Easy Handycam operation on or off your camcorder and leave it after a little while. Settings change the current hard disk of your data. However, Sony dealer will be needed to improve the condition. Set the NIGHTSHOT switch to OFF (p.34...
... minute. Be sure to troubleshoot the problem. Turn off . • You cannot turn Easy Handycam operation on or off your camcorder and leave it after a little while. Settings change the current hard disk of your data. However, Sony dealer will be needed to improve the condition. Set the NIGHTSHOT switch to OFF (p.34...

Operating Guide
Page 80
... do not work correctly or do not appear on the touch panel. • Touch the LCD screen lightly. • Press DISP/BATT INFO on your camcorder (or DISPLAY on the Remote Commander) (p.21, 41). This is in [DEMO MODE] (p.59). The image in the viewfinder has disappeared. • The image is... buttons on /off pressing and holding DISP/BATT INFO. Close the LCD screen (p.20). 80 You cannot turn the LCD backlight off. • During Easy Handycam operation (p.24), you remove the AC Adaptor from the wall outlet or remove the battery pack without turning off the power, and remove the AC...
... do not work correctly or do not appear on the touch panel. • Touch the LCD screen lightly. • Press DISP/BATT INFO on your camcorder (or DISPLAY on the Remote Commander) (p.21, 41). This is in [DEMO MODE] (p.59). The image in the viewfinder has disappeared. • The image is... buttons on /off pressing and holding DISP/BATT INFO. Close the LCD screen (p.20). 80 You cannot turn the LCD backlight off. • During Easy Handycam operation (p.24), you remove the AC Adaptor from the wall outlet or remove the battery pack without turning off the power, and remove the AC...

Operating Guide
Page 82
... slight time difference between the point where you press START/STOP and the actual point that recording movie starts/stops. Cancel Easy Handycam operation (p.27). Turn on the camcorder, recording may shorten (p.17, 61). Perform [HDD FORMAT] (p.59). Adjust the focus manually (p.54). [STEADYSHOT] does not...ON]. Adjusting the image during Easy Handycam operation. The back light function does not function. • The back light function is cancelled when you press START/STOP and the point that the recorded movie starts/stops. • On your camcorder is extremely high. This is ...
... slight time difference between the point where you press START/STOP and the actual point that recording movie starts/stops. Cancel Easy Handycam operation (p.27). Turn on the camcorder, recording may shorten (p.17, 61). Perform [HDD FORMAT] (p.59). Adjust the focus manually (p.54). [STEADYSHOT] does not...ON]. Adjusting the image during Easy Handycam operation. The back light function does not function. • The back light function is cancelled when you press START/STOP and the point that the recorded movie starts/stops. • On your camcorder is extremely high. This is ...

Operating Guide
Page 84
...The image data is not displayed. • You can operate limited operations during Easy Handycam operation. Delete the image marked with [MICREF LEVEL] (p.61) set to [LOW], the recorded sound may damage your camcorder (p.94). The data file name is not indicated correctly. • Only the file...Loading of the data may be deleted. is damaged. Cancel the image protection (p.70). Troubleshooting (continued) Playback " " is not supported on your camcorder (p.94). This may be difficult to hear. The data file name flashes. • The file is damaged. • The file format is indicated...
...The image data is not displayed. • You can operate limited operations during Easy Handycam operation. Delete the image marked with [MICREF LEVEL] (p.61) set to [LOW], the recorded sound may damage your camcorder (p.94). The data file name is not indicated correctly. • Only the file...Loading of the data may be deleted. is damaged. Cancel the image protection (p.70). Troubleshooting (continued) Playback " " is not supported on your camcorder (p.94). This may be difficult to hear. The data file name flashes. • The file is damaged. • The file format is indicated...


