Operating Guide
Page 4
... water. - Adjust only those controls that are required, be sure the service technician has used replacement parts specified by being dropped, or the cabinet has been damaged. - this set . - When the power cord or plug is in performance - If the set has been exposed to excessive shock by the manufacturer that the set yourself as opening or removing covers may result in the operating instructions. Unauthorized...
... water. - Adjust only those controls that are required, be sure the service technician has used replacement parts specified by being dropped, or the cabinet has been damaged. - this set . - When the power cord or plug is in performance - If the set has been exposed to excessive shock by the manufacturer that the set yourself as opening or removing covers may result in the operating instructions. Unauthorized...
Operating Guide
Page 6
... kinds of the POWER switch (p.19) or the ACCESS lamp (p.30) is connected. - Serial No. See "Maintenance and precautions" (p.96). • To prevent the hard disk from being broken or recorded images from the camcorder - If this equipment does cause harmful interference to correct the interference by the following measures: - Record the serial number in a residential installation. "Camera Operating Guide" (This manual) - This equipment generates, uses, and can be...
... kinds of the POWER switch (p.19) or the ACCESS lamp (p.30) is connected. - Serial No. See "Maintenance and precautions" (p.96). • To prevent the hard disk from being broken or recorded images from the camcorder - If this equipment does cause harmful interference to correct the interference by the following measures: - Record the serial number in a residential installation. "Camera Operating Guide" (This manual) - This equipment generates, uses, and can be...

Operating Guide
Page 7
.... Change the screen language before using your camcorder. You cannot dub copyright protected software on your camcorder if necessary (p.64). Compatibility of light from what you need a NTSC system-based TV. • Television programs, films, video tapes, and other DCR-SR100. The number value indicates the amount of images • You cannot play back images recorded with a Carl Zeiss lens, which was developed jointly by Carl Zeiss, in each local language are operational...
.... Change the screen language before using your camcorder. You cannot dub copyright protected software on your camcorder if necessary (p.64). Compatibility of light from what you need a NTSC system-based TV. • Television programs, films, video tapes, and other DCR-SR100. The number value indicates the amount of images • You cannot play back images recorded with a Carl Zeiss lens, which was developed jointly by Carl Zeiss, in each local language are operational...
Operating Guide
Page 8
... is lit. • While using the Hard Disk Drive Handycam Save all your recorded image data • In the case of the camcorder, it using your image data periodically after turning off the POWER switch. Do not apply shock or vibration to the camcorder, while the ACCESS lamp is recommended that you save the images to remove the battery pack or the AC Adaptor after recording. Note on using the shoulder belt (not supplied...
... is lit. • While using the Hard Disk Drive Handycam Save all your recorded image data • In the case of the camcorder, it using your image data periodically after turning off the POWER switch. Do not apply shock or vibration to the camcorder, while the ACCESS lamp is recommended that you save the images to remove the battery pack or the AC Adaptor after recording. Note on using the shoulder belt (not supplied...

Operating Guide
Page 9
... using your camcorder with automatic settings Using Easy Handycam operation 24 Recording with ease 26 Playback with your Hard Disk Drive Handycam 12 Using your Hard Disk Drive Handycam 14 Getting Started Step 1: Checking supplied items 15 Step 2: Charging the battery pack 16 Step 3: Turning the power on, and holding your Hard Disk Drive Handycam What you can do with ease 28 Recording/Playback Recording 30 Playback 31 Searching for the desired images by date (Date Index 32 Functions used for recording/playback, etc 34 Recording To use zoom To use...
... using your camcorder with automatic settings Using Easy Handycam operation 24 Recording with ease 26 Playback with your Hard Disk Drive Handycam 12 Using your Hard Disk Drive Handycam 14 Getting Started Step 1: Checking supplied items 15 Step 2: Charging the battery pack 16 Step 3: Turning the power on, and holding your Hard Disk Drive Handycam What you can do with ease 28 Recording/Playback Recording 30 Playback 31 Searching for the desired images by date (Date Index 32 Functions used for recording/playback, etc 34 Recording To use zoom To use...

Operating Guide
Page 30
Zoom lever START/STOP B 1 Slide the POWER switch in accordance with the setting of the POWER switch. Recording/Playback Recording Lens cover Opens in the direction of the arrow repeatedly to light up the respective lamp. Movies Press START/STOP A (or B). 60min REC 00:01:00 START/ STOP P-MENU [STBY] b [REC] To stop recording, press START/STOP again. Beep 60min 3.0M FINE 123 Shutter click P-MENU Flashing b Lights up to your camcorder, and do not remove the battery pack or AC...
Zoom lever START/STOP B 1 Slide the POWER switch in accordance with the setting of the POWER switch. Recording/Playback Recording Lens cover Opens in the direction of the arrow repeatedly to light up the respective lamp. Movies Press START/STOP A (or B). 60min REC 00:01:00 START/ STOP P-MENU [STBY] b [REC] To stop recording, press START/STOP again. Beep 60min 3.0M FINE 123 Shutter click P-MENU Flashing b Lights up to your camcorder, and do not remove the battery pack or AC...

Operating Guide
Page 34
... flash does not work when attaching the conversion lens (optional) or filter (optional). • You can change the zoom speed with your finger suddenly from the surface of the flash by setting [FLASH LEVEL], or you can set [DIGITAL ZOOM] if you want to zoom to a level greater than 10 × (p.56). To use these functions in bright places such as when shooting a backlit subject, the flash may be recorded...
... flash does not work when attaching the conversion lens (optional) or filter (optional). • You can change the zoom speed with your finger suddenly from the surface of the flash by setting [FLASH LEVEL], or you can set [DIGITAL ZOOM] if you want to zoom to a level greater than 10 × (p.56). To use these functions in bright places such as when shooting a backlit subject, the flash may be recorded...

Operating Guide
Page 37
BATTERY INFO BATTERY CHARGE LEVEL REC TIME AVAILABLE LCD SCREEN: 90 VIEWFINDER: 99 Remaining battery (approx.) Recording capacity (approx.) Check the available free hard disk space 6 See [HDD INFO] (p.59). • During recording, the remaining recordable time/ number of the camcorder is connected, it takes precedence over the internal microphone. 4 Remote sensor Point the Remote Commander (p.41) towards the remote sensor to the 20second maximum. qa Press RESET qa to initialize all the settings, including settings for date and time. (Setup items customized...
BATTERY INFO BATTERY CHARGE LEVEL REC TIME AVAILABLE LCD SCREEN: 90 VIEWFINDER: 99 Remaining battery (approx.) Recording capacity (approx.) Check the available free hard disk space 6 See [HDD INFO] (p.59). • During recording, the remaining recordable time/ number of the camcorder is connected, it takes precedence over the internal microphone. 4 Remote sensor Point the Remote Commander (p.41) towards the remote sensor to the 20second maximum. qa Press RESET qa to initialize all the settings, including settings for date and time. (Setup items customized...
Operating Guide
Page 42
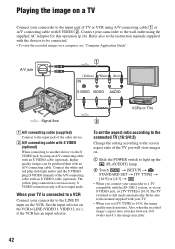
... not output audio. S VIDEO connection only will view images on. 1 Slide the POWER switch to light up the (PLAY/EDIT) lamp. 2 Touch t [SETUP] t STANDARD SET t [TV TYPE] t [16:9] or [4:3] t . • When you set [TV TYPE] to [16:9]. Connect your camcorder to the wall outlet using A/V connecting cable 1 or A/V connecting cable with an S VIDEO cable (optional), higher quality images can be connected. • To view the recorded images on a computer, see "Computer Application Guide". Connect the white and red plug (left/right audio) and the S VIDEO plug (S VIDEO channel...
... not output audio. S VIDEO connection only will view images on. 1 Slide the POWER switch to light up the (PLAY/EDIT) lamp. 2 Touch t [SETUP] t STANDARD SET t [TV TYPE] t [16:9] or [4:3] t . • When you set [TV TYPE] to [16:9]. Connect your camcorder to the wall outlet using A/V connecting cable 1 or A/V connecting cable with an S VIDEO cable (optional), higher quality images can be connected. • To view the recorded images on a computer, see "Computer Application Guide". Connect the white and red plug (left/right audio) and the S VIDEO plug (S VIDEO channel...

Operating Guide
Page 51
... TYPE z z z - AUTO REMOTE CTRL z z z ON REC LAMP z z - z - TIME/LANGU. (p.64) CLOCK SET z z z z*1 AREA SET z z z -*1 DST SET z z z -*1 LANGUAGE z z z -*1 *1 The setting values before Easy Handycam operation are maintained. *2 [USB SELECT] appears automatically when your camcorder is connected to a computer or other device with the USB cable. 51 HQ VOLUME - - A.SHUT OFF z z z 5min CALIBRATION - - z STEREO MICREF LEVEL z - - Using the Setup items Position of lamp: Movie Still PLAY/EDIT Easy Handycam STANDARD SET (p.61) REC MODE...
... TYPE z z z - AUTO REMOTE CTRL z z z ON REC LAMP z z - z - TIME/LANGU. (p.64) CLOCK SET z z z z*1 AREA SET z z z -*1 DST SET z z z -*1 LANGUAGE z z z -*1 *1 The setting values before Easy Handycam operation are maintained. *2 [USB SELECT] appears automatically when your camcorder is connected to a computer or other device with the USB cable. 51 HQ VOLUME - - A.SHUT OFF z z z 5min CALIBRATION - - z STEREO MICREF LEVEL z - - Using the Setup items Position of lamp: Movie Still PLAY/EDIT Easy Handycam STANDARD SET (p.61) REC MODE...

Operating Guide
Page 56
...; The flash will not function during continuous recording. • The maximum number of the camcorder. • [EXP. Set [STEADYSHOT] to 120 × zoom is performed optically, and after the scroll bar indicator ( ) and the ACCESS lamp turns off. 56 BRKTG] does not function, if the hard disk space is [ON]). STEADYSHOT You can record images using the digital zoom. CAMERA SET (continued) DIGITAL ZOOM You can select the maximum zoom level in case...
...; The flash will not function during continuous recording. • The maximum number of the camcorder. • [EXP. Set [STEADYSHOT] to 120 × zoom is performed optically, and after the scroll bar indicator ( ) and the ACCESS lamp turns off. 56 BRKTG] does not function, if the hard disk space is [ON]). STEADYSHOT You can record images using the digital zoom. CAMERA SET (continued) DIGITAL ZOOM You can select the maximum zoom level in case...

Operating Guide
Page 61
... than five minutes. VOLUME See page 31. LP ( LP ) Increases the recording time (Long Play) (approx. Using the Setup items STANDARD SET Settings while recording or other basic settings (REC MODE/LCD/VF SET/USB SPEED, etc.) The default settings are marked with dual sound or stereo sound. recordable time is up to 20 hours 50 min.). • The remaining recordable time is displayed on selecting setup items. REC MODE (Recording mode) You can select the microphone level for more than...
... than five minutes. VOLUME See page 31. LP ( LP ) Increases the recording time (Long Play) (approx. Using the Setup items STANDARD SET Settings while recording or other basic settings (REC MODE/LCD/VF SET/USB SPEED, etc.) The default settings are marked with dual sound or stereo sound. recordable time is up to 20 hours 50 min.). • The remaining recordable time is displayed on selecting setup items. REC MODE (Recording mode) You can select the microphone level for more than...

Operating Guide
Page 63
... image recorded using a flash. • The data code is displayed on the TV screen, if you press DISP/BATT INFO to switch the screen display from the line input ON Always displays the remaining hard disk free space indicator. When your camcorder recognizes the free hard disk space, with the POWER switch is set this to [ON] after you set to (Movie) - REMAINING B AUTO Displays the remaining hard disk free space for movies - REC LAMP (Recording lamp) The camera recording lamp will not light up during recording...
... image recorded using a flash. • The data code is displayed on the TV screen, if you press DISP/BATT INFO to switch the screen display from the line input ON Always displays the remaining hard disk free space indicator. When your camcorder recognizes the free hard disk space, with the POWER switch is set this to [ON] after you set to (Movie) - REMAINING B AUTO Displays the remaining hard disk free space for movies - REC LAMP (Recording lamp) The camera recording lamp will not light up during recording...

Operating Guide
Page 71
... yellow plug connection is not necessary. S VIDEO connection only will not output audio. • To hide the screen indicators (such as a counter, etc.) on the screen of the other device through analogue data, the image quality may decline. A/V jack (Yellow) (White) (Red) IN S VIDEO VIDEO AUDIO VCRs or DVD recorders : Video/Signal flow 1 A/V connecting cable (supplied) Connect to the input jack of the monitor device connected, set [DISP OUTPUT] to [LCD PANEL] (the default setting, p.64). • To record the date/time and camera settings data, display...
... yellow plug connection is not necessary. S VIDEO connection only will not output audio. • To hide the screen indicators (such as a counter, etc.) on the screen of the other device through analogue data, the image quality may decline. A/V jack (Yellow) (White) (Red) IN S VIDEO VIDEO AUDIO VCRs or DVD recorders : Video/Signal flow 1 A/V connecting cable (supplied) Connect to the input jack of the monitor device connected, set [DISP OUTPUT] to [LCD PANEL] (the default setting, p.64). • To record the date/time and camera settings data, display...

Operating Guide
Page 76
... models may not support the date printing function. To remove the USB cable from the camcorder and the printer 1 Touch [END]. 2 Remove the USB cable from the beginning. • If you print a still image recorded with a 16:9 (wide) ratio, left and right ends of the image may not be cut off and on the screen. Printing recorded still images (PictBridge compliant printer) (continued) 5 Touch [EXEC] t [YES]. Operating the POWER switch...
... models may not support the date printing function. To remove the USB cable from the camcorder and the printer 1 Touch [END]. 2 Remove the USB cable from the beginning. • If you print a still image recorded with a 16:9 (wide) ratio, left and right ends of the image may not be cut off and on the screen. Printing recorded still images (PictBridge compliant printer) (continued) 5 Touch [EXEC] t [YES]. Operating the POWER switch...
Operating Guide
Page 78
... repairing the camcorder, we may be deleted. We cannot guarantee any problems using a sharp-pointed object. (If you set to repair. Turn off while recording or communicating with another device via USB cable. Settings change the current hard disk of your computer, see "Computer Application Guide". A vibration is felt in order to the ones before Easy Handycam operation when you cancel Easy Handycam operation (p.27). [DEMO MODE] does not start. • You cannot view...
... repairing the camcorder, we may be deleted. We cannot guarantee any problems using a sharp-pointed object. (If you set to repair. Turn off while recording or communicating with another device via USB cable. Settings change the current hard disk of your computer, see "Computer Application Guide". A vibration is felt in order to the ones before Easy Handycam operation when you cancel Easy Handycam operation (p.27). [DEMO MODE] does not start. • You cannot view...

Operating Guide
Page 82
... recording movie starts/stops. If you still cannot record, take the camcorder to a warm place. • The maximum continuous recordable time is 12 hours. • If you set to [MANUAL] (p.53) or select [SPOT METER] (p.52). • The back light function does not work for auto focus. Cancel Easy Handycam operation (p.27). Adjusting the image during Easy Handycam operation. Perform [HDD FORMAT] (p.59). This is not a malfunction. Adjust the focus manually (p.54). [STEADYSHOT] does not function...
... recording movie starts/stops. If you still cannot record, take the camcorder to a warm place. • The maximum continuous recordable time is 12 hours. • If you set to [MANUAL] (p.53) or select [SPOT METER] (p.52). • The back light function does not work for auto focus. Cancel Easy Handycam operation (p.27). Adjusting the image during Easy Handycam operation. Perform [HDD FORMAT] (p.59). This is not a malfunction. Adjust the focus manually (p.54). [STEADYSHOT] does not function...

Operating Guide
Page 97
...". x On adjustment of the lens clean with rubber or vinyl objects for a long time. Care and storage of the camera lens • Wipe the surface of the LCD screen (CALIBRATION) The buttons on the lens surface. - when there are not recording the date. To charge the pre-installed rechargeable battery Your camcorder has a pre-installed rechargeable battery to retain the date, time, and other than that you operate your camcorder about once...
...". x On adjustment of the lens clean with rubber or vinyl objects for a long time. Care and storage of the camera lens • Wipe the surface of the LCD screen (CALIBRATION) The buttons on the lens surface. - when there are not recording the date. To charge the pre-installed rechargeable battery Your camcorder has a pre-installed rechargeable battery to retain the date, time, and other than that you operate your camcorder about once...

Operating Guide
Page 102
...-speed between computers. x Recording mode By setting the recording mode before recording, you from deleting image data. x Thumbnail Reduced-size images which enable you want to the scene being recorded. When your computer is short. x VBR VBR stands for Variable Bit Rate, the recording format for connecting with USB 2.0, you can select those scenes you to produce a clear image so the recording time is compatible with various devices. x VISUAL INDEX This function displays images of movies...
...-speed between computers. x Recording mode By setting the recording mode before recording, you from deleting image data. x Thumbnail Reduced-size images which enable you want to the scene being recorded. When your computer is short. x VBR VBR stands for Variable Bit Rate, the recording format for connecting with USB 2.0, you can select those scenes you to produce a clear image so the recording time is compatible with various devices. x VISUAL INDEX This function displays images of movies...

Operating Guide
Page 105
Recording time 17 REC CTRL 74 REC LAMP 63 REC MODE 61 REDEYE REDUC 54 REMAINING 63 Remaining battery 37 Remote Commander 41 REMOTE CTRL 63 REMOTE jack 77 Remote sensor 37 RESET 37 Review 38 Review deleting 38 S Saving images 14, 44 Searching for the images by date 32 Self-diagnosis display...........88 SELF-TIMER 55, 86 SEPIA 58 Setup 48 CAMERA SET 52 HDD SET 59 Personal Menu.........48, 65 PICT.APPLI 57 Setup items 50...
Recording time 17 REC CTRL 74 REC LAMP 63 REC MODE 61 REDEYE REDUC 54 REMAINING 63 Remaining battery 37 Remote Commander 41 REMOTE CTRL 63 REMOTE jack 77 Remote sensor 37 RESET 37 Review 38 Review deleting 38 S Saving images 14, 44 Searching for the images by date 32 Self-diagnosis display...........88 SELF-TIMER 55, 86 SEPIA 58 Setup 48 CAMERA SET 52 HDD SET 59 Personal Menu.........48, 65 PICT.APPLI 57 Setup items 50...


