
Operating Guide
Page 7
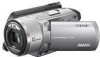
...in Germany, and Sony Corporation, and produces superior images. Compatibility of images • You cannot play back images recorded with other DCR-SR100. Change the screen language before using a digital still camera, and thus may appear different from a subject coming into the lens. 7 It adopts...the image and sound are subject to change without any problems. • Compensation for your camcorder to a malfunction of this manual are captured using your camcorder. You also cannot play back both movies and still images other materials may cause malfunctions. ...
...in Germany, and Sony Corporation, and produces superior images. Compatibility of images • You cannot play back images recorded with other DCR-SR100. Change the screen language before using a digital still camera, and thus may appear different from a subject coming into the lens. 7 It adopts...the image and sound are subject to change without any problems. • Compensation for your camcorder to a malfunction of this manual are captured using your camcorder. You also cannot play back both movies and still images other materials may cause malfunctions. ...

Operating Guide
Page 19
...the LCD screen for approximately five minutes, to save battery power. ([A.SHUT OFF], p.64). • When you leave your camcorder correctly. POWER switch Lens cover 2 Hold your camcorder without any operation for a few seconds. Getting Started 1 Turn on the power by sliding the POWER switch in the center.... Step 3: Turning the power on, and holding your camcorder To record, slide the POWER switch to (Movie) or (Still), the lens cover opens up . When using it for the first time, the [CLOCK SET] screen appears (p.22). ...
...the LCD screen for approximately five minutes, to save battery power. ([A.SHUT OFF], p.64). • When you leave your camcorder correctly. POWER switch Lens cover 2 Hold your camcorder without any operation for a few seconds. Getting Started 1 Turn on the power by sliding the POWER switch in the center.... Step 3: Turning the power on, and holding your camcorder To record, slide the POWER switch to (Movie) or (Still), the lens cover opens up . When using it for the first time, the [CLOCK SET] screen appears (p.22). ...

Operating Guide
Page 20
Viewfinder lens adjustment lever Move it until appears. This is practical when you use your camcorder in bright conditions or you can close it with the LCD ... adjust the LCD screen. • If you open the LCD screen 90 degrees to the camcorder, then rotate it 180 degrees to the lens side, you want to save battery power. The recorded image will not be affected by the... longer Press and hold DISP/BATT INFO until it clicks. 2 90 degrees 1 90 degrees to the (max.) camcorder • Be careful not to press the buttons on the LCD screen is clear. Step 4: Adjusting the LCD ...
Viewfinder lens adjustment lever Move it until appears. This is practical when you use your camcorder in bright conditions or you can close it with the LCD ... adjust the LCD screen. • If you open the LCD screen 90 degrees to the camcorder, then rotate it 180 degrees to the lens side, you want to save battery power. The recorded image will not be affected by the... longer Press and hold DISP/BATT INFO until it clicks. 2 90 degrees 1 90 degrees to the (max.) camcorder • Be careful not to press the buttons on the LCD screen is clear. Step 4: Adjusting the LCD ...

Operating Guide
Page 30
...hard disk. Still Images Press PHOTO lightly to light up A shutter sound is finished, it fully B. Do not apply shock or vibration to your camcorder, and do not remove the battery pack or AC Adaptor. • You cannot record movies and still images at the same time. • ...SIZE] (p.57). 30 When disappears, the image has been recorded. • If the ACCESS lamp is on after recording is heard. Recording/Playback Recording Lens cover Opens in the OFF (CHG) position. 2 Start recording. Beep 60min 3.0M FINE 123 Shutter click P-MENU Flashing b Lights up the respective lamp....
...hard disk. Still Images Press PHOTO lightly to light up A shutter sound is finished, it fully B. Do not apply shock or vibration to your camcorder, and do not remove the battery pack or AC Adaptor. • You cannot record movies and still images at the same time. • ...SIZE] (p.57). 30 When disappears, the image has been recorded. • If the ACCESS lamp is on after recording is heard. Recording/Playback Recording Lens cover Opens in the OFF (CHG) position. 2 Start recording. Beep 60min 3.0M FINE 123 Shutter click P-MENU Flashing b Lights up the respective lamp....

Operating Guide
Page 34
.... To record an image brighter in flash is insufficient ambient light. This may be effective. • The flash does not work when attaching the conversion lens (optional) or filter (optional). • You can prevent the redeye by setting [REDEYE REDUC] (p.54). To use infrared light. Flash effect may...Move it . If you do not cover the infrared port 4 with the zoom buttons 7 on the LCD frame. • The minimum distance required between your camcorder and the subject to get a sharp focus is complete. • If you want to zoom to ON. ( and ["NIGHTSHOT"] appear.) • To record ...
.... To record an image brighter in flash is insufficient ambient light. This may be effective. • The flash does not work when attaching the conversion lens (optional) or filter (optional). • You can prevent the redeye by setting [REDEYE REDUC] (p.54). To use infrared light. Flash effect may...Move it . If you do not cover the infrared port 4 with the zoom buttons 7 on the LCD frame. • The minimum distance required between your camcorder and the subject to get a sharp focus is complete. • If you want to zoom to ON. ( and ["NIGHTSHOT"] appear.) • To record ...
Operating Guide
Page 36
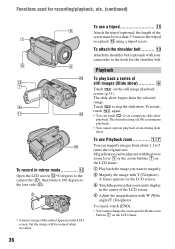
... appears on the LCD screen. 3 Touch the portion that you want to display in the center of the LCD screen. 4 Adjust the magnification with your camcorder to the hook for recording/playback, etc. (continued) To record in mirror mode qs Open the LCD screen qs 90 degrees to the... camcorder (1), then rotate it 180 degrees to the lens side (2). • A mirror-image of the subject appears on the LCD screen, but the image will be normal when recorded. 36...
... appears on the LCD screen. 3 Touch the portion that you want to display in the center of the LCD screen. 4 Adjust the magnification with your camcorder to the hook for recording/playback, etc. (continued) To record in mirror mode qs Open the LCD screen qs 90 degrees to the... camcorder (1), then rotate it 180 degrees to the lens side (2). • A mirror-image of the subject appears on the LCD screen, but the image will be normal when recorded. 36...
Operating Guide
Page 55
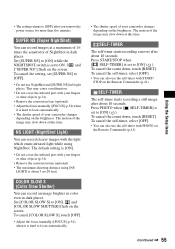
...sensitivity of your fingers or other objects (p.34). • Remove the conversion lens (optional). • Adjust the focus manually ([FOCUS], p.54) when it is [ON]. • Do not cover the infrared port with your camcorder changes depending on the Remote Commander (p.41). To cancel the self-timer,...record an image brighter in color even in bright places. Using the Setup items • The setting returns to [ON]. The motion of your camcorder changes depending on the Remote Commander (p.41). To cancel [COLOR SLOW S], touch [OFF]. • Adjust the focus manually ([FOCUS], p.54),...
...sensitivity of your fingers or other objects (p.34). • Remove the conversion lens (optional). • Adjust the focus manually ([FOCUS], p.54) when it is [ON]. • Do not cover the infrared port with your camcorder changes depending on the Remote Commander (p.41). To cancel the self-timer,...record an image brighter in color even in bright places. Using the Setup items • The setting returns to [ON]. The motion of your camcorder changes depending on the Remote Commander (p.41). To cancel [COLOR SLOW S], touch [OFF]. • Adjust the focus manually ([FOCUS], p.54),...

Operating Guide
Page 56
... 2.3M ( ) : 3 images EXP. B OFF Select this when not recording continuously. Record the next still image after another by pressing PHOTO. The right side of the camcorder. • [EXP. B OFF Up to 10 × zoom is performed optically. 20 × Up to 10 × zoom is performed optically, and after that up... × zoom is performed digitally. STEADYSHOT You can select the maximum zoom level in parentheses appear when the items are using a tripod or the conversion lens (optional). The indicators in case you select the zooming level.
... 2.3M ( ) : 3 images EXP. B OFF Select this when not recording continuously. Record the next still image after another by pressing PHOTO. The right side of the camcorder. • [EXP. B OFF Up to 10 × zoom is performed optically. 20 × Up to 10 × zoom is performed optically, and after that up... × zoom is performed digitally. STEADYSHOT You can select the maximum zoom level in parentheses appear when the items are using a tripod or the conversion lens (optional). The indicators in case you select the zooming level.

Operating Guide
Page 80
...the touch panel. • Touch the LCD screen lightly. • Press DISP/BATT INFO on your camcorder (or DISPLAY on the screen. • The camcorder is in the viewfinder is not a malfunction. Cancel Easy Handycam operation (p.27). The buttons on the LCD screen. • This occurs if you cannot turn the LCD... you change the aspect ratio of the image, the aspect ratio of the buttons of the touch panel and indicators will switch to adjust the lens (p.20). Close the LCD screen (p.20). 80 Then, connect it again. The image in [DEMO MODE] (p.59). Touch the LCD screen. This is...
...the touch panel. • Touch the LCD screen lightly. • Press DISP/BATT INFO on your camcorder (or DISPLAY on the screen. • The camcorder is in the viewfinder is not a malfunction. Cancel Easy Handycam operation (p.27). The buttons on the LCD screen. • This occurs if you cannot turn the LCD... you change the aspect ratio of the image, the aspect ratio of the buttons of the touch panel and indicators will switch to adjust the lens (p.20). Close the LCD screen (p.20). 80 Then, connect it again. The image in [DEMO MODE] (p.59). Touch the LCD screen. This is...

Operating Guide
Page 81
... [COLOR SLOW S] - [D. Delete images (p.45) or perform [HDD FORMAT] (p.59). • While activating [DROP SENSOR] (p.60), you stop recording. • Your camcorder is full. Pressing START/STOP or PHOTO does not record movies/still images. • Slide the POWER switch to "Adjusting the image during recording" (p.82...). When the conversion lens attached • The flash does not light up the (Movie) or the (Still) lamp. • Your camcorder is wider than the one hour. • The folder number shows 999, and the ...
... [COLOR SLOW S] - [D. Delete images (p.45) or perform [HDD FORMAT] (p.59). • While activating [DROP SENSOR] (p.60), you stop recording. • Your camcorder is full. Pressing START/STOP or PHOTO does not record movies/still images. • Slide the POWER switch to "Adjusting the image during recording" (p.82...). When the conversion lens attached • The flash does not light up the (Movie) or the (Still) lamp. • Your camcorder is wider than the one hour. • The folder number shows 999, and the ...

Operating Guide
Page 83
...; The spots appear when you are recording in [SUPER NS] or [COLOR SLOW S]. Otherwise, the Remote Commander may not function properly. • Remove the conversion lens (optional) as direct sunlight or overhead lighting.
...; The spots appear when you are recording in [SUPER NS] or [COLOR SLOW S]. Otherwise, the Remote Commander may not function properly. • Remove the conversion lens (optional) as direct sunlight or overhead lighting.

Operating Guide
Page 90
Cannot recover data. • Writing data onto the hard disk of the camcorder. x Flash Charging... Lens accessory attached. Cannot use flash. • The flash does not work when attaching the conversion lens (optional) or filter (optional). Turn the power off the printer and on ...reading or writing the hard disk of the camcorder has failed. Recovering data Avoid any vibration. • Your camcorder tries to recover the data, but they were unsuccessful. Connect the camcorder to a computer" in "Computer Application Guide". x Lens cover Lens cover not fully open. When you touch...
Cannot recover data. • Writing data onto the hard disk of the camcorder. x Flash Charging... Lens accessory attached. Cannot use flash. • The flash does not work when attaching the conversion lens (optional) or filter (optional). Turn the power off the printer and on ...reading or writing the hard disk of the camcorder has failed. Recovering data Avoid any vibration. • Your camcorder tries to recover the data, but they were unsuccessful. Connect the camcorder to a computer" in "Computer Application Guide". x Lens cover Lens cover not fully open. When you touch...
Operating Guide
Page 96
... not the cord. • Do not damage the power cord such as by a Sony dealer before storing it . • Keep metal contacts clean. 96 • Keep the Remote Commander and button-type battery out of the lens. • Keep the POWER switch setting to direct sunlight. x Note on and let... it run such as by a heating device. • You bring your camcorder from rain or sea water. x If moisture condensation has occurred Turn off...
... not the cord. • Do not damage the power cord such as by a Sony dealer before storing it . • Keep metal contacts clean. 96 • Keep the Remote Commander and button-type battery out of the lens. • Keep the POWER switch setting to direct sunlight. x Note on and let... it run such as by a heating device. • You bring your camcorder from rain or sea water. x If moisture condensation has occurred Turn off...

Operating Guide
Page 97
... you use the LCD Cleaning Kit (optional), do not use your camcorder but it , or if you are using your camcorder. Care and storage of the camera lens • Wipe the surface of the AC Adaptor from your camcorder to the wall outlet using the supplied AC Adaptor during the operation....casing with rubber or vinyl objects for a long time. The rechargeable battery will get discharged gradually if you are using your camcorder at the seaside. • Store the lens in about once a month to calibrate the LCD screen. The position of the LCD screen may damage the surface of ...
... you use the LCD Cleaning Kit (optional), do not use your camcorder but it , or if you are using your camcorder. Care and storage of the camera lens • Wipe the surface of the AC Adaptor from your camcorder to the wall outlet using the supplied AC Adaptor during the operation....casing with rubber or vinyl objects for a long time. The rechargeable battery will get discharged gradually if you are using your camcorder at the seaside. • Store the lens in about once a month to calibrate the LCD screen. The position of the LCD screen may damage the surface of ...
Operating Guide
Page 99
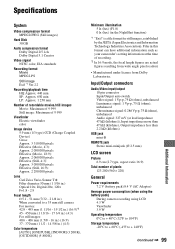
Files in this format can have additional information such as your camcorder's setting information at load impedance 47 kΩ (kilohms)), Input impedance more than 47 kΩ (kilohms), Output impedance less than 2.2 kΩ (kilohms) USB jack ..., 4:3): Approx. 2 050 000 pixels Effective (Movie, 16:9): Approx. 2 060 000 pixels Effective (Still, 4:3): Approx. 3 050 000 pixels Effective (Still, 16:9): Approx. 2 290 000 pixels Lens Carl Zeiss Vario-Sonnar T Filter diameter:30 mm (1 3/16 in.) Optical:10×, Digital:20×, 120× F=1.8 - 2.9 Focal length f=5.1 - 51 mm (7/32 - 2 1/8 in...
Files in this format can have additional information such as your camcorder's setting information at load impedance 47 kΩ (kilohms)), Input impedance more than 47 kΩ (kilohms), Output impedance less than 2.2 kΩ (kilohms) USB jack ..., 4:3): Approx. 2 050 000 pixels Effective (Movie, 16:9): Approx. 2 060 000 pixels Effective (Still, 4:3): Approx. 3 050 000 pixels Effective (Still, 16:9): Approx. 2 290 000 pixels Lens Carl Zeiss Vario-Sonnar T Filter diameter:30 mm (1 3/16 in.) Optical:10×, Digital:20×, 120× F=1.8 - 2.9 Focal length f=5.1 - 51 mm (7/32 - 2 1/8 in...
Operating Guide
Page 104
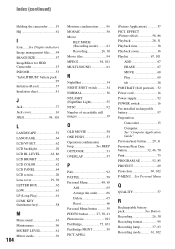
... MOVE 68 Play 69 tab 28 PORTRAIT (Soft portrait)... 52 Power cord 16 Power supply 92 POWER switch 16 Pre-installed rechargeable battery 97 Preparation Camcorder 15 Computer See "Computer Application Guide" Previous/next button ...... 29, 31 Previous/Next Date button 32, 46, 70 Print 75 PROGRAM AE 52, ... Camcorder 15 INDOOR 53 "InfoLITHIUM" battery pack 95 Initialize (Reset 37 Insulation sheet 41 J Jack 77 Jack cover 16 JPEG 94, 101 L LANDSCAPE 52 LANGUAGE 64 LCD/VF SET 62 LCD backlight 20 LCD BL LEVEL 62, 86 LCD BRIGHT 62 LCD COLOR 62 LCD PANEL 64 LCD screen 20 Lens...
... MOVE 68 Play 69 tab 28 PORTRAIT (Soft portrait)... 52 Power cord 16 Power supply 92 POWER switch 16 Pre-installed rechargeable battery 97 Preparation Camcorder 15 Computer See "Computer Application Guide" Previous/next button ...... 29, 31 Previous/Next Date button 32, 46, 70 Print 75 PROGRAM AE 52, ... Camcorder 15 INDOOR 53 "InfoLITHIUM" battery pack 95 Initialize (Reset 37 Insulation sheet 41 J Jack 77 Jack cover 16 JPEG 94, 101 L LANDSCAPE 52 LANGUAGE 64 LCD/VF SET 62 LCD backlight 20 LCD BL LEVEL 62, 86 LCD BRIGHT 62 LCD COLOR 62 LCD PANEL 64 LCD screen 20 Lens...

Operating Guide
Page 105
... V VBR 102 VF B.LIGHT (Viewfinder back light) ........ 62 VF WIDE DISP (View finder wide display 62 Video operation buttons ....... 39 Viewfinder 20 Brightness 62 Viewfinder lens adjustment lever 20 VISUAL INDEX.... 28, 31, 102 Volume 29, 31 V-OUT/PANEL 64 W Wall outlet 16 Warning indicators 88 Warning messages 88 WHITE BAL...
... V VBR 102 VF B.LIGHT (Viewfinder back light) ........ 62 VF WIDE DISP (View finder wide display 62 Video operation buttons ....... 39 Viewfinder 20 Brightness 62 Viewfinder lens adjustment lever 20 VISUAL INDEX.... 28, 31, 102 Volume 29, 31 V-OUT/PANEL 64 W Wall outlet 16 Warning indicators 88 Warning messages 88 WHITE BAL...


