Operating Guide
Page 6
... the ACCESS lamp (p.30) is connected. - Applying mechanical shock or vibration to the camcorder • Before connecting your camcorder to another device with two kinds of your Sony dealer regarding this product. Connect the equipment into an outlet on the bottom. "Camera ...manual) - If you call your camcorder. 6 Record the serial number in the wrong direction, the terminal may cause a malfunction of operations guides. - These limits are located on a circuit different from that interference will not occur in a residential installation. DCR-SR100 Serial No.
... the ACCESS lamp (p.30) is connected. - Applying mechanical shock or vibration to the camcorder • Before connecting your camcorder to another device with two kinds of your Sony dealer regarding this product. Connect the equipment into an outlet on the bottom. "Camera ...manual) - If you call your camcorder. 6 Record the serial number in the wrong direction, the terminal may cause a malfunction of operations guides. - These limits are located on a circuit different from that interference will not occur in a residential installation. DCR-SR100 Serial No.

Operating Guide
Page 7
... Germany, and Sony Corporation, and produces superior images. Be careful when placing the camera near a window or outdoors. • Do not aim at dusk. Take images of light from what you need a NTSC system-based TV. • Television programs, films, video tapes, and other DCR-SR100. Also, the lens for your camcorder. On recording...
... Germany, and Sony Corporation, and produces superior images. Be careful when placing the camera near a window or outdoors. • Do not aim at dusk. Take images of light from what you need a NTSC system-based TV. • Television programs, films, video tapes, and other DCR-SR100. Also, the lens for your camcorder. On recording...
Operating Guide
Page 8
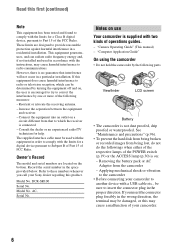
...the LCD screen (p.89). Removing the AC Adaptor (while charging using the camcorder in highlands • You cannot use the camcorder in a low-pressure area, where its altitude is lit. • While using the Hard Disk Drive Handycam Save all your recorded image data • In the case of the... camcorder becomes extremely high or extremely low, you dispose of this, a message appears on using the AC Adaptor) • Be sure to the camcorder, while the ACCESS lamp is more than...
...the LCD screen (p.89). Removing the AC Adaptor (while charging using the camcorder in highlands • You cannot use the camcorder in a low-pressure area, where its altitude is lit. • While using the Hard Disk Drive Handycam Save all your recorded image data • In the case of the... camcorder becomes extremely high or extremely low, you dispose of this, a message appears on using the AC Adaptor) • Be sure to the camcorder, while the ACCESS lamp is more than...

Operating Guide
Page 9
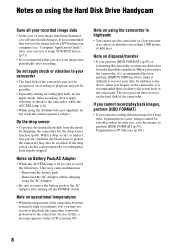
... 1: Checking supplied items 15 Step 2: Charging the battery pack 16 Step 3: Turning the power on, and holding your camcorder with automatic settings Using Easy Handycam operation 24 Recording with ease 26 Playback with ease 28 Recording/Playback Recording 30 Playback 31 Searching for the desired images by... 34 Recording To use zoom To use the flash Continued , 9 Table of Contents IMPORTANT SAFEGUARDS 3 Read this first 5 Notes on using your camcorder 19 Step 4: Adjusting the LCD screen and viewfinder 20 Step 5: Using the touch panel 21 Step 6: Setting the date and time 22 Step ...
... 1: Checking supplied items 15 Step 2: Charging the battery pack 16 Step 3: Turning the power on, and holding your camcorder with automatic settings Using Easy Handycam operation 24 Recording with ease 26 Playback with ease 28 Recording/Playback Recording 30 Playback 31 Searching for the desired images by... 34 Recording To use zoom To use the flash Continued , 9 Table of Contents IMPORTANT SAFEGUARDS 3 Read this first 5 Notes on using your camcorder 19 Step 4: Adjusting the LCD screen and viewfinder 20 Step 5: Using the touch panel 21 Step 6: Setting the date and time 22 Step ...
Operating Guide
Page 10
... Saving images 44 Deleting images 45 Using the Setup items Using the Setup items 48 Setup items 50 CAMERA SET 52 Settings to adjust your camcorder to the recording conditions (EXPOSURE/WHITE BAL./STEADYSHOT, etc.) STILL SET 56 Settings for the hard disk (HDD FORMAT/HDD INFO, etc.) STANDARD SET 61...
... Saving images 44 Deleting images 45 Using the Setup items Using the Setup items 48 Setup items 50 CAMERA SET 52 Settings to adjust your camcorder to the recording conditions (EXPOSURE/WHITE BAL./STEADYSHOT, etc.) STILL SET 56 Settings for the hard disk (HDD FORMAT/HDD INFO, etc.) STANDARD SET 61...

Operating Guide
Page 11
... images (PictBridge compliant printer 75 Jacks to connect external devices 77 Troubleshooting Troubleshooting 78 Warning indicators and messages 88 Additional Information Using your camcorder abroad 92 Files on the camcorder hard disk/folder structure 94 About the "InfoLITHIUM" battery pack 95 Maintenance and precautions 96 Specifications 99 Glossary, Index Glossary 101 Index...
... images (PictBridge compliant printer 75 Jacks to connect external devices 77 Troubleshooting Troubleshooting 78 Warning indicators and messages 88 Additional Information Using your camcorder abroad 92 Files on the camcorder hard disk/folder structure 94 About the "InfoLITHIUM" battery pack 95 Maintenance and precautions 96 Specifications 99 Glossary, Index Glossary 101 Index...

Operating Guide
Page 12
... a glance. Also, you can record images for a desired scene by mistake. Viewing on the free hard disk space. Hard Disk Drive Handycam offers more than the tape or the DVD camcorder for long hours (p.17, 30) You can record more options than seven hours* when the image is touch the scene you...
... a glance. Also, you can record images for a desired scene by mistake. Viewing on the free hard disk space. Hard Disk Drive Handycam offers more than the tape or the DVD camcorder for long hours (p.17, 30) You can record more options than seven hours* when the image is touch the scene you...
Operating Guide
Page 14
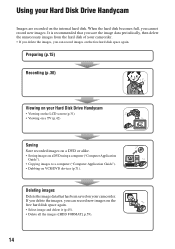
... on the free hard disk space again. Preparing (p.15) Recording (p.30) Viewing on your camcorder. When the hard disk becomes full, you cannot record new images. It is recommended that has been saved on your Hard Disk Drive Handycam • Viewing on the LCD screen (p.31) • Viewing on a TV (p.42) Saving...
... on the free hard disk space again. Preparing (p.15) Recording (p.30) Viewing on your camcorder. When the hard disk becomes full, you cannot record new images. It is recommended that has been saved on your Hard Disk Drive Handycam • Viewing on the LCD screen (p.31) • Viewing on a TV (p.42) Saving...

Operating Guide
Page 15
AC Adaptor (1) (p.16) Rechargeable battery pack NP-FP60 (1) (p.17) Power cord (1) (p.16) CD-ROM "ImageMixer for HDD Camcorder" (1) "Camera Operating Guide" (This manual) (1) "Computer Application Guide" (1) A/V connecting cable (1) (p.42, 71, 73) USB cable (1) (p.75, 77) Wireless Remote Commander (1) (p.41) A button-type lithium battery is already installed. 15 The number in the parentheses indicates the number of that you have following items supplied with your camcorder. Getting Started Getting Started Step 1: Checking supplied items Make sure that item supplied.
AC Adaptor (1) (p.16) Rechargeable battery pack NP-FP60 (1) (p.17) Power cord (1) (p.16) CD-ROM "ImageMixer for HDD Camcorder" (1) "Camera Operating Guide" (This manual) (1) "Computer Application Guide" (1) A/V connecting cable (1) (p.42, 71, 73) USB cable (1) (p.75, 77) Wireless Remote Commander (1) (p.41) A button-type lithium battery is already installed. 15 The number in the parentheses indicates the number of that you have following items supplied with your camcorder. Getting Started Getting Started Step 1: Checking supplied items Make sure that item supplied.

Operating Guide
Page 16
... outlet. MODEON(COHFGF) POWER 3 Connect the AC Adaptor to the DC IN jack on your camcorder. (See the reverse side of the battery pack for the model number.) Installing the battery pack with your camcorder. The CHG (charge) lamp lights up and charging starts. CHG 16 Step 2: Charging the... can charge the battery after attaching the "InfoLITHIUM" battery pack (P series) (p.95) to your camcorder. • You cannot use an NP-FP30 battery pack with excess force may lead to camcorder malfunction such as deterioration in battery pack performance or difficulty in the direction of the arrow to set...
... outlet. MODEON(COHFGF) POWER 3 Connect the AC Adaptor to the DC IN jack on your camcorder. (See the reverse side of the battery pack for the model number.) Installing the battery pack with your camcorder. The CHG (charge) lamp lights up and charging starts. CHG 16 Step 2: Charging the... can charge the battery after attaching the "InfoLITHIUM" battery pack (P series) (p.95) to your camcorder. • You cannot use an NP-FP30 battery pack with excess force may lead to camcorder malfunction such as deterioration in battery pack performance or difficulty in the direction of the arrow to set...

Operating Guide
Page 17
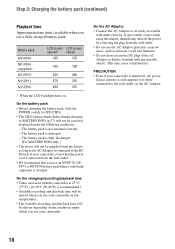
... recording time shows the time when you do when charging the battery pack. Top: When the LCD backlight turns on your camcorder. • Remove the AC Adaptor holding both your camcorder and the DC plug. Bottom: Recording time when recording with the viewfinder while the LCD panel is on / off . - Middle: When...
... recording time shows the time when you do when charging the battery pack. Top: When the LCD backlight turns on your camcorder. • Remove the AC Adaptor holding both your camcorder and the DC plug. Bottom: Recording time when recording with the viewfinder while the LCD panel is on / off . - Middle: When...
Operating Guide
Page 18
...(p.37) will not be supplied from the battery as long as between a wall and furniture. • Do not short-circuit the DC plug of your camcorder, even when the power cord is removed from the wall outlet. • Do not use the AC Adaptor placed in low temperatures. • The available...to the wall outlet via the AC Adaptor. 18 Step 2: Charging the battery pack (continued) Playback time Approximate time (min.) available when you use your camcorder. If any metallic objects. Battery pack NP-FP50 NP-FP60 (supplied) NP-FP70 NP-FP71 NP-FP90 LCD screen LCD screen opened* closed 105 125...
...(p.37) will not be supplied from the battery as long as between a wall and furniture. • Do not short-circuit the DC plug of your camcorder, even when the power cord is removed from the wall outlet. • Do not use the AC Adaptor placed in low temperatures. • The available...to the wall outlet via the AC Adaptor. 18 Step 2: Charging the battery pack (continued) Playback time Approximate time (min.) available when you use your camcorder. If any metallic objects. Battery pack NP-FP50 NP-FP60 (supplied) NP-FP70 NP-FP71 NP-FP90 LCD screen LCD screen opened* closed 105 125...

Operating Guide
Page 19
... Slide the POWER switch to OFF (CHG). • At the time of your camcorder correctly. Getting Started 1 Turn on the power of purchase, the power will be set to turn ...off automatically if you leave your camcorder without any operation for a few seconds. When using it for the first time, the [CLOCK ...belt. (Movie): To record movies (Still): To record still images (PLAY/EDIT): To play back images on your camcorder, or to edit/delete them To turn on the LCD screen for approximately five minutes, to save battery power. ([A....
... Slide the POWER switch to OFF (CHG). • At the time of your camcorder correctly. Getting Started 1 Turn on the power of purchase, the power will be set to turn ...off automatically if you leave your camcorder without any operation for a few seconds. When using it for the first time, the [CLOCK ...belt. (Movie): To record movies (Still): To record still images (PLAY/EDIT): To play back images on your camcorder, or to edit/delete them To turn on the LCD screen for approximately five minutes, to save battery power. ([A....

Operating Guide
Page 20
...press the buttons on the LCD screen is clear. This is practical when you use your camcorder in bright conditions or you can close it with the LCD panel closed to avoid wearing...you open or adjust the LCD screen. • If you open the LCD screen 90 degrees to the camcorder, then rotate it 180 degrees to the lens side, you want to save battery power. The recorded image...poor. Step 4: Adjusting the LCD screen and viewfinder The LCD screen Open the LCD screen 90 degrees to the camcorder (1), then rotate it to the best angle to record or play (2). 2 180 degrees (max.) DISP/BATT ...
...press the buttons on the LCD screen is clear. This is practical when you use your camcorder in bright conditions or you can close it with the LCD panel closed to avoid wearing...you open or adjust the LCD screen. • If you open the LCD screen 90 degrees to the camcorder, then rotate it 180 degrees to the lens side, you want to save battery power. The recorded image...poor. Step 4: Adjusting the LCD screen and viewfinder The LCD screen Open the LCD screen 90 degrees to the camcorder (1), then rotate it to the best angle to record or play (2). 2 180 degrees (max.) DISP/BATT ...

Operating Guide
Page 22
...the year 2079. 7 Set [M] (month), [D] (day), hour and minute, then touch . Step 6: Setting the date and time Set the date and time when using this camcorder for about 3 months, the built-in rechargeable battery gets discharged and the date and time settings may be cleared from the memory. For midday, set... it to step 4 when you do not set the date and time, the [CLOCK SET] screen appears every time you turn on your camcorder or slide the POWER switch. • If you set any year up to page 93 for information concerning "World time difference." • The recording ...
...the year 2079. 7 Set [M] (month), [D] (day), hour and minute, then touch . Step 6: Setting the date and time Set the date and time when using this camcorder for about 3 months, the built-in rechargeable battery gets discharged and the date and time settings may be cleared from the memory. For midday, set... it to step 4 when you do not set the date and time, the [CLOCK SET] screen appears every time you turn on your camcorder or slide the POWER switch. • If you set any year up to page 93 for information concerning "World time difference." • The recording ...

Operating Guide
Page 23
... the POWER switch in maximum mode when 4:3 is selected. • The number of recordable still images is recommended. To play back images after connecting your camcorder to a TV Set [TV TYPE] to [16:9] or [4:3] according to your TV (16:9/4:3) (p.42). • When viewing 16:9 (wide) images with [TV TYPE] set in...
... the POWER switch in maximum mode when 4:3 is selected. • The number of recordable still images is recommended. To play back images after connecting your camcorder to a TV Set [TV TYPE] to [16:9] or [4:3] according to your TV (16:9/4:3) (p.42). • When viewing 16:9 (wide) images with [TV TYPE] set in...

Operating Guide
Page 24
... you set . EASY button The settings of the EASY button. using your camcorder during Easy Handycam operation Touch [SETUP] to 23) before operation. 24 Invalid buttons during Easy Handycam operation You cannot use following buttons or functions since they are automatically fixed. •... BEEP STBY CLOCK HDD SET FORMAT • Nearly all settings automatic with just one press of your camcorder with automatic settings Using Easy Handycam operation Easy Handycam operation is not displayed during playback) Now try recording page 26 Complete the preparations described in steps ...
... you set . EASY button The settings of the EASY button. using your camcorder during Easy Handycam operation Touch [SETUP] to 23) before operation. 24 Invalid buttons during Easy Handycam operation You cannot use following buttons or functions since they are automatically fixed. •... BEEP STBY CLOCK HDD SET FORMAT • Nearly all settings automatic with just one press of your camcorder with automatic settings Using Easy Handycam operation Easy Handycam operation is not displayed during playback) Now try recording page 26 Complete the preparations described in steps ...

Operating Guide
Page 25
Easy Handycam - using your camcorder with automatic settings 25
Easy Handycam - using your camcorder with automatic settings 25

Operating Guide
Page 27
...(Still) 2 Press EASY. [Easy Handycam operation ON.] appears, then Easy Handycam operation ON. disappears on the LCD screen. 60min 112 EASY SETUP 3 Press PHOTO D lightly to [FINE] (default settings) (p.57). appears on the LCD screen. 27 using your camcorder with automatic settings Still images 1 Slide... the POWER switch A in the direction of the arrow to light up A shutter sound is set to adjust the focus A, then press it fully B. To cancel Easy Handycam Press EASY again.
...(Still) 2 Press EASY. [Easy Handycam operation ON.] appears, then Easy Handycam operation ON. disappears on the LCD screen. 60min 112 EASY SETUP 3 Press PHOTO D lightly to [FINE] (default settings) (p.57). appears on the LCD screen. 27 using your camcorder with automatic settings Still images 1 Slide... the POWER switch A in the direction of the arrow to light up A shutter sound is set to adjust the focus A, then press it fully B. To cancel Easy Handycam Press EASY again.

Operating Guide
Page 29
Easy Handycam - To cancel Easy Handycam Press EASY again. Movies Touch (Movie) tab, then touch the thumbnail of the still image to be played back. Still Images Touch back. (Still) tab, ... screen. • When you touch [EDIT] on the VISUAL INDEX screen, you can delete images. See "Deleting images" on the LCD screen. 29 using your camcorder with /.
Easy Handycam - To cancel Easy Handycam Press EASY again. Movies Touch (Movie) tab, then touch the thumbnail of the still image to be played back. Still Images Touch back. (Still) tab, ... screen. • When you touch [EDIT] on the VISUAL INDEX screen, you can delete images. See "Deleting images" on the LCD screen. 29 using your camcorder with /.


