Operating Instructions
Page 2
.... This Class B digital apparatus complies with Part 15 of this Handycam is intended to alert the user to rain or moisture. This symbol is harmful to eyes, do not expose the unit to the presence of rechargeable batteries, call toll free 1-800-8228837, or visit http://www.rbrc.org/. DCR-IP55 only Countries...
.... This Class B digital apparatus complies with Part 15 of this Handycam is intended to alert the user to rain or moisture. This symbol is harmful to eyes, do not expose the unit to the presence of rechargeable batteries, call toll free 1-800-8228837, or visit http://www.rbrc.org/. DCR-IP55 only Countries...
Operating Instructions
Page 3
... interference to Subpart B of Part 15 of FCC Rules. Operation is connected. - DCR-IP55 only IMPORTANT NOTE To comply with Part 15 of Conformity Trade Name: SONY Model No.: DCR-IP55 Responsible Party: Sony Electronics Inc. Reorient or relocate the receiving antenna. - For customers in a particular installation... the receiver is subject to the following measures: - Consult the dealer or an experienced radio/TV technician for a Class B digital device, pursuant to comply with the limits for the FCC related matters only. Note: This equipment has been tested and found ...
... interference to Subpart B of Part 15 of FCC Rules. Operation is connected. - DCR-IP55 only IMPORTANT NOTE To comply with Part 15 of Conformity Trade Name: SONY Model No.: DCR-IP55 Responsible Party: Sony Electronics Inc. Reorient or relocate the receiving antenna. - For customers in a particular installation... the receiver is subject to the following measures: - Consult the dealer or an experienced radio/TV technician for a Class B digital device, pursuant to comply with the limits for the FCC related matters only. Note: This equipment has been tested and found ...
Operating Instructions
Page 5
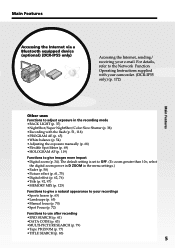
... (p. 70) •Spot Focus (p. 72) Functions to give images more impact •Digital zoom (p. 34). For details, refer to the Network Function Operating Instructions supplied with your camcorder. (DCR-IP55 only) (p. 172) Main Features Other uses Functions to adjust exposure in the menu settings.)... •Fader (p. 58) •Picture effect (p. 61, 75) •Digital effect (p. 62, 76) •Title (p. 92, ...
... (p. 70) •Spot Focus (p. 72) Functions to give images more impact •Digital zoom (p. 34). For details, refer to the Network Function Operating Instructions supplied with your camcorder. (DCR-IP55 only) (p. 172) Main Features Other uses Functions to adjust exposure in the menu settings.)... •Fader (p. 58) •Picture effect (p. 61, 75) •Digital effect (p. 62, 76) •Title (p. 92, ...
Operating Instructions
Page 7
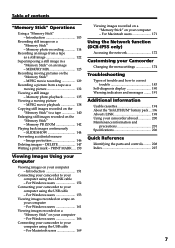
........... 191 Additional Information Usable cassettes 194 About the "InfoLITHIUM" battery pack .... 196 About i.LINK 198 Using your camcorder abroad 200 Maintenance information and precautions 201 Specifications 206 Quick Reference Identifying the parts and controls ......... 208 Index 215 ... 151 Connecting your camcorder to a tape 140 Enlarging still images recorded on your Camcorder Changing the menu settings 174 Troubleshooting Types of contents "Memory Stick" Operations Using a "Memory Stick" - For Macintosh users 171 Using the Network function (DCR-IP55 only) Accessing the...
........... 191 Additional Information Usable cassettes 194 About the "InfoLITHIUM" battery pack .... 196 About i.LINK 198 Using your camcorder abroad 200 Maintenance information and precautions 201 Specifications 206 Quick Reference Identifying the parts and controls ......... 208 Index 215 ... 151 Connecting your camcorder to a tape 140 Enlarging still images recorded on your Camcorder Changing the menu settings 174 Troubleshooting Types of contents "Memory Stick" Operations Using a "Memory Stick" - For Macintosh users 171 Using the Network function (DCR-IP55 only) Accessing the...

Operating Instructions
Page 8
...when you use the network (DCR-IP55 only) function. VCR Use this mode when you play back or edit an image in a "Memory Stick." Each time you record on a "Memory Stick," or play back or edit an image recorded on , and then the camcorder turns to the supplied network function...1 Preparing the power supply" on a tape. How to operate the camcorder. For details, refer to the CAMERA mode so that the CAMERA lamp lights up . WORK VCR (CHG) OFF ON MODE POWER (1) Slide the POWER switch down . MEMORY/NETWORK (DCR-IP55) MEMORY: Use this mode when you record on page 17. 1,2...
...when you use the network (DCR-IP55 only) function. VCR Use this mode when you play back or edit an image in a "Memory Stick." Each time you record on a "Memory Stick," or play back or edit an image recorded on , and then the camcorder turns to the supplied network function...1 Preparing the power supply" on a tape. How to operate the camcorder. For details, refer to the CAMERA mode so that the CAMERA lamp lights up . WORK VCR (CHG) OFF ON MODE POWER (1) Slide the POWER switch down . MEMORY/NETWORK (DCR-IP55) MEMORY: Use this mode when you record on page 17. 1,2...

Operating Instructions
Page 11
...Monitoring the playback picture on the camcorder to the recording position, and hold your camcorder by the LCD panel, the battery pack, the flash or the jack cover. The VCR lamp lights up . Adjust the viewfinder lens to your thumb or the supplied stylus (DCR-IP55 only) supporting the LCD screen ...LCD panel is not set up yet. Note When using the touch panel, press operation buttons lightly with sharp objects other than the stylus supplied (DCR-IP55 only). 11 CAMERA MEMORY/ NET- Do not press the LCD screen with your eyesight (p. 33). 3 Set the POWER switch to start playback....
...Monitoring the playback picture on the camcorder to the recording position, and hold your camcorder by the LCD panel, the battery pack, the flash or the jack cover. The VCR lamp lights up . Adjust the viewfinder lens to your thumb or the supplied stylus (DCR-IP55 only) supporting the LCD screen ...LCD panel is not set up yet. Note When using the touch panel, press operation buttons lightly with sharp objects other than the stylus supplied (DCR-IP55 only). 11 CAMERA MEMORY/ NET- Do not press the LCD screen with your eyesight (p. 33). 3 Set the POWER switch to start playback....

Operating Instructions
Page 13
... switch to MEMORY/NETWORK (DCR-IP55 only) or VCR. When the green z mark stops flashing, then lights up yet. WORK VCR (CHG) OFF ON MODE POWER 2 Press PLAY or PB. PHOTO PHOTO Monitoring the still image on the camcorder to the recording position, and hold your camcorder through the wrist strap. ... and time for a picture, set up , you purchase your camcorder by the LCD panel, the battery pack, the flash or the jack cover. 13 The picture appears on a "Memory Stick". The image when you want to MEMORY/ NETWORK (DCR-IP55 only). The last recorded image is closed, use the viewfinder....
... switch to MEMORY/NETWORK (DCR-IP55 only) or VCR. When the green z mark stops flashing, then lights up yet. WORK VCR (CHG) OFF ON MODE POWER 2 Press PLAY or PB. PHOTO PHOTO Monitoring the still image on the camcorder to the recording position, and hold your camcorder through the wrist strap. ... and time for a picture, set up , you purchase your camcorder by the LCD panel, the battery pack, the flash or the jack cover. 13 The picture appears on a "Memory Stick". The image when you want to MEMORY/ NETWORK (DCR-IP55 only). The last recorded image is closed, use the viewfinder....
Operating Instructions
Page 14
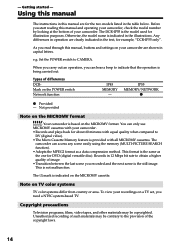
...DCR-IP55 only". Note on the MICROMV cassette. Any differences in operation are shown in the text, for illustration purposes. Not provided Note on the MICROMV format Your camcorder is indicated on TV color systems TV color systems differ from country or area. The camcorder can hear a beep to DV (digital... as a data compression method. To view your camcorder are clearly indicated in capital letters. When you carry out an operation, you read through this manual, buttons and settings on the POWER switch Network function IP45 MEMORY - This format is being carried out. ...
...DCR-IP55 only". Note on the MICROMV cassette. Any differences in operation are shown in the text, for illustration purposes. Not provided Note on the MICROMV format Your camcorder is indicated on TV color systems TV color systems differ from country or area. The camcorder can hear a beep to DV (digital... as a data compression method. To view your camcorder are clearly indicated in capital letters. When you carry out an operation, you read through this manual, buttons and settings on the POWER switch Network function IP45 MEMORY - This format is being carried out. ...

Operating Instructions
Page 16
..., 18) 3 A/V connecting cable (1) (p. 47, 85) 4 Wireless Remote Commander (1) (p. 212) 5 Size AA (R6) batteries for MICROMV) (1) (p. 152) qa Battery terminal cover (1) (p. 17) qs Cleaning cloth (1) (p. 202) qd Stylus (1) (DCR-IP55 only) Contents of the recording cannot be compensated if recording or playback is not made due to a malfunction of the camcorder, storage media, etc. 16
..., 18) 3 A/V connecting cable (1) (p. 47, 85) 4 Wireless Remote Commander (1) (p. 212) 5 Size AA (R6) batteries for MICROMV) (1) (p. 152) qa Battery terminal cover (1) (p. 17) qs Cleaning cloth (1) (p. 202) qd Stylus (1) (DCR-IP55 only) Contents of the recording cannot be compensated if recording or playback is not made due to a malfunction of the camcorder, storage media, etc. 16

Operating Instructions
Page 22
..., the daylight saving time (DST), the year, the month, the day, the hour and the minute. (1) Set the POWER switch to CAMERA or MEMORY/NETWORK (DCR-IP55 only). r R EXEC 6R r CLOCK SET AREA26 R GMT NewYork, Bogota r DST OFF EXIT -5.0 DATE Y M D EXEC CLOCK SET EXIT AREA26 GMT -5.0 NewYork, ... be released (bars may be displayed each time you set the POWER switch to CAMERA or MEMORY/ NETWORK (DCR-IP55 only) unless you use your camcorder for about three months, the date and time settings may appear) because the built-in rechargeable battery installed in daylight saving ...
..., the daylight saving time (DST), the year, the month, the day, the hour and the minute. (1) Set the POWER switch to CAMERA or MEMORY/NETWORK (DCR-IP55 only). r R EXEC 6R r CLOCK SET AREA26 R GMT NewYork, Bogota r DST OFF EXIT -5.0 DATE Y M D EXEC CLOCK SET EXIT AREA26 GMT -5.0 NewYork, ... be released (bars may be displayed each time you set the POWER switch to CAMERA or MEMORY/ NETWORK (DCR-IP55 only) unless you use your camcorder for about three months, the date and time settings may appear) because the built-in rechargeable battery installed in daylight saving ...
Operating Instructions
Page 27
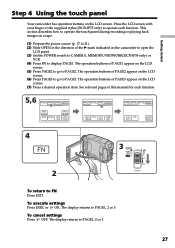
... To execute settings Press EXEC or OK. Getting started Step 4 Using the touch panel Your camcorder has operation buttons on the camcorder to open the LCD panel. (3) Set the POWER switch to CAMERA, MEMORY/NETWORK(DCR-IP55 only) or VCR. (4) Press FN to display PAGE1. The operation buttons of this manual... for each function. Press the LCD screen with your finger or the supplied stylus (DCR-IP55 only) to...
... To execute settings Press EXEC or OK. Getting started Step 4 Using the touch panel Your camcorder has operation buttons on the camcorder to open the LCD panel. (3) Set the POWER switch to CAMERA, MEMORY/NETWORK(DCR-IP55 only) or VCR. (4) Press FN to display PAGE1. The operation buttons of this manual... for each function. Press the LCD screen with your finger or the supplied stylus (DCR-IP55 only) to...
Operating Instructions
Page 28
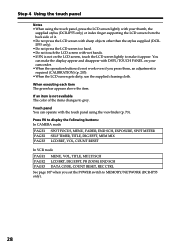
... page 107 when you press them, an adjustment is not on your thumb, the supplied stylus (DCR-IP55 only) or index finger supporting the LCD screen from the back side of the items changes to MEMORY/NETWORK (DCR-IP55 only). 28 Step 4 Using the touch panel Notes •When using the viewfinder (p. 73). Touch... screen too hard. •Do not touch the LCD screen with the touch panel using the touch panel, press the LCD screen lightly with your camcorder. •When the operation buttons do not work even if you set the POWER switch to grey.
... page 107 when you press them, an adjustment is not on your thumb, the supplied stylus (DCR-IP55 only) or index finger supporting the LCD screen from the back side of the items changes to MEMORY/NETWORK (DCR-IP55 only). 28 Step 4 Using the touch panel Notes •When using the viewfinder (p. 73). Touch... screen too hard. •Do not touch the LCD screen with the touch panel using the touch panel, press the LCD screen lightly with your camcorder. •When the operation buttons do not work even if you set the POWER switch to grey.
Operating Instructions
Page 32
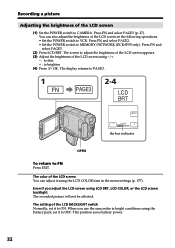
Press FN and select PAGE2. • Set the POWER switch to PAGE3. 1 FN PAGE3 2-4 LCD BRT OK - The display returns to MEMORY/NETWORK (DCR-IP55 only). LCD BRT + the bar indicator OPEN To return to CAMERA. When you adjust the LCD screen using the battery pack, set it using -/+. - : ...to dim + : to ON. You can adjust it to brighten (4) Press OK. Press FN and select PAGE3. (2) Press LCD BRT. Even if you use the camcorder in bright conditions using LCD BRT, LCD COLOR, or the LCD screen backlight The recorded picture will not be affected. The screen to adjust the...
Press FN and select PAGE2. • Set the POWER switch to PAGE3. 1 FN PAGE3 2-4 LCD BRT OK - The display returns to MEMORY/NETWORK (DCR-IP55 only). LCD BRT + the bar indicator OPEN To return to CAMERA. When you adjust the LCD screen using the battery pack, set it using -/+. - : ...to dim + : to ON. You can adjust it to brighten (4) Press OK. Press FN and select PAGE3. (2) Press LCD BRT. Even if you use the camcorder in bright conditions using LCD BRT, LCD COLOR, or the LCD screen backlight The recorded picture will not be affected. The screen to adjust the...
Operating Instructions
Page 33
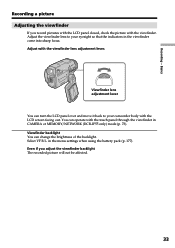
... the viewfinder come into sharp focus. Viewfinder backlight You can turn the LCD panel over and move it back to your camcorder body with the viewfinder. in CAMERA or MEMORY/NETWORK (DCR-IP55 only) mode (p. 73). Even if you record pictures with the LCD panel closed, check the picture with the LCD screen...
... the viewfinder come into sharp focus. Viewfinder backlight You can turn the LCD panel over and move it back to your camcorder body with the viewfinder. in CAMERA or MEMORY/NETWORK (DCR-IP55 only) mode (p. 73). Even if you record pictures with the LCD panel closed, check the picture with the LCD screen...

Operating Instructions
Page 34
...POWER switch is set to OFF in the default setting (p. 176). The digital zoom function is sharp. When you shoot close to MEMORY/NETWORK (DCR-IP55 only) You cannot use the digital zoom. 34 W T The digital zooming zone appears when you move the power zoom lever to the "W"...away in the menu settings. You can shoot a subject that is performed digitally. Digital zoom •Digital zoom starts to 20x or 120x zoom is performed digitally. •The picture quality deteriorates as you select the digital zoom power in the wide-angle position. Up to function when zoom exceeds...
...POWER switch is set to OFF in the default setting (p. 176). The digital zoom function is sharp. When you shoot close to MEMORY/NETWORK (DCR-IP55 only) You cannot use the digital zoom. 34 W T The digital zooming zone appears when you move the power zoom lever to the "W"...away in the menu settings. You can shoot a subject that is performed digitally. Digital zoom •Digital zoom starts to 20x or 120x zoom is performed digitally. •The picture quality deteriorates as you select the digital zoom power in the wide-angle position. Up to function when zoom exceeds...
Operating Instructions
Page 35
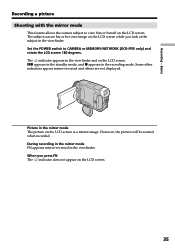
...-reversed and others are not displayed. Basics Recording a picture Shooting with the mirror mode This feature allows the camera subject to CAMERA or MEMORY/NETWORK (DCR-IP55 only) and rotate the LCD screen 180 degrees.
...-reversed and others are not displayed. Basics Recording a picture Shooting with the mirror mode This feature allows the camera subject to CAMERA or MEMORY/NETWORK (DCR-IP55 only) and rotate the LCD screen 180 degrees.
Operating Instructions
Page 37
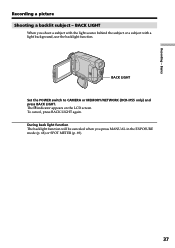
BACK LIGHT When you press MANUAL in the EXPOSURE mode (p. 68) or SPOT METER (p. 69). 37 The . During back light function The backlight function will be canceled when you shoot a subject with the light source behind the subject or a subject with a light background, use the backlight function. BACK LIGHT Set the POWER switch to CAMERA or MEMORY/NETWORK (DCR-IP55 only) and press BACK LIGHT. indicator appears on the LCD screen. To cancel, press BACK LIGHT again. Recording - Basics Recording a picture Shooting a backlit subject -
BACK LIGHT When you press MANUAL in the EXPOSURE mode (p. 68) or SPOT METER (p. 69). 37 The . During back light function The backlight function will be canceled when you shoot a subject with the light source behind the subject or a subject with a light background, use the backlight function. BACK LIGHT Set the POWER switch to CAMERA or MEMORY/NETWORK (DCR-IP55 only) and press BACK LIGHT. indicator appears on the LCD screen. To cancel, press BACK LIGHT again. Recording - Basics Recording a picture Shooting a backlit subject -
Operating Instructions
Page 38
... flash on the LCD screen. The and COLOR SLOW SHUTTER indicators flash on the LCD screen. Set the POWER switch to CAMERA or MEMORY/NETWORK (DCR-IP55 only) and set NIGHTSHOT to ON. To cancel the Color Slow Shutter function, press COLOR SLOW S again. 38 To cancel NightShot, set NIGHTSHOT to OFF...
... flash on the LCD screen. The and COLOR SLOW SHUTTER indicators flash on the LCD screen. Set the POWER switch to CAMERA or MEMORY/NETWORK (DCR-IP55 only) and set NIGHTSHOT to ON. To cancel the Color Slow Shutter function, press COLOR SLOW S again. 38 To cancel NightShot, set NIGHTSHOT to OFF...
Operating Instructions
Page 39
While using NightShot, you keep NIGHTSHOT set to MEMORY/NETWORK (DCR-IP55 only) You cannot use following functions: - Exposure - Recording still images - White balance - Exposure - HOLOGRAM AF - Recording with the flash While using the ... Slow Shutter The shutter speed will be recorded in normal recording, the picture may cause your camcorder to ON in incorrect or unnatural colors. •If focusing is about three meters (10 feet). Flexible Spot Meter - Digital effect - Flexble Spot Meter - Super NightShot function - Basics Recording a picture Notes •...
While using NightShot, you keep NIGHTSHOT set to MEMORY/NETWORK (DCR-IP55 only) You cannot use following functions: - Exposure - Recording still images - White balance - Exposure - HOLOGRAM AF - Recording with the flash While using the ... Slow Shutter The shutter speed will be recorded in normal recording, the picture may cause your camcorder to ON in incorrect or unnatural colors. •If focusing is about three meters (10 feet). Flexible Spot Meter - Digital effect - Flexble Spot Meter - Super NightShot function - Basics Recording a picture Notes •...

Operating Instructions
Page 40
... recording mode is finished. - The self-timer starts counting down from the LCD screen while your camcorder is in 10 seconds after you set the self-timer. The POWER switch is set to MEMORY/NETWORK (DCR-IP55 only) You can also use the Remote Commander for this operation. (1) In the standby mode, press...
... recording mode is finished. - The self-timer starts counting down from the LCD screen while your camcorder is in 10 seconds after you set the self-timer. The POWER switch is set to MEMORY/NETWORK (DCR-IP55 only) You can also use the Remote Commander for this operation. (1) In the standby mode, press...

