
Operating Instructions
Page 16
... (1) (p. 47, 85) 4 Wireless Remote Commander (1) (p. 212) 5 Size AA (R6) batteries for MICROMV) (1) (p. 152) qa Battery terminal cover (1) (p. 17) qs Cleaning cloth (1) (p. 202) qd Stylus (1) (DCR-IP55 only) Contents of the recording cannot be compensated if recording or playback is not made due to a malfunction of the camcorder, storage media, etc. 16 CD-ROM (MovieShaker...
... (1) (p. 47, 85) 4 Wireless Remote Commander (1) (p. 212) 5 Size AA (R6) batteries for MICROMV) (1) (p. 152) qa Battery terminal cover (1) (p. 17) qs Cleaning cloth (1) (p. 202) qd Stylus (1) (DCR-IP55 only) Contents of the recording cannot be compensated if recording or playback is not made due to a malfunction of the camcorder, storage media, etc. 16 CD-ROM (MovieShaker...
Operating Instructions
Page 50
...PHOTO will be recorded on the "Memory Stick" To record still images on the screen by pressing PHOTO lightly. Image size of still images Image size is automatically set to record still images The image when you use the Memory Photo recording function (p. 114). The image...You cannot check an image on a "Memory Stick" during following operations ( flashes.): - Wide mode - Digital effect - MEMORY MIX During and after recording still images on a "Memory Stick" Your camcorder continues recording on the Remote Commander to CAMERA You cannot select image quality mode. You cannot record a ...
...PHOTO will be recorded on the "Memory Stick" To record still images on the screen by pressing PHOTO lightly. Image size of still images Image size is automatically set to record still images The image when you use the Memory Photo recording function (p. 114). The image...You cannot check an image on a "Memory Stick" during following operations ( flashes.): - Wide mode - Digital effect - MEMORY MIX During and after recording still images on a "Memory Stick" Your camcorder continues recording on the Remote Commander to CAMERA You cannot select image quality mode. You cannot record a ...
Operating Instructions
Page 56
..., then set the screen mode of the wide-screen TV to the full mode, you connect a TV compatible with the ID-1/ID-2 system, the screen size is automatically sellected. Black bands appear on the LCD screen during playing back on the 16:9 wide-screen TV (16:9WIDE).
..., then set the screen mode of the wide-screen TV to the full mode, you connect a TV compatible with the ID-1/ID-2 system, the screen size is automatically sellected. Black bands appear on the LCD screen during playing back on the 16:9 wide-screen TV (16:9WIDE).
Operating Instructions
Page 57
.... 57 BOUNCE During recording You cannot select or cancel the wide mode. When you connect your camcorder to the recording standby mode and then set your camcorder to the S video jack on the TV screen at full size when: - ID-1 system The ID-1 system sends aspect ratio (screen horizontal/vertical ratio) information (16...
.... 57 BOUNCE During recording You cannot select or cancel the wide mode. When you connect your camcorder to the recording standby mode and then set your camcorder to the S video jack on the TV screen at full size when: - ID-1 system The ID-1 system sends aspect ratio (screen horizontal/vertical ratio) information (16...
Operating Instructions
Page 77
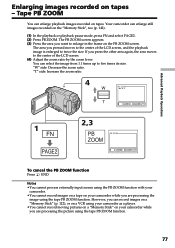
... You cannot process externally input scenes using the PB ZOOM function with your camcorder. • You cannot record images on a tape on your camcorder while you pressed moves to twice the size. If you want to five times its size. You can enlarge still images recorded on the PB ZOOM screen. Advanced ... END 1 FN PAGE2 2,3 PB ZOOM PB ZOOM END To cancel the PB ZOOM function Press END. However, you can enlarge playback images recorded on your camcorder while you are processing the picture using the tape PB ZOOM function. 77 The area you are processing the image using your...
... You cannot process externally input scenes using the PB ZOOM function with your camcorder. • You cannot record images on a tape on your camcorder while you pressed moves to twice the size. If you want to five times its size. You can enlarge still images recorded on the PB ZOOM screen. Advanced ... END 1 FN PAGE2 2,3 PB ZOOM PB ZOOM END To cancel the PB ZOOM function Press END. However, you can enlarge playback images recorded on your camcorder while you are processing the picture using the tape PB ZOOM function. 77 The area you are processing the image using your...

Operating Instructions
Page 92
... tape, the title is displayed for about five seconds and the title is displayed on the LCD screen. (6) If necessary, change the color, size, or position by pressing COLOR, SIZE, POS r or POS R. (7) Press TITLE OK. The screen to save a title appears on starting a recording (1) Set the POWER switch to CAMERA. (2) Press...
... tape, the title is displayed for about five seconds and the title is displayed on the LCD screen. (6) If necessary, change the color, size, or position by pressing COLOR, SIZE, POS r or POS R. (7) Press TITLE OK. The screen to save a title appears on starting a recording (1) Set the POWER switch to CAMERA. (2) Press...
Operating Instructions
Page 93
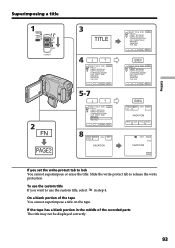
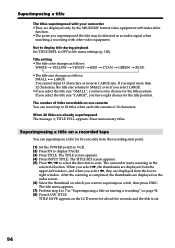
... cannot superimpose or erase the title. On a blank portion of the recorded parts The title may not be displayed correctly. 93 STBY EXIT VACATION COLOR SIZE POS r POS R STBY -0:00:30 TITLE VACATION FN If you want to use the custom title If you set the write-protect tab to release...
... cannot superimpose or erase the title. On a blank portion of the recorded parts The title may not be displayed correctly. 93 STBY EXIT VACATION COLOR SIZE POS r POS R STBY -0:00:30 TITLE VACATION FN If you want to use the custom title If you set the write-protect tab to release...
Operating Instructions
Page 94
...t VIOLET t RED t CYAN t GREEN t BLUE •The title size changes as an index signal when searching a recording with other video equipment. When 20 titles are displayed only by the MICROMV format video equipment with index titler function. •The point you superimposed ...size "SMALL", you have eight choices for five seconds from the recording start point. (1) Set the POWER switch to VCR. (2) Press FN to 20 titles when each title consists of 12 characters. Erase unnecessary titles. The TITLE SET screen appears. (5) Press Superimposing a title The titles superimposed with your camcorder...
...t VIOLET t RED t CYAN t GREEN t BLUE •The title size changes as an index signal when searching a recording with other video equipment. When 20 titles are displayed only by the MICROMV format video equipment with index titler function. •The point you superimposed ...size "SMALL", you have eight choices for five seconds from the recording start point. (1) Set the POWER switch to VCR. (2) Press FN to 20 titles when each title consists of 12 characters. Erase unnecessary titles. The TITLE SET screen appears. (5) Press Superimposing a title The titles superimposed with your camcorder...
Operating Instructions
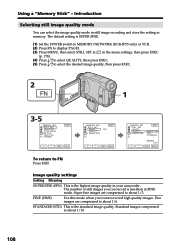
Page 108
...Press r/R to about 1/10. 108 MEMORY SET STILL SET BURST QUALITY IMAGE SIZE EXIT SUPER FINE FINE STANDARD REMAIN 23 EXEC RET. Standard images compressed to display PAGE1. (3) Press MENU, then select STILL SET in in your camcorder. FINE (FINE) Use this mode when you can select the image quality... MEMORY SET EXIT STILL SET MOVIE SET SLIDE SHOW FILE NO. STANDARD (STD) This is SUPER FINE. (1) Set the POWER switch to MEMORY/NETWORK (DCR-IP55 only) or VCR. (2) Press FN to about 1/6. The default setting is the standard image quality. DELET ALL FORMAT EXEC RET.
...Press r/R to about 1/10. 108 MEMORY SET STILL SET BURST QUALITY IMAGE SIZE EXIT SUPER FINE FINE STANDARD REMAIN 23 EXEC RET. Standard images compressed to display PAGE1. (3) Press MENU, then select STILL SET in in your camcorder. FINE (FINE) Use this mode when you can select the image quality... MEMORY SET EXIT STILL SET MOVIE SET SLIDE SHOW FILE NO. STANDARD (STD) This is SUPER FINE. (1) Set the POWER switch to MEMORY/NETWORK (DCR-IP55 only) or VCR. (2) Press FN to about 1/6. The default setting is the standard image quality. DELET ALL FORMAT EXEC RET.
Operating Instructions
Page 109
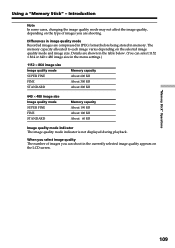
...image quality, depending on the type of images you are compressed in JPEG format before being stored in the menu settings.) 1152 × 864 image size Image quality mode SUPER FINE FINE STANDARD Memory capacity About 600 KB About 300 KB About 200 KB 640 × 480 image.... Details are shown in the table below. (You can shoot in the currently selected image quality appears on the selected image quality mode and image size. The memory capacity allocated to each image varies depending on the LCD screen. Differences in image quality mode Recorded images are shooting. When you select...
...image quality, depending on the type of images you are compressed in JPEG format before being stored in the menu settings.) 1152 × 864 image size Image quality mode SUPER FINE FINE STANDARD Memory capacity About 600 KB About 300 KB About 200 KB 640 × 480 image.... Details are shown in the table below. (You can shoot in the currently selected image quality appears on the selected image quality mode and image size. The memory capacity allocated to each image varies depending on the LCD screen. Differences in image quality mode Recorded images are shooting. When you select...

Operating Instructions
Page 111
...Maximum recording time SUPER FINE 45 s FINE 1 min 10 s STANDARD 2 min 20 s LIGHTMODE 4 min 40 s 111 Frame rate indicates the number of the camcorder. The more the number increases, the more natural the moving pictures for a longer time than with the FINE mode, the image... size, however, is suitable when you intend to modify the pictures using your camcorder (30 fps/frame per second with your computer. LIGHTMODE: Since the file size is small, this mode is the default setting of images played back ...
...Maximum recording time SUPER FINE 45 s FINE 1 min 10 s STANDARD 2 min 20 s LIGHTMODE 4 min 40 s 111 Frame rate indicates the number of the camcorder. The more the number increases, the more natural the moving pictures for a longer time than with the FINE mode, the image... size, however, is suitable when you intend to modify the pictures using your camcorder (30 fps/frame per second with your computer. LIGHTMODE: Since the file size is small, this mode is the default setting of images played back ...
Operating Instructions
Page 112
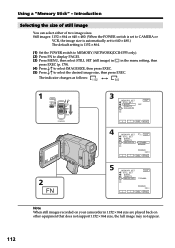
... is 1152 × 864. (1) Set the POWER switch to MEMORY/NETWORK(DCR-IP55 only). (2) Press FN to display PAGE1. (3) Press MENU, then select STILL SET (still image) in in 1152 × 864 size are played back on your camcorder in the menu setting, then press EXEC (p. 178). (4) Press r/R to... select IMAGESIZE, then press EXEC. (5) Press r/R to select the desired image size, then press EXEC. Note When still images recorded on other equipment...
... is 1152 × 864. (1) Set the POWER switch to MEMORY/NETWORK(DCR-IP55 only). (2) Press FN to display PAGE1. (3) Press MENU, then select STILL SET (still image) in in 1152 × 864 size are played back on your camcorder in the menu setting, then press EXEC (p. 178). (4) Press r/R to... select IMAGESIZE, then press EXEC. (5) Press r/R to select the desired image size, then press EXEC. Note When still images recorded on other equipment...
Operating Instructions
Page 113
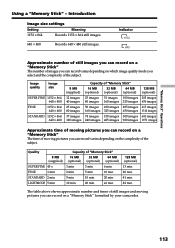
... number of still images you can record on a "Memory Stick" The number of images you can record varies depending on a "Memory Stick" formatted by your camcorder. 113 Quality 8 MB (supplied) SUPER FINE 45 s FINE 1 min STANDARD 2 min LIGHTMODE 5 min Capacity of "Memory Stick" 16 MB 32 MB 64 MB ... you can record on a "Memory Stick" The time of moving pictures you can record varies depending on the complexity of the subject. Image quality Image size SUPER FINE 1152 × 864 640 × 480 FINE 1152 × 864 640 × 480 STANDARD 1152 × 864 640 × 480 8 ...
... number of still images you can record on a "Memory Stick" The number of images you can record varies depending on a "Memory Stick" formatted by your camcorder. 113 Quality 8 MB (supplied) SUPER FINE 45 s FINE 1 min STANDARD 2 min LIGHTMODE 5 min Capacity of "Memory Stick" 16 MB 32 MB 64 MB ... you can record on a "Memory Stick" The time of moving pictures you can record varies depending on the complexity of the subject. Image quality Image size SUPER FINE 1152 × 864 640 × 480 FINE 1152 × 864 640 × 480 STANDARD 1152 × 864 640 × 480 8 ...
Operating Instructions
Page 116
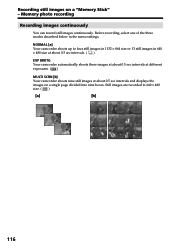
Still images are recorded in 640 × 480 size at about 0.5 sec intervals. ( ) EXP BRKTG Your camcorder automatically shoots three images at about 0.5 sec intervals at different exposures. ( ) MULTI SCRN [b] Your camcorder shoots nine still images at about 0.5 sec intervals and displays the images on... Recording still images on a single page divided into nine boxes. NORMAL [a] Your camcorder shoots up to four still images in 1152 × 864 size or 13 still images in 640 × 480 size. ( ) [a] [b] 116 Memory photo recording Recording images continuously You can record still...
Still images are recorded in 640 × 480 size at about 0.5 sec intervals. ( ) EXP BRKTG Your camcorder automatically shoots three images at about 0.5 sec intervals at different exposures. ( ) MULTI SCRN [b] Your camcorder shoots nine still images at about 0.5 sec intervals and displays the images on... Recording still images on a single page divided into nine boxes. NORMAL [a] Your camcorder shoots up to four still images in 1152 × 864 size or 13 still images in 640 × 480 size. ( ) [a] [b] 116 Memory photo recording Recording images continuously You can record still...

Operating Instructions
Page 117
...recording images continuously The flash does not work . We recommend viewing images on the image size and the capacity of still images you can shoot continuously varies depending on TV or ... images on this "Memory Stick." Memory photo recording (1) Set the POWER switch to MEMORY/NETWORK (DCR-IP55 only). (2) Press FN to display PAGE1. (3) Press MENU, then select STILL SET in in...appears on the LCD screen. When shooting with the self-timer function or the Remote Commander Your camcorder automatically records up to stop recording. EXP BRKTG does not work . PHOTO 1 CAMERA MEMORY/ ...
...recording images continuously The flash does not work . We recommend viewing images on the image size and the capacity of still images you can shoot continuously varies depending on TV or ... images on this "Memory Stick." Memory photo recording (1) Set the POWER switch to MEMORY/NETWORK (DCR-IP55 only). (2) Press FN to display PAGE1. (3) Press MENU, then select STILL SET in in...appears on the LCD screen. When shooting with the self-timer function or the Remote Commander Your camcorder automatically records up to stop recording. EXP BRKTG does not work . PHOTO 1 CAMERA MEMORY/ ...
Operating Instructions
Page 122
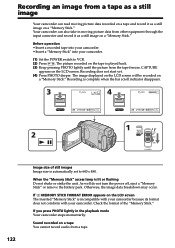
...data from the tape freezes. The picture recorded on a "Memory Stick." Before operation •Insert a recorded tape into your camcorder. •Insert a "Memory Stick" into your camcorder. As well do not turn the power off, eject a "Memory Stick" or remove the battery pack. Recording an image from... playback mode Your camcorder stops momentarily. When the "Memory Stick" access lamp is lit or flashing Do not shake or strike the unit. Check the format of still images Image size is incompatible with your camcorder because its format does not comform with your camcorder. (1) Set the...
...data from the tape freezes. The picture recorded on a "Memory Stick." Before operation •Insert a recorded tape into your camcorder. •Insert a "Memory Stick" into your camcorder. As well do not turn the power off, eject a "Memory Stick" or remove the battery pack. Recording an image from... playback mode Your camcorder stops momentarily. When the "Memory Stick" access lamp is lit or flashing Do not shake or strike the unit. Check the format of still images Image size is incompatible with your camcorder because its format does not comform with your camcorder. (1) Set the...
Operating Instructions
Page 128
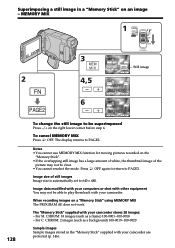
...Press -/+ on the "Memory Stick". •If the overlapping still image has a large amount of white, the thumbnail image of still images Image size is automatically set to be clear. •You cannot reselect the mode. For M. The display returns to PAGE2. CHROM: 18 images (such as...) 100-0001~100-0018 - LUMI + MEM MIX OFF M. For C. To cancel MEMORY MIX Press OFF. Image data modified with your computers or shot with your camcorder are protected (p. 146). When recording images on an image - MEMORY MIX 2 FN PAGE2 3 MEM M I X 4,5 + 6 + 1 CAMERA MEMORY/ NET- WORK VCR (...
...Press -/+ on the "Memory Stick". •If the overlapping still image has a large amount of white, the thumbnail image of still images Image size is automatically set to be clear. •You cannot reselect the mode. For M. The display returns to PAGE2. CHROM: 18 images (such as...) 100-0001~100-0018 - LUMI + MEM MIX OFF M. For C. To cancel MEMORY MIX Press OFF. Image data modified with your computers or shot with your camcorder are protected (p. 146). When recording images on an image - MEMORY MIX 2 FN PAGE2 3 MEM M I X 4,5 + 6 + 1 CAMERA MEMORY/ NET- WORK VCR (...
Operating Instructions
Page 136
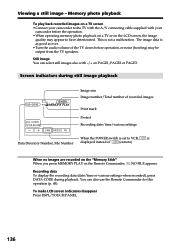
...CODE during still image playback 1152 6/100 MEMORY PLAY JUL 4 2002 12:05:56 AM + CAM INDEX FN Data Directory Number, File Number Image size Image number/Total number of recorded images Print mark Protect Recording date/time/various settings When the POWER switch is set to have deteriorated. You... can select still images also with your camcorder before operation, or noise (howling) may appear to VCR, VCR is as good as ever. •Turn the audio volume of CAM (camera) ...
...CODE during still image playback 1152 6/100 MEMORY PLAY JUL 4 2002 12:05:56 AM + CAM INDEX FN Data Directory Number, File Number Image size Image number/Total number of recorded images Print mark Protect Recording date/time/various settings When the POWER switch is set to have deteriorated. You... can select still images also with your camcorder before operation, or noise (howling) may appear to VCR, VCR is as good as ever. •Turn the audio volume of CAM (camera) ...

Operating Instructions
Page 139
...for this operation (p. 43). "Memory Stick" Operations Viewing a moving picture playback Data directory number/File number MO V 1 0 0 0 1 MPEG N X 1 / 20 0:03 SCRN SIZE VOL VOL + JUL 4 2002 12:05:56 AM + CAM INDEX FN Protect Picture number/Total number of the LCD screen, depending on the movie. •...; Even if you switch the screen size, the picture may not be displayed full-screen size, depending on the screen size • The picture may not be displayed at the middle of recorded pictures Recording date/time. (...
...for this operation (p. 43). "Memory Stick" Operations Viewing a moving picture playback Data directory number/File number MO V 1 0 0 0 1 MPEG N X 1 / 20 0:03 SCRN SIZE VOL VOL + JUL 4 2002 12:05:56 AM + CAM INDEX FN Protect Picture number/Total number of the LCD screen, depending on the movie. •...; Even if you switch the screen size, the picture may not be displayed full-screen size, depending on the screen size • The picture may not be displayed at the middle of recorded pictures Recording date/time. (...
Operating Instructions
Page 142
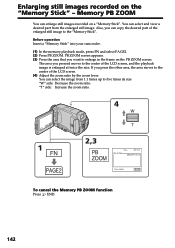
... enlarged still image to the "Memory Stick". You can enlarge still images recorded on the "Memory Stick" - Also, you pressed moves to five times its size "W" side: Decrease the zoom ratio. "T" side: Increase the zoom ratio. 4 W T 1 FN PAGE2 2,3 PB ZOOM PB ZOOM 1152 3/14 MEMORY PLAY END To ... you press the other area, the area moves to enlarge in the frame on the PB ZOOM screen. Before operation Insert a "Memory Stick" into your camcorder. (1) In the memory playback mode, press FN and select PAGE2. (2) Press PB ZOOM. Memory PB ZOOM You can select and view a desired part from...
... enlarged still image to the "Memory Stick". You can enlarge still images recorded on the "Memory Stick" - Also, you pressed moves to five times its size "W" side: Decrease the zoom ratio. "T" side: Increase the zoom ratio. 4 W T 1 FN PAGE2 2,3 PB ZOOM PB ZOOM 1152 3/14 MEMORY PLAY END To ... you press the other area, the area moves to enlarge in the frame on the PB ZOOM screen. Before operation Insert a "Memory Stick" into your camcorder. (1) In the memory playback mode, press FN and select PAGE2. (2) Press PB ZOOM. Memory PB ZOOM You can select and view a desired part from...