Computer Applications Guide
Page 4
... to editing pictures on a computer 6 Features ...6 Overview of the preparation 7 Step 1: Installing the software on a computer 8 Step 2: Connecting your camcorder to a computer 10 Using the USB cable (supplied) when viewing pictures on a tape 11 Using the USB cable (supplied) when copying pictures on ...Package CD Backup 23 Creating a Video CD (Direct Access to the computer via your computer - Digital convert function 33 4 Picture Package Auto Slide 21 Saving the images on your camcorder - Picture Package VCD Maker 24 Copying images for MEMORY MIX to a "Memory Stick" (only...
... to editing pictures on a computer 6 Features ...6 Overview of the preparation 7 Step 1: Installing the software on a computer 8 Step 2: Connecting your camcorder to a computer 10 Using the USB cable (supplied) when viewing pictures on a tape 11 Using the USB cable (supplied) when copying pictures on ...Package CD Backup 23 Creating a Video CD (Direct Access to the computer via your computer - Digital convert function 33 4 Picture Package Auto Slide 21 Saving the images on your camcorder - Picture Package VCD Maker 24 Copying images for MEMORY MIX to a "Memory Stick" (only...
Computer Applications Guide
Page 6
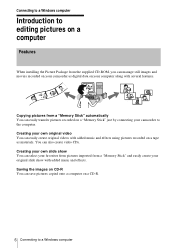
...computer Saving the images on CD-R You can easily create original videos with added music and effects using pictures recorded on a tape as digital data on your computer along with several features. Creating your own slide show with added music and effects. Connecting to a Windows computer... show You can select your favorites from pictures imported from the supplied CD-ROM, you can manage still images and movies recorded on your camcorder as materials. Copying pictures from a "Memory Stick" automatically You can also create video CDs. You can easily transfer pictures recorded on a...
...computer Saving the images on CD-R You can easily create original videos with added music and effects using pictures recorded on a tape as digital data on your computer along with several features. Creating your own slide show with added music and effects. Connecting to a Windows computer... show You can select your favorites from pictures imported from the supplied CD-ROM, you can manage still images and movies recorded on your camcorder as materials. Copying pictures from a "Memory Stick" automatically You can also create video CDs. You can easily transfer pictures recorded on a...
Computer Applications Guide
Page 11
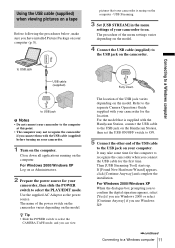
...Operations Guide supplied with your camcorder for the location. If [Found New Hardware Wizard] appears, click [Continue Anyway] and complete the installation. Then [USB Streaming Tool] starts up. For Windows 2000/Windows XP When the dialogue box prompting you to confirm the digital signature appears, select [Yes]...a tape Before following the procedures below, make sure you have installed Picture Package on your camcorder is supplied with the Handycam Station, connect the USB cable to the USB jack on the Handycam Station, then set the USB ON/OFF switch to ON. 5 Connect the other end of...
...Operations Guide supplied with your camcorder for the location. If [Found New Hardware Wizard] appears, click [Continue Anyway] and complete the installation. Then [USB Streaming Tool] starts up. For Windows 2000/Windows XP When the dialogue box prompting you to confirm the digital signature appears, select [Yes]...a tape Before following the procedures below, make sure you have installed Picture Package on your camcorder is supplied with the Handycam Station, connect the USB cable to the USB jack on the Handycam Station, then set the USB ON/OFF switch to ON. 5 Connect the other end of...
Computer Applications Guide
Page 32
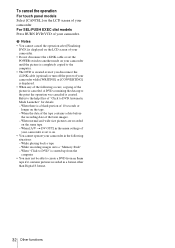
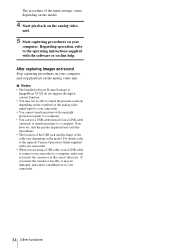
...the operation was canceled is created. A DVD containing the data up from an 8mm tape if it contains pictures recorded in a format other than Digital 8 format. 32 Other functions When normal and wide size pictures are recorded on the tape. - b Notes • You cannot cancel the operation... after [Finalizing DVD.] is displayed on the LCD screen of your camcorder. • Do not disconnect the i.LINK cable or set to on. • You cannot operate your camcorder while [WRITING] or [CONVERTING] is canceled. When [A/V t DV OUT] in the following occurs,...
...the operation was canceled is created. A DVD containing the data up from an 8mm tape if it contains pictures recorded in a format other than Digital 8 format. 32 Other functions When normal and wide size pictures are recorded on the tape. - b Notes • You cannot cancel the operation... after [Finalizing DVD.] is displayed on the LCD screen of your camcorder. • Do not disconnect the i.LINK cable or set to on. • You cannot operate your camcorder while [WRITING] or [CONVERTING] is canceled. When [A/V t DV OUT] in the following occurs,...
Computer Applications Guide
Page 33
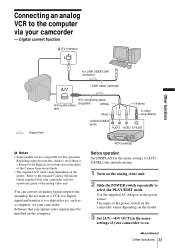
Digital convert function DV Interface Other functions to the computer via your camcorder - VCR (analog) Before operation Set [DISPLAY] in the index of the Camera Operations Guide. • The supplied A/V cable varies depending on the model. ... a listing for this operation. Refer to the separate Camera Operations Guide supplied with your camcorder with the operations guide of your camcorder to a digital device, such as a computer, via your camcorder. The name of the power switch on the camcorder varies depending on the model. 3 Set [A/VtDV OUT] in the menu settings of ...
Digital convert function DV Interface Other functions to the computer via your camcorder - VCR (analog) Before operation Set [DISPLAY] in the index of the Camera Operations Guide. • The supplied A/V cable varies depending on the model. ... a listing for this operation. Refer to the separate Camera Operations Guide supplied with your camcorder with the operations guide of your camcorder to a digital device, such as a computer, via your camcorder. The name of the power switch on the camcorder varies depending on the model. 3 Set [A/VtDV OUT] in the menu settings of ...
Computer Applications Guide
Page 34
... Notes • The bundled software Picture Package or ImageMixer VCD2 do not support the digital convert function. • You may be able to output the pictures correctly depending on the condition of your camcorder. • You cannot transfer pictures with the software or on the analog video unit...sure you insert the connector forcibly, it may not be damaged, and causes a malfunction of the analog video signal input to your camcorder. 34 Other functions If you insert the connector in the correct direction. For details, refer to the separate Camera Operations Guide supplied with...
... Notes • The bundled software Picture Package or ImageMixer VCD2 do not support the digital convert function. • You may be able to output the pictures correctly depending on the condition of your camcorder. • You cannot transfer pictures with the software or on the analog video unit...sure you insert the connector forcibly, it may not be damaged, and causes a malfunction of the analog video signal input to your camcorder. 34 Other functions If you insert the connector in the correct direction. For details, refer to the separate Camera Operations Guide supplied with...
Camera Operations Guide
Page 3
... that any questions about half the size of a standard "Memory Stick," in order to comply with the limits for a Class B digital device, pursuant to correct the interference by one or more of the FCC Rules. Bernardo Dr, San Diego, CA 92127 U.S.A. Telephone ...installed and used with the equipment in your Sony dealer regarding this manual could void your camcorder. Regulatory Information Declaration of Conformity Trade Name: SONY Model No.: DCR-HC85 Responsible Party: Sony Electronics Inc. Bernardo Dr, San Diego, CA 92127 U.S.A. DCR-HC Serial No. If this equipment does cause...
... that any questions about half the size of a standard "Memory Stick," in order to comply with the limits for a Class B digital device, pursuant to correct the interference by one or more of the FCC Rules. Bernardo Dr, San Diego, CA 92127 U.S.A. Telephone ...installed and used with the equipment in your Sony dealer regarding this manual could void your camcorder. Regulatory Information Declaration of Conformity Trade Name: SONY Model No.: DCR-HC85 Responsible Party: Sony Electronics Inc. Bernardo Dr, San Diego, CA 92127 U.S.A. DCR-HC Serial No. If this equipment does cause...

Camera Operations Guide
Page 4
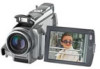
...light conditions, such as at the sun. Doing so might cause your camcorder to other materials may be sure to support it. If you see. • The illustrations used on this manual are based on the model DCR-HC85. • The on the LCD panel, viewfinder, and lens •... near a window or outdoors. • Do not aim at dusk. Change the screen language before using a digital still camera, and thus may be copyrighted. Viewfinder LCD panel Battery pack Flash (DCR-HC85) 4 Unauthorized recording of such materials may be some tiny black points and/ or bright points (white, red,...
...light conditions, such as at the sun. Doing so might cause your camcorder to other materials may be sure to support it. If you see. • The illustrations used on this manual are based on the model DCR-HC85. • The on the LCD panel, viewfinder, and lens •... near a window or outdoors. • Do not aim at dusk. Change the screen language before using a digital still camera, and thus may be copyrighted. Viewfinder LCD panel Battery pack Flash (DCR-HC85) 4 Unauthorized recording of such materials may be some tiny black points and/ or bright points (white, red,...

Camera Operations Guide
Page 7
....APPLI.) menu - PICT.EFFECT/SLIDE SHOW/ FRAME REC/INT.REC-STL, etc 74 Using the (EDIT/PLAY) menu - Digital program editing 98 Dubbing sound to a recorded tape 105 Deleting recorded pictures ........107 Marking recorded images with your computer cComputer Applications ... ....108 Printing recorded images (PictBridge compliant printer 110 Troubleshooting Troubleshooting 113 Warning indicators and messages ...121 Additional Information Using your camcorder abroad ..........125 Usable cassette tapes 126 About the "Memory Stick 127 About the "InfoLITHIUM" battery pack 130 About i.LINK...
....APPLI.) menu - PICT.EFFECT/SLIDE SHOW/ FRAME REC/INT.REC-STL, etc 74 Using the (EDIT/PLAY) menu - Digital program editing 98 Dubbing sound to a recorded tape 105 Deleting recorded pictures ........107 Marking recorded images with your computer cComputer Applications ... ....108 Printing recorded images (PictBridge compliant printer 110 Troubleshooting Troubleshooting 113 Warning indicators and messages ...121 Additional Information Using your camcorder abroad ..........125 Usable cassette tapes 126 About the "Memory Stick 127 About the "InfoLITHIUM" battery pack 130 About i.LINK...

Camera Operations Guide
Page 27
... the power zoom lever slightly for a faster zoom. Move it further for a slower zoom. Open the LCD panel 90 degrees to the camcorder, then rotate it sparingly for best results. The subject appears farther away (Wide angle). Occasional use it 180 degrees towards the subject. You...Move the power zoom lever towards T. To record wider range of the zoom is selected, you and your camcorder and the subject to get a sharp focus in that point activate the digital zoom ([DIGITAL ZOOM], p. 68). To record closer view Move the power zoom lever towards W. A mirror-image of...
... the power zoom lever slightly for a faster zoom. Move it further for a slower zoom. Open the LCD panel 90 degrees to the camcorder, then rotate it sparingly for best results. The subject appears farther away (Wide angle). Occasional use it 180 degrees towards the subject. You...Move the power zoom lever towards T. To record wider range of the zoom is selected, you and your camcorder and the subject to get a sharp focus in that point activate the digital zoom ([DIGITAL ZOOM], p. 68). To record closer view Move the power zoom lever towards W. A mirror-image of...
Camera Operations Guide
Page 43
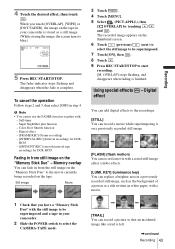
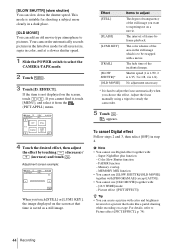
The fader indicator stops flashing and disappears when the fade is finished. Digital effect - [FRAME REC] (Frame recording) - [INTERVAL REC] (Interval recording) for DCR-HC85 Fading in a previously recorded still image, such as a still image. (While storing the image, the screen turns ...Shutter function - Recording 4 Touch the desired effect, then touch . To cancel the operation Follow steps 2 and 3, then select [OFF] in your camcorder. 2 Slide the POWER switch to start recording. [M. Self-timer - Super NightShot plus function - Memory overlap You can record a picture so that you...
The fader indicator stops flashing and disappears when the fade is finished. Digital effect - [FRAME REC] (Frame recording) - [INTERVAL REC] (Interval recording) for DCR-HC85 Fading in a previously recorded still image, such as a still image. (While storing the image, the screen turns ...Shutter function - Recording 4 Touch the desired effect, then touch . To cancel the operation Follow steps 2 and 3, then select [OFF] in your camcorder. 2 Slide the POWER switch to start recording. [M. Self-timer - Super NightShot plus function - Memory overlap You can record a picture so that you...
Camera Operations Guide
Page 44
...MEMORY MIX function • You cannot use [SLOW SHUTTR]/[OLD MOVIE] together with [PROGRAM AE] (except [AUTO]). • You cannot use Digital effect together with color and brightness reversed or a picture that looks like a pastel drawing while recording on the screen at a slower shutter speed. ...and touch . The interval of the area in color, and at that time is 1/4). This mode is not displayed on a movie. Your camcorder automatically records pictures in the letterbox mode for shooting a subject more clearly in step 4. EFFECT]. If the item is suitable for all screen size...
...MEMORY MIX function • You cannot use [SLOW SHUTTR]/[OLD MOVIE] together with [PROGRAM AE] (except [AUTO]). • You cannot use Digital effect together with color and brightness reversed or a picture that looks like a pastel drawing while recording on the screen at a slower shutter speed. ...and touch . The interval of the area in color, and at that time is 1/4). This mode is not displayed on a movie. Your camcorder automatically records pictures in the letterbox mode for shooting a subject more clearly in step 4. EFFECT]. If the item is suitable for all screen size...

Camera Operations Guide
Page 51
... Tip • You cannot record the pictures edited using special effects on each effect, see page 43. To cancel Digital effect Follow steps 2 to externally input pictures. Playback 51 Digital effect You can copy them to select the PLAY/EDIT mode. 2 Touch while the picture you cannot output pictures edited... another tape (p. 94). For details on the tape in step 5. appears. b Note • You cannot add effects to 4, then select [OFF] in your camcorder, but you can apply [STILL], [FLASH], [LUMI. Playback Viewing recordings with digital effects via the DV Interface.
... Tip • You cannot record the pictures edited using special effects on each effect, see page 43. To cancel Digital effect Follow steps 2 to externally input pictures. Playback 51 Digital effect You can copy them to select the PLAY/EDIT mode. 2 Touch while the picture you cannot output pictures edited... another tape (p. 94). For details on the tape in step 5. appears. b Note • You cannot add effects to 4, then select [OFF] in your camcorder, but you can apply [STILL], [FLASH], [LUMI. Playback Viewing recordings with digital effects via the DV Interface.
Camera Operations Guide
Page 68
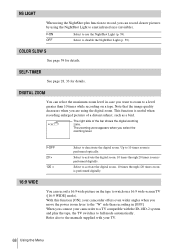
...the maximum zoom level in case you want to zoom to a level greater than recording in [OFF]. Up to 10 times zoom is performed digitally. With this function [ON], your TV. 68 Using the Menu NS LIGHT When using the NightShot plus function to record, you can record ...16:9 wide-screen TV ([16:9 WIDE] mode). GOFF 20 × 120 × Select to activate the digital zoom. 10 times through 20 times zoom is performed optically. When you connect your camcorder to a TV compatible with your camcorder offers even wider angles when you select the zooming level. Select to deactivate the...
...the maximum zoom level in case you want to zoom to a level greater than recording in [OFF]. Up to 10 times zoom is performed digitally. With this function [ON], your TV. 68 Using the Menu NS LIGHT When using the NightShot plus function to record, you can record ...16:9 wide-screen TV ([16:9 WIDE] mode). GOFF 20 × 120 × Select to activate the digital zoom. 10 times through 20 times zoom is performed optically. When you connect your camcorder to a TV compatible with your camcorder offers even wider angles when you select the zooming level. Select to deactivate the...
Camera Operations Guide
Page 86
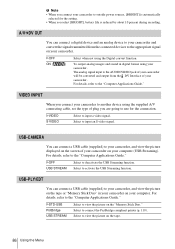
...refer to the "Computer Applications Guide." USB-PLY/EDT You can connect a USB cable (supplied) to your camcorder, and view the picture on the tape or "Memory Stick Duo" in digital format using the supplied A/V connecting cable, set the type of plug you select [BRIGHT], battery life is ...Memory Stick Duo." Select to view the picture on the tape. 86 Using the Menu USB-CAMERA You can connect a digital device and an analog device to another device using your camcorder. For details, refer to activate the USB Streaming function. GOFF ON ( Select when not using the...
...refer to the "Computer Applications Guide." USB-PLY/EDT You can connect a USB cable (supplied) to your camcorder, and view the picture on the tape or "Memory Stick Duo" in digital format using the supplied A/V connecting cable, set the type of plug you select [BRIGHT], battery life is ...Memory Stick Duo." Select to view the picture on the tape. 86 Using the Menu USB-CAMERA You can connect a digital device and an analog device to another device using your camcorder. For details, refer to activate the USB Streaming function. GOFF ON ( Select when not using the...

Camera Operations Guide
Page 94
... cable, press DISPLAY/BATT INFO to select the PLAY/EDIT mode. 4 Start the playback on your camcorder while recording to the operating instructions supplied with Picture effect ([PICT.EFFECT] p. 74), Digital effect (p. 43, 51), or Playback zoom (p. 56) cannot be output via the DV Interface, ... the "Memory Stick Duo." • When dubbing using the i.LINK cable, the recorded picture becomes rough when a picture is finished, stop your camcorder for playback. • Insert the recorded cassette. • Slide the POWER switch to hide indicators such as a recording device (p. 93). 2 ...
... cable, press DISPLAY/BATT INFO to select the PLAY/EDIT mode. 4 Start the playback on your camcorder while recording to the operating instructions supplied with Picture effect ([PICT.EFFECT] p. 74), Digital effect (p. 43, 51), or Playback zoom (p. 56) cannot be output via the DV Interface, ... the "Memory Stick Duo." • When dubbing using the i.LINK cable, the recorded picture becomes rough when a picture is finished, stop your camcorder for playback. • Insert the recorded cassette. • Slide the POWER switch to hide indicators such as a recording device (p. 93). 2 ...

Camera Operations Guide
Page 98
... dub MPEG movies on a VCR that does not support [IR SETUP] codes. • The operating signal for the Digital program editing cannot be able to a tape in your camcorder and VCR for the first time to dub images modified on your computer or recorded with other recording device such as... programs" (p. 102). b Note • You cannot perform the Digital program editing on the tape. Digital program editing You can skip this setting...
... dub MPEG movies on a VCR that does not support [IR SETUP] codes. • The operating signal for the Digital program editing cannot be able to a tape in your camcorder and VCR for the first time to dub images modified on your computer or recorded with other recording device such as... programs" (p. 102). b Note • You cannot perform the Digital program editing on the tape. Digital program editing You can skip this setting...
Camera Operations Guide
Page 101
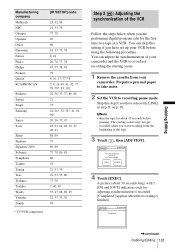
... is finished. The starting scene. 1 Remove the cassette from the beginning of the VCR Follow the steps below when you have set up your camcorder. EDIT ADJ TEST 0:00:00:00 Set the recording device in a VCR. Skip this setting if you start recording from your VCR before pausing... of the tape. 3 Touch , then [ADJ TEST]. You can skip this step if you are performing digital program edit for the first time to a tape in rec. You can adjust the synchronization of your camcorder and the VCR to recording pause mode. A picture (about 50 seconds long) with 5 [IN] and ...
... is finished. The starting scene. 1 Remove the cassette from the beginning of the VCR Follow the steps below when you have set up your camcorder. EDIT ADJ TEST 0:00:00:00 Set the recording device in a VCR. Skip this setting if you start recording from your VCR before pausing... of the tape. 3 Touch , then [ADJ TEST]. You can skip this step if you are performing digital program edit for the first time to a tape in rec. You can adjust the synchronization of your camcorder and the VCR to recording pause mode. A picture (about 50 seconds long) with 5 [IN] and ...

Camera Operations Guide
Page 102
...the average number value for each [CUT-IN] and [CUTOUT]. 7 Touch [CUT-IN]. Recording the selected scenes as programs When you are performing a digital program edit for the first time to a tape in a VCR, go through the procedures described in slow mode. 5 opening numbers for each [IN... a tape, insert a cassette for [CUT-IN], then touch . EDIT OK (EDIT/ 5 Touch / to select the average number value for recording into the camcorder. OTHER DEVICE MEMORY STICK 102 Dubbing/Editing 5 Rewind the tape on your VCR. EDIT CUT-IN 0:00:00:00 0 -60~+240 8 Touch / to select...
...the average number value for each [CUT-IN] and [CUTOUT]. 7 Touch [CUT-IN]. Recording the selected scenes as programs When you are performing a digital program edit for the first time to a tape in a VCR, go through the procedures described in slow mode. 5 opening numbers for each [IN... a tape, insert a cassette for [CUT-IN], then touch . EDIT OK (EDIT/ 5 Touch / to select the average number value for recording into the camcorder. OTHER DEVICE MEMORY STICK 102 Dubbing/Editing 5 Rewind the tape on your VCR. EDIT CUT-IN 0:00:00:00 0 -60~+240 8 Touch / to select...

Camera Operations Guide
Page 109
...want to print out later. PROTECT - You can mark images that you want to print out while viewing them on your camcorder. (You cannot specify the number of printouts.) The DPOF (Digital Print Order Format) standard is used to protect. 5 Touch [PROTECT]. To cancel image protection Follow steps 1 to 5, ... 101 6 Touch the image that you want to select images for printing - disappears from the image. Selecting still images for printing on your camcorder. 1 Slide the POWER switch to cancel image protection. - Print mark 101-0002 2/ 10 101 SET 4 Touch .
...want to print out later. PROTECT - You can mark images that you want to print out while viewing them on your camcorder. (You cannot specify the number of printouts.) The DPOF (Digital Print Order Format) standard is used to protect. 5 Touch [PROTECT]. To cancel image protection Follow steps 1 to 5, ... 101 6 Touch the image that you want to select images for printing - disappears from the image. Selecting still images for printing on your camcorder. 1 Slide the POWER switch to cancel image protection. - Print mark 101-0002 2/ 10 101 SET 4 Touch .


