Computer Applications Guide
Page 2
... Standard installation is required. The supplied CD-ROM includes the following URL:http://www.ppackage.com/) When playing pictures recorded on a "Memory Stick" on a tape to play back movies.) • Others: USB port (this first • For camera operations, read the separate Camera Operations Guide supplied with an i.LINK cable and use the standard software in the OS. For the compatible drive, visit the following software. You can only transfer and view still images. •...
... Standard installation is required. The supplied CD-ROM includes the following URL:http://www.ppackage.com/) When playing pictures recorded on a "Memory Stick" on a tape to play back movies.) • Others: USB port (this first • For camera operations, read the separate Camera Operations Guide supplied with an i.LINK cable and use the standard software in the OS. For the compatible drive, visit the following software. You can only transfer and view still images. •...
Computer Applications Guide
Page 14
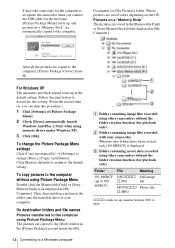
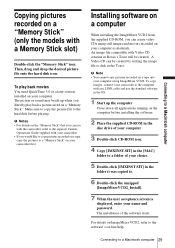
... [Delete]. To copy pictures to change the Picture Package Menu settings Click [Copy automatically] t [Settings] to the computer without using other camcorders without the folder creation function (for playback only) Folder File Meaning 101 MSDCF (up at the default setting. Click [Restore defaults] to return to 9999. Where pictures are saved varies depending on a "Memory Stick" The pictures are stored in the [Removable Disk] or [Sony MemoryStick] folder displayed in [My Computer]. C Folder containing movie data recorded using Picture...
... [Delete]. To copy pictures to change the Picture Package Menu settings Click [Copy automatically] t [Settings] to the computer without using other camcorders without the folder creation function (for playback only) Folder File Meaning 101 MSDCF (up at the default setting. Click [Restore defaults] to return to 9999. Where pictures are saved varies depending on a "Memory Stick" The pictures are stored in the [Removable Disk] or [Sony MemoryStick] folder displayed in [My Computer]. C Folder containing movie data recorded using Picture...
Computer Applications Guide
Page 18
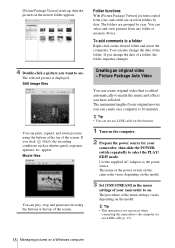
... power switch on the camcorder varies depending on the model. 3 Set [USB STREAM] in the newest folder appears. 4 Double-click a picture you want to see. To add comments to the computer via an i.LINK cable (p. 15). 18 Managing pictures on a Windows computer Picture Package Auto Video You can play, stop, and pause movies using the buttons at the top of the screen. [Picture Package Viewer] starts up, then the pictures in the menu settings...
... power switch on the camcorder varies depending on the model. 3 Set [USB STREAM] in the newest folder appears. 4 Double-click a picture you want to see. To add comments to the computer via an i.LINK cable (p. 15). 18 Managing pictures on a Windows computer Picture Package Auto Video You can play, stop, and pause movies using the buttons at the top of the screen. [Picture Package Viewer] starts up, then the pictures in the menu settings...
Computer Applications Guide
Page 24
... a picture recorded on a tape (maximum length of your camcorder. The disc tray comes out automatically. . 24 Managing pictures on the model. Regarding supported models, check to see if there is a listing for your camcorder to select the PLAY/ EDIT mode. The name of the separate Camera Operations Guide. • You can only use an i.LINK cable. 1 Turn on your camcorder, then slide the POWER switch repeatedly to the computer directly - Saving to CD-R]. . USB Streaming. 3 Set [USB...
... a picture recorded on a tape (maximum length of your camcorder. The disc tray comes out automatically. . 24 Managing pictures on the model. Regarding supported models, check to see if there is a listing for your camcorder to select the PLAY/ EDIT mode. The name of the separate Camera Operations Guide. • You can only use an i.LINK cable. 1 Turn on your camcorder, then slide the POWER switch repeatedly to the computer directly - Saving to CD-R]. . USB Streaming. 3 Set [USB...
Computer Applications Guide
Page 26
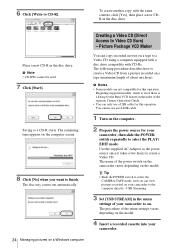
... with a DVD drive and software compatible with Video CDs - For details, refer to the separate Camera Operations Guide supplied with a Memory Stick slot) You can play the Video CD You can copy images for MEMORY MIX to a "Memory Stick" (only the models with your camcorder. 5 Connect your computer and start up [MEMORY MIX Image Tool]. To play back the Video CD in the disc drive of the picture stops automatically when the tape is due to the AVI format used to...
... with a DVD drive and software compatible with Video CDs - For details, refer to the separate Camera Operations Guide supplied with a Memory Stick slot) You can play the Video CD You can copy images for MEMORY MIX to a "Memory Stick" (only the models with your camcorder. 5 Connect your computer and start up [MEMORY MIX Image Tool]. To play back the Video CD in the disc drive of the picture stops automatically when the tape is due to the AVI format used to...
Computer Applications Guide
Page 29
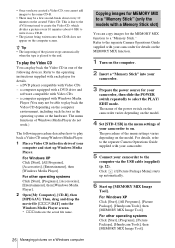
... sure to copy the picture file to the hard disk before installing the software 2 Place the supplied CD-ROM in the disc drive of your computer 3 Double-click CD-ROM icon. 4 Copy [IMXINST.SIT] in the [MAC] folder to a folder of the software starts. Connecting to the software's on-line help. b Note • You cannot copy pictures recorded on a tape into your camcorder first. Connecting to a Macintosh computer Copying pictures recorded on a "Memory Stick" (only the models with Video CD...
... sure to copy the picture file to the hard disk before installing the software 2 Place the supplied CD-ROM in the disc drive of your computer 3 Double-click CD-ROM icon. 4 Copy [IMXINST.SIT] in the [MAC] folder to a folder of the software starts. Connecting to the software's on-line help. b Note • You cannot copy pictures recorded on a tape into your camcorder first. Connecting to a Macintosh computer Copying pictures recorded on a "Memory Stick" (only the models with Video CD...

Computer Applications Guide
Page 30
... on your camcorder, then slide the POWER switch repeatedly to select the PLAY/ EDIT mode. Latin America http://vaio-online.sony.com/ Using the Direct Access to "Click to DVD" function for each Windows XP user. 1 Turn on a tape to a DVD easily if your camcorder to a Sony VAIO series computer* that can only use a USB cable. Before operating the Direct Access to "Click to DVD" function, follow the steps below to start "Click to DVD Automatic Mode Launcher." 1 Turn on...
... on your camcorder, then slide the POWER switch repeatedly to select the PLAY/ EDIT mode. Latin America http://vaio-online.sony.com/ Using the Direct Access to "Click to DVD" function for each Windows XP user. 1 Turn on a tape to a DVD easily if your camcorder to a Sony VAIO series computer* that can only use a USB cable. Before operating the Direct Access to "Click to DVD" function, follow the steps below to start "Click to DVD Automatic Mode Launcher." 1 Turn on...
Computer Applications Guide
Page 33
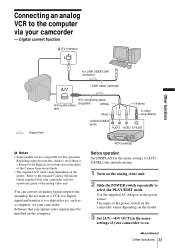
... A/V connecting cable A/V (audio/video) (supplied) (White) jack (Red) AUDIO/VIDEO jacks (Yellow) S video plug (Black) b Notes • Some models are not compatible for the Digital convert function in the menu settings of your camcorder to on. ,continued Other functions 33 Connecting an analog VCR to a digital device, such as a computer, via your camcorder with the operations guide of the analog video unit You can capture video signals must be installed on the computer. Refer to the separate Camera Operations Guide supplied with your camcorder - Use...
... A/V connecting cable A/V (audio/video) (supplied) (White) jack (Red) AUDIO/VIDEO jacks (Yellow) S video plug (Black) b Notes • Some models are not compatible for the Digital convert function in the menu settings of your camcorder to on. ,continued Other functions 33 Connecting an analog VCR to a digital device, such as a computer, via your camcorder with the operations guide of the analog video unit You can capture video signals must be installed on the computer. Refer to the separate Camera Operations Guide supplied with your camcorder - Use...
Computer Applications Guide
Page 36
... devices below are already installed, right-click them . mark in the [Other devices] folder 5 When the [Confirm Device Removal] screen appears, click [OK]. 6 Turn off the power of your camcorder, disconnect the USB cable, then restart the computer. 7 Place the supplied CD-ROM in the [Universal Serial Bus Controller] folder For copying and viewing pictures recorded on a tape using the USB cable. Sony DSC] with a Memory Stick slot) • [? b Note • Deleting anything other than [USB Audio Device], [USB Device], [USB Composite Device...
... devices below are already installed, right-click them . mark in the [Other devices] folder 5 When the [Confirm Device Removal] screen appears, click [OK]. 6 Turn off the power of your camcorder, disconnect the USB cable, then restart the computer. 7 Place the supplied CD-ROM in the [Universal Serial Bus Controller] folder For copying and viewing pictures recorded on a tape using the USB cable. Sony DSC] with a Memory Stick slot) • [? b Note • Deleting anything other than [USB Audio Device], [USB Device], [USB Composite Device...
Computer Applications Guide
Page 37
Sony Handycam] or [? The [System Properties] screen appears. 3 Click the [Hardware] tab. 4 Click [Device Manager]. 5 Click [View], then click [Devices by type]. 6 If devices below and try to install the USB driver again. 1 Double-click [My Computer]. 2 Right-click [PICTUREPACKAGE] (Disc drive)*. * Drive names (such as Administrators. 1 Check that your camcorder is connected to delete them. For copying and viewing pictures recorded on a tape • [USB Composite Device] in the [Universal Serial Bus Controller] folder • [USB Audio Device] in the...
Sony Handycam] or [? The [System Properties] screen appears. 3 Click the [Hardware] tab. 4 Click [Device Manager]. 5 Click [View], then click [Devices by type]. 6 If devices below and try to install the USB driver again. 1 Double-click [My Computer]. 2 Right-click [PICTUREPACKAGE] (Disc drive)*. * Drive names (such as Administrators. 1 Check that your camcorder is connected to delete them. For copying and viewing pictures recorded on a tape • [USB Composite Device] in the [Universal Serial Bus Controller] folder • [USB Audio Device] in the...
Computer Applications Guide
Page 38
... devices] folder 8 When the [Confirm Device Removal] screen appears, click [OK]. 9 Turn off the power of your camcorder, disconnect the USB cable, then restart the computer. 10 Place the supplied CD-ROM in the [Other devices] folder For copying and viewing pictures recorded on a tape • [USB Composite Device] in the [Universal Serial Bus Controller] folder • [USB Audio Device] in the [Sound, video and game controllers] folder • [USB Device] in the disc drive of your camcorder is connected to install the USB driver...
... devices] folder 8 When the [Confirm Device Removal] screen appears, click [OK]. 9 Turn off the power of your camcorder, disconnect the USB cable, then restart the computer. 10 Place the supplied CD-ROM in the [Other devices] folder For copying and viewing pictures recorded on a tape • [USB Composite Device] in the [Universal Serial Bus Controller] folder • [USB Audio Device] in the [Sound, video and game controllers] folder • [USB Device] in the disc drive of your camcorder is connected to install the USB driver...
Camera Operations Guide
Page 3
... turning the equipment off and on the DV format. Regulatory Information Declaration of Conformity Trade Name: SONY Model No.: DCR-HC85 Responsible Party: Sony Electronics Inc. Operation is encouraged to try to radio communications. This equipment generates, uses, and can use Note on Cassette Memory Your camcorder is based on , the user is subject to which can use Title search (p. 60), Date search (p. 61), [ TITLE] (p. 81), [ TAPE...
... turning the equipment off and on the DV format. Regulatory Information Declaration of Conformity Trade Name: SONY Model No.: DCR-HC85 Responsible Party: Sony Electronics Inc. Operation is encouraged to try to radio communications. This equipment generates, uses, and can use Note on Cassette Memory Your camcorder is based on , the user is subject to which can use Title search (p. 60), Date search (p. 61), [ TITLE] (p. 81), [ TAPE...

Camera Operations Guide
Page 4
... the pixels are operational for effective use. Viewfinder LCD panel Battery pack Flash (DCR-HC85) 4 If you need an NTSC system-based TV. • Television programs, films, video tapes, and other device such as a VCR or a computer with a USB or i.LINK cable, be some tiny black points and/ or bright points (white, red, blue, or green in low light conditions, such as shown in the following parts. These points are...
... the pixels are operational for effective use. Viewfinder LCD panel Battery pack Flash (DCR-HC85) 4 If you need an NTSC system-based TV. • Television programs, films, video tapes, and other device such as a VCR or a computer with a USB or i.LINK cable, be some tiny black points and/ or bright points (white, red, blue, or green in low light conditions, such as shown in the following parts. These points are...
Camera Operations Guide
Page 15
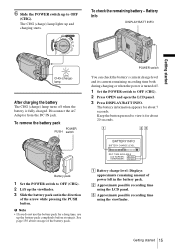
.... Battery Info DISPLAY/BATT INFO Getting started 15 See page 130 about storage of power left in the direction of the arrow while pressing the PUSH button. C Approximate possible recording time using the LCD panel. 6 Slide the POWER switch up to OFF (CHG). 2 Lift up the viewfinder. 3 Slide the battery pack out in the battery pack. To remove the battery pack POWER PUSH switch Battery pack 1 Set the POWER switch to...
.... Battery Info DISPLAY/BATT INFO Getting started 15 See page 130 about storage of power left in the direction of the arrow while pressing the PUSH button. C Approximate possible recording time using the LCD panel. 6 Slide the POWER switch up to OFF (CHG). 2 Lift up the viewfinder. 3 Slide the battery pack out in the battery pack. To remove the battery pack POWER PUSH switch Battery pack 1 Set the POWER switch to...
Camera Operations Guide
Page 32
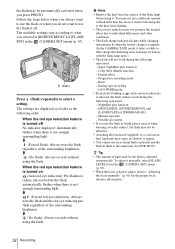
... [FLASH LEVEL] from the (CAMERA SET) menu (p. 67). • When the focus is complete. (In the CAMERA-TAPE mode, it takes a while to fully charge the flash lamp since it charges its shadow to "Adjusting the focus manually" (p. 41) for DCR-HC85). You may not produce the desired effect due to individual differences and other conditions. • The flash charge indicator flickers while charging, and remains lit when the battery charge is hard...
... [FLASH LEVEL] from the (CAMERA SET) menu (p. 67). • When the focus is complete. (In the CAMERA-TAPE mode, it takes a while to fully charge the flash lamp since it charges its shadow to "Adjusting the focus manually" (p. 41) for DCR-HC85). You may not produce the desired effect due to individual differences and other conditions. • The flash charge indicator flickers while charging, and remains lit when the battery charge is hard...
Camera Operations Guide
Page 34
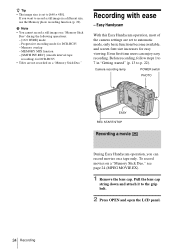
... recording mode for DCR-HC85 - Recording with ease - Camera recording lamp POWER switch PHOTO EASY REC START/STOP Recording a movie During Easy Handycam operation, you want to record a still image in "Getting started" (p. 13 to the grip belt. 2 Press OPEN and open the LCD panel. 34 Recording Memory overlap - To record movies on a "Memory Stick Duo" during the following operations: - [16:9 WIDE] mode - Easy Handycam With this Easy Handycam operation, most of the camera settings are not recorded on a tape only. Even first time users can record movies on a "Memory Stick...
... recording mode for DCR-HC85 - Recording with ease - Camera recording lamp POWER switch PHOTO EASY REC START/STOP Recording a movie During Easy Handycam operation, you want to record a still image in "Getting started" (p. 13 to the grip belt. 2 Press OPEN and open the LCD panel. 34 Recording Memory overlap - To record movies on a "Memory Stick Duo" during the following operations: - [16:9 WIDE] mode - Easy Handycam With this Easy Handycam operation, most of the camera settings are not recorded on a tape only. Even first time users can record movies on a "Memory Stick...

Camera Operations Guide
Page 117
... play back. The displayed pictures are connected as well. (p. 59) The sound breaks off. This is new and has nothing recorded. "---" is displayed on the screen. • The tape you are playing back the pictures stored on a "Memory Stick Duo," refer also to error.] appears and recording stops. Symptom Cause and/or Corrective Actions The flash level cannot be changed during Easy Handycam operation. This is being played. • The data code on the screen. Use a cleaning cassette...
... play back. The displayed pictures are connected as well. (p. 59) The sound breaks off. This is new and has nothing recorded. "---" is displayed on the screen. • The tape you are playing back the pictures stored on a "Memory Stick Duo," refer also to error.] appears and recording stops. Symptom Cause and/or Corrective Actions The flash level cannot be changed during Easy Handycam operation. This is being played. • The data code on the screen. Use a cleaning cassette...
Camera Operations Guide
Page 128
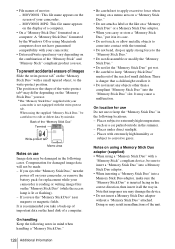
... result in malfunctions of the "Memory Stick" and "Memory Stick" compliant product you eject the "Memory Stick Duo," turn the power off on the "Memory Stick Duo" (while the access lamp is inserted facing in the correct direction, then insert it all the way in the following locations. - Places subject to edit or delete data by the Windows OS or using the supplied "Memory Stick Duo," be made. - Note...
... result in malfunctions of the "Memory Stick" and "Memory Stick" compliant product you eject the "Memory Stick Duo," turn the power off on the "Memory Stick Duo" (while the access lamp is inserted facing in the correct direction, then insert it all the way in the following locations. - Places subject to edit or delete data by the Windows OS or using the supplied "Memory Stick Duo," be made. - Note...
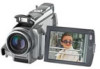
Marketing Specifications
Page 1
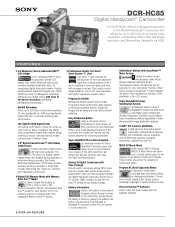
... Movie Mode will be sharp and clear with Memory Stick Duo™ Media Capture digital still images at any analog NTSC video source to power on either the LCD screen or in the viewfinder. Analog NTSC video can be passed through the digital Handycam camcorder directly into a PC via the i.LINK® interface in real-time for recording operational. Battery Information Battery information is momentarily displayed without having to digital video via USB. Progressive Shutter Mechanical shutter system that extreme digital zooming...
... Movie Mode will be sharp and clear with Memory Stick Duo™ Media Capture digital still images at any analog NTSC video source to power on either the LCD screen or in the viewfinder. Analog NTSC video can be passed through the digital Handycam camcorder directly into a PC via the i.LINK® interface in real-time for recording operational. Battery Information Battery information is momentarily displayed without having to digital video via USB. Progressive Shutter Mechanical shutter system that extreme digital zooming...
Marketing Specifications
Page 2
...; Media, MSAC-M2 Memory Stick Duo Adapter, Lens Cap, Lens Hood, Multi A/V Cable, LCD Cleaning Cloth, CD-ROM with USB Driver (Picture Package™ Software v.1.0 for data management functions. Sony, AccuPower, Advanced HAD, Handycam, i.LINK, InfoLithium, Memory Stick, the Memory Stick logo, Memory Stick Duo, Memory Stick PRO, Memory Stick PRO Duo, NightShot, Picture Package, Remote Commander, SteadyShot, SwivelScreen, and Worry Free are trademarks of their respective owners. DCR-HC85 Digital Handycam® Camcorder ADDITIONAL FEATURES 12-Bit/16-Bit PCM Digital Stereo Digital Audio/Video...
...; Media, MSAC-M2 Memory Stick Duo Adapter, Lens Cap, Lens Hood, Multi A/V Cable, LCD Cleaning Cloth, CD-ROM with USB Driver (Picture Package™ Software v.1.0 for data management functions. Sony, AccuPower, Advanced HAD, Handycam, i.LINK, InfoLithium, Memory Stick, the Memory Stick logo, Memory Stick Duo, Memory Stick PRO, Memory Stick PRO Duo, NightShot, Picture Package, Remote Commander, SteadyShot, SwivelScreen, and Worry Free are trademarks of their respective owners. DCR-HC85 Digital Handycam® Camcorder ADDITIONAL FEATURES 12-Bit/16-Bit PCM Digital Stereo Digital Audio/Video...


