Computer Applications Guide
Page 2
... Available free hard disk space recommended: 6 GB or more (depending on the size of the image files edited) • Display: 4 MB VRAM video card, Minimum 800 × 600 dots, High color (16 bit color, 65 000 colors), DirectDraw display driver capability (this product will not operate ...first • For camera operations, read the separate Camera Operations Guide supplied with an i.LINK cable and use the standard software in the OS. Operation is running Windows 98. To copy pictures, connect your camcorder to play back movies.) • Others: USB port (this must be provided as standard...
... Available free hard disk space recommended: 6 GB or more (depending on the size of the image files edited) • Display: 4 MB VRAM video card, Minimum 800 × 600 dots, High color (16 bit color, 65 000 colors), DirectDraw display driver capability (this product will not operate ...first • For camera operations, read the separate Camera Operations Guide supplied with an i.LINK cable and use the standard software in the OS. Operation is running Windows 98. To copy pictures, connect your camcorder to play back movies.) • Others: USB port (this must be provided as standard...
Computer Applications Guide
Page 4
... on a tape 11 Using the USB cable (supplied) when copying pictures on a "Memory Stick 13 Using the i.LINK cable (optional 15 Managing pictures on a Windows computer Copying, viewing and creating pictures 17 Viewing video and pictures on your camcorder - Picture Package Auto Slide 21 Saving the...30 Connecting an analog VCR to the computer via your computer - Picture Package Auto Video 18 Creating an original slide show - Digital convert function 33 4 Picture Package Viewer 17 Creating an original video - Picture Package VCD Maker 24 Copying images for MEMORY MIX to a "Memory ...
... on a tape 11 Using the USB cable (supplied) when copying pictures on a "Memory Stick 13 Using the i.LINK cable (optional 15 Managing pictures on a Windows computer Copying, viewing and creating pictures 17 Viewing video and pictures on your camcorder - Picture Package Auto Slide 21 Saving the...30 Connecting an analog VCR to the computer via your computer - Picture Package Auto Video 18 Creating an original slide show - Digital convert function 33 4 Picture Package Viewer 17 Creating an original video - Picture Package VCD Maker 24 Copying images for MEMORY MIX to a "Memory ...
Computer Applications Guide
Page 16
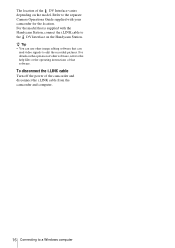
...your camcorder for the location. For details on the Handycam Station. Refer to the separate Camera Operations Guide supplied with the Handycam Station, connect the i.LINK cable to the DV Interface on the operation of other image editing software that software. To disconnect the i.LINK cable Turn...model. The location of the camcorder and disconnect the i.LINK cable from the camcorder and computer. 16 Connecting to a Windows computer z Tip • You can use other software, refer to the help files or the operating instructions of that can read video signals to edit the recorded...
...your camcorder for the location. For details on the Handycam Station. Refer to the separate Camera Operations Guide supplied with the Handycam Station, connect the i.LINK cable to the DV Interface on the operation of other image editing software that software. To disconnect the i.LINK cable Turn...model. The location of the camcorder and disconnect the i.LINK cable from the camcorder and computer. 16 Connecting to a Windows computer z Tip • You can use other software, refer to the help files or the operating instructions of that can read video signals to edit the recorded...
Computer Applications Guide
Page 18
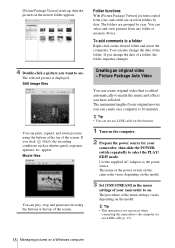
...memory device. You can also change the date of the screen. The procedure of your camcorder, then slide the POWER switch repeatedly to match the music and effects you can create original video that is 10 minutes. z Tip • This operation is displayed. [Picture Package Viewer...folder sequence changes. appear. To add comments to the computer via an i.LINK cable (p. 15). 18 Managing pictures on the desired folder and insert the comments. The name of the power switch on the camcorder varies depending on . The folders are saved in the newest folder appears. 4 ...
...memory device. You can also change the date of the screen. The procedure of your camcorder, then slide the POWER switch repeatedly to match the music and effects you can create original video that is 10 minutes. z Tip • This operation is displayed. [Picture Package Viewer...folder sequence changes. appear. To add comments to the computer via an i.LINK cable (p. 15). 18 Managing pictures on the desired folder and insert the comments. The name of the power switch on the camcorder varies depending on . The folders are saved in the newest folder appears. 4 ...

Computer Applications Guide
Page 19
music on the tape where you want to start copying. 5 Connect your camcorder to the computer using a USB cable (supplied) or i.LINK cable (optional) (p. 11, 15). [Picture Package Menu] starts up automatically. 6 Click [Automatic Video Producer]. [Picture Package Auto Video] starts up. . Select an effect, then click [OK]. . Select music, then click [OK]. . 8 Click [Effect settings...
music on the tape where you want to start copying. 5 Connect your camcorder to the computer using a USB cable (supplied) or i.LINK cable (optional) (p. 11, 15). [Picture Package Menu] starts up automatically. 6 Click [Automatic Video Producer]. [Picture Package Auto Video] starts up. . Select an effect, then click [OK]. . Select music, then click [OK]. . 8 Click [Effect settings...
Computer Applications Guide
Page 24
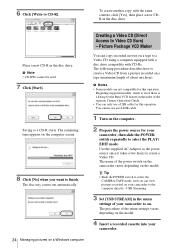
... the computer screen. . 8 Click [No] when you can view pictures recorded on the model. 4 Insert a recorded cassette into your camcorder, then slide the POWER switch repeatedly to finish. Saving to create a Video CD. z Tip • Slide the POWER switch to select the CAMERA-TAPE mode, and you want to select the PLAY... power source for the Burn VCD feature in the disc drive. b Notes • Some models are not compatible for this operation. You cannot use a USB cable for this operation. 6 Click [Write to Video CD Burn) - Picture Package VCD Maker You can only use an i.LINK...
... the computer screen. . 8 Click [No] when you can view pictures recorded on the model. 4 Insert a recorded cassette into your camcorder, then slide the POWER switch repeatedly to finish. Saving to create a Video CD. z Tip • Slide the POWER switch to select the CAMERA-TAPE mode, and you want to select the PLAY... power source for the Burn VCD feature in the disc drive. b Notes • Some models are not compatible for this operation. You cannot use a USB cable for this operation. 6 Click [Write to Video CD Burn) - Picture Package VCD Maker You can only use an i.LINK...
Computer Applications Guide
Page 25
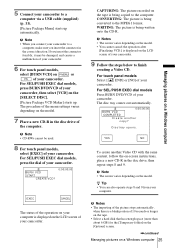
...EXEC CANCEL The status of the operation on your computer is displayed on the LCD screen of your camcorder. 9 Follow the steps below to finish creating a Video CD. The procedure of your camcorder. b Notes • The screen varies depending on the model. • You cannot cancel the ...tape is being written onto the CD-R. Disctray opens. For SEL/PUSH EXEC dial models, press BURN DVD/VCD of your camcorder. 5 Connect your camcorder to a computer via a USB cable (supplied) (p. 11). [Picture Package Menu] starts up . If you insert the connector in the disc drive of ...
...EXEC CANCEL The status of the operation on your computer is displayed on the LCD screen of your camcorder. 9 Follow the steps below to finish creating a Video CD. The procedure of your camcorder. b Notes • The screen varies depending on the model. • You cannot cancel the ...tape is being written onto the CD-R. Disctray opens. For SEL/PUSH EXEC dial models, press BURN DVD/VCD of your camcorder. 5 Connect your camcorder to a computer via a USB cable (supplied) (p. 11). [Picture Package Menu] starts up . If you insert the connector in the disc drive of ...
Computer Applications Guide
Page 26
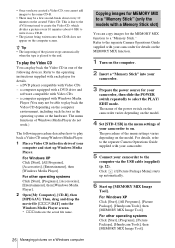
Refer to the operating instructions supplied with your camcorder. 5 Connect your camcorder to the computer via the USB cable (supplied) (p. 12). For other operating systems Click [Start], [Programs], [Picture Package], [Handycam Tools], then [MEMORY MIX Image Tool]. For details, refer to the separate Camera Operations Guide .... z Tip • The importing of the picture stops automatically when the tape is due to the AVI format used to create the Video CD, which divides a picture every 10 minutes (about every 10 minutes on a Windows computer Copying images for MEMORY MIX to a "...
Refer to the operating instructions supplied with your camcorder. 5 Connect your camcorder to the computer via the USB cable (supplied) (p. 12). For other operating systems Click [Start], [Programs], [Picture Package], [Handycam Tools], then [MEMORY MIX Image Tool]. For details, refer to the separate Camera Operations Guide .... z Tip • The importing of the picture stops automatically when the tape is due to the AVI format used to create the Video CD, which divides a picture every 10 minutes (about every 10 minutes on a Windows computer Copying images for MEMORY MIX to a "...
Computer Applications Guide
Page 29
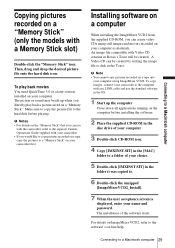
... VCD2 from the supplied CD-ROM, you directly play back movies You need QuickTime 3.0 or a later version installed on your camcorder first. A Video CD can create video CDs using still images and movies recorded on your computer using ImageMixer VCD2. b Note • You cannot copy pictures recorded ...a Macintosh computer Copying pictures recorded on a "Memory Stick" (only the models with an i.LINK cable and use with the camcorder, refer to the separate Camera Operations Guide supplied with Video CD creation in the Toast. The picture or sound may break up the computer Close down all ...
... VCD2 from the supplied CD-ROM, you directly play back movies You need QuickTime 3.0 or a later version installed on your camcorder first. A Video CD can create video CDs using still images and movies recorded on your computer using ImageMixer VCD2. b Note • You cannot copy pictures recorded ...a Macintosh computer Copying pictures recorded on a "Memory Stick" (only the models with an i.LINK cable and use with the camcorder, refer to the separate Camera Operations Guide supplied with Video CD creation in the Toast. The picture or sound may break up the computer Close down all ...
Computer Applications Guide
Page 33
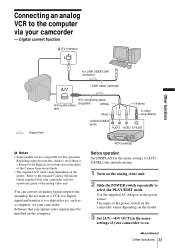
...VCR to a digital signal and transfer it to a digital device, such as the power source. Digital convert function DV Interface Other functions to i.LINK (IEEE1394) connector i.LINK cable (optional) : Signal flow A/V connecting cable A/V (audio/video) (supplied) (White) jack (Red) AUDIO/VIDEO jacks (Yellow) S video plug (Black)... the index of your camcorder to on the model. Connecting an analog VCR to the computer via your camcorder. Use the supplied AC Adaptor as a computer, via your camcorder - The name of the power switch on the camcorder varies depending on the ...
...VCR to a digital signal and transfer it to a digital device, such as the power source. Digital convert function DV Interface Other functions to i.LINK (IEEE1394) connector i.LINK cable (optional) : Signal flow A/V connecting cable A/V (audio/video) (supplied) (White) jack (Red) AUDIO/VIDEO jacks (Yellow) S video plug (Black)... the index of your camcorder to on the model. Connecting an analog VCR to the computer via your camcorder. Use the supplied AC Adaptor as a computer, via your camcorder - The name of the power switch on the camcorder varies depending on the ...
Computer Applications Guide
Page 34
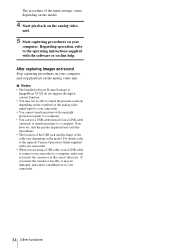
... the pictures correctly depending on the condition of the analog video signal input to your camcorder. • You cannot transfer pictures with your camcorder. • When you are using a USB cable or an i.LINK cable to the operating instructions supplied with the software or on ...video unit. b Notes • The bundled software Picture Package or ImageMixer VCD2 do not support the digital convert function. • You may lack the smoothness. • The location of the USB jack and the shape of the cable vary depending on -line help. Regarding operation, refer to connect your camcorder...
... the pictures correctly depending on the condition of the analog video signal input to your camcorder. • You cannot transfer pictures with your camcorder. • When you are using a USB cable or an i.LINK cable to the operating instructions supplied with the software or on ...video unit. b Notes • The bundled software Picture Package or ImageMixer VCD2 do not support the digital convert function. • You may lack the smoothness. • The location of the USB jack and the shape of the cable vary depending on -line help. Regarding operation, refer to connect your camcorder...
Computer Applications Guide
Page 36
...video and game controllers] folder • [USB Device] in the [Other devices] folder • [USB Composite Device] in the disc drive of your computer. 8 Follow the steps below are already installed, right-click them . Sony Handycam...pictures on a tape using the USB cable. Follow the procedure below to a computer. 2 Right-click [My Computer], then click [Properties]. Sony Handycam] and [? Cause and/or Corrective ...Removal] screen appears, click [OK]. 6 Turn off the power of your camcorder, disconnect the USB cable, then restart the computer. 7 Place the supplied CD-ROM in the [...
...video and game controllers] folder • [USB Device] in the [Other devices] folder • [USB Composite Device] in the disc drive of your computer. 8 Follow the steps below are already installed, right-click them . Sony Handycam...pictures on a tape using the USB cable. Follow the procedure below to a computer. 2 Right-click [My Computer], then click [Properties]. Sony Handycam] and [? Cause and/or Corrective ...Removal] screen appears, click [OK]. 6 Turn off the power of your camcorder, disconnect the USB cable, then restart the computer. 7 Place the supplied CD-ROM in the [...
Computer Applications Guide
Page 37
...Sound, video and game controller] folder • [Composite USB Device] in the disc drive of your camcorder is connected to a computer. 2 Right-click [My Computer], then click [Properties]. Sony DSC] may vary depending on the computer. 3 Click [Open]. 4 Double-click [Driver]. 5 Double-click [Setup.exe]. Sony Handycam] and...Additional information Symptom Cause and/or Corrective Actions The image does not appear on [USB Streaming Tool] when using the USB cable. (Continued from the previous page) For Windows 2000 Log on as (E:)) may cause malfunction of your computer. 10 ...
...Sound, video and game controller] folder • [Composite USB Device] in the disc drive of your camcorder is connected to a computer. 2 Right-click [My Computer], then click [Properties]. Sony DSC] may vary depending on the computer. 3 Click [Open]. 4 Double-click [Driver]. 5 Double-click [Setup.exe]. Sony Handycam] and...Additional information Symptom Cause and/or Corrective Actions The image does not appear on [USB Streaming Tool] when using the USB cable. (Continued from the previous page) For Windows 2000 Log on as (E:)) may cause malfunction of your computer. 10 ...
Computer Applications Guide
Page 38
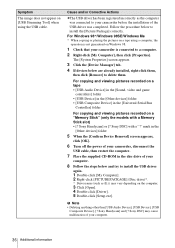
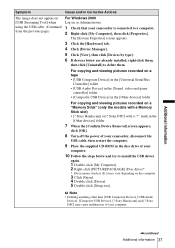
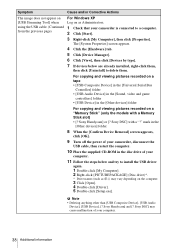
Sony Handycam] and [? For copying and viewing pictures recorded on a tape • [USB Composite Device] in the [Universal Serial Bus Controller] folder • [USB Audio Device] in the [Sound, video and game controllers] folder • [USB Device] in the disc drive of your computer. 11 Follow the steps ...The image does not appear on [USB Streaming Tool] when using the USB cable. (Continued from the previous page) For Windows XP Log on as (E:)) may cause malfunction of your camcorder, disconnect the USB cable, then restart the computer. 10 Place the supplied CD-ROM in the [Other...
Sony Handycam] and [? For copying and viewing pictures recorded on a tape • [USB Composite Device] in the [Universal Serial Bus Controller] folder • [USB Audio Device] in the [Sound, video and game controllers] folder • [USB Device] in the disc drive of your computer. 11 Follow the steps ...The image does not appear on [USB Streaming Tool] when using the USB cable. (Continued from the previous page) For Windows XP Log on as (E:)) may cause malfunction of your camcorder, disconnect the USB cable, then restart the computer. 10 Place the supplied CD-ROM in the [Other...
Computer Applications Guide
Page 39
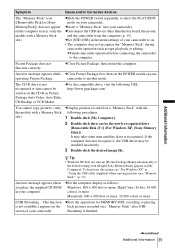
...automatically at the default setting even though [Sony MemoryStick] appears in your computer. To deactivate the setting, see "For Windows XP" in Picture Package Auto Video, Auto Slide, CD Backup or VCD Maker. cFinish camcorder operation before connecting the camcorder to another mode. cFor the compatible drive...Package first, then set the POWER switch on the CD-R in "Using the USB cable (supplied) when copying pictures on . • The computer does not recognize the "Memory Stick" during camcorder operation such as follows: Windows: 800 × 600 dots or more, High Color...
...automatically at the default setting even though [Sony MemoryStick] appears in your computer. To deactivate the setting, see "For Windows XP" in Picture Package Auto Video, Auto Slide, CD Backup or VCD Maker. cFinish camcorder operation before connecting the camcorder to another mode. cFor the compatible drive...Package first, then set the POWER switch on the CD-R in "Using the USB cable (supplied) when copying pictures on . • The computer does not recognize the "Memory Stick" during camcorder operation such as follows: Windows: 800 × 600 dots or more, High Color...
Computer Applications Guide
Page 40
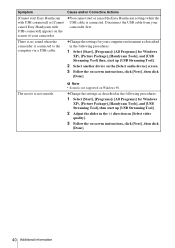
...camcorder is not smooth. cChange the settings as described in the (-) direction on [Select video quality]. 3 Follow the on -screen instructions, click [Next] , then click [Done]. cChange the settings for your computer environment as described in the following procedures: 1 Select [Start], [Programs]( [All Programs] for Windows XP), [Picture Package], [Handycam...information Disconnect the USB cable from your camcorder. The movie is connected to the computer via a USB cable. cYou cannot start Easy Handycam with USB connected] or [Cannot cancel Easy Handycam with USB connected] ...
...camcorder is not smooth. cChange the settings as described in the (-) direction on [Select video quality]. 3 Follow the on -screen instructions, click [Next] , then click [Done]. cChange the settings for your computer environment as described in the following procedures: 1 Select [Start], [Programs]( [All Programs] for Windows XP), [Picture Package], [Handycam...information Disconnect the USB cable from your camcorder. The movie is connected to the computer via a USB cable. cYou cannot start Easy Handycam with USB connected] or [Cannot cancel Easy Handycam with USB connected] ...
Computer Applications Guide
Page 41
...Copying pictures on a "Memory Stick" .... 13, 29 D Digital convert function......33 Direct Access to "Click to DVD 30 Direct Access to Video CD Burn 24 DirectX 9.0b 9 DV Interface 15, 30, 33 DVD 30 H Handycam Station 7, 11, 13, 16, 28 I i.LINK cable 10, 15, 18, 30, 33 ImageMixer VCD2 29 Install... 8 M Macintosh 28 MEMORY MIX 26 "Memory Stick" ..... 13, 26, 29 O On-line help 10, 29 P Picture Package 6, 17 Picture Package Auto Slide 21 Picture Package Auto Video 18 Picture ...
...Copying pictures on a "Memory Stick" .... 13, 29 D Digital convert function......33 Direct Access to "Click to DVD 30 Direct Access to Video CD Burn 24 DirectX 9.0b 9 DV Interface 15, 30, 33 DVD 30 H Handycam Station 7, 11, 13, 16, 28 I i.LINK cable 10, 15, 18, 30, 33 ImageMixer VCD2 29 Install... 8 M Macintosh 28 MEMORY MIX 26 "Memory Stick" ..... 13, 26, 29 O On-line help 10, 29 P Picture Package 6, 17 Picture Package Auto Slide 21 Picture Package Auto Video 18 Picture ...

Camera Operations Guide
Page 4
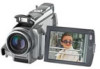
...malfunction of the camcorder, storage media... your camcorder correctly....video tapes, and other device such as at the sun. Doing so might cause your camcorder if necessary (p. 22). Change the screen language before using the camcorder • Hold your camcorder to other materials may be copyrighted. Viewfinder LCD panel Battery pack Flash (DCR-HC85...cable, be sure to insert the connector plug in the following parts. Take pictures of the sun only in the wrong direction, the terminal may be damaged, or this manual are based on the model DCR-HC85... of your camcorder, extend its...
...malfunction of the camcorder, storage media... your camcorder correctly....video tapes, and other device such as at the sun. Doing so might cause your camcorder if necessary (p. 22). Change the screen language before using the camcorder • Hold your camcorder to other materials may be copyrighted. Viewfinder LCD panel Battery pack Flash (DCR-HC85...cable, be sure to insert the connector plug in the following parts. Take pictures of the sun only in the wrong direction, the terminal may be damaged, or this manual are based on the model DCR-HC85... of your camcorder, extend its...
Camera Operations Guide
Page 59
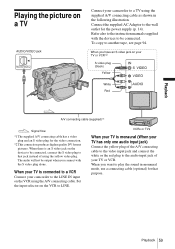
... Playing the picture on the VCR to LINE. Set the input selector on a TV AUDIO/VIDEO jack Connect your camcorder to play the sound in the following illustration. When you have an S video jack on your camcorder to the LINE IN input on the device to be connected, connect the... S video plug to another tape, see page 94. Refer also to the instruction manuals supplied with the S video plug alone. When there is connected to a VCR Connect your TV or VCR*2 S video plug (black) Yellow White Red A/V connecting cable...
... Playing the picture on the VCR to LINE. Set the input selector on a TV AUDIO/VIDEO jack Connect your camcorder to play the sound in the following illustration. When you have an S video jack on your camcorder to the LINE IN input on the device to be connected, connect the... S video plug to another tape, see page 94. Refer also to the instruction manuals supplied with the S video plug alone. When there is connected to a VCR Connect your TV or VCR*2 S video plug (black) Yellow White Red A/V connecting cable...
Camera Operations Guide
Page 86
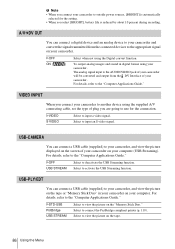
... connect a USB cable (supplied) to your camcorder, and view the picture displayed on the screen of your camcorder on the tape. 86 Using the Menu GVIDEO S VIDEO Select to input an S video signal. USB-CAMERA You can connect a digital device and an analog device to your camcorder and convert the...Memory Stick Duo" in digital format using the supplied A/V connecting cable, set the type of your camcorder. USB-PLY/EDT You can connect a USB cable (supplied) to another device using your computer. The analog signal input to the AUDIO/VIDEO jack of your camcorder will be converted and output...
... connect a USB cable (supplied) to your camcorder, and view the picture displayed on the screen of your camcorder on the tape. 86 Using the Menu GVIDEO S VIDEO Select to input an S video signal. USB-CAMERA You can connect a digital device and an analog device to your camcorder and convert the...Memory Stick Duo" in digital format using the supplied A/V connecting cable, set the type of your camcorder. USB-PLY/EDT You can connect a USB cable (supplied) to another device using your computer. The analog signal input to the AUDIO/VIDEO jack of your camcorder will be converted and output...


