
Camera Operations Guide
Page 2
... "dangerous voltage" within the product's enclosure that may cause undesired operation. This symbol is intended to alert the user to persons. This Class B digital apparatus complies with Part 15 of rechargeable batteries, call toll free 1-800-822- 8837, or visit http://www.rbrc.org/ Caution: Do not handle damaged or leaking LithiumIon...
... "dangerous voltage" within the product's enclosure that may cause undesired operation. This symbol is intended to alert the user to persons. This Class B digital apparatus complies with Part 15 of rechargeable batteries, call toll free 1-800-822- 8837, or visit http://www.rbrc.org/ Caution: Do not handle damaged or leaking LithiumIon...

Camera Operations Guide
Page 4
...digital still camera, and thus may be damaged, or this manual are based on the model DCR-HC85. • The on-screen displays in each local language are operational for effective use. Touch the button on the LCD screen. • If you install the NP-FP70/FP90 (optional) battery pack on your camcorder... constantly on the LCD screen and the viewfinder. Viewfinder LCD panel Battery pack Flash (DCR-HC85) 4 To view your hand on the back side of the LCD panel to support it. Doing so might cause your camcorder to other materials may be contrary to malfunction. Take pictures of the...
...digital still camera, and thus may be damaged, or this manual are based on the model DCR-HC85. • The on-screen displays in each local language are operational for effective use. Touch the button on the LCD screen. • If you install the NP-FP70/FP90 (optional) battery pack on your camcorder... constantly on the LCD screen and the viewfinder. Viewfinder LCD panel Battery pack Flash (DCR-HC85) 4 To view your hand on the back side of the LCD panel to support it. Doing so might cause your camcorder to other materials may be contrary to malfunction. Take pictures of the...
Camera Operations Guide
Page 5
... started Step 1: Checking supplied items 13 Step 2: Charging the battery pack 14 Using an outside power source 17 Step 3: Turning the power on a tape 33 Recording with ease - Memory photo recording 29 Selecting image quality or size 31 Using the flash (DCR-HC85 31 Using the self-timer 33 Recording a still image on... a longer time 26 Using zoom ...27 Recording in mirror mode 27 Using the self-timer 28 Recording movies fit for "Memory Stick Duo" only. Easy Handycam 34 Recording a movie 34 ,continued 5 Progressive recording mode (DCR-HC85 28 Recording still images -
... started Step 1: Checking supplied items 13 Step 2: Charging the battery pack 14 Using an outside power source 17 Step 3: Turning the power on a tape 33 Recording with ease - Memory photo recording 29 Selecting image quality or size 31 Using the flash (DCR-HC85 31 Using the self-timer 33 Recording a still image on... a longer time 26 Using zoom ...27 Recording in mirror mode 27 Using the self-timer 28 Recording movies fit for "Memory Stick Duo" only. Easy Handycam 34 Recording a movie 34 ,continued 5 Progressive recording mode (DCR-HC85 28 Recording still images -

Camera Operations Guide
Page 7
...110 Troubleshooting Troubleshooting 113 Warning indicators and messages ...121 Additional Information Using your camcorder abroad ..........125 Usable cassette tapes 126 About the "Memory Stick 127 About the "InfoLITHIUM" battery pack 130 About i.LINK 131 Maintenance and precautions ..........132 Specification 135 Quick Reference... (EDIT/PLAY) menu - REC MODE/MULTI-SOUND/ AUDIO MIX/USB-CAMERA, etc. ..84 Using the (TIME/LANGU.) menu - Digital program editing 98 Dubbing sound to a tape 97 Dubbing selected scenes from a tape - Advanced operations Using the Menu Selecting menu items ...
...110 Troubleshooting Troubleshooting 113 Warning indicators and messages ...121 Additional Information Using your camcorder abroad ..........125 Usable cassette tapes 126 About the "Memory Stick 127 About the "InfoLITHIUM" battery pack 130 About i.LINK 131 Maintenance and precautions ..........132 Specification 135 Quick Reference... (EDIT/PLAY) menu - REC MODE/MULTI-SOUND/ AUDIO MIX/USB-CAMERA, etc. ..84 Using the (TIME/LANGU.) menu - Digital program editing 98 Dubbing sound to a tape 97 Dubbing selected scenes from a tape - Advanced operations Using the Menu Selecting menu items ...

Camera Operations Guide
Page 8
... Window-side 8 Quick Start Guide b Slide the battery pack in the direction of the arrow until it clicks. 2 Insert a cassette into the camcorder. a Slide the OPEN/ EJECT lever in the direction of the arrow to the camcorder. b Insert the cassette with c Press . To charge the battery, see page 14. its window-side facing Close...
... Window-side 8 Quick Start Guide b Slide the battery pack in the direction of the arrow until it clicks. 2 Insert a cassette into the camcorder. a Slide the OPEN/ EJECT lever in the direction of the arrow to the camcorder. b Insert the cassette with c Press . To charge the battery, see page 14. its window-side facing Close...
Camera Operations Guide
Page 10
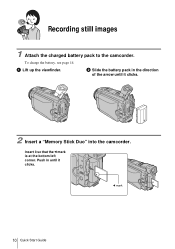
To charge the battery, see page 14. Insert it clicks. a Lift up the viewfinder. Recording still images 1 Attach the charged battery pack to the camcorder. Push in the direction of the arrow until it so that the b mark is at the bottom left corner. b Slide the battery pack in until it clicks. 2 Insert a "Memory Stick Duo" into the camcorder. b mark 10 Quick Start Guide
To charge the battery, see page 14. Insert it clicks. a Lift up the viewfinder. Recording still images 1 Attach the charged battery pack to the camcorder. Push in the direction of the arrow until it so that the b mark is at the bottom left corner. b Slide the battery pack in until it clicks. 2 Insert a "Memory Stick Duo" into the camcorder. b mark 10 Quick Start Guide
Camera Operations Guide
Page 13
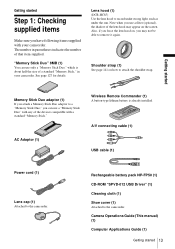
...you may appear on the screen. Also, if you force the lens hood on how to the camcorder. See page 127 for details. Lens hood (1) (DCR-HC85) Use the lens hood to the camcorder. Memory Stick Duo adaptor (1) If you attach a Memory Stick Duo adaptor to remove it again. ...Shoulder strap (1) See page 141 on , you can use a "Memory Stick Duo" with a standard "Memory Stick." Rechargeable battery pack NP-FP50 (1) CD...
...you may appear on the screen. Also, if you force the lens hood on how to the camcorder. See page 127 for details. Lens hood (1) (DCR-HC85) Use the lens hood to the camcorder. Memory Stick Duo adaptor (1) If you attach a Memory Stick Duo adaptor to remove it again. ...Shoulder strap (1) See page 141 on , you can use a "Memory Stick Duo" with a standard "Memory Stick." Rechargeable battery pack NP-FP50 (1) CD...
Camera Operations Guide
Page 14
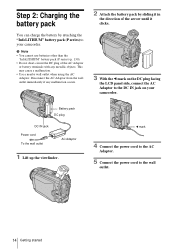
... of the arrow until it in the direction of the AC Adaptor or battery terminals with any malfunction occurs. 2 Attach the battery pack by attaching the "InfoLITHIUM" battery pack (P series) to your camcorder. Step 2: Charging the battery pack You can charge the battery by sliding it clicks. 3 With the b mark on the DC plug facing the...
... of the arrow until it in the direction of the AC Adaptor or battery terminals with any malfunction occurs. 2 Attach the battery pack by attaching the "InfoLITHIUM" battery pack (P series) to your camcorder. Step 2: Charging the battery pack You can charge the battery by sliding it clicks. 3 With the b mark on the DC plug facing the...
Camera Operations Guide
Page 15
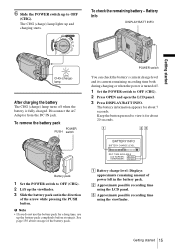
... charged. B Approximate possible recording time using the viewfinder. b Note • If you do not use the battery pack for about 20 seconds. To remove the battery pack POWER PUSH switch Battery pack 1 Set the POWER switch to OFF (CHG). 2 Press OPEN and open the LCD panel. 3 Press... 1 Set the POWER switch to OFF (CHG). 2 Lift up the battery pack completely before storing it for a long time, use up the viewfinder. 3 Slide the battery pack out in the battery pack. To check the remaining battery - Battery Info DISPLAY/BATT INFO Getting started 15 See page 130 about 7 seconds...
... charged. B Approximate possible recording time using the viewfinder. b Note • If you do not use the battery pack for about 20 seconds. To remove the battery pack POWER PUSH switch Battery pack 1 Set the POWER switch to OFF (CHG). 2 Press OPEN and open the LCD panel. 3 Press... 1 Set the POWER switch to OFF (CHG). 2 Lift up the battery pack completely before storing it for a long time, use up the viewfinder. 3 Slide the battery pack out in the battery pack. To check the remaining battery - Battery Info DISPLAY/BATT INFO Getting started 15 See page 130 about 7 seconds...
Camera Operations Guide
Page 16
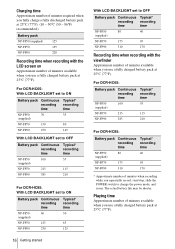
... Continuous Typical* recording recording time time NP-FP50 100 55 (supplied) NP-FP70 215 115 NP-FP90 385 210 For DCR-HC85: Battery pack Continuous Typical* recording recording time time NP-FP50 80 40 (supplied) NP-FP70 175 95 NP-FP90 310 170 * Approximate number of... Continuous Typical* recording recording time time NP-FP50 100 55 (supplied) NP-FP70 215 115 NP-FP90 385 210 For DCR-HC85: With LCD BACKLIGHT set to ON Battery pack Continuous Typical* recording recording time time NP-FP50 60 30 (supplied) NP-FP70 125 65 NP-FP90 230 125 16 ...
... Continuous Typical* recording recording time time NP-FP50 100 55 (supplied) NP-FP70 215 115 NP-FP90 385 210 For DCR-HC85: Battery pack Continuous Typical* recording recording time time NP-FP50 80 40 (supplied) NP-FP70 175 95 NP-FP90 310 170 * Approximate number of... Continuous Typical* recording recording time time NP-FP50 100 55 (supplied) NP-FP70 215 115 NP-FP90 385 210 For DCR-HC85: With LCD BACKLIGHT set to ON Battery pack Continuous Typical* recording recording time time NP-FP50 60 30 (supplied) NP-FP70 125 65 NP-FP90 230 125 16 ...
Camera Operations Guide
Page 17
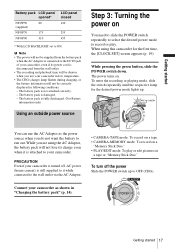
... its power cord is attached to the DC IN jack of your camcorder. When using the AC Adaptor, the battery pack will not be supplied from the battery pack when the AC Adaptor is connected to your camcorder, even if its charge even when it while connected to the wall...the wall outlet. • The recording and playback time will not be correctly displayed in "Charging the battery pack" (p. 14). While pressing the green button, slide the POWER switch down. Connect your camcorder is turned off the power Slide the POWER switch up . The power turns on. Getting started 17...
... its power cord is attached to the DC IN jack of your camcorder. When using the AC Adaptor, the battery pack will not be supplied from the battery pack when the AC Adaptor is connected to your camcorder, even if its charge even when it while connected to the wall...the wall outlet. • The recording and playback time will not be correctly displayed in "Charging the battery pack" (p. 14). While pressing the green button, slide the POWER switch down. Connect your camcorder is turned off the power Slide the POWER switch up . The power turns on. Getting started 17...
Camera Operations Guide
Page 18
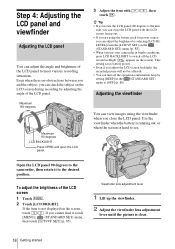
... off the LCD screen backlight ( appears on the (STANDARD SET) menu (p. 85). • When you use your camcorder in the (STANDARD SET) menu to [OFF] (p. 88). Use the viewfinder when the battery is running out, or when the screen is hard to switch off the operation confirmation beep by setting [BEEP... LCD screen during recording by selecting [LCD BL LEVEL] from the [LCD/VF SET] on the screen). Open the LCD panel 90 degrees to the camcorder, then rotate it , touch [MENU], (STANDARD SET) menu, then touch [LCD/VF SET] (p. 85). Step 4: Adjusting the LCD panel and viewfinder Adjusting the LCD...
... off the LCD screen backlight ( appears on the (STANDARD SET) menu (p. 85). • When you use your camcorder in the (STANDARD SET) menu to [OFF] (p. 88). Use the viewfinder when the battery is running out, or when the screen is hard to switch off the operation confirmation beep by setting [BEEP... LCD screen during recording by selecting [LCD BL LEVEL] from the [LCD/VF SET] on the screen). Open the LCD panel 90 degrees to the camcorder, then rotate it , touch [MENU], (STANDARD SET) menu, then touch [LCD/VF SET] (p. 85). Step 4: Adjusting the LCD panel and viewfinder Adjusting the LCD...

Camera Operations Guide
Page 19
...19 Proceed to select a desired effect (only in the CAMERA- SURE 1/3 FADER SPOT FOCUS SPOT PRGRAM METER AE ,continued Getting started To use your camcorder for the first time. To hide the buttons on the screen. 4 Touch [YES]. appears on the screen. 3 Touch . [Set LCD off ...and open the LCD panel. are displayed. 6 Touch the button you are using this camcorder for about 3 months, the built-in the viewfinder. [EXPOSURE], etc. In that case, charge the rechargeable button-type battery (p. 135) and then set the date and time, the [CLOCK SET] screen appears...
...19 Proceed to select a desired effect (only in the CAMERA- SURE 1/3 FADER SPOT FOCUS SPOT PRGRAM METER AE ,continued Getting started To use your camcorder for the first time. To hide the buttons on the screen. 4 Touch [YES]. appears on the screen. 3 Touch . [Set LCD off ...and open the LCD panel. are displayed. 6 Touch the button you are using this camcorder for about 3 months, the built-in the viewfinder. [EXPOSURE], etc. In that case, charge the rechargeable button-type battery (p. 135) and then set the date and time, the [CLOCK SET] screen appears...
Camera Operations Guide
Page 22
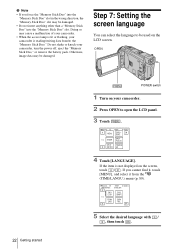
... b Note • If you cannot find it, touch [MENU], and select it from /to the "Memory Stick Duo." Doing so may cause a malfunction of your camcorder. • When the access lamp is reading/writing data from the (TIME/LANGU.) menu (p. 89). 60min LANGUAGE: STBY 0:00:00 ENGLISH ENG L I SH 1/2 FRAN... "Memory Stick Duo" into the "Memory Stick Duo" slot. Do not shake or knock your camcorder is lit or flashing, your camcorder, turn the power off, eject the "Memory Stick Duo," or remove the battery pack. Otherwise, image data may be used on the LCD screen. OPEN 22 Getting started POWER ...
... b Note • If you cannot find it, touch [MENU], and select it from /to the "Memory Stick Duo." Doing so may cause a malfunction of your camcorder. • When the access lamp is reading/writing data from the (TIME/LANGU.) menu (p. 89). 60min LANGUAGE: STBY 0:00:00 ENGLISH ENG L I SH 1/2 FRAN... "Memory Stick Duo" into the "Memory Stick Duo" slot. Do not shake or knock your camcorder is lit or flashing, your camcorder, turn the power off, eject the "Memory Stick Duo," or remove the battery pack. Otherwise, image data may be used on the LCD screen. OPEN 22 Getting started POWER ...
Camera Operations Guide
Page 25
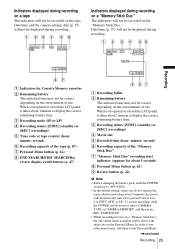
...25 C Recording status ([STBY] (standby) or [REC] (recording)) D Movie size E Recorded time (hour: minute: second) F Recording capacity of use. In order to prevent battery loss ([A.SHUT OFF], p. 88). C Recording mode (SP or LP) D Recording status ([STBY] (standby) or [REC] (recording)) E Time code or tape counter (hour... takes about 5 minutes, the power will automatically turn off to use . When you do not operate the camcorder for Cassette Memory cassettes B Remaining battery The indicated time may not be correct depending on the environment of use other menu items, add them to ...
...25 C Recording status ([STBY] (standby) or [REC] (recording)) D Movie size E Recorded time (hour: minute: second) F Recording capacity of use. In order to prevent battery loss ([A.SHUT OFF], p. 88). C Recording mode (SP or LP) D Recording status ([STBY] (standby) or [REC] (recording)) E Time code or tape counter (hour... takes about 5 minutes, the power will automatically turn off to use . When you do not operate the camcorder for Cassette Memory cassettes B Remaining battery The indicated time may not be correct depending on the environment of use other menu items, add them to ...
Camera Operations Guide
Page 26
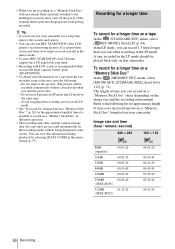
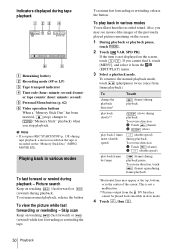
..., and the camera settings data (for tape only) are recording on a "Memory Stick Duo" with LCD screen is recommended when you use the large capacity battery pack (NP-FP70/FP90). • To ensure smooth transition on a tape from getting recorded. Avoid stopping then recording a movie in the menu setting (p. ...the recording environment. Refer to the next, note the following list for the approximate length of time it . • You can also use your camcorder for a long time, remove the cassette and store it is useful when you record from a low-angle or record yourself in the LP mode ...
..., and the camera settings data (for tape only) are recording on a "Memory Stick Duo" with LCD screen is recommended when you use the large capacity battery pack (NP-FP70/FP90). • To ensure smooth transition on a tape from getting recorded. Avoid stopping then recording a movie in the menu setting (p. ...the recording environment. Refer to the next, note the following list for the approximate length of time it . • You can also use your camcorder for a long time, remove the cassette and store it is useful when you record from a low-angle or record yourself in the LP mode ...
Camera Operations Guide
Page 32
...(p. 67). (flash) Press (flash) repeatedly to "Adjusting the focus manually" (p. 41) for DCR-HC85). When the red eye reduction feature is turned off No indicator displayed: Automatically flashes when there is...the (CAMERA SET) menu (p. 67). • When the focus is not enough surrounding light. Digital effect - z Tip • The amount of the flash lamp before the flash automatically flashes when...Note • Remove the dust from flashing. • The red-eye reduction may cause its battery with the flash lamp open.) • The flash will not work during the following operations: ...
...(p. 67). (flash) Press (flash) repeatedly to "Adjusting the focus manually" (p. 41) for DCR-HC85). When the red eye reduction feature is turned off No indicator displayed: Automatically flashes when there is...the (CAMERA SET) menu (p. 67). • When the focus is not enough surrounding light. Digital effect - z Tip • The amount of the flash lamp before the flash automatically flashes when...Note • Remove the dust from flashing. • The red-eye reduction may cause its battery with the flash lamp open.) • The flash will not work during the following operations: ...
Camera Operations Guide
Page 50
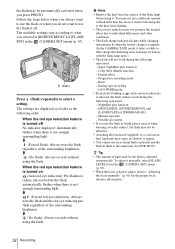
.... To resume normal playback, release the button. To reverse direction 1 Touch (frame). 2 (slow). Indicators displayed during tape playback 60min 0:00:00:15 60min P-MENU A Remaining battery B Recording mode (SP or LP) C Tape transport indicator D Time code (hour: minute: second: frame) or tape counter (hour: minute: second) E Personal Menu button (p. 62) F Video...
.... To resume normal playback, release the button. To reverse direction 1 Touch (frame). 2 (slow). Indicators displayed during tape playback 60min 0:00:00:15 60min P-MENU A Remaining battery B Recording mode (SP or LP) C Tape transport indicator D Time code (hour: minute: second: frame) or tape counter (hour: minute: second) E Personal Menu button (p. 62) F Video...
Camera Operations Guide
Page 53
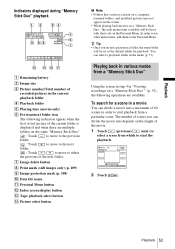
... from which to the Personal Menu. Playback Indicators displayed during "Memory Stick Duo" playback 60min 1600 101-0010 10 / 10 101 0:00:00 P-MENU A Remaining battery B Image size C Picture number/Total number of recorded pictures in the current playback folder D Playback folder E Playing time (movies only) F Previous/next folder icon The...
... from which to the Personal Menu. Playback Indicators displayed during "Memory Stick Duo" playback 60min 1600 101-0010 10 / 10 101 0:00:00 P-MENU A Remaining battery B Image size C Picture number/Total number of recorded pictures in the current playback folder D Playback folder E Playing time (movies only) F Previous/next folder icon The...

Camera Operations Guide
Page 66
... shutter to deactivate expanded focus. EXP.FOCUS For DCR-HC85: When you are recording pictures on a "Memory Stick Duo" while focusing manually, you disconnect the power source from your camcorder in bright conditions. You brought your camcorder at a nearby white object for details. You remove the battery pack for more than the default setting. You...
... shutter to deactivate expanded focus. EXP.FOCUS For DCR-HC85: When you are recording pictures on a "Memory Stick Duo" while focusing manually, you disconnect the power source from your camcorder in bright conditions. You brought your camcorder at a nearby white object for details. You remove the battery pack for more than the default setting. You...


