Operating Guide
Page 4
... Check Upon completion of time, unplug it is left unattended and unused for service. Adjust only those controls that the set is damaged or frayed. - Unauthorized substitutions may result in fire, electric shock, or other controls may expose you to dangerous voltage or other hazards. Replacement parts When replacement parts are specified in the operating instructions. If the set exhibits a distinct change in performance - Servicing Do...
... Check Upon completion of time, unplug it is left unattended and unused for service. Adjust only those controls that the set is damaged or frayed. - Unauthorized substitutions may result in fire, electric shock, or other controls may expose you to dangerous voltage or other hazards. Replacement parts When replacement parts are specified in the operating instructions. If the set exhibits a distinct change in performance - Servicing Do...
Operating Guide
Page 8
... the picture and sound are recorded without notice. • The illustrations used on this manual are based on the model DCR-DVD305. • Disc in this manual are captured using your camcorder. Unauthorized recording of light from what you see. • Design and specifications of recording media and accessories are subject to change without any problems. You cannot delete images once you need an NTSC system-based TV. • Television programs, films, video tapes, and...
... the picture and sound are recorded without notice. • The illustrations used on this manual are based on the model DCR-DVD305. • Disc in this manual are captured using your camcorder. Unauthorized recording of light from what you see. • Design and specifications of recording media and accessories are subject to change without any problems. You cannot delete images once you need an NTSC system-based TV. • Television programs, films, video tapes, and...
Operating Guide
Page 10
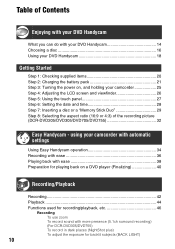
... Recording/Playback Recording 42 Playback 44 Functions used for recording/playback, etc 46 Recording To use zoom To record sound with ease 38 Preparation for backlit subjects (BACK LIGHT) 10 Table of Contents Enjoying with your DVD Handycam What you can do with your DVD Handycam 14 Choosing a disc 16 Using your camcorder 25 Step 4: Adjusting the LCD screen and viewfinder 26 Step 5: Using the touch panel 27 Step 6: Setting the date and time 28 Step 7: Inserting a disc or a "Memory Stick...
... Recording/Playback Recording 42 Playback 44 Functions used for recording/playback, etc 46 Recording To use zoom To record sound with ease 38 Preparation for backlit subjects (BACK LIGHT) 10 Table of Contents Enjoying with your DVD Handycam What you can do with your DVD Handycam 14 Choosing a disc 16 Using your camcorder 25 Step 4: Adjusting the LCD screen and viewfinder 26 Step 5: Using the touch panel 27 Step 6: Setting the date and time 28 Step 7: Inserting a disc or a "Memory Stick...
Operating Guide
Page 11
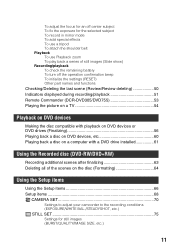
... Playback To use Playback zoom To play back a series of still images (Slide show) Recording/playback To check the remaining battery To turn off the operation confirmation beep To initialize the settings (RESET) Other part names and functions Checking/Deleting the last scene (Review/Review deleting 50 Indicators displayed during recording/playback 51 Remote Commander (DCR-DVD305/DVD755 53 Playing the picture on a TV 54 Playback on DVD devices Making the disc compatible with playback on DVD devices or DVD drives (Finalizing 56 Playing back a disc on DVD devices, etc 60 Playing back a disc...
... Playback To use Playback zoom To play back a series of still images (Slide show) Recording/playback To check the remaining battery To turn off the operation confirmation beep To initialize the settings (RESET) Other part names and functions Checking/Deleting the last scene (Review/Review deleting 50 Indicators displayed during recording/playback 51 Remote Commander (DCR-DVD305/DVD755 53 Playing the picture on a TV 54 Playback on DVD devices Making the disc compatible with playback on DVD devices or DVD drives (Finalizing 56 Playing back a disc on DVD devices, etc 60 Playing back a disc...
Operating Guide
Page 12
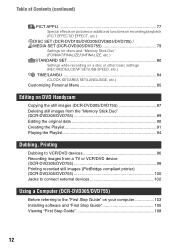
... effects on pictures or additional functions on recording/playback (PICT.EFFECT/D.EFFECT, etc.) DISC SET (DCR-DVD105/DVD205/DVD605/DVD705) / MEDIA SET (DCR-DVD305/DVD755 79 Settings for discs and "Memory Stick Duo" (FORMAT/FINALIZE/UNFINALIZE, etc.) STANDARD SET 80 Settings while recording on a disc or other basic settings (REC MODE/LCD/VF SET/USB SPEED, etc.) TIME/LANGU 84 (CLOCK SET/AREA SET/LANGUAGE, etc.) Customizing Personal Menu 85 Editing on DVD Handycam Copying the still images (DCR-DVD305/DVD755 87 Deleting still images from the "Memory Stick Duo" (DCR-DVD305...
... effects on pictures or additional functions on recording/playback (PICT.EFFECT/D.EFFECT, etc.) DISC SET (DCR-DVD105/DVD205/DVD605/DVD705) / MEDIA SET (DCR-DVD305/DVD755 79 Settings for discs and "Memory Stick Duo" (FORMAT/FINALIZE/UNFINALIZE, etc.) STANDARD SET 80 Settings while recording on a disc or other basic settings (REC MODE/LCD/VF SET/USB SPEED, etc.) TIME/LANGU 84 (CLOCK SET/AREA SET/LANGUAGE, etc.) Customizing Personal Menu 85 Editing on DVD Handycam Copying the still images (DCR-DVD305/DVD755 87 Deleting still images from the "Memory Stick Duo" (DCR-DVD305...

Operating Guide
Page 18
... viewing (p.54). The disc can be played back on various DVD devices * Select the mode on your DVD Handycam (See pages 38 and 44) You can also connect it to 32.) Select the disc that best suits your DVD Handycam and format (p.29). recorded (p.50). 3Viewing on your needs. Continued on a various DVD devices The disc can only delete the a recorded image images you like to do after recording? Repeated use of a disc To save recorded To use...
... viewing (p.54). The disc can be played back on various DVD devices * Select the mode on your DVD Handycam (See pages 38 and 44) You can also connect it to 32.) Select the disc that best suits your DVD Handycam and format (p.29). recorded (p.50). 3Viewing on your needs. Continued on a various DVD devices The disc can only delete the a recorded image images you like to do after recording? Repeated use of a disc To save recorded To use...
Operating Guide
Page 23
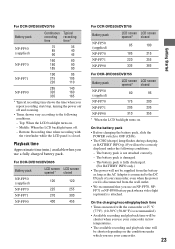
Middle: When the LCD backlight turns off and zooming. • Times shown vary according to the following conditions. - On the battery pack • Before changing the battery pack, slide the POWER switch to the DC IN jack of your camcorder in low temperatures. • The available recording and playback time will be correctly displayed under which you use your camcorder. 23 Getting Started Playback time Approximate time (min.) available when...
Middle: When the LCD backlight turns off and zooming. • Times shown vary according to the following conditions. - On the battery pack • Before changing the battery pack, slide the POWER switch to the DC IN jack of your camcorder in low temperatures. • The available recording and playback time will be correctly displayed under which you use your camcorder. 23 Getting Started Playback time Approximate time (min.) available when...
Operating Guide
Page 30
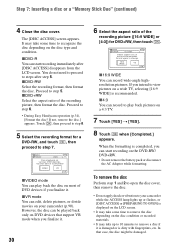
... it is damaged or is displayed on the LCD screen. • It may take some time to your camcorder (p.90). xDVD-RW Select the recording format, then format the disc. FORMAT : VIDEO Can playback on the DVD-RW/ DVD+RW. • Do not remove the battery pack or disconnect the AC Adaptor while formatting. x4:3 You can start recording on various DVD devices. In that support VR mode when you finalize it...
... it is damaged or is displayed on the LCD screen. • It may take some time to your camcorder (p.90). xDVD-RW Select the recording format, then format the disc. FORMAT : VIDEO Can playback on the DVD-RW/ DVD+RW. • Do not remove the battery pack or disconnect the AC Adaptor while formatting. x4:3 You can start recording on various DVD devices. In that support VR mode when you finalize it...

Operating Guide
Page 32
... a DVD-R/DVDRW (VIDEO mode). - when [D.EFFECT] is set to your device. MODE ON 32 * When viewing on subjects. To play back pictures after connecting your camcorder to a TV Set [TV TYPE] to [16:9] or [4:3] according to [OLD MOVIE] (p.78) • Differences in the following situations. - when using a DVD+RW - It may appear rough depending on the LCD screen. while recording movies - For details, refer to light up the (Movie) lamp. when you change...
... a DVD-R/DVDRW (VIDEO mode). - when [D.EFFECT] is set to your device. MODE ON 32 * When viewing on subjects. To play back pictures after connecting your camcorder to a TV Set [TV TYPE] to [16:9] or [4:3] according to [OLD MOVIE] (p.78) • Differences in the following situations. - when using a DVD+RW - It may appear rough depending on the LCD screen. while recording movies - For details, refer to light up the (Movie) lamp. when you change...
Operating Guide
Page 34
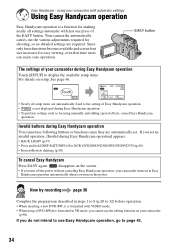
... EASY button. EASY button The settings of Easy Handycam operation. • is a function for making nearly all setup items are automatically set an invalid operation, [Invalid during Easy Handycam operation Touch [SETUP] to page 42. 34 using a DVD-RW disc formatted in Easy Handycam operation automatically when you turn off the power without canceling Easy Handycam operation, your camcorder turns on in VR mode, you turn on your camcorder with automatic settings Using Easy Handycam operation Easy Handycam operation is not displayed during Easy Handycam operation...
... EASY button. EASY button The settings of Easy Handycam operation. • is a function for making nearly all setup items are automatically set an invalid operation, [Invalid during Easy Handycam operation Touch [SETUP] to page 42. 34 using a DVD-RW disc formatted in Easy Handycam operation automatically when you turn off the power without canceling Easy Handycam operation, your camcorder turns on in VR mode, you turn on your camcorder with automatic settings Using Easy Handycam operation Easy Handycam operation is not displayed during Easy Handycam operation...

Operating Guide
Page 46
Enjoy realistic sound when playing the disc on the LCD frame. • The minimum distance required between your finger suddenly from the power zoom lever 1 If you do so, the sound of the lever moving may be recorded. • You cannot change the zoom speed with the zoom buttons 5 on devices that support 5.1ch surround sound. Wider range of view: (Wide) DCR-DVD205/DVD705: DCR-DVD105/DVD605: 46 Close view: (Telephoto) •...
Enjoy realistic sound when playing the disc on the LCD frame. • The minimum distance required between your finger suddenly from the power zoom lever 1 If you do so, the sound of the lever moving may be recorded. • You cannot change the zoom speed with the zoom buttons 5 on devices that support 5.1ch surround sound. Wider range of view: (Wide) DCR-DVD205/DVD705: DCR-DVD105/DVD605: 46 Close view: (Telephoto) •...

Operating Guide
Page 49
... to adjust the volume, see page 45. Recording/playback To check the remaining battery .... Recording/Playback 1 Play back the picture you want to display in stereo microphone When an external microphone (supplied or optional) is [ON] (continuous playback). • You cannot operate playback zoom during slide show . To cancel, touch [END]. • You cannot change the zoom speed with T (Telephoto). If you press this button once, BATTERY INFO appears on the screen for date and time. (Setup...
... to adjust the volume, see page 45. Recording/playback To check the remaining battery .... Recording/Playback 1 Play back the picture you want to display in stereo microphone When an external microphone (supplied or optional) is [ON] (continuous playback). • You cannot operate playback zoom during slide show . To cancel, touch [END]. • You cannot change the zoom speed with T (Telephoto). If you press this button once, BATTERY INFO appears on the screen for date and time. (Setup...
Operating Guide
Page 64
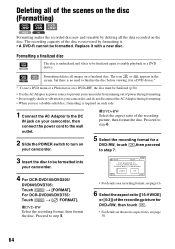
Formatting deletes all the data recorded on the disc. xDVD+RW Select the aspect ratio of the disc is recovered by deleting all images on various DVD devices. FORMAT : VIDEO Can playback on a finalized disc. Proceed to your camcorder. 4 For DCR-DVD105/DVD205/ DVD605/DVD705: Touch t [FORMAT]. The icon or appears in the screen, but there is no need to finalize the disc before viewing it in a DVD device.* * To use a DVD menu or a Photomovie on a DVD+RW, the...
Formatting deletes all the data recorded on the disc. xDVD+RW Select the aspect ratio of the disc is recovered by deleting all images on various DVD devices. FORMAT : VIDEO Can playback on a finalized disc. Proceed to your camcorder. 4 For DCR-DVD105/DVD205/ DVD605/DVD705: Touch t [FORMAT]. The icon or appears in the screen, but there is no need to finalize the disc before viewing it in a DVD device.* * To use a DVD menu or a Photomovie on a DVD+RW, the...
Operating Guide
Page 75
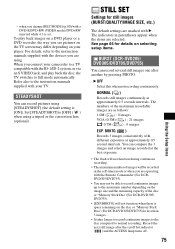
... ACCESS lamp turns off. 75 Using the Setup items To play back the disc, the TV switches to the instruction manuals supplied with the Remote Commander (For DCRDVD305/DVD755). • You may differ depending on the disc or "Memory Stick Duo" (For DCR-DVD305/DVD755)for still images (BURST/QUALITY/IMAGE SIZE, etc.) The default settings are selected. STILL SET Settings for less than 3 images. • It takes longer to record continuous images...
... ACCESS lamp turns off. 75 Using the Setup items To play back the disc, the TV switches to the instruction manuals supplied with the Remote Commander (For DCRDVD305/DVD755). • You may differ depending on the disc or "Memory Stick Duo" (For DCR-DVD305/DVD755)for still images (BURST/QUALITY/IMAGE SIZE, etc.) The default settings are selected. STILL SET Settings for less than 3 images. • It takes longer to record continuous images...
Operating Guide
Page 96
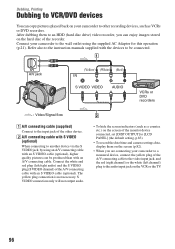
... the instruction manuals supplied with an S VIDEO cable (optional). A/V jack (Yellow) (White) (Red) IN S VIDEO VIDEO AUDIO VCRs or DVD recorders : Video/Signal flow 1 A/V connecting cable (supplied) Connect to the input jack of the other recording devices, such as a counter, etc.) on the screen of the monitor device connected, set [DISP OUTPUT] to [LCD PANEL] (the default setting, p.83). • To record the date/time and camera settings data, display them to an HDD (hard disc drive) video recorder, you are connecting your camcorder to a monaural device, connect the yellow plug...
... the instruction manuals supplied with an S VIDEO cable (optional). A/V jack (Yellow) (White) (Red) IN S VIDEO VIDEO AUDIO VCRs or DVD recorders : Video/Signal flow 1 A/V connecting cable (supplied) Connect to the input jack of the other recording devices, such as a counter, etc.) on the screen of the monitor device connected, set [DISP OUTPUT] to [LCD PANEL] (the default setting, p.83). • To record the date/time and camera settings data, display them to an HDD (hard disc drive) video recorder, you are connecting your camcorder to a monaural device, connect the yellow plug...
Operating Guide
Page 101
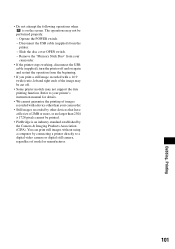
.... - Remove the "Memory Stick Duo" from your camcorder. • If the printer stops working, disconnect the USB cable (supplied), turn the printer off and on the screen. You can print still images without using a computer by the Camera & Imaging Products Association (CIPA). The operations may not support the date printing function. • Do not attempt the following operations when is an industry standard established by connecting a printer directly to a digital video camera or digital still camera...
.... - Remove the "Memory Stick Duo" from your camcorder. • If the printer stops working, disconnect the USB cable (supplied), turn the printer off and on the screen. You can print still images without using a computer by the Camera & Imaging Products Association (CIPA). The operations may not support the date printing function. • Do not attempt the following operations when is an industry standard established by connecting a printer directly to a digital video camera or digital still camera...
Operating Guide
Page 103
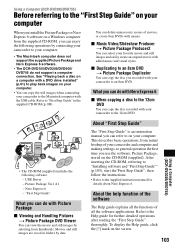
... Picture Package or Nero Express 6 software on a Windows computer from the supplied CD-ROM, you can copy the still images when connecting your camcorder to the Macintosh computer with the USB cable. Movies and still images are saved in the supplied CD-ROM (p.108). See "Playing back a disc on a computer with a DVD drive installed" (p.61) to play back images on your camcorder and computer and making settings, to an 8cm DVD. x Music Video/Slideshow Producer t Picture...
... Picture Package or Nero Express 6 software on a Windows computer from the supplied CD-ROM, you can copy the still images when connecting your camcorder to the Macintosh computer with the USB cable. Movies and still images are saved in the supplied CD-ROM (p.108). See "Playing back a disc on a computer with a DVD drive installed" (p.61) to play back images on your camcorder and computer and making settings, to an 8cm DVD. x Music Video/Slideshow Producer t Picture...
Operating Guide
Page 108
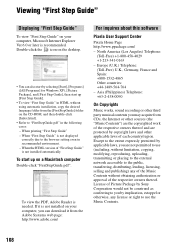
...: http://www.adobe.com/ For inquires about this software Pixela User Support Center Pixela Home Page http://www.ppackage.com/ - When printing "First Step Guide" - When "First Step Guide" is needed. Asia (Philippines) Telephone: +63-2-438-0090 On Copyrights Music works, sound recording or other third party musical contents you by Sony Corporation would not be construed as conferring to...
...: http://www.adobe.com/ For inquires about this software Pixela User Support Center Pixela Home Page http://www.ppackage.com/ - When printing "First Step Guide" - When "First Step Guide" is needed. Asia (Philippines) Telephone: +63-2-438-0090 On Copyrights Music works, sound recording or other third party musical contents you by Sony Corporation would not be construed as conferring to...

Operating Guide
Page 135
... "Memory Stick" compliant product you use. a*2*3 "MagicGate Memory Stick Duo" *1 "Memory Stick PRO" "Memory Stick PRO Duo" *1 a*3 - DSC00001.JPG: This file name appears on the display of a computer. • A "Memory Stick Duo" formatted by a computer (Windows OS/Mac OS) does not have guaranteed compatibility with a data capacity that records and transfers the contents in your camcorder. Compensation for replacement while your camcorder is reading or writing image files on the "Memory Stick Duo" (while the ACCESS lamp is lit or flashing...
... "Memory Stick" compliant product you use. a*2*3 "MagicGate Memory Stick Duo" *1 "Memory Stick PRO" "Memory Stick PRO Duo" *1 a*3 - DSC00001.JPG: This file name appears on the display of a computer. • A "Memory Stick Duo" formatted by a computer (Windows OS/Mac OS) does not have guaranteed compatibility with a data capacity that records and transfers the contents in your camcorder. Compensation for replacement while your camcorder is reading or writing image files on the "Memory Stick Duo" (while the ACCESS lamp is lit or flashing...
Operating Guide
Page 150
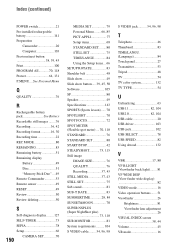
... Battery Recordable still images ........76 Recording 36, 42 Recording format............16, 30 Recording time 22 REC MODE 80 REMAINING 83 Remaining battery 51 Remaining display Battery 49 Disc 51 "Memory Stick Duo" ....49 Remote Commander 53 Remote sensor 49 RESET 49 Review 50 Review deleting 50 S Self-diagnosis display.........127 SELF-TIMER 73 SEPIA 78 Setup 66 150 CAMERA SET 70 MEDIA SET 79 Personal Menu ........ 66, 85 PICT.APPLI 77 Setup items 68 STANDARD SET......... 80 STILL SET 75 TIME/LANGU 84 Using...
... Battery Recordable still images ........76 Recording 36, 42 Recording format............16, 30 Recording time 22 REC MODE 80 REMAINING 83 Remaining battery 51 Remaining display Battery 49 Disc 51 "Memory Stick Duo" ....49 Remote Commander 53 Remote sensor 49 RESET 49 Review 50 Review deleting 50 S Self-diagnosis display.........127 SELF-TIMER 73 SEPIA 78 Setup 66 150 CAMERA SET 70 MEDIA SET 79 Personal Menu ........ 66, 85 PICT.APPLI 77 Setup items 68 STANDARD SET......... 80 STILL SET 75 TIME/LANGU 84 Using...


