Operating Instructions
Page 6
.... Do not use a damp cloth, detergent solution, or thinner. • Wipe the lens gently with a soft cloth such as a cleaning cloth or glass cleaning cloth. • Stubborn stains may impair the performance of the projector, take care with water. • Never use a soft dry cloth. Stubborn stains may...place anything near the ventilation holes - On illumination • To obtain the best picture, the front of reflecting material, it out by qualified Sony personnel before operating it further. • Unplug the unit from the AC outlet. Do not use these holes, or internal heat build-up...
.... Do not use a damp cloth, detergent solution, or thinner. • Wipe the lens gently with a soft cloth such as a cleaning cloth or glass cleaning cloth. • Stubborn stains may impair the performance of the projector, take care with water. • Never use a soft dry cloth. Stubborn stains may...place anything near the ventilation holes - On illumination • To obtain the best picture, the front of reflecting material, it out by qualified Sony personnel before operating it further. • Unplug the unit from the AC outlet. Do not use these holes, or internal heat build-up...
Operating Instructions
Page 9
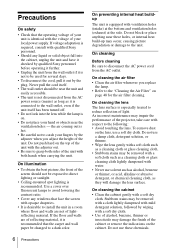
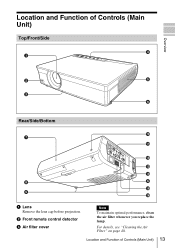
...of the lens Do not place any object just in front of preventing theft, by using as the unit topples over the ventilation holes (exhaust/intake); If you lift the projector by holding the Security bar, or hang the projector by attaching...the light may build up. Do not tilt right/left Use the Security bar at the side of the projector for transporting or installation Avoid using something to cut off the picture. Use the PIC MUTING key to cover .... Unsuitable Conditions Do not use the Security bar for a purpose of the lens that may cause the projector to fall or be damaged.
...of the lens Do not place any object just in front of preventing theft, by using as the unit topples over the ventilation holes (exhaust/intake); If you lift the projector by holding the Security bar, or hang the projector by attaching...the light may build up. Do not tilt right/left Use the Security bar at the side of the projector for transporting or installation Avoid using something to cut off the picture. Use the PIC MUTING key to cover .... Unsuitable Conditions Do not use the Security bar for a purpose of the lens that may cause the projector to fall or be damaged.
Operating Instructions
Page 13
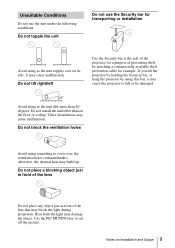
For details, see "Cleaning the Air Filter" on page 48. Location and Function of Controls (Main Unit) 13 b Front remote control detector c Air filter cover Note To maintain optimal performance, clean the air filter whenever you replace the lamp. Location and Function of Controls (Main Unit) Top/Front/Side 4 1 Overview 2 5 3 6 Rear/Side/Bottom 7 8 9 NIENTPWUTORCK RGB MONITOR INPUT A AUDIO OUTPUT AUDIO RGB S VIDEO VVIDIDEEOOIN AUDIO INPUT B RRESM-2O32TCE 0 qa qs qd qf 6 qg qh a Lens Remove the lens cap before projection.
For details, see "Cleaning the Air Filter" on page 48. Location and Function of Controls (Main Unit) 13 b Front remote control detector c Air filter cover Note To maintain optimal performance, clean the air filter whenever you replace the lamp. Location and Function of Controls (Main Unit) Top/Front/Side 4 1 Overview 2 5 3 6 Rear/Side/Bottom 7 8 9 NIENTPWUTORCK RGB MONITOR INPUT A AUDIO OUTPUT AUDIO RGB S VIDEO VVIDIDEEOOIN AUDIO INPUT B RRESM-2O32TCE 0 qa qs qd qf 6 qg qh a Lens Remove the lens cap before projection.
Operating Instructions
Page 19
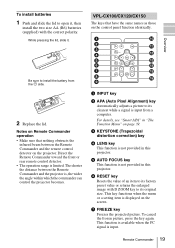
... function is available when the PC signal is displayed on the projector. c KEYSTONE (Trapezoidal distortion correction) key d LENS key This function is input from the # side. 2 Replace the lid. g FREEZE key Freezes the projected picture. Remote Commander 19 VPL-CX100/CX120/CX150 The keys that nothing obstructs the infrared beam between the Remote Commander...
... function is available when the PC signal is displayed on the projector. c KEYSTONE (Trapezoidal distortion correction) key d LENS key This function is input from the # side. 2 Replace the lid. g FREEZE key Freezes the projected picture. Remote Commander 19 VPL-CX100/CX120/CX150 The keys that nothing obstructs the infrared beam between the Remote Commander...
Operating Instructions
Page 21
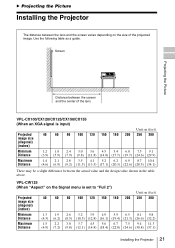
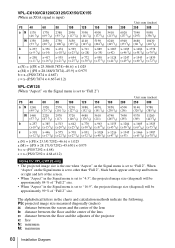
... table as a guide. VPL-CW125 (When "Aspect" on the size of the lens VPL-CX100/CX120/CX125/CX150/CX155 (When an XGA signal is set to "...Full 2") Unit: m (feet) Projected image size (diagonal) (inches) 40 60 80 100 120 150 180 200 250 300 Minimum Distance 1.3 1.9 2.6 3.2 3.9 4.9 5.9 6.5 8.1 9.8 (4.3) (6.2) (8.5) (10.5) (12.8) (16.1) (19.4) (21.3) (26.6) (32.2) Maximum Distance 1.5 2.2 3.0 3.7 4.5 5.6 6.7 7.5 9.4 11.3 (4.9) (7.2) (9.8) (12.1) (14.8) (18.4) (22.0) (24.6) (30.8) (37.1) Installing the Projector...
... table as a guide. VPL-CW125 (When "Aspect" on the size of the lens VPL-CX100/CX120/CX125/CX150/CX155 (When an XGA signal is set to "...Full 2") Unit: m (feet) Projected image size (diagonal) (inches) 40 60 80 100 120 150 180 200 250 300 Minimum Distance 1.3 1.9 2.6 3.2 3.9 4.9 5.9 6.5 8.1 9.8 (4.3) (6.2) (8.5) (10.5) (12.8) (16.1) (19.4) (21.3) (26.6) (32.2) Maximum Distance 1.5 2.2 3.0 3.7 4.5 5.6 6.7 7.5 9.4 11.3 (4.9) (7.2) (9.8) (12.1) (14.8) (18.4) (22.0) (24.6) (30.8) (37.1) Installing the Projector...

Operating Instructions
Page 26
The ON/STANDBY indicator flashes in green, and then lights in red and the projector goes into a wall outlet, then connect all equipment. The ON/STANDBY indicator lights in green. 3 Turn on the Remote Commander. 26 Projecting Projecting 24 LAMP/ ... C AIR SHOT VIDEO S VIDEO 2 4 MENU APA ENTER RESET FOCUS ZOOM SHIFT ASPECT KEY STONE VPL-CX125/CX155/CW125 APA INPUT KEY STONE /TILT LENS ENTER AUTO FOCUS RESET MENU FREEZE PIC MUTING D ZOOM AUDIO MUTING VOLUME 2 4 VPL-CX100/CX120/CX150 1 Plug the AC power cord into standby mode. 2 Press the ?/1 key. To operate with...
The ON/STANDBY indicator flashes in green, and then lights in red and the projector goes into a wall outlet, then connect all equipment. The ON/STANDBY indicator lights in green. 3 Turn on the Remote Commander. 26 Projecting Projecting 24 LAMP/ ... C AIR SHOT VIDEO S VIDEO 2 4 MENU APA ENTER RESET FOCUS ZOOM SHIFT ASPECT KEY STONE VPL-CX125/CX155/CW125 APA INPUT KEY STONE /TILT LENS ENTER AUTO FOCUS RESET MENU FREEZE PIC MUTING D ZOOM AUDIO MUTING VOLUME 2 4 VPL-CX100/CX120/CX150 1 Plug the AC power cord into standby mode. 2 Press the ?/1 key. To operate with...
Operating Instructions
Page 29
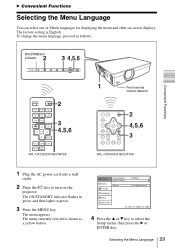
...VVIIDDEEOOIN INPUT B AUDIO AUDIO RRSE-M23O2TCE 1 Front remote control detector APA INPUT KEY STONE /TILT LENS ENTER AUTO FOCUS RESET MENU FREEZE PIC MUTING D ZOOM AUDIO MUTING VOLUME 2 4,5,6 3 VPL-CX100/CX120/CX150 1 Plug the AC power cord into a wall outlet. 2 Press the ?/1 key to select... the Setup menu, then press the B or ENTER key. B Convenient Functions Selecting the Menu Language You can select one of fifteen languages for displaying the menu and other on the projector...
...VVIIDDEEOOIN INPUT B AUDIO AUDIO RRSE-M23O2TCE 1 Front remote control detector APA INPUT KEY STONE /TILT LENS ENTER AUTO FOCUS RESET MENU FREEZE PIC MUTING D ZOOM AUDIO MUTING VOLUME 2 4,5,6 3 VPL-CX100/CX120/CX150 1 Plug the AC power cord into a wall outlet. 2 Press the ?/1 key to select... the Setup menu, then press the B or ENTER key. B Convenient Functions Selecting the Menu Language You can select one of fifteen languages for displaying the menu and other on the projector...
Operating Instructions
Page 50
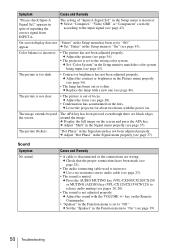
...image extends beyond The APA key has been pressed even though there are wrong. The picture flickers. c Press the AUDIO MUTING key (VPL-CX100/CX120/CX150 or MUTING (AUDIO) key (VPL-CX125/CX155/CW125) to "On" (see page 46). c Adjust the picture (see pages 18, 20). • The sound... is set to the input signal (see page 37). c Adjust the sound with the power on the lens. in the Function menu to release audio muting (see page 36). • The projector is disconnected or the connections are black edges the screen. The picture is incorrect. around the image. c...
...image extends beyond The APA key has been pressed even though there are wrong. The picture flickers. c Press the AUDIO MUTING key (VPL-CX100/CX120/CX150 or MUTING (AUDIO) key (VPL-CX125/CX155/CW125) to "On" (see page 46). c Adjust the picture (see pages 18, 20). • The sound... is set to the input signal (see page 37). c Adjust the sound with the power on the lens. in the Function menu to release audio muting (see page 36). • The projector is disconnected or the connections are black edges the screen. The picture is incorrect. around the image. c...
Operating Instructions
Page 54
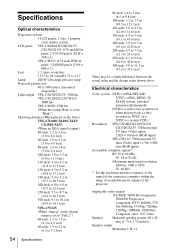
... Optical characteristics Projection system 3 LCD panels, 1 lens, 3 primary color shutter system LCD panel VPL-CX100/CX120/CX125/ CX150/CX155: 0.79-inch XGA panel, 2,359,296 pixels (1024 × 768 × 3) VPL-CW125: 0.74-inch WXGA panel, 3,280,000 pixels (1366 × 800 × 3) Lens 1.2 times zoom lens f 23.5 to 28.2 ...Hz) 1) Set the resolution and the frequency of the signal of the connected computer within the range of acceptable preset signals of the projector. Applicable video signals 15 k RGB, 50/60 Hz Component, 50/60 Hz Progressive component, DTV (480/60i, 575/ 50i,...
... Optical characteristics Projection system 3 LCD panels, 1 lens, 3 primary color shutter system LCD panel VPL-CX100/CX120/CX125/ CX150/CX155: 0.79-inch XGA panel, 2,359,296 pixels (1024 × 768 × 3) VPL-CW125: 0.74-inch WXGA panel, 3,280,000 pixels (1366 × 800 × 3) Lens 1.2 times zoom lens f 23.5 to 28.2 ...Hz) 1) Set the resolution and the frequency of the signal of the connected computer within the range of acceptable preset signals of the projector. Applicable video signals 15 k RGB, 50/60 Hz Component, 50/60 Hz Progressive component, DTV (480/60i, 575/ 50i,...

Operating Instructions
Page 55
... 240V AC, 2.9-1.3A, 50/60 Hz Power consumption VPL-CX100/CX120/CX125/ CX150/CX155: Max. 285 W in standby (standard): 7 W in standby (low): 0.5 W VPL-CW125: Max. 287 W in standby (standard): 7 W in standby (low): 0.5 W Heat dissipation VPL-CX100/CX120/CX125/ CX150/CX155: 973 BTU VPL-CW125: 979 BTU Operating temperature 0°C to 35°...;F) Storage humidity 10% to 90% Supplied accessories Remote Commander (1) Size AA (R6) batteries (2) (VPLCX125/CX155/CW125) Lithium battery CR2025 (1) (VPLCX100/CX120/CX150) Lens cap (1) HD D-sub 15 pin cable (2 m) (1) (1-791-992-xx) Specifications 55 Others
... 240V AC, 2.9-1.3A, 50/60 Hz Power consumption VPL-CX100/CX120/CX125/ CX150/CX155: Max. 285 W in standby (standard): 7 W in standby (low): 0.5 W VPL-CW125: Max. 287 W in standby (standard): 7 W in standby (low): 0.5 W Heat dissipation VPL-CX100/CX120/CX125/ CX150/CX155: 973 BTU VPL-CW125: 979 BTU Operating temperature 0°C to 35°...;F) Storage humidity 10% to 90% Supplied accessories Remote Commander (1) Size AA (R6) batteries (2) (VPLCX125/CX155/CW125) Lithium battery CR2025 (1) (VPLCX100/CX120/CX150) Lens cap (1) HD D-sub 15 pin cable (2 m) (1) (1-791-992-xx) Specifications 55 Others
Operating Instructions
Page 59
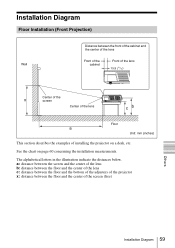
...measurements. See the chart on a desk, etc. a: distance between the screen and the center of the lens b: distance between the floor and the center of the lens c: distance between the floor and the bottom of the adjusters of the projector x: distance between the front of the cabinet and the center of the... lens Wall Front of the cabinet Front of the lens 15.9 (21/32) Center of the screen Center of the lens Floor Unit: mm (inches) This section describes the examples...
...measurements. See the chart on a desk, etc. a: distance between the screen and the center of the lens b: distance between the floor and the center of the lens c: distance between the floor and the bottom of the adjusters of the projector x: distance between the front of the cabinet and the center of the... lens Wall Front of the cabinet Front of the lens 15.9 (21/32) Center of the screen Center of the lens Floor Unit: mm (inches) This section describes the examples...
Operating Instructions
Page 60
... between the screen and the center of the lens b: distance between the floor and the center of the lens c: distance between the floor and the adjusters of the projector x: free N: minimum M: maximum 60 Installation Diagram VPL-CX100/CX120/CX125/CX150/CX155 (When an XGA signal is input) Unit: mm (inches) ... 23.306/0.7874)-46.6} × 1.025 a (M) = {(PS × 28.188/0.7874)-45.9} × 0.975 b = x-(PS/0.7874 × 4.667) c = x-(PS/0.7874 × 4.667+61.2) VPL-CW125 (When "Aspect" on the Signal menu is set to "Full 2") Unit: mm (inches) PS 40 60 80 100 120 150 180 200 250 300...
... between the screen and the center of the lens b: distance between the floor and the center of the lens c: distance between the floor and the adjusters of the projector x: free N: minimum M: maximum 60 Installation Diagram VPL-CX100/CX120/CX125/CX150/CX155 (When an XGA signal is input) Unit: mm (inches) ... 23.306/0.7874)-46.6} × 1.025 a (M) = {(PS × 28.188/0.7874)-45.9} × 0.975 b = x-(PS/0.7874 × 4.667) c = x-(PS/0.7874 × 4.667+61.2) VPL-CW125 (When "Aspect" on the Signal menu is set to "Full 2") Unit: mm (inches) PS 40 60 80 100 120 150 180 200 250 300...
Operating Instructions
Page 61
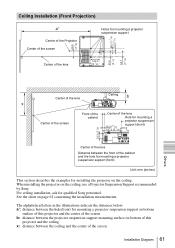
...Projector Suspension Support recommended by Sony. When installing the projector on page 62 concerning the installation measurements. Ceiling Installation (Front Projection) Center of the Projector Center of the screen 64.9 (2 5/8) 46.1 (1 7/8) 12.2 (1/2) Holes for mounting a projector suspension support 56.6 (2 1/4) 52.7 (2 1/8) Center of the lens 104.5 (4 1/8) Others Center of the lens... B RGB AUDIO RGB AUDIO Center of the screen Front of the cabinet Center of the lens Hole for mounting a projector suspension 15.9 (21/32) 137.3 (5 1/2) support (front) 53.2 (2 1/8) AUDIO...
...Projector Suspension Support recommended by Sony. When installing the projector on page 62 concerning the installation measurements. Ceiling Installation (Front Projection) Center of the Projector Center of the screen 64.9 (2 5/8) 46.1 (1 7/8) 12.2 (1/2) Holes for mounting a projector suspension support 56.6 (2 1/4) 52.7 (2 1/8) Center of the lens 104.5 (4 1/8) Others Center of the lens... B RGB AUDIO RGB AUDIO Center of the screen Front of the cabinet Center of the lens Hole for mounting a projector suspension 15.9 (21/32) 137.3 (5 1/2) support (front) 53.2 (2 1/8) AUDIO...
Operating Instructions
Page 65
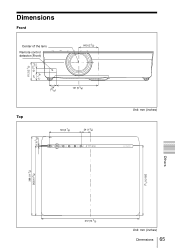
Dimensions Front Center of the lens Remote control detector (Front) 64.9 (2 5/8) 61.2 (2 1/2) 27 13 (17/32) (1 1/8) Top 24 (31/32) 141 (5 5/8) 123 (4 7/8) 34 (1 3/8) Unit: mm (inches) 5.3 (7/32) DATA PROJECTOR LAMP/ COVER ON/ STANDBY INPUT KEYSTONE MENU PUSH ENTER PIC MUTING 298 (11 3/4) 263 (10 3/8) Others 265 (10 1/2) 372 (14 3/4) Unit: mm (inches) Dimensions 65
Dimensions Front Center of the lens Remote control detector (Front) 64.9 (2 5/8) 61.2 (2 1/2) 27 13 (17/32) (1 1/8) Top 24 (31/32) 141 (5 5/8) 123 (4 7/8) 34 (1 3/8) Unit: mm (inches) 5.3 (7/32) DATA PROJECTOR LAMP/ COVER ON/ STANDBY INPUT KEYSTONE MENU PUSH ENTER PIC MUTING 298 (11 3/4) 263 (10 3/8) Others 265 (10 1/2) 372 (14 3/4) Unit: mm (inches) Dimensions 65
Operating Instructions
Page 66
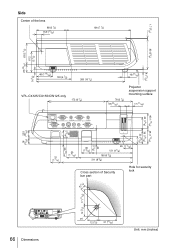
Side Center of the lens 88 (3 1/2) 15.9 (21/32) 190 (7 1/2) 1.7 (3/32) 63 (2 1/2) 90 (3 5/8) 61. 2 (2 1/2) 23 (29/32) 9 (3/8) 48 (1 15/16) 103 (4 1/8) 260 (10 1/4) VPL-CX125/CX155/CW125 only 172 (6 7/8) NETWORK INPUT C RGB AUDIO INPUT A RGB AUDIO INPUT B MONITOR AUDIO OUTPUT... S VIDEO VIDEO AUDIO VIDEO IN RS-232C REMOTE 8 (11/32) 16 (21/32) 78 (3 1/8) 18 (23/32) Projector suspension support mounting surface 17 (11/16...
Side Center of the lens 88 (3 1/2) 15.9 (21/32) 190 (7 1/2) 1.7 (3/32) 63 (2 1/2) 90 (3 5/8) 61. 2 (2 1/2) 23 (29/32) 9 (3/8) 48 (1 15/16) 103 (4 1/8) 260 (10 1/4) VPL-CX125/CX155/CW125 only 172 (6 7/8) NETWORK INPUT C RGB AUDIO INPUT A RGB AUDIO INPUT B MONITOR AUDIO OUTPUT... S VIDEO VIDEO AUDIO VIDEO IN RS-232C REMOTE 8 (11/32) 16 (21/32) 78 (3 1/8) 18 (23/32) Projector suspension support mounting surface 17 (11/16...

