
Operating Instructions
Page 4
... Menu 39 The Installation Menu 41 The Setup Menu 43 The Information Menu 44 Projecting the Picture Installing the Projector 21 Connecting the Projector 23 Connecting a Computer 23 Connecting a VCR 24 Projecting 26 Turning Off the Power 28 Convenient Functions Selecting the Menu Language .......... 29 Security Lock 30 Other Functions 32 Direct Power On/Off Function ... 32 4 Table of Contents Maintenance Replacing the Lamp 46 Cleaning the Air Filter 48 Others Troubleshooting 49 Messages List 53 Specifications 54 Installation...
... Menu 39 The Installation Menu 41 The Setup Menu 43 The Information Menu 44 Projecting the Picture Installing the Projector 21 Connecting the Projector 23 Connecting a Computer 23 Connecting a VCR 24 Projecting 26 Turning Off the Power 28 Convenient Functions Selecting the Menu Language .......... 29 Security Lock 30 Other Functions 32 Direct Power On/Off Function ... 32 4 Table of Contents Maintenance Replacing the Lamp 46 Cleaning the Air Filter 48 Others Troubleshooting 49 Messages List 53 Specifications 54 Installation...
Operating Instructions
Page 6
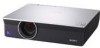
... not disconnected from the AC power source (mains) as long as it is desirable to the unit. On cleaning the air filter • Clean the air filter whenever you adjust the height of lightreflecting material. If voltage adaptation is required, consult with qualified Sony personnel. • Should any windows that face the screen with opaque draperies. • It is connected to the wall outlet...
... not disconnected from the AC power source (mains) as long as it is desirable to the unit. On cleaning the air filter • Clean the air filter whenever you adjust the height of lightreflecting material. If voltage adaptation is required, consult with qualified Sony personnel. • Should any windows that face the screen with opaque draperies. • It is connected to the wall outlet...
Operating Instructions
Page 10
... for Air Shot Version 2 (Version 2.xx) (Japanese and English only) This is not displayed due to which you have to the projector. Manuals Safety Regulations (separately printed manual) This manual describes important notes and cautions to the model. 10 About the Supplied Manuals Operating Instructions (on the CD-ROM. This manual contains explanations for projecting pictures after you have made the required connections. Operating Instructions for transmitting data...
... for Air Shot Version 2 (Version 2.xx) (Japanese and English only) This is not displayed due to which you have to the projector. Manuals Safety Regulations (separately printed manual) This manual describes important notes and cautions to the model. 10 About the Supplied Manuals Operating Instructions (on the CD-ROM. This manual contains explanations for projecting pictures after you have made the required connections. Operating Instructions for transmitting data...
Operating Instructions
Page 11
... "Operating Instructions for the VPL-CX100. For details, refer to prevent projection of the projector and the air filter is located at the rear or 90 degrees in one Remote Commander when you can be directly turned on the screen unless the required password is entered when the projector is connected to a LAN by wired or wireless connection, can install the projector by connecting a network cable to the front floor or ceiling installation, you use of...
... "Operating Instructions for the VPL-CX100. For details, refer to prevent projection of the projector and the air filter is located at the rear or 90 degrees in one Remote Commander when you can be directly turned on the screen unless the required password is entered when the projector is connected to a LAN by wired or wireless connection, can install the projector by connecting a network cable to the front floor or ceiling installation, you use of...
Operating Instructions
Page 15
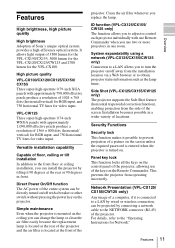
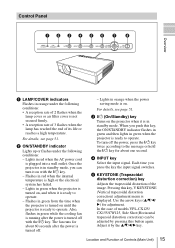
... orange under the following conditions: • A reception rate of 2 flashes when the lamp cover or air filter cover is not secured firmly. • A reception rate of 3 flashes when the lamp has reached the end of models VPL-CX125/ CX155/CW125, Side Shot (Horizontal trapezoid distortion correction) can turn off . - Adjust it on . Control Panel 123456 7 8 LAMP/ COVER ON/ STANDBY INPUT KEYSTONE MENU PUSH ENTER PIC MUTING Overview a LAMP/COVER indicators Flashes in red when the internal temperature...
... orange under the following conditions: • A reception rate of 2 flashes when the lamp cover or air filter cover is not secured firmly. • A reception rate of 3 flashes when the lamp has reached the end of models VPL-CX125/ CX155/CW125, Side Shot (Horizontal trapezoid distortion correction) can turn off . - Adjust it on . Control Panel 123456 7 8 LAMP/ COVER ON/ STANDBY INPUT KEYSTONE MENU PUSH ENTER PIC MUTING Overview a LAMP/COVER indicators Flashes in red when the internal temperature...
Operating Instructions
Page 17
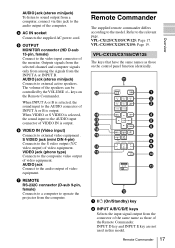
... the control panel function identically. f VIDEO IN (Video input) Connects to the model. ql qk qj qh qg qf qd wa COMMAND OFF ON INPUT A INPUT D INPUT B INPUT E INPUT C AIR SHOT VIDEO S VIDEO MENU APA ENTER RESET FOCUS ZOOM SHIFT ASPECT KEY STONE D ZOOM MUTING VOLUME + PIC + - When VIDEO or S VIDEO is output. Remote Commander The supplied remote commander differs according to external video equipment . AUDIO - VPL-CX100/CX120/CX150: Page 19. The volume of VIDEO IN is selected, the sound input to the AUDIO input connector...
... the control panel function identically. f VIDEO IN (Video input) Connects to the model. ql qk qj qh qg qf qd wa COMMAND OFF ON INPUT A INPUT D INPUT B INPUT E INPUT C AIR SHOT VIDEO S VIDEO MENU APA ENTER RESET FOCUS ZOOM SHIFT ASPECT KEY STONE D ZOOM MUTING VOLUME + PIC + - When VIDEO or S VIDEO is output. Remote Commander The supplied remote commander differs according to external video equipment . AUDIO - VPL-CX100/CX120/CX150: Page 19. The volume of VIDEO IN is selected, the sound input to the AUDIO input connector...
Operating Instructions
Page 18
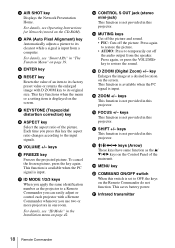
... the picture. i VOLUME +/- p FOCUS +/- r M/m/ c AIR SHOT key Displays the Network Presentation Home. For details, see "Smart APA" in one room. Each time you can easily adjust or control each projector with D ZOOM key to its original size. o ZOOM +/- For details, see "ID Mode" in this key the aspect ratio changes according to restore the sound. n D ZOOM (Digital Zoom) +/- k ID MODE 1/2/3 keys When you apply the same identification number as the projector to a Remote Commander...
... the picture. i VOLUME +/- p FOCUS +/- r M/m/ c AIR SHOT key Displays the Network Presentation Home. For details, see "Smart APA" in one room. Each time you can easily adjust or control each projector with D ZOOM key to its original size. o ZOOM +/- For details, see "ID Mode" in this key the aspect ratio changes according to restore the sound. n D ZOOM (Digital Zoom) +/- k ID MODE 1/2/3 keys When you apply the same identification number as the projector to a Remote Commander...
Operating Instructions
Page 19
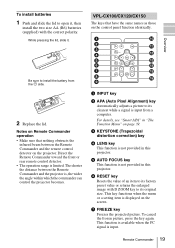
... in this projector. g FREEZE key Freezes the projected picture. This function is available when the PC signal is displayed on the control panel function identically. 1 2 3 4 5 6 7 8 9 APA INPUT KEY STONE /TILT LENS ENTER AUTO FOCUS RESET MENU FREEZE PIC MUTING D ZOOM AUDIO MUTING VOLUME 0 qa qs qd qf qg qh a INPUT key b APA (Auto Pixel Alignment) key Automatically adjusts a picture to its clearest while a signal is input from the # side. 2 Replace the lid...
... in this projector. g FREEZE key Freezes the projected picture. This function is available when the PC signal is displayed on the control panel function identically. 1 2 3 4 5 6 7 8 9 APA INPUT KEY STONE /TILT LENS ENTER AUTO FOCUS RESET MENU FREEZE PIC MUTING D ZOOM AUDIO MUTING VOLUME 0 qa qs qd qf qg qh a INPUT key b APA (Auto Pixel Alignment) key Automatically adjusts a picture to its clearest while a signal is input from the # side. 2 Replace the lid...
Operating Instructions
Page 20
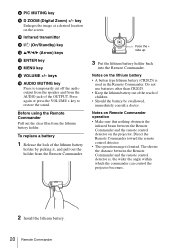
.../Standby) key l v/V/b/B (Arrow) keys m ENTER key n MENU key o VOLUME +/- Notes on the screen. The shorter the distance between the Remote Commander and the remote control detector on the projector. Direct the Remote Commander toward the remote control detector. • The operation range is , the wider the angle within which the commander can control the projector becomes. 2 Install the lithium battery. 20 Remote Commander h PIC MUTING key i D ZOOM (Digital Zoom) +/- To replace a battery 1 Release the lock...
.../Standby) key l v/V/b/B (Arrow) keys m ENTER key n MENU key o VOLUME +/- Notes on the screen. The shorter the distance between the Remote Commander and the remote control detector on the projector. Direct the Remote Commander toward the remote control detector. • The operation range is , the wider the angle within which the commander can control the projector becomes. 2 Install the lithium battery. 20 Remote Commander h PIC MUTING key i D ZOOM (Digital Zoom) +/- To replace a battery 1 Release the lock...

Operating Instructions
Page 26
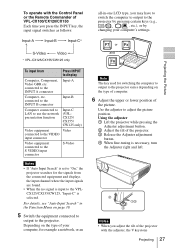
... LENS ENTER AUTO FOCUS RESET MENU FREEZE PIC MUTING D ZOOM AUDIO MUTING VOLUME 2 4 VPL-CX100/CX120/CX150 1 Plug the AC power cord into standby mode. 2 Press the ?/1 key. To operate with the Remote Commander of VPL-CX125/ CX155/CW125 You can select directly the input signal you want to project by pressing one key from among INPUT A, B, C, AIR SHOT, VIDEO or S VIDEO on the equipment connected to the projector. 4 Select the input source. The ON/STANDBY indicator flashes in green, and then lights...
... LENS ENTER AUTO FOCUS RESET MENU FREEZE PIC MUTING D ZOOM AUDIO MUTING VOLUME 2 4 VPL-CX100/CX120/CX150 1 Plug the AC power cord into standby mode. 2 Press the ?/1 key. To operate with the Remote Commander of VPL-CX125/ CX155/CW125 You can select directly the input signal you want to project by pressing one key from among INPUT A, B, C, AIR SHOT, VIDEO or S VIDEO on the equipment connected to the projector. 4 Select the input source. The ON/STANDBY indicator flashes in green, and then lights...
Operating Instructions
Page 27
... picture. connected to adjust the picture position. Projecting the Picture * VPL-CX125/CX155/CW125 only or and To input from the connected equipment and displays the input channel where the input signals are found. • When the no signal is input to the VPLCX125/CX155/CW125, "Input-C" is necessary, turn the Adjuster right and left. 2 13 4 Notes • When you adjust the tilt of the projector with the Control Panel or the Remote Commander...
... picture. connected to adjust the picture position. Projecting the Picture * VPL-CX125/CX155/CW125 only or and To input from the connected equipment and displays the input channel where the input signals are found. • When the no signal is input to the VPLCX125/CX155/CW125, "Input-C" is necessary, turn the Adjuster right and left. 2 13 4 Notes • When you adjust the tilt of the projector with the Control Panel or the Remote Commander...
Operating Instructions
Page 29
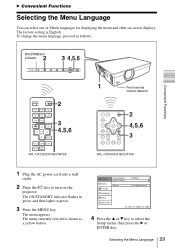
...screen displays. The menu currently selected is English. The ON/STANDBY indicator flashes in green, and then lights in green. 3 Press the MENU key. B Convenient Functions Selecting the Menu Language You can select one of fifteen languages for displaying the menu and other on the projector. The factory setting is shown as follows: Convenient Functions ON/STANDBY 2 indicator 3 4,5,6 LAMP/ COVER ON/ STANDBY INPUT KEYSTONE MENU PUSH ENTER PIC MUTING COMMAND OFF ON INPUT A INPUT D INPUT B INPUT E INPUT C AIR SHOT VIDEO S VIDEO MENU APA ENTER 2 3 4,5,6 RESET FOCUS ZOOM...
...screen displays. The menu currently selected is English. The ON/STANDBY indicator flashes in green, and then lights in green. 3 Press the MENU key. B Convenient Functions Selecting the Menu Language You can select one of fifteen languages for displaying the menu and other on the projector. The factory setting is shown as follows: Convenient Functions ON/STANDBY 2 indicator 3 4,5,6 LAMP/ COVER ON/ STANDBY INPUT KEYSTONE MENU PUSH ENTER PIC MUTING COMMAND OFF ON INPUT A INPUT D INPUT B INPUT E INPUT C AIR SHOT VIDEO S VIDEO MENU APA ENTER 2 3 4,5,6 RESET FOCUS ZOOM...
Operating Instructions
Page 34
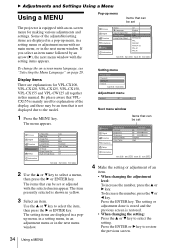
... adjustment level: To increase the number, press the v or B key. Picture Signal Function Installation Setup V Keystone: Side Shot: Image Flip: Background: Lamp Mode: IR Receiver: ID Mode: Direct Power On: High Altitude Mode: Information Sel: Auto 0 Off Blue Standard Front & Rear All Off Off Set: Exit: 2 Use the v or V key to restore the previous screen. 34 Using a MENU The setting items are displayed in a pop-up menu Items that can be set Picture Signal Function Status: Language: Input-A Signal Sel.: Color System: Lamp Timer Reset Installation Setup...
... adjustment level: To increase the number, press the v or B key. Picture Signal Function Installation Setup V Keystone: Side Shot: Image Flip: Background: Lamp Mode: IR Receiver: ID Mode: Direct Power On: High Altitude Mode: Information Sel: Auto 0 Off Blue Standard Front & Rear All Off Off Set: Exit: 2 Use the v or V key to restore the previous screen. 34 Using a MENU The setting items are displayed in a pop-up menu Items that can be set Picture Signal Function Status: Language: Input-A Signal Sel.: Color System: Lamp Timer Reset Installation Setup...
Operating Instructions
Page 37
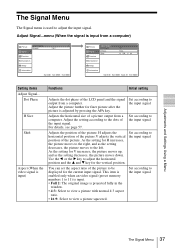
... an video signal (preset memory numbers 1 to 11) is input. • Full 2: The original image is projected fully in the window. • 4:3: Select to view a picture with normal 4:3 aspect ratio. • 16:9: Select to adjust the input signal. H adjusts the horizontal position of the picture.V adjusts the vertical position of a picture output from a computer. Set according to the input signal Adjusts the horizontal size of the picture. The Signal Menu The Signal menu is used to view a picture squeezed. Use...
... an video signal (preset memory numbers 1 to 11) is input. • Full 2: The original image is projected fully in the window. • 4:3: Select to view a picture with normal 4:3 aspect ratio. • 16:9: Select to adjust the input signal. H adjusts the horizontal position of the picture.V adjusts the vertical position of a picture output from a computer. Set according to the input signal Adjusts the horizontal size of the picture. The Signal Menu The Signal menu is used to view a picture squeezed. Use...
Operating Instructions
Page 38
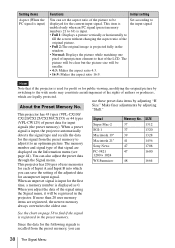
... (VPL-CW125) of the signal using the Signal menu, it to that of the LCD. Size." The memory number and signal type of that if the projector is used for profit or for public viewing, modifying the original picture by switching to be displayed for the current input signal. Setting items Aspect (When the PC signal is input) Functions Initial setting You can save the setting of the adjusted data for an unpreset input signal. This...
... (VPL-CW125) of the signal using the Signal menu, it to that of the LCD. Size." The memory number and signal type of that if the projector is used for profit or for public viewing, modifying the original picture by switching to be displayed for the current input signal. Setting items Aspect (When the PC signal is input) Functions Initial setting You can save the setting of the adjusted data for an unpreset input signal. This...
Operating Instructions
Page 40
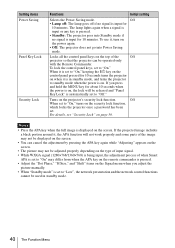
... "Adjusting" appears on the screen. • The picture may differ from when the APA key on the remote commander is pressed. • Standby: The projector goes into Power Saving mode. Setting items Power Saving Panel Key Lock Security Lock Functions Initial setting Selects the Power Saving mode. To use it is set . When it is in standby mode. 40 The Function Menu Off • Lamp off: The lamp goes off if no signal is displayed on...
... "Adjusting" appears on the screen. • The picture may differ from when the APA key on the remote commander is pressed. • Standby: The projector goes into Power Saving mode. Setting items Power Saving Panel Key Lock Security Lock Functions Initial setting Selects the Power Saving mode. To use it is set . When it is in standby mode. 40 The Function Menu Off • Lamp off: The lamp goes off if no signal is displayed on...
Operating Instructions
Page 43
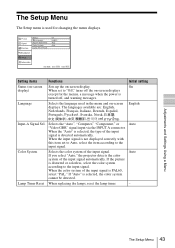
... the input signal is PAL60, select "PAL." When the "Auto" is selected, the type of the input signal is detected automatically. Auto Lamp Timer Reset When replacing the lamps, reset the lamp timer. - The Setup Menu The Setup menu is distorted or colorless, select the color system according to the input signal. Selects the "Auto", "Computer," "Component," or "Video GBR" signal input via the INPUT A connector. If the picture is used in the menu and on-screen displays. Adjustments and Settings Using a Menu The Setup Menu 43...
... the input signal is PAL60, select "PAL." When the "Auto" is selected, the type of the input signal is detected automatically. Auto Lamp Timer Reset When replacing the lamps, reset the lamp timer. - The Setup Menu The Setup menu is distorted or colorless, select the color system according to the input signal. Selects the "Auto", "Computer," "Component," or "Video GBR" signal input via the INPUT A connector. If the picture is used in the menu and on-screen displays. Adjustments and Settings Using a Menu The Setup Menu 43...
Operating Instructions
Page 46
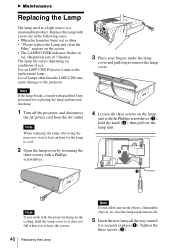
... of use. Note When replacing the lamp after using the projector, wait at least an hour for the lamp to cool. 2 Open the lamp cover by loosening the three screws with qualified Sony personnel for replacing the lamp and internal checking. 1 Turn off the projector, and disconnect the AC power cord from the AC outlet. into the lamp replacement slot. 5 Insert the new lamp all the way in place (a). Use an LMP-C200 Projector Lamp as a light source...
... of use. Note When replacing the lamp after using the projector, wait at least an hour for the lamp to cool. 2 Open the lamp cover by loosening the three screws with qualified Sony personnel for replacing the lamp and internal checking. 1 Turn off the projector, and disconnect the AC power cord from the AC outlet. into the lamp replacement slot. 5 Insert the new lamp all the way in place (a). Use an LMP-C200 Projector Lamp as a light source...
Operating Instructions
Page 50
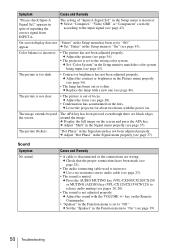
... to "Off." c Press the AUDIO MUTING key (VPL-CX100/CX120/CX150 or MUTING (AUDIO) key (VPL-CX125/CX155/CW125) to "On" (see page 28). • Condensation has accumulated on the screen and press the APA key. c Adjust the focus (see page 43). c Set "Status" in the Signal menu has not been adjusted properly. c Replace the lamp with a new one (see page 46). c Display the full image on the lens.
... to "Off." c Press the AUDIO MUTING key (VPL-CX100/CX120/CX150 or MUTING (AUDIO) key (VPL-CX125/CX155/CW125) to "On" (see page 28). • Condensation has accumulated on the screen and press the APA key. c Adjust the focus (see page 43). c Set "Status" in the Signal menu has not been adjusted properly. c Replace the lamp with a new one (see page 46). c Display the full image on the lens.
Operating Instructions
Page 52
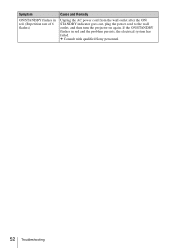
Symptom ON/STANDBY flashes in red and the problem persists, the electrical system has failed. If the ON/STANDBY flashes in red. (Repetition rate of 6 flashes) Cause and Remedy Unplug the AC power cord from the wall outlet after the ON/ STANDBY indicator goes out, plug the power cord to the wall outlet, and then turn the projector on again. c Consult with qualified Sony personnel. 52 Troubleshooting
Symptom ON/STANDBY flashes in red and the problem persists, the electrical system has failed. If the ON/STANDBY flashes in red. (Repetition rate of 6 flashes) Cause and Remedy Unplug the AC power cord from the wall outlet after the ON/ STANDBY indicator goes out, plug the power cord to the wall outlet, and then turn the projector on again. c Consult with qualified Sony personnel. 52 Troubleshooting


