

Limited Warranty (U.S. Only)
Page 1
...LIMITED IN DURATION TO THE DURATION OF THIS WARRANTY. Printed in the Product; Labor: For a period of the product ("Labor Warranty"), Sony will , at its original specifications. This Limited Warranty covers only the hardware components packaged with respect to the End User License Agreements ...It is invalid if the factory-applied serial number has been altered or removed from the original date of purchase of one (1) year from the original date of purchase of product ("Parts Warranty"), Sony will do not allow the exclusion or limitation of incidental or consequential damages,...
...LIMITED IN DURATION TO THE DURATION OF THIS WARRANTY. Printed in the Product; Labor: For a period of the product ("Labor Warranty"), Sony will , at its original specifications. This Limited Warranty covers only the hardware components packaged with respect to the End User License Agreements ...It is invalid if the factory-applied serial number has been altered or removed from the original date of purchase of one (1) year from the original date of purchase of product ("Parts Warranty"), Sony will do not allow the exclusion or limitation of incidental or consequential damages,...
Installation/Connection Instructions
Page 1
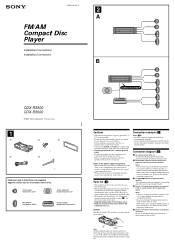
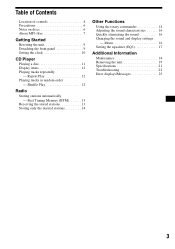
... and do not use the release keys 5 to connect the ground lead before shipping. 3-261-846-11 (1) 2 A FM/AM Compact Disc Player Installation/Connections Installation/Connexions B AUDIO OUT REAR CDX-R3300 CDX-R3000 © 2004 Sony Corporation Printed in Korea 1 1 2 3 × 4 4 5 × 2 Equipment used in illustrations (not supplied... to a common ground point. • Be sure to insulate any other system may spring out. For details, see "Removing the protection collar and the bracket (4)" on both sides of antenna booster amplifier Notes • It is energized at all ...
... and do not use the release keys 5 to connect the ground lead before shipping. 3-261-846-11 (1) 2 A FM/AM Compact Disc Player Installation/Connections Installation/Connexions B AUDIO OUT REAR CDX-R3300 CDX-R3000 © 2004 Sony Corporation Printed in Korea 1 1 2 3 × 4 4 5 × 2 Equipment used in illustrations (not supplied... to a common ground point. • Be sure to insulate any other system may spring out. For details, see "Removing the protection collar and the bracket (4)" on both sides of antenna booster amplifier Notes • It is energized at all ...
Operating Instructions
Page 3
... Resetting the unit 9 Detaching the front panel 9 Setting the clock 10 CD Player Playing a disc 11 Display items 12 Playing tracks repeatedly - Shuffle Play 12 Radio Storing stations automatically - Menu 16 Setting the equalizer (EQ3 17 Additional Information Maintenance 18 Removing the unit 19 Specifications 21 Troubleshooting 22 Error displays/Messages 23 3 Best...
... Resetting the unit 9 Detaching the front panel 9 Setting the clock 10 CD Player Playing a disc 11 Display items 12 Playing tracks repeatedly - Shuffle Play 12 Radio Storing stations automatically - Menu 16 Setting the equalizer (EQ3 17 Additional Information Maintenance 18 Removing the unit 19 Specifications 21 Troubleshooting 22 Error displays/Messages 23 3 Best...
Operating Instructions
Page 6
In such a case, remove the disc and wait for about an hour until the moisture has evaporated. The following malfunctions may occur inside the lenses and display of a sticker or label causing a disc to warp. • Discs with sticky ink/residue. Do not use discs with non-standard shapes ...mechanism). - Should this manual, please consult your nearest Sony dealer. To maintain high sound quality Be careful not to a label or sticker peeling off before operating it. • Power aerial will not operate properly. Such discs may stop spinning when used, causing a malfunction, ...
In such a case, remove the disc and wait for about an hour until the moisture has evaporated. The following malfunctions may occur inside the lenses and display of a sticker or label causing a disc to warp. • Discs with sticky ink/residue. Do not use discs with non-standard shapes ...mechanism). - Should this manual, please consult your nearest Sony dealer. To maintain high sound quality Be careful not to a label or sticker peeling off before operating it. • Power aerial will not operate properly. Such discs may stop spinning when used, causing a malfunction, ...
Operating Instructions
Page 9
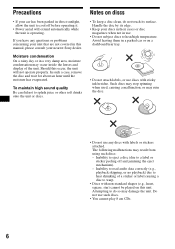
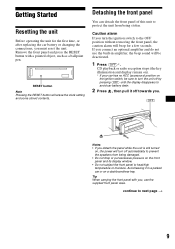
... stolen. Detaching the front panel You can detach the front panel of this unit to the OFF position without removing the front panel, the caution alarm will be deactivated. 1 Press (OFF)*. Remove the front panel and press the RESET button with you detach the panel while the unit is still turned on...
... stolen. Detaching the front panel You can detach the front panel of this unit to the OFF position without removing the front panel, the caution alarm will be deactivated. 1 Press (OFF)*. Remove the front panel and press the RESET button with you detach the panel while the unit is still turned on...

Operating Instructions
Page 18
...10 dB. Note When EQ3 is adjustable by 1 dB steps from the ignition switch. 18 • Never touch the connectors directly with your nearest Sony dealer. Cleaning the connectors The unit may not function properly if the connectors between the unit and the front panel are not clean. Main unit... Back of the front panel Notes • For safety, turn off the ignition before cleaning the connectors, and remove the key from -10 dB to use a fuse with an amperage rating exceeding the one matching the amperage rating stated on the original fuse. ...
...10 dB. Note When EQ3 is adjustable by 1 dB steps from the ignition switch. 18 • Never touch the connectors directly with your nearest Sony dealer. Cleaning the connectors The unit may not function properly if the connectors between the unit and the front panel are not clean. Main unit... Back of the front panel Notes • For safety, turn off the ignition before cleaning the connectors, and remove the key from -10 dB to use a fuse with an amperage rating exceeding the one matching the amperage rating stated on the original fuse. ...

Operating Instructions
Page 19
Removing the unit 1 Remove the protection collar. 1 Detach the front panel (page 9). 2 Engage the release keys together with a new CR2025 lithium battery. Should the battery be shorter, depending on ... use.) When the battery becomes weak, the range of fire or explosion. Replace the battery with the protection collar. Use of in fire. continue to remove the protection collar. Replacing the lithium battery Under normal conditions, battery will last approximately 1 year. (The service life may be swallowed, immediately consult a doctor. •...
Removing the unit 1 Remove the protection collar. 1 Detach the front panel (page 9). 2 Engage the release keys together with a new CR2025 lithium battery. Should the battery be shorter, depending on ... use.) When the battery becomes weak, the range of fire or explosion. Replace the battery with the protection collar. Use of in fire. continue to remove the protection collar. Replacing the lithium battery Under normal conditions, battery will last approximately 1 year. (The service life may be swallowed, immediately consult a doctor. •...

Operating Instructions
Page 20
Face the hook inwards. 2 Pull the release keys to unseat the unit. 3 Slide the unit out of the mounting. 20 2 Remove the unit. 1 Insert both release keys together until they click.
Face the hook inwards. 2 Pull the release keys to unseat the unit. 3 Slide the unit out of the mounting. 20 2 Remove the unit. 1 Insert both release keys together until they click.
Operating Instructions
Page 22
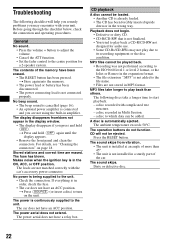
...in the display window. • The display disappears if you press and hold (OFF) again until the display appears. • Remove the front panel and clean the connectors. a disc to start playback. - The display disappears from vibration. • The unit is continuously supplied to the unit. • Check... the car's accessory power connector. The ambient temperature exceeds 50°C. CD will help you remedy problems you are erased. Dirty or defective disc. 22 The leads are not stored in order, check the fuse. • The car does not have been erased. • The ...
...in the display window. • The display disappears if you press and hold (OFF) again until the display appears. • Remove the front panel and clean the connectors. a disc to start playback. - The display disappears from vibration. • The unit is continuously supplied to the unit. • Check... the car's accessory power connector. The ambient temperature exceeds 50°C. CD will help you remedy problems you are erased. Dirty or defective disc. 22 The leads are not stored in order, check the fuse. • The car does not have been erased. • The ...


